2020 Ram 3500 clock
[x] Cancel search: clockPage 414 of 568

412SERVICING AND MAINTENANCE
UNDERBODY MOUNTED FUEL FILTER
R
EPLACEMENT — DIESEL ENGINE
NOTE:
Using a fuel filter that does not meet the
manufacturer's filtration and water sepa -
rating requirements can severely impact fuel
system life and reliability.
The underbody mounted filter housing will
cause the engine not to run if:
a. No filter is installed.
Underbody Mounted Fuel Filter Assembly
1. Ensure engine is turned off.
2. Place drain pan under the fuel filter drain
hose.
3. Open the water drain valve one full turn counterclockwise and completely drain fuel
and water into the approved container.
4. Close the water drain valve.
5. Remove lid using a socket or strap wrench. Rotate counterclockwise for removal.
Remove used o-ring and discard it.
6. Remove the used filter cartridge from the housing and dispose of according to your
local regulations. 7. Wipe clean the sealing surfaces of the lid
and housing.
8. Install new o-ring back into ring groove on the filter housing and lubricate with clean
engine oil.
NOTE:
Water In Fuel (WIF) sensor is re-usable. Service
kit comes with new o-ring for filter canister and
WIF sensor.
PRIMING IF THE ENGINE HAS RUN OUT
O
F FUEL — DIESEL ENGINE
1. Add a substantial amount of fuel to the
tank, approximately 2 to 5 gal (8L to 19L).
2. Three priming cycles must be completed. Turn ignition to the RUN position and wait
approximately 30 seconds. This will activate
the in tank fuel pump. Turn the ignition
1 — Drain Valve
CAUTION!
Diesel fuel will damage blacktop paving
surfaces. Drain the filter into an appro-
priate container.
Do not prefill the fuel filter when installing a
new fuel filter. There is a possibility debris
could be introduced into the fuel filter
during this action. It is best to install the
filter dry and allow the in-tank lift pump to
prime the fuel system.
WARNING!
Do not open the high pressure fuel system
with the engine running. Engine operation
causes high fuel pressure. High pressure fuel
spray can cause serious injury or death.
20_DJD2_OM_EN_USC_t.book Page 412
Page 470 of 568

468MULTIMEDIA
Privacy of any wireless and wired
communications cannot be assured. Third
parties may unlawfully intercept information
and private communications without your
consent. For further information, refer to “Data
Collection & Privacy” in your Uconnect Owner’s
Manual Supplement or “Onboard Diagnostic
System (OBD II) Cybersecurity” in “Getting To
Know Your Instrument Panel”.
UCONNECT SETTINGS
The Uconnect system uses a combination of
buttons on the touchscreen and buttons on the
faceplate located on the center of the
instrument panel. These buttons allow you to
access and change the customer
programmable features. Many features can
vary by vehicle.
Buttons on the faceplate are located below
and/or beside the Uconnect system in the
center of the instrument panel. In addition,
there is a Scroll/Enter control knob located on
the right side. Turn the control knob to scroll
through menus and change settings. Push the
center of the control knob one or more times to
select or change a setting. Your Uconnect system may also have Screen
Off and Mute buttons on the faceplate.
Push the Screen Off button on the faceplate to
turn off the Uconnect screen. Push the button
again or tap the screen to turn the screen on.
Push the Back Arrow button to exit out of a
Menu or certain option on the Uconnect system.
UCONNECT 3 SETTINGS
Uconnect 3 With 5-inch Display Buttons On The
Touchscreen And Buttons On The Faceplate
Push the SETTINGS button, then press the
Settings button on the touchscreen (if equipped)
to display the settings menu screen. In this mode the Uconnect system allows you to access
programmable features that may be equipped
such as Display, Units, Voice, Clock, Safety &
Driving Assistance, Lights, Doors & Locks, Power
Side Steps, Auto-On Comfort (if equipped),
Engine Off Options, Suspension, Trailer Brake,
Audio, Phone/Bluetooth®, SiriusXM® Setup (if
equipped), Restore Settings, Clear Personal
Data, and System Information.
NOTE:
Only one category may be selected at a time.
When making a selection, press the button on
the touchscreen to enter the desired menu.
Once in the desired menu, press and release
the preferred setting until the button is
highlighted. Once the setting is complete, either
press the Back Arrow or the Done button on the
touchscreen or push the Back button on the
faceplate to return to the previous menu.
Pressing the Up or Down Arrow buttons on the
touchscreen on the right side of the screen will
allow you to toggle up or down through the list
of available settings.
NOTE:
All settings should be changed with the ignition
in the ON/RUN position.
1 — Uconnect Buttons On The Touchscreen
2 — Uconnect Buttons On The Faceplate
20_DJD2_OM_EN_USC_t.book Page 468
Page 473 of 568

MULTIMEDIA471
Clock
After pressing the Clock button on the touchscreen, the following settings will be available:
Safety/Assistance
After pressing the Safety/Assistance button on the touchscreen, the following settings will be available:
Setting Name Selectable Options
Set Time & Format12 hour
24 hour
AM PM
Sync Time OnOff
Setting Name Selectable Options
Forward Collision Warning —
If Equipped Off
Warning Only Warning & Braking
Forward Collision Warning Sensitivity — If Equipped Near
Med Far
Lane Sense Warning — If Equipped EarlyMedLate
Lane Sense Strength — If Equipped LowMed High
Front ParkSense Chime Volume — If Equipped Low
Med High
Rear ParkSense Chime Volume — If Equipped Low
Med High
9
20_DJD2_OM_EN_USC_t.book Page 471
Page 485 of 568

MULTIMEDIA483
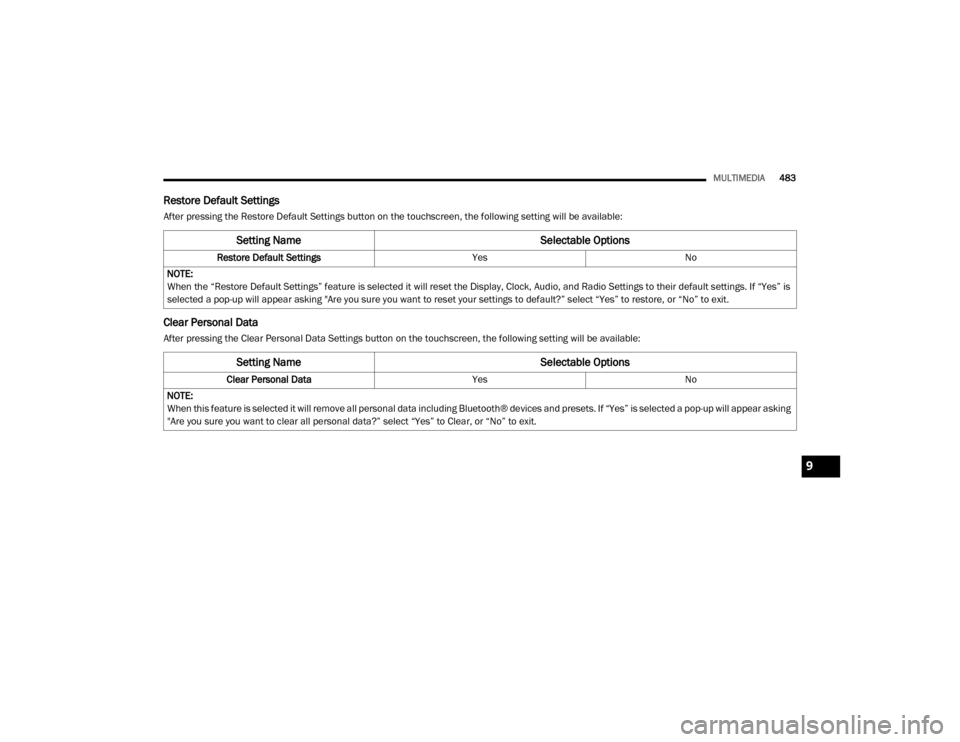
Restore Default Settings
After pressing the Restore Default Settings button on the touchscreen, the following setting will be available:
Clear Personal Data
After pressing the Clear Personal Data Settings button on the touchscreen, the following setting will be available:
Setting Name Selectable Options
Restore Default SettingsYesNo
NOTE:
When the “Restore Default Settings” feature is selected it will reset the Display, Clock, Audio, and Radio Settings to their default settings. If “Yes” is
selected a pop-up will appear asking "Are you sure you want to reset your settings to default?” select “Yes” to restore, or “No” to exit.
Setting Name Selectable Options
Clear Personal DataYesNo
NOTE:
When this feature is selected it will remove all personal data including Bluetooth® devices and presets. If “Yes” is selected a pop-up will appear asking
"Are you sure you want to clear all personal data?” select “Yes” to Clear, or “No” to exit.
9
20_DJD2_OM_EN_USC_t.book Page 483
Page 486 of 568

484MULTIMEDIA
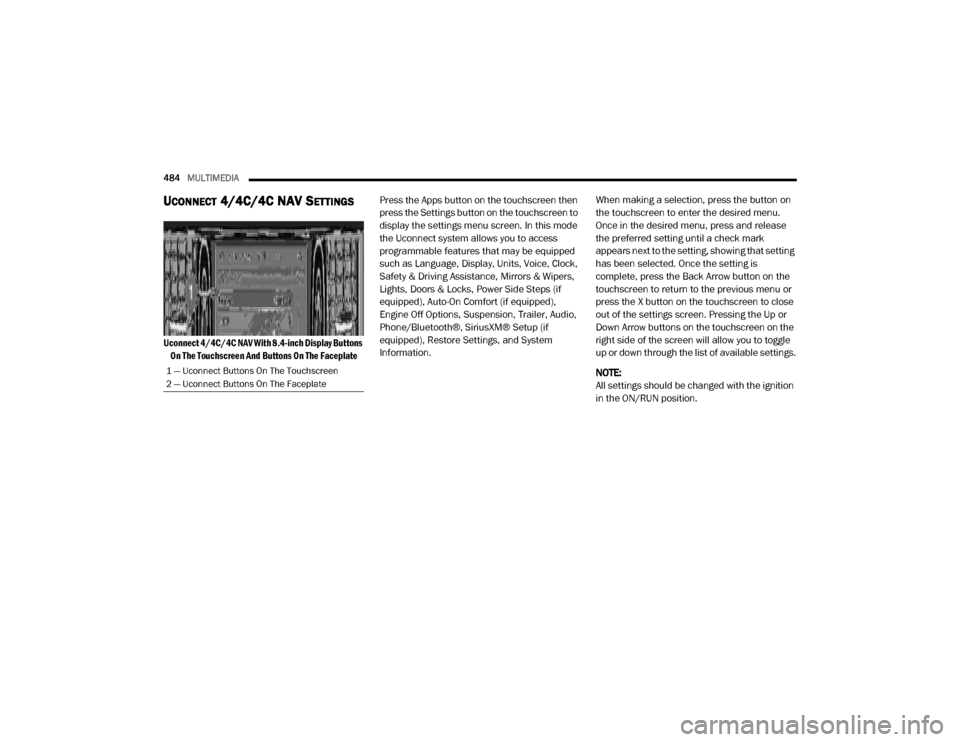
UCONNECT 4/4C/4C NAV SETTINGS
Uconnect 4/4C/4C NAV With 8.4-inch Display Buttons
On The Touchscreen And Buttons On The Faceplate
Press the Apps button on the touchscreen then
press the Settings button on the touchscreen to
display the settings menu screen. In this mode
the Uconnect system allows you to access
programmable features that may be equipped
such as Language, Display, Units, Voice, Clock,
Safety & Driving Assistance, Mirrors & Wipers,
Lights, Doors & Locks, Power Side Steps (if
equipped), Auto-On Comfort (if equipped),
Engine Off Options, Suspension, Trailer, Audio,
Phone/Bluetooth®, SiriusXM® Setup (if
equipped), Restore Settings, and System
Information.
When making a selection, press the button on
the touchscreen to enter the desired menu.
Once in the desired menu, press and release
the preferred setting until a check mark
appears next to the setting, showing that setting
has been selected. Once the setting is
complete, press the Back Arrow button on the
touchscreen to return to the previous menu or
press the X button on the touchscreen to close
out of the settings screen. Pressing the Up or
Down Arrow buttons on the touchscreen on the
right side of the screen will allow you to toggle
up or down through the list of available settings.
NOTE:
All settings should be changed with the ignition
in the ON/RUN position.
1 — Uconnect Buttons On The Touchscreen
2 — Uconnect Buttons On The Faceplate
20_DJD2_OM_EN_USC_t.book Page 484
Page 489 of 568

MULTIMEDIA487
Voice
After pressing the Voice button on the touchscreen, the following settings will be available:
Clock
After pressing the Clock button on the touchscreen, the following settings will be available:Speed
MPH km/h
Distance mi km
Fuel Consumption MPG (US)MPG (UK)L/100 km km/L
Pressure psikPa bar
Power — If Equipped HP (US)HP (UK) Kw
Temperature °F °C
Torque — If Equipped lb-ft Nm
Setting Name Selectable Options
Setting NameSelectable Options
Voice Response LengthBrief Detailed
Show Command List Neverw/Help Always
Setting Name Selectable Options
Sync Time With GPS — If Equipped OnOff
Set Time Hours –+
Set Time Minutes –+
9
20_DJD2_OM_EN_USC_t.book Page 487
Page 490 of 568

488MULTIMEDIA
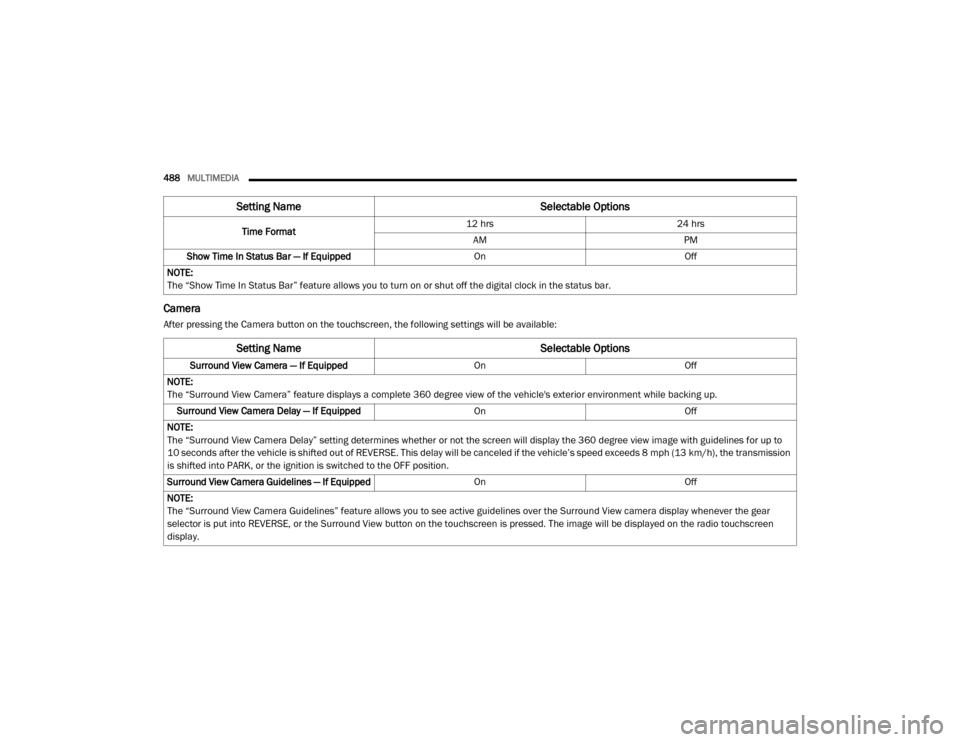
Camera
After pressing the Camera button on the touchscreen, the following settings will be available: Time Format
12 hrs
24 hrs
AM PM
Show Time In Status Bar — If Equipped OnOff
NOTE:
The “Show Time In Status Bar” feature allows you to turn on or shut off the digital clock in the status bar.
Setting Name Selectable Options
Setting NameSelectable Options
Surround View Camera — If Equipped OnOff
NOTE:
The “Surround View Camera” feature displays a complete 360 degree view of the vehicle's exterior environment while backing up. Surround View Camera Delay — If Equipped OnOff
NOTE:
The “Surround View Camera Delay” setting determines whether or not the screen will display the 360 degree view image with guidelines for up to
10 seconds after the vehicle is shifted out of REVERSE. This delay will be canceled if the vehicle’s speed exceeds 8 mph (13 km/h), the transmission
is shifted into PARK, or the ignition is switched to the OFF position.
Surround View Camera Guidelines — If Equipped OnOff
NOTE:
The “Surround View Camera Guidelines” feature allows you to see active guidelines over the Surround View camera display whenever the gear
selector is put into REVERSE, or the Surround View button on the touchscreen is pressed. The image will be displayed on the radio touchscreen
display.
20_DJD2_OM_EN_USC_t.book Page 488
Page 505 of 568

MULTIMEDIA503
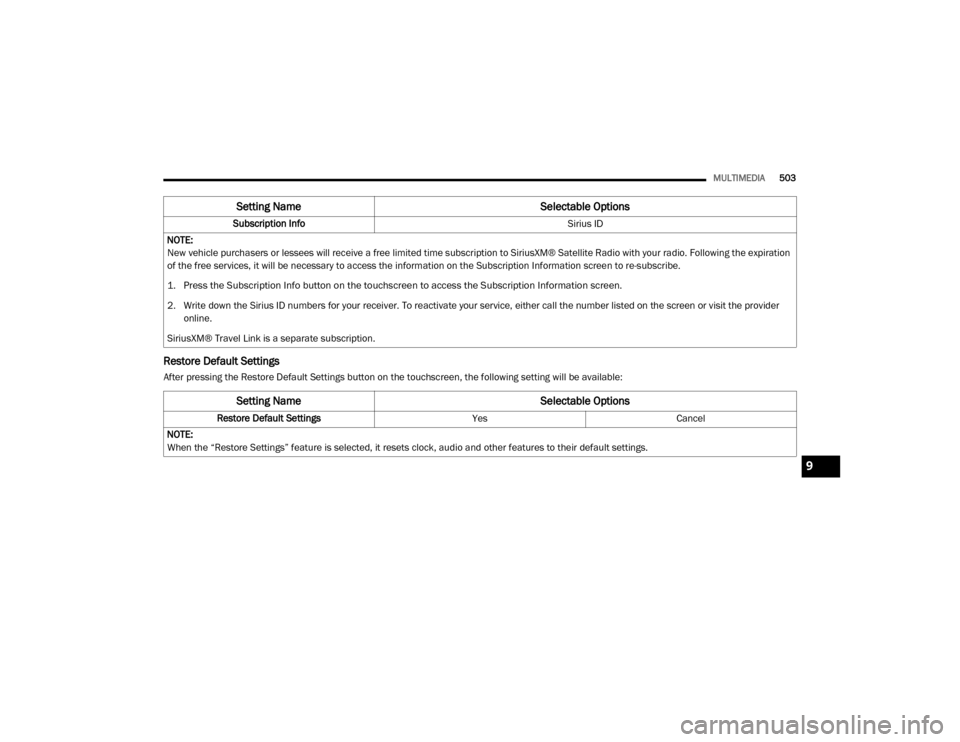
Restore Default Settings
After pressing the Restore Default Settings button on the touchscreen, the following setting will be available:Subscription Info
Sirius ID
NOTE:
New vehicle purchasers or lessees will receive a free limited time subscription to SiriusXM® Satellite Radio with your radio. Following the expiration
of the free services, it will be necessary to access the information on the Subscription Information screen to re-subscribe.
1. Press the Subscription Info button on the touchscreen to access the Subscription Information screen.
2. Write down the Sirius ID numbers for your receiver. To reactivate your service, either call the number listed on the screen or visit the provider online.
SiriusXM® Travel Link is a separate subscription.
Setting Name Selectable Options
Setting NameSelectable Options
Restore Default SettingsYesCancel
NOTE:
When the “Restore Settings” feature is selected, it resets clock, audio and other features to their default settings.
9
20_DJD2_OM_EN_USC_t.book Page 503