2020 Peugeot Partner screenwash
[x] Cancel search: screenwashPage 7 of 260
5
Overview
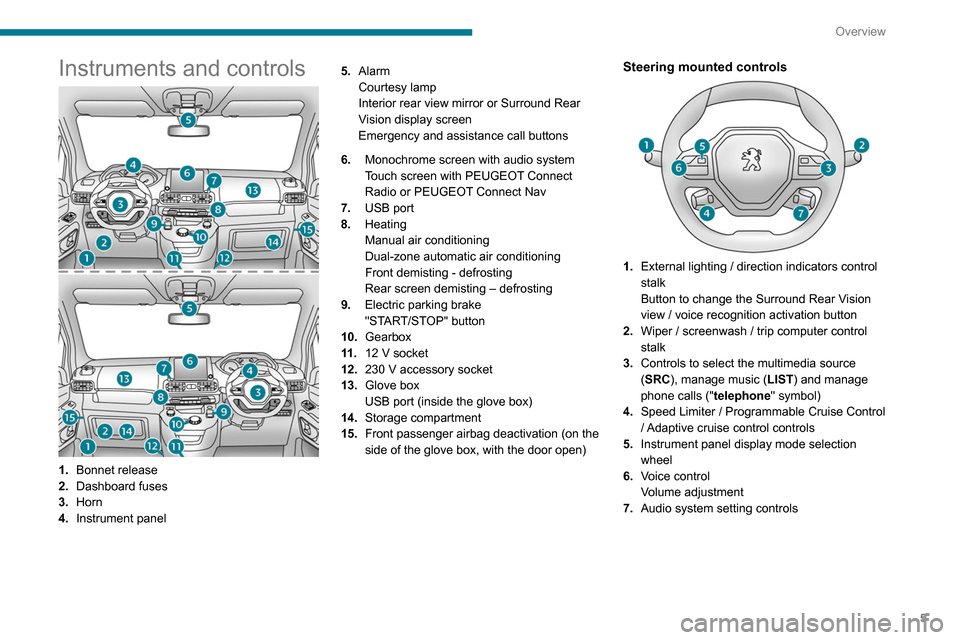
Instruments and controls
1.Bonnet release
2. Dashboard fuses
3. Horn
4. Instrument panel 5.
Alarm
Courtesy lamp
Interior rear view mirror or Surround Rear
Vision display screen
Emergency and assistance call buttons
6. Monochrome screen with audio system
Touch screen with PEUGEOT Connect
Radio or PEUGEOT Connect Nav
7. USB port
8. Heating
Manual air conditioning
Dual-zone automatic air conditioning
Front demisting - defrosting
Rear screen demisting – defrosting
9. Electric parking brake
"START/STOP" button
10. Gearbox
11 . 12 V socket
12. 230 V accessory socket
13. Glove box
USB port (inside the glove box)
14. Storage compartment
15. Front passenger airbag deactivation (on the
side of the glove box, with the door open)
Steering mounted controls
1.External lighting / direction indicators control
stalk
Button to change the Surround Rear Vision
view / voice recognition activation button
2. Wiper / screenwash / trip computer control
stalk
3. Controls to select the multimedia source
(SRC), manage music (LIST) and manage
phone calls (" telephone" symbol)
4. Speed Limiter / Programmable Cruise Control
/ Adaptive cruise control controls
5. Instrument panel display mode selection
wheel
6. Voice control
Volume adjustment
7. Audio system setting controls
Page 69 of 260

67
Lighting and visibility
4Headlamp beam height
adjustment
To avoid inconvenience to other road users,
the height of the halogen headlamps should be
adjusted according to the load in the vehicle.
0Unladen.
1 Partial load.
2 Medium load.
3 Maximum
authorised load.
4 5 6 Not used.
The initial setting is position 0.
Wiper control stalk
Programming
Your vehicle may also include some functions
that can be activated/deactivated:
–
automatic windscreen wipers,
–
rear wiping on engaging reverse gear
.
In wintry conditions, remove snow, ice or
frost present on the windscreen, around
the wiper arms and blades and the
windscreen seal, before operating the wipers.
Do not operate the wipers on a dry
windscreen. Under extremely hot or cold
conditions, ensure that the wiper blades are
not stuck to the windscreen before operating
the wipers.
Manual controls
The wipers are controlled directly by the driver.
With manual wiping (intermittent)
With AUTO wiping
Windscreen wipers
► To select the wiping speed: raise or lower the
stalk to the desired position.
Fast wiping (heavy rain)
Normal wiping (moderate rain)
Intermittent wiping (proportional to the
vehicle’s speed)
Off
or
Automatic wiping (press down, then release).
Single wipe (pull the stalk briefly towards you).
Windscreen wash
► Pull the wiper control stalk towards you and
hold.
The screenwash and windscreen wipers operate
for as long as the control stalk is pulled.
A
final wiping cycle is performed when
screenwashing ends.
Page 70 of 260

68
Lighting and visibility
After refitting a windscreen wiper blade
► To return the wiper blades to their initial
position, switch on the ignition and operate the
wiper control stalk.
Changing a wiper blade
Removing/refitting at the front
► Carry out these wiper blade replacement
operations from the driver's side.
► Starting with the wiper blade farthest from
you, hold each arm by the rigid section and raise
it as far as possible.
Take care not to hold the arms at the jet locations.
Do not touch the wiper blades. Risk of
irreparable deformation.
Do not release them while moving them. Risk
of damaging the windscreen!
On vehicles fitted with automatic air
conditioning, any action on the
screenwash control temporarily closes the air
intake, to avoid odours inside the passenger
compartment.
The windscreen wash jets are incorporated into the tip of each wiper
arm.
Screenwash fluid is sprayed along the length
of the wiper blade. This improves visibility and
reduces screenwash fluid consumption.
In some cases, depending on the contents
or colour of the fluid and on the exterior
brightness, the liquid spray may be barely
noticeable.
To avoid damaging the wiper blades, do not operate the windscreen washer if the
windscreen washer reservoir is empty.
Only operate the windscreen washer if
there is no risk of the fluid freezing on the
windscreen and hindering visibility. Always
use windscreen washer fluid suitable for low
temperatures during the winter period.
Never top up with water.
Rear wiper
Rear wiper selection ring:Off.
Intermittent wiping (proportional to the
speed of the vehicle).
Wash-wipe (set duration).
Reverse gear
When reverse gear is engaged, the rear wiper
will come into operation automatically if the
windscreen wipers are operating.
Activation/Deactivation
Activation or deactivation is set via the vehicle
configuration menu.
This system is activated by default.
If a significant accumulation of snow or
ice is present, or when using a bicycle
carrier on the boot, deactivate the automatic
rear wiper.
Special position of the
windscreen wipers
This maintenance position is used while cleaning
or replacing the wiper blades. It can also be
useful, in winter (ice, snow), to release the wiper
blades from the windscreen.
To maintain the effectiveness of the flat wiper blades, it is advisable to:
–
handle them with care,
–
clean them regularly using soapy water
,
–
avoid using them to retain cardboard on the
windscreen,
–
replace them at the first signs of wear
.
Before removing a windscreen wiper blade
► Actuating the wiper control stalk within one
minute of switching off the ignition will position
the wiper blades vertically
.
►
Proceed with the desired operation or replace
the wiper blades.
Page 71 of 260

69
Lighting and visibility
4After refitting a windscreen wiper blade
► To return the wiper blades to their initial
position, switch on the ignition and operate the
wiper control stalk.
Changing a wiper blade
Removing/refitting at the front
► Carry out these wiper blade replacement
operations from the driver's side.
►
Starting with the wiper blade farthest from
you, hold each arm by the rigid section and raise
it as far as possible.
Take care not to hold the arms at the jet locations.
Do not touch the wiper blades. Risk of
irreparable deformation.
Do not release them while moving them. Risk
of damaging the windscreen!
► Clean the windscreen using screenwash
fluid.
Do not apply "Rain X" type water-
repellent products.
►
Unclip the worn wiper blade closest to you
and remove it.
►
Install the new wiper blade and clip it to the
arm.
►
Repeat the procedure for the other wiper
blade.
►
Starting with the wiper blade closest to you,
once again hold each arm by the rigid section,
then guide it carefully onto the windscreen.
Removing/refitting at the rear
► Hold the arm by the rigid section and raise it
as far as possible.
►
Clean the rear screen using screenwash
fluid.
►
Unclip the worn wiper blade and remove it.
►
Install the new wiper blade and clip it to the
arm.
►
Once again hold the arm by the rigid section,
then guide it carefully onto the rear screen.
Automatic windscreen wipers
The windscreen wipers operate automatically
once rain is detected (sensor behind the rear
view mirror), adapting their speed to the intensity
of the rain without any action on the part of the
driver.
Switching on
Briefly push the control stalk downwards.
A wiping cycle confirms that the instruction has
been accepted.
Depending on version, this symbol
appears in the display screen or
this indicator lamp comes on on the instrument
panel and a message is displayed.
Off
Give the control stalk another brief push
downwards or place the control stalk in
another position (Int, 1 or 2).
This indicator lamp goes off on the instrument
panel and a message is displayed.
If the ignition has been off for more than
one minute, the automatic wipers must
Page 144 of 260

142
Practical information
► Reinsert the dipstick and push fully down,
then pull it out again to visually check the oil
level: the correct level is between marks A (max)
and B (min).
Do not start the engine if the level is:
– above mark A: contact a PEUGEOT dealer or
a qualified workshop.
– below mark B: top up the engine oil
immediately.
Oil grade
Before topping up or changing the engine
oil, check that the oil is suitable for the engine
and complies with the recommendations in
the service schedule supplied with the vehicle
(or available from your PEUGEOT dealer and
qualified workshops).
Use of non-recommended oil may invalidate
the contractual warranty in the event of
engine failure.
Topping up the engine oil level
The location of the oil filler cap is shown in the
corresponding underbonnet layout view.
► Add oil in small quantities, avoiding any spills
on engine components (risk of fire).
The locations of the following elements may
varyW
–
Air filter
.
–
Engine oil dipstick.
–
Engine oil filler cap.
Petrol engine
Diesel engine
1. Screenwash fluid reservoir
2. Engine coolant reservoir
3. Brake fluid reservoir
4. Battery / Fuses
5. Remote earth point (-)
6. Fusebox
7. Air filter
8. Engine oil filler cap
9. Engine oil dipstick
The Diesel fuel system operates under
very high pressure.
All work on this circuit must be carried out
only by a PEUGEOT dealer or a qualified
workshop.
Checking levels
Check all of the following levels regularly in
accordance with the manufacturer's service
schedule. Top them up if required, unless
otherwise indicated.
If a level drops significantly, have the
corresponding system checked by a PEUGEOT
dealer or a qualified workshop.
The fluids must comply with the manufacturer's requirements and with
the vehicle's engine.
Take care when working under the bonnet, as certain areas of the engine
may be extremely hot (risk of burns) and the
cooling fan could start at any time (even with
the ignition off).
Used products
Avoid prolonged contact of used oil or fluids with the skin.
Most of these fluids are harmful to health and
very corrosive.
Do not discard used oil or fluids into
sewers or onto the ground.
Empty used oil into the containers reserved
for this purpose at a PEUGEOT dealer or a
qualified workshop.
Engine oil
The level is checked, with the engine having been switched off for at least 30
minutes and on level ground, either using the oil
level indicator in the instrument panel when the
ignition is switched on (for vehicles equipped
with an electric gauge), or using the dipstick.
It is normal to top up the oil level between two
services (or oil changes). It is recommended
that you check the level, and top up if necessary,
every 3,000 miles (5,000 km).
In order to maintain the reliability of the
engine and emissions control system,
never use additives in the engine oil.
Checking using the dipstick
For the location of the dipstick, please refer
to the illustration of the corresponding engine
compartment.
►
Grasp the dipstick by its coloured grip and
pull it out completely
.
►
Wipe the end of the dipstick using a clean,
lint-free cloth.
Page 145 of 260

143
Practical information
7
► Reinsert the dipstick and push fully down,
then pull it out again to visually check the oil
level: the correct level is between marks A
(max)
and B (min).
Do not start the engine if the level is:
–
above mark
A: contact a PEUGEOT dealer or
a qualified workshop.
–
below mark B
: top up the engine oil
immediately.
Oil grade
Before topping up or changing the engine
oil, check that the oil is suitable for the engine
and complies with the recommendations in
the service schedule supplied with the vehicle
(or available from your PEUGEOT dealer and
qualified workshops).
Use of non-recommended oil may invalidate
the contractual warranty in the event of
engine failure.
Topping up the engine oil level
The location of the oil filler cap is shown in the
corresponding underbonnet layout view.
►
Add oil in small quantities, avoiding any spills
on engine components (risk of fire).
► Wait a few minutes before checking the level
again using the dipstick.
►
Add more oil if necessary
.
►
After checking the level, carefully refit the oil
filler cap and the dipstick in its tube.
During the 30 minutes after topping up
the oil, the check performed with the oil
level indicator in the instrument panel when
the ignition is switched on is not valid.
Brake fluid
The level of this fluid should be close to the "MAX" mark. If not, check the brake
pad wear.
To know how often the brake fluid should be
replaced, refer to the manufacturer's servicing
schedule.
If topping up, clean the cap before
replacing it. Use only DOT4 brake fluid
from a sealed canister.
Engine coolant
Check the engine coolant level regularly.
It is normal to top up this fluid between
two services.
The check and top-up must only be done with
the engine cold.
A low level presents a risk of serious damage to
the engine. The level of this fluid should be close to the
"MAX" mark but should never exceed it.
If the level is close to or below the "
MIN” mark, it
is essential to top up.
When the engine is hot, the temperature of this
fluid is regulated by the fan.
In addition, as the cooling system is pressurised,
wait at least one hour after switching off the
engine before carrying out any work.
To avoid the risk of scalding if you need to top
up in an emergency, wrap a cloth around the cap
and unscrew the cap by two turns to allow the
pressure to drop.
Once the pressure has dropped, remove the cap
and top up to the required level.
Screenwash fluid
Top up to the required level when necessary.
Capacity of the tank:
–
5.3 litres for "very cold climate" versions.
–
2.2 litres for other versions.
Fluid specification
The fluid must be topped up with a ready-to-use
mixture.
In winter (temperatures below zero), a liquid
containing an agent to prevent freezing must
be used which is appropriate for the prevailing
conditions, in order to protect the elements of the
system (pump, tank, ducts, jets, etc.).
Page 164 of 260

162
In the event of a breakdown
malfunction of your vehicle. Contact a
PEUGEOT dealer or a qualified workshop.
Good
Failed
Tweezers
Installing electrical accessories
Your vehicle's electrical system is
designed to operate with standard or optional
equipment.
Before installing other electrical equipment
or accessories on your vehicle, contact a
PEUGEOT dealer or a qualified workshop.
PEUGEOT will not accept responsibility
for the cost incurred in repairing your
vehicle or for rectifying malfunctions resulting
from the installation of accessories not
supplied and not recommended by
PEUGEOT and not installed in accordance
with its instructions, in particular when the
combined consumption of all of the additional
equipment connected exceeds 10
milliamperes.
For more information on installing a
towbar or TAXI type equipment, contact a
PEUGEOT dealer.
Dashboard fuses
The fusebox is placed in the lower dashboard
(left-hand side).
Access to the fuses
► Unclip the cover by pulling at the top left, then
right.
The fuses described below vary according to the equipment in your vehicle.
Fuse No. Rating (A) Functions
F1 10Wireless
smartphone
charger, interior
electrochrome
rear view mirror.
Fuse No. Rating (A) Functions
F415Horn.
F6 20Screenwash
pump.
F7 1012
V socket
(rear).
F10 30 Electric locks
module.
F13 10 Telematics and
radio controls.
F14 5 Alarm, overload
indicator,
advanced
telematic unit.
F19 3 Trailer interface
unit.
F22 3 Surround Rear
Vision display
screen.
F23 5 Generic trailer
interface unit.
F27 5 Additional
heating.
F29 20 Audio system,
touch screen.
F32 15 12
V socket
(front).Fuse No. Rating (A) Functions
F34 5 Mirror control.
F36 5 USB socket.
Engine compartment fuses
The fusebox is placed in the engine
compartment near the battery.
Access to the fuses
► Release the two latches A.
► Remove the cover.
► Change the fuse.
► When you have finished, close the cover
carefully then engage the two latches A, to
ensure correct sealing of the fusebox.
Page 233 of 260

231
Alphabetical index
Lane departure warning active 120, 125
LEDs - Light-emitting diodes
65, 157
Level, AdBlue®
144
Level, brake fluid
143
Level, Diesel additive
144–145
Level, engine coolant
16, 143
Level, engine oil
142
Levels and checks
142–144
Level, screenwash fluid
68, 143
Light-emitting diodes - LEDs
65, 157
Lighting
63
Lighting, exterior
63
Lighting, guide-me home
65
Lighting, welcome
65
Loading
50, 140
Load reduction mode
140
Load restraint
49
Locating your vehicle
25
Locking
24–25, 29
Locking from the inside
33–34
Long load support bar
36
Low fuel level
134–135
Lumbar
41
M
Maintenance (advice) 148
Maintenance, routine
106, 144
Manoeuvring aids (recommendations)
105
Markings, identification
176
Mat
47, 106
Memorising a speed 117–118
Menu
196
Menu, main
178
Menus (audio)
191–192, 204–205
Messages
222
Messages, quick
222
Mirror, rear view
43–44
Mirrors, door
43, 59, 124
Misfuel prevention
135–136
MP3 CD
182
N
Navigation 210–212
Navigation, connected
212–214
Number plate lamps
160–161
O
Obstacle detection 127
Oil change
142
Oil consumption
142
OIl, engine
142
On-board tools
150–151
Opening the bonnet
141–142
Opening the boot
24
Opening the doors
24
Overhead storage
47
P
Pads, brake 145
Paint
149, 176
Paint colour code
176
Parking brake
94–95, 145
Parking brake, electric
95–97, 145
Parking sensors, audible and visual
127
Parking sensors, front
128
Parking sensors, rear
127
Plates, identification
176
Player, Apple®
183, 195
Player, Apple®
219
Player, MP3 CD
182
Player, USB
181, 194, 219
Port, USB
48, 181, 194, 214, 219
Pressures, tyres
145, 153, 156, 176
Pre-tensioning seat belts
80
Priming pump
150
Priming the fuel system
150
Profiles
199, 223
Programmable cruise control
11 2
Protecting children
82, 84–87
Puncture
151, 153
R
Radar (warnings) 106
Radio
179–180, 192, 195, 217
Radio, digital (Digital Audio Broadcasting -
DAB)
180, 194–195, 218