2020 Peugeot Partner Reversing light
[x] Cancel search: Reversing lightPage 131 of 260

129
Driving
6installed in accordance with the
manufacturer's recommendations.
In this case, the outline of a trailer is displayed
at the rear of the image of the vehicle.
Operating limits
If the boot is heavily loaded, the vehicle may tilt,
affecting distance measurements.
Malfunction
In the event of a malfunction when
changing into reverse, this warning lamp
comes on on the instrument panel, accompanied
by an onscreen message and an audible signal
(short beep).
Contact a PEUGEOT dealer or a qualified
workshop to have the system checked.
Reversing camera
Refer to the General recommendations on the
use of driving and manoeuvring aids .
With the ignition on, this system uses a camera
located near the third brake lamp to display
a view of the rear of your vehicle on the
reproduction screen (if it is a panel van or has a
solid partition).
The reversing camera is activated automatically
when reverse gear is engaged. The image
is displayed on the reproduction screen. The
reproduction screen switches off when the
gearbox is in neutral or in a forward gear.
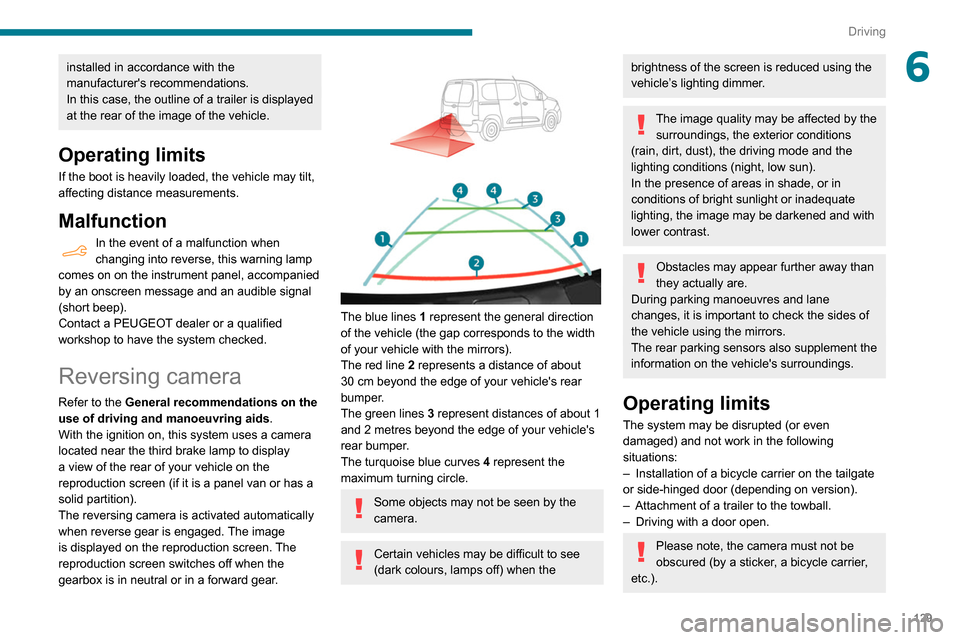
The blue lines 1 represent the general direction
of the vehicle (the gap corresponds to the width
of your vehicle with the mirrors).
The red line 2 represents a distance of about
30
cm beyond the edge of your vehicle's rear
bumper.
The green lines 3 represent distances of about 1
and 2 metres beyond the edge of your vehicle's
rear bumper.
The turquoise blue curves 4 represent the
maximum turning circle.
Some objects may not be seen by the
camera.
Certain vehicles may be difficult to see
(dark colours, lamps off) when the
brightness of the screen is reduced using the
vehicle’s lighting dimmer.
The image quality may be affected by the surroundings, the exterior conditions
(rain, dirt, dust), the driving mode and the
lighting conditions (night, low sun).
In the presence of areas in shade, or in
conditions of bright sunlight or inadequate
lighting, the image may be darkened and with
lower contrast.
Obstacles may appear further away than
they actually are.
During parking manoeuvres and lane
changes, it is important to check the sides of
the vehicle using the mirrors.
The rear parking sensors also supplement the
information on the vehicle's surroundings.
Operating limits
The system may be disrupted (or even
damaged) and not work in the following
situations:
–
Installation of a bicycle carrier on the tailgate
or side-hinged door (depending on version).
–
Attachment of a trailer to the towball.
–
Driving with a door open.
Please note, the camera must not be
obscured (by a sticker, a bicycle carrier,
etc.).
Page 133 of 260

131
Driving
6The blue dimension lines 1 represent the width
of your vehicle with the mirrors unfolded.
The red line 2 represents a distance of 30
cm
from the rear bumper; the two green lines 3 and
4 represent 1
m and 2 m, respectively.
The blue curves 5 appear successively; they
are based on the position of the steering wheel
and represent the turning circle radius of your
vehicle.
The orange dashes 6 represent the opening radii
of the rear doors.
Please routinely check your exterior
mirrors while driving and during
manoeuvres.
Some items may not be seen by the rear
camera.
Certain vehicles may be difficult to see
(dark colours, lamps off) when the
brightness of the screen is reduced using the
vehicle’s lighting dimmer.
The image quality may be affected by the environment, the exterior conditions
(rain, dirt, dust), the driving mode and the
lighting conditions (night, low sun).
In the presence of areas in shade, or in
conditions of bright sunlight or inadequate
lighting, the image may be darkened and with
lower contrast.
Obstacles may appear further away than
they actually are.
During parking manoeuvres and lane
changes, it is important to check the sides of
the vehicle using the mirrors.
The rear parking sensors also supplement the
information on the vehicle's surroundings.
Activation / Deactivation
The system starts when the ignition is switched
on.
► With the ignition on, press button 2 to switch
the reproduction screen on / off.
A message appears.
►
T
ake note of this message and validate
with button 1 corresponding to the “ Accept”
response.
The reproduction screen comes on.
► With the engine running, press button 2 to
switch the reproduction screen off.
The function is automatically paused (the reproduction screen becomes grey) in
reverse , above 9 mph (15
km/h).
The function restarts when the vehicle is
once more travelling at a speed below this
threshold.
Operation
► In neutral , the monitoring rear view is
displayed by default.
►
When reverse is engaged
, the visual
reversing aid is displayed on the screen (even if
it is switched off).
► To change the view , press the end of the
lighting control stalk or press the corresponding
button located below the screen.
Page 162 of 260

160
In the event of a breakdown
Rear lamps
For more information on Changing a bulb
and, in particular, the types of bulb, refer to the
corresponding section.
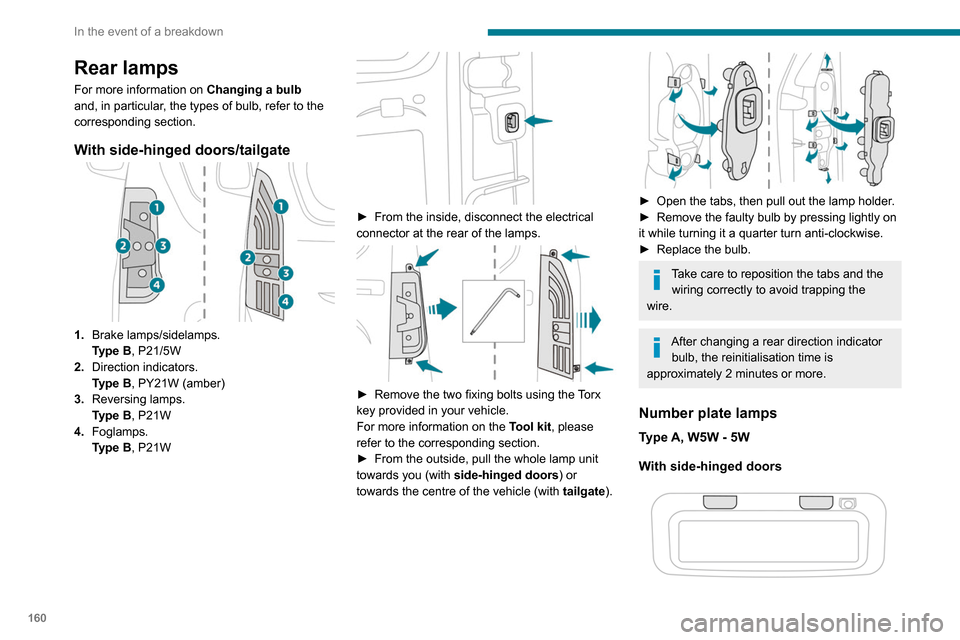
With side-hinged doors/tailgate
1. Brake lamps/sidelamps.
Type
B, P21/5W
2. Direction indicators.
Type
B, PY21W (amber)
3. Reversing lamps.
Type
B, P21W
4. Foglamps.
Type
B, P21W
► From the inside, disconnect the electrical
connector at the rear of the lamps.
► Remove the two fixing bolts using the Torx
key provided in your vehicle.
For more information on the Tool kit, please
refer to the corresponding section.
►
From the outside, pull the whole lamp unit
towards you (with side-hinged doors ) or
towards the centre of the vehicle (with tailgate
).
► Open the tabs, then pull out the lamp holder .
► Remove the faulty bulb by pressing lightly on
it while turning it a quarter turn anti-clockwise.
►
Replace the bulb.
Take care to reposition the tabs and the wiring correctly to avoid trapping the
wire.
After changing a rear direction indicator bulb, the reinitialisation time is
approximately 2 minutes or more.
Number plate lamps
Type A, W5W - 5W
With side-hinged doors
► Unclip the interior trim.
► Disconnect the connector by moving aside
its tab.
► Turn the bulb holder a quarter turn
anti-clockwise.
► Change the bulb.
► Put the bulb holder back in place and
reconnect the connector.
► Put the trim back in place.
With tailgate
► Remove the plastic lens using a screwdriver.
► Change the bulb.
► Refit the plastic lens and press on it.
Third brake lamp
Type A, W16W - 16W
– Unscrew the two nuts.
Page 234 of 260

232
Alphabetical index
Range, AdBlue 144
RDS
193, 218
Rear screen, demisting
59
Recharging the battery
164–165
Recirculation, air
56–57
Recovery
167
Reduction of electrical load
140
Regeneration of the particle filter
144
Reinitialisation of the under-inflation
detection system
105
Reinitialising the remote control
32
Reminder, key in ignition
94
Reminder, lighting on
63–64
Remote control
24–27, 29–30, 91
Removing a wheel
154, 156
Removing the mat
47
Replacing bulbs
156–157
Replacing fuses
161–163
Replacing the air filter
144
Replacing the oil filter
144
Replacing the passenger compartment
filter
144
Reservoir, screenwash
143
Reversing camera
106, 129
Reversing lamps
160
Roof bars
140
Running out of fuel (Diesel)
150
S
Safety, children 82, 84–87
Saturation of the particle filter (Diesel) 144
Screen menu map
196
Screen, multifunction (with audio system)
178
Screenwash, front
67
Screenwash, rear
68
SCR (Selective Catalytic Reduction)
146
Seat belts
79–81, 86
Seat, bench front, 2-seat
44–45, 79
Seat, rear bench
46
Seats, front
40–42, 44–45
Seats, front bench
44–45
Seats, heated
42
Seats, Multiflex ~ Extenso Cab
51
Seats, rear
40, 44, 46, 85
Sensors (warnings)
106
Serial number, vehicle
176
Service indicator
16
Servicing
16, 144
Settings, system
199, 223
Sidelamps
63, 65, 157–159
Side parking sensors
128
Side repeater
158
Sliding side door, electric
29, 35
Snow chains
104, 136
Snow chains, link
136
Socket, 12 V accessory
47
Socket, 220 V
48
Socket, auxiliary
182, 195, 219
Socket, Jack
182, 219
Speed limiter
109–111, 117–118
Speed limit recognition
107–108
Speedometer
107Stability control (ESC) 75–78
Starting a Diesel engine
134
Starting the engine
91
Starting the vehicle
92, 94, 99–101
Starting using another battery
164
Station, radio
179, 192, 217–218
Stay, bonnet
141
Steering mounted controls, audio
178–179, 190,
204
Steering wheel, adjustment
42
Stickers, customising ~ Stickers,
expressive
149
Stopping the vehicle
94, 99–101
Stop & Start
22, 55, 59, 102–104,
134, 141, 144, 163, 166
Storage
47
Stowing rings
49
Sunshine sensor
55
Surround Rear Vision
130
Switching off the engine
91, 93
Synchronising the remote control
32
T
Tables of fuses 161–163
Tank, fuel
134–135
Technical data
173–175
Telephone
48, 184–186, 197–198, 220–222
Telephone, Bluetooth with voice
recognition
186
Temperature, coolant
16