2020 PEUGEOT 5008 parking brake
[x] Cancel search: parking brakePage 189 of 308
187
Practical information
7The system only registers AdBlue® top-ups of
5
litres or more.
If the AdBlue® tank is completely empty
– which is confirmed by the message
"Top up
AdBlue: Starting impossible" – it is
essential to add at least 5 litres.
Free-wheeling
In certain situations, you must allow the vehicle
to free-wheel (while being towed, on a rolling
road, in an automatic car wash, or being
transported by rail or sea freight, etc.).
The procedure varies according to the type of
gearbox and parking brake.
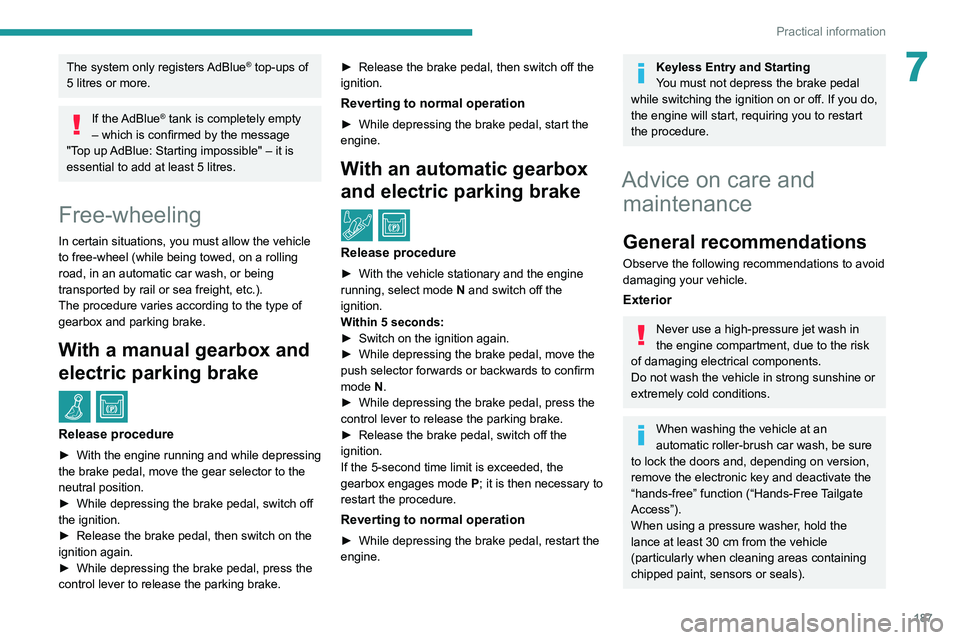
With a manual gearbox and
electric parking brake
/
Release procedure
► With the engine running and while depressing
the brake pedal, move the gear selector to the
neutral position.
►
While depressing the brake pedal, switch off
the ignition.
►
Release the brake pedal, then switch on the
ignition again.
►
While depressing the brake pedal, press the
control lever to release the parking brake. ►
Release the brake pedal, then switch off the
ignition.
Reverting to normal operation
► While depressing the brake pedal, start the
engine.
With an automatic gearbox
and electric parking brake
/
Release procedure
► With the vehicle stationary and the engine
running, select mode N and switch off the
ignition.
Within 5
seconds:
►
Switch on the ignition again.
►
While depressing the brake pedal, move the
push selector forwards or backwards to confirm
mode
N.
►
While depressing the brake pedal, press the
control lever to release the parking brake.
►
Release the brake pedal, switch off the
ignition.
If the 5-second time limit is exceeded, the
gearbox engages mode P
; it is then necessary to
restart the procedure.
Reverting to normal operation
► While depressing the brake pedal, restart the
engine.
Keyless Entry and Starting
You must not depress the brake pedal
while switching the ignition on or off. If you do,
the engine will start, requiring you to restart
the procedure.
Advice on care and maintenance
General recommendations
Observe the following recommendations to avoid
damaging your vehicle.
Exterior
Never use a high-pressure jet wash in
the engine compartment, due to the risk
of damaging electrical components.
Do not wash the vehicle in strong sunshine or
extremely cold conditions.
When washing the vehicle at an
automatic roller-brush car wash, be sure
to lock the doors and, depending on version,
remove the electronic key and deactivate the
“hands-free” function (“Hands-Free Tailgate
Access”).
When using a pressure washer, hold the
lance at least 30 cm from the vehicle
(particularly when cleaning areas containing
chipped paint, sensors or seals).
Page 196 of 308
194
In the event of a breakdown
Repair procedure
Do not remove any foreign bodies (e.g.
nail, screw) which have penetrated into
the tyre.
►
Park the vehicle without obstructing traffic
and apply the parking brake.
►
Follow the safety instructions (hazard
warning lamps, warning triangle, high visibility
jacket, etc.) according to the legislation in force
in the country in which you are driving.
►
Switch the ignition off.
Connecting kit 1
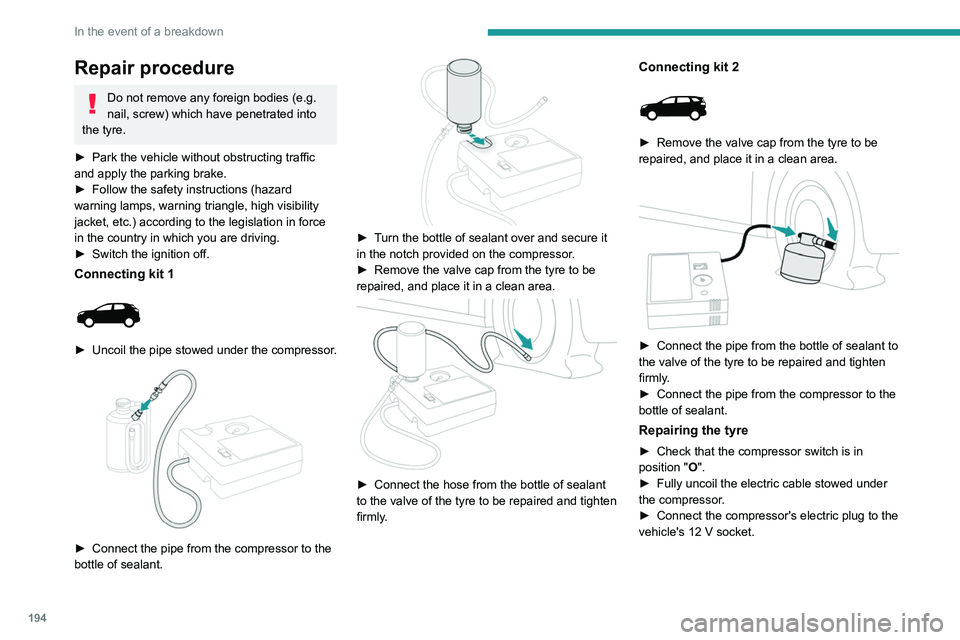
► Uncoil the pipe stowed under the compressor.
► Connect the pipe from the compressor to the
bottle of sealant.
► Turn the bottle of sealant over and secure it
in the notch provided on the compressor.
►
Remove the valve cap from the tyre to be
repaired, and place it in a clean area.
► Connect the hose from the bottle of sealant
to the valve of the tyre to be repaired and tighten
firmly
.
Connecting kit 2
► Remove the valve cap from the tyre to be
repaired, and place it in a clean area.
► Connect the pipe from the bottle of sealant to
the valve of the tyre to be repaired and tighten
firmly
.
►
Connect the pipe from the compressor to the
bottle of sealant.
Repairing the tyre
► Check that the compressor switch is in
position "O".
►
Fully uncoil the electric cable stowed under
the compressor
.
►
Connect the compressor's electric plug to the
vehicle's 12
V socket.
Page 201 of 308
199
In the event of a breakdown
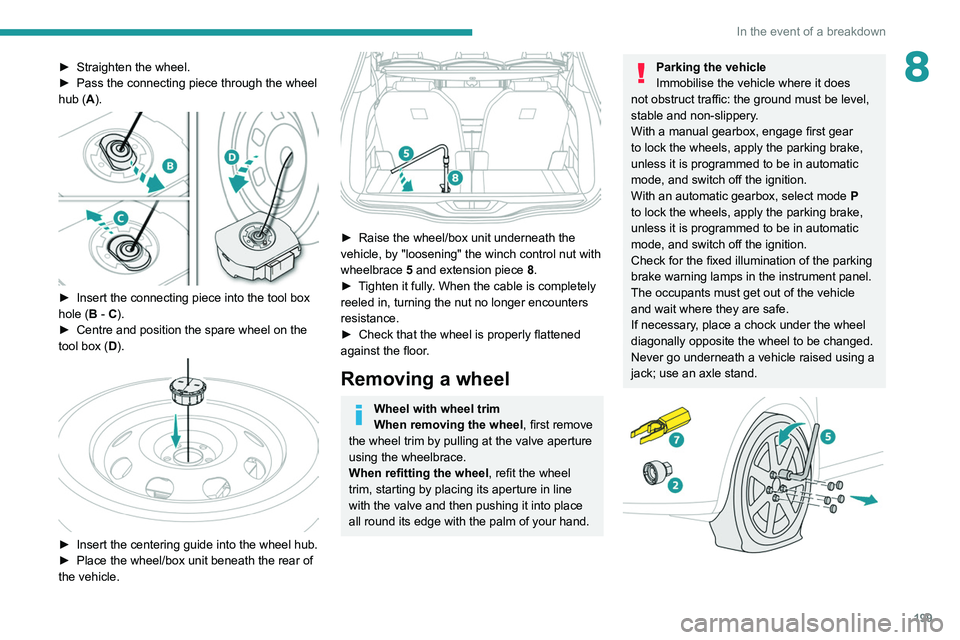
8► Straighten the wheel.
► Pass the connecting piece through the wheel
hub (
A).
► Insert the connecting piece into the tool box
hole ( B - C).
►
Centre and position the spare wheel on the
tool box (
D).
► Insert the centering guide into the wheel hub.
► Place the wheel/box unit beneath the rear of
the vehicle.
► Raise the wheel/box unit underneath the
vehicle, by "loosening" the winch control nut with
wheelbrace 5
and extension piece 8.
►
T
ighten it fully. When the cable is completely
reeled in, turning the nut no longer encounters
resistance.
►
Check that the wheel is properly flattened
against the floor
.
Removing a wheel
Wheel with wheel trim
When removing the wheel , first remove
the wheel trim by pulling at the valve aperture
using the wheelbrace.
When refitting the wheel , refit the wheel
trim, starting by placing its aperture in line
with the valve and then pushing it into place
all round its edge with the palm of your hand.
Parking the vehicle
Immobilise the vehicle where it does
not obstruct traffic: the ground must be level,
stable and non-slippery.
With a manual gearbox, engage first gear
to lock the wheels, apply the parking brake,
unless it is programmed to be in automatic
mode, and switch off the ignition.
With an automatic gearbox, select mode
P
to lock the wheels, apply the parking brake,
unless it is programmed to be in automatic
mode, and switch off the ignition.
Check for the fixed illumination of the parking
brake warning lamps in the instrument panel.
The occupants must get out of the vehicle
and wait where they are safe.
If necessary, place a chock under the wheel
diagonally opposite the wheel to be changed.
Never go underneath a vehicle raised using a
jack; use an axle stand.
Page 217 of 308
215
In the event of a breakdown
8
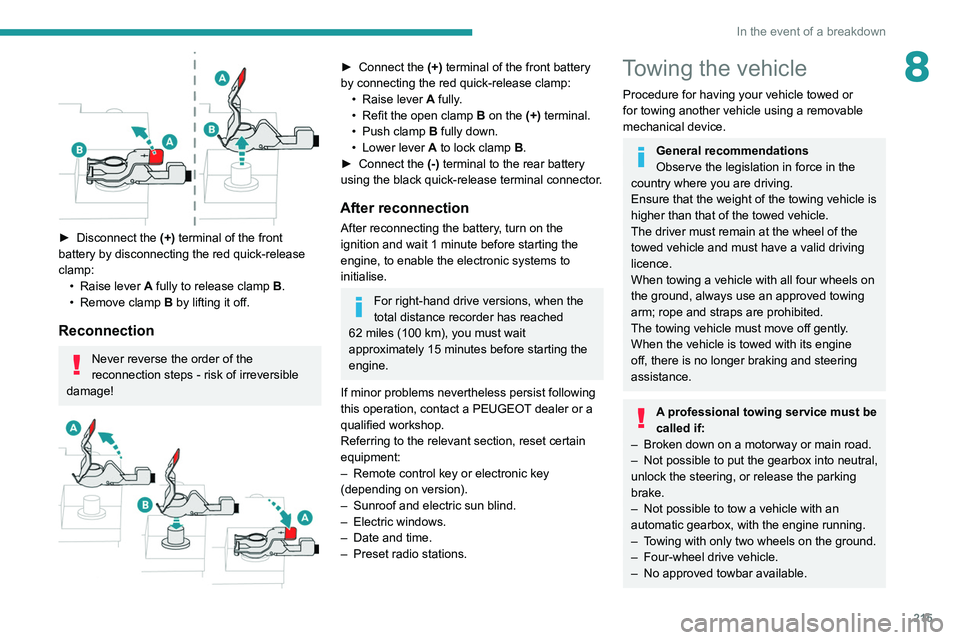
► Disconnect the (+) terminal of the front
battery by disconnecting the red quick-release
clamp: •
Raise lever
A
fully to release clamp
B
.
•
Remove clamp
B
by lifting it off.
Reconnection
Never reverse the order of the
reconnection steps - risk of irreversible
damage!
► Connect the (+) terminal of the front battery
by connecting the red quick-release clamp: •
Raise lever
A
fully.
•
Refit the open clamp
B
on the (+) terminal.
•
Push clamp
B fully down.
•
Lower lever
A
to lock clamp B.
►
Connect the
(-) terminal to the rear battery
using the black quick-release terminal connector.
After reconnection
After reconnecting the battery, turn on the
ignition and wait 1 minute before starting the
engine, to enable the electronic systems to
initialise.
For right-hand drive versions, when the
total distance recorder has reached
62
miles (100 km), you must wait
approximately 15
minutes before starting the
engine.
If minor problems nevertheless persist following
this operation, contact a PEUGEOT dealer or a
qualified workshop.
Referring to the relevant section, reset certain
equipment:
–
Remote control key or electronic key
(depending on version).
–
Sunroof and electric sun blind.
–
Electric windows.
–
Date and time.
–
Preset radio stations.
Towing the vehicle
Procedure for having your vehicle towed or
for towing another vehicle using a removable
mechanical device.
General recommendations
Observe the legislation in force in the
country where you are driving.
Ensure that the weight of the towing vehicle is
higher than that of the towed vehicle.
The driver must remain at the wheel of the
towed vehicle and must have a valid driving
licence.
When towing a vehicle with all four wheels on
the ground, always use an approved towing
arm; rope and straps are prohibited.
The towing vehicle must move off gently.
When the vehicle is towed with its engine
off, there is no longer braking and steering
assistance.
A professional towing service must be
called if:
–
Broken down on a motorway or main road.
–
Not possible to put
the gearbox into neutral,
unlock the steering, or release the parking
brake.
–
Not possible to tow a vehicle with an
automatic gearbox, with the engine running.
–
T
owing with only two wheels on the ground.
–
Four-wheel drive vehicle.
–
No approved towbar available.
Page 218 of 308
216
In the event of a breakdown
Hybrid vehicles
Before any intervention, with the ignition on, depress the brake pedal and select mode N, then switch off the hybrid system (READY indicator lamp
off).
Always call on professionals for recovery of the vehicle on a flatbed lorry or trailer .
Use the towing eye only
to free the vehicle where it is stuck, or to secure it for recovery on a flatbed lorry or trailer .
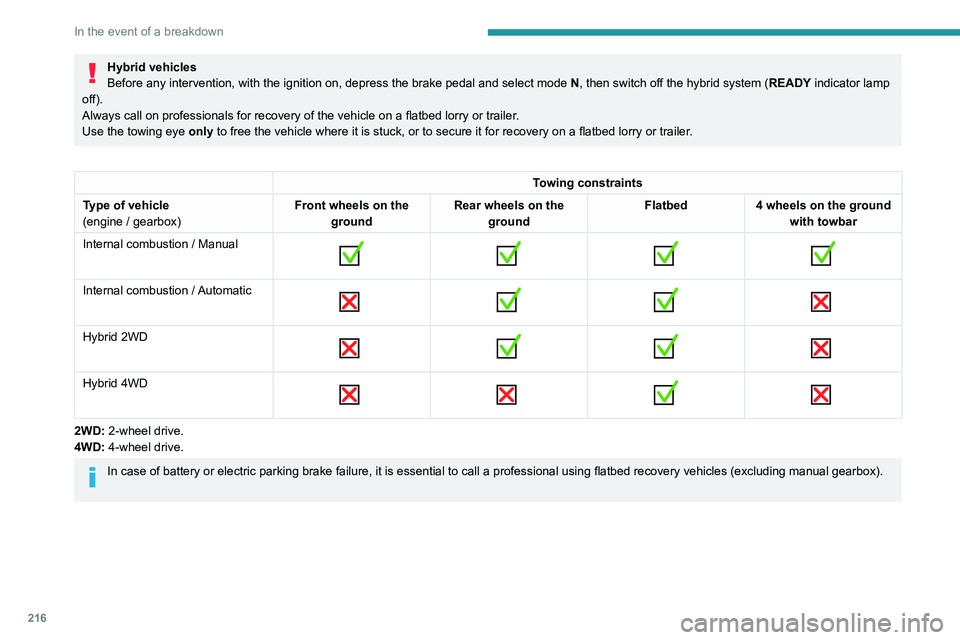
Towing constraints
Type of vehicle
(engine / gearbox) Front wheels on the
ground Rear wheels on the
ground Flatbed
4 wheels on the ground
with towbar
Internal combustion / Manual
Internal combustion / Automatic
Hybrid 2WD
Hybrid 4WD
2WD: 2-wheel drive.
4WD: 4-wheel drive.
In case of battery or electric parking brake failure, it is essential to call a p
rofessional using flatbed recovery vehicles (excluding manual gearbox).
Accessing the tools
Page 220 of 308
218
In the event of a breakdown
Failure to observe this instruction could
result in damage to certain components
(braking, transmission, etc.) and to the
absence of braking assistance the next time
the engine is started.
Automatic gearbox: never tow the vehicle with the driving wheels on the ground
and the engine off.
►
Unlock the steering and release the parking
brake.
►
Switch on the hazard warning lamps on both
vehicles.
►
Move off gently
, drive slowly and only for a
short distance.
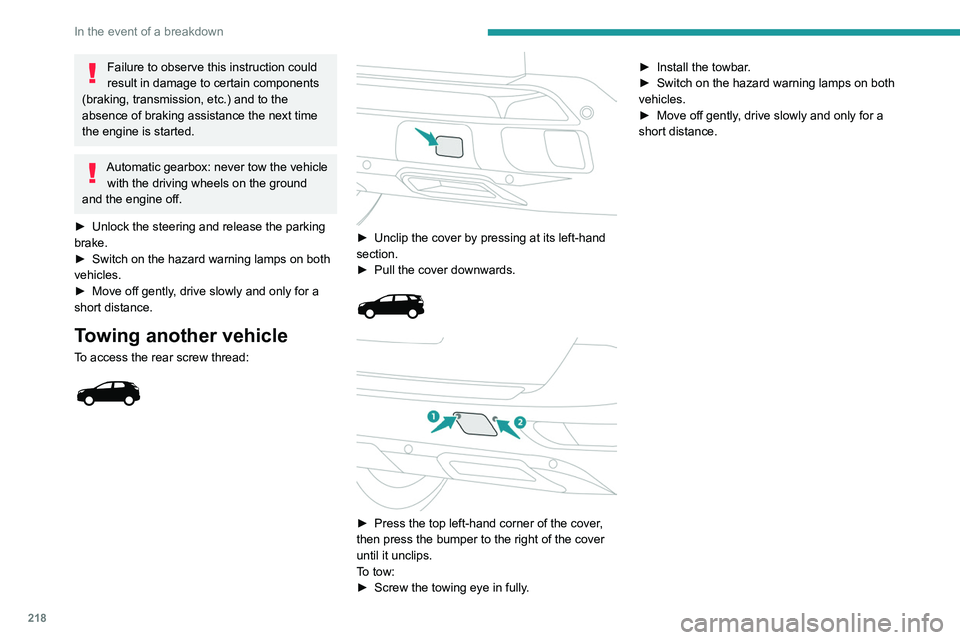
Towing another vehicle
To access the rear screw thread:
► Unclip the cover by pressing at its left-hand
section.
►
Pull the cover downwards.
► Press the top left-hand corner of the cover ,
then press the bumper to the right of the cover
until it unclips.
To tow:
►
Screw the towing eye in fully
.►
Install the towbar
.
►
Switch on the hazard warning lamps on both
vehicles.
►
Move off gently
, drive slowly and only for a
short distance.
Page 284 of 308
282
Alphabetical index
I
i-Cockpit® amplify function 48, 125–126
Ignition
117, 273
Ignition on
11 7
Ignition switch
114, 116
Immobiliser, electronic
11 4
Indicator, AdBlue® range
18
Indicator, coolant temperature
18
Indicator, engine oil level
17, 20
Indicators, direction
79, 203
Inflating tyres
184, 227
Inflating tyres and accessories
(using the kit)
193, 195
Infrared camera
131
Instrument panel
9–10, 20–22, 132
Instrument panel (Hybrid)
9
Intelligent Traction Control
90
Internet browser
263, 267
ISOFIX mountings
105
J
Jack 193, 196–198, 270
Jump starting
210
K
Key 28–29, 32–33
Key, electronic
30–31
Keyless Entry and Starting 30–31, 116–117
Key not recognised
117–118
Key with remote control
28, 114
Kit, hands-free
234–235, 248–249, 271–272
Kit, puncture repair
191–192
Kit, temporary puncture repair
191–195
L
Labels, identification 227
Lamp, boot
77
Lamps, parking
79
Lamps, rear
204
Lams with Full LED technology
80, 82
Lane assist
139, 143–144, 146
Lane departure warning active
150, 155
Lane Departure Warning System (LDWS)
150
Leather (care)
189
LEDs - Light-emitting diodes
79, 202, 204
Level, AdBlue®
182
Level, brake fluid
182
Level, Diesel additive
182–183
Level, engine coolant
18, 182
Level, engine oil
17, 181
Levels and checks
180–182
Level, screenwash fluid
84, 182
Light-emitting diodes - LEDs
79, 202, 204
Lighting, cornering
82
Lighting dimmer
21
Lighting, exterior
78
Lighting, guide-me home
29, 81
Lighting, interior 69–70
Lighting, mood
21, 70
Lighting, welcome
81
Loading
75–76, 176–177
Load reduction mode
179
Locating your vehicle
29
Locking
29, 31
Locking from the inside
32
Locking the doors
32
Long objects, transporting
71
Low fuel level
166
M
Mains socket (domestic network) 169, 173
Maintenance (advice)
168, 187
Maintenance, routine
131, 183
Manoeuvring aids (recommendations)
130
Map reading lamps
69
Markings, identification
227
Massage function
48
Massage, multi-point
48
Mat
69, 132
Memorising a speed
132
Menu
247
Menu, main
25, 229
Menus (audio)
242–243, 255–256
Menu short cuts
25
Messages
273
Messages, quick
273
Mirror, rear view
50
Page 285 of 308
283
Alphabetical index
Mirrors, door 49–50, 65, 154
Mirror, vanity
66
Misfuel prevention
167
Modularity, seats
57
Motor, electric
126, 167, 225
Motorised tailgate
37–38, 40
Mountings, ISOFIX
105
MP3 CD
233
N
Navigation 260–262
Navigation, connected
263–265
Net
73–74
Net, high load retaining
75–76
Number plate lamps
205
O
Obstacle detection 155
Oil change
181
Oil consumption
181
OIl, engine
181
On-board tools
76, 191–193
Opening the bonnet
179–180
Opening the boot
30, 36
Opening the doors
30, 36
Opening the windows
28
P
Pads, brake 184
Paint
188, 227
Paint colour code
227
Paint, matt
188
Parcel shelf, rear
71, 73
Park Assist
161–162
Parking brake, electric
118–120, 184
Parking sensors, audible and visual
155
Parking sensors, front
156
Parking sensors, rear
155
Personalisation
10
Plates, identification
227
Player, Apple®
234, 246, 270
Player, MP3 CD
233
Player, USB
232, 245, 270
Port, USB
67, 232, 245, 265, 270
Power
20
Power indicator
20
Pressures, tyres
184, 196, 227
Pre-tensioning seat belts
97
Priming pump
191
Priming the fuel system
190
Profiles
250, 274
Protecting children
98, 100–103,
105, 107, 110–111
Puncture
193–194, 196
Q
Quiet vehicle warning sound 88
R
Radar (warnings) 131
Radio
230–231, 243–244, 246, 268
Radio, digital (Digital Audio
Broadcasting - DAB)
231, 245, 269
Range, AdBlue®
18, 182
RDS
244, 268–269
READY lamp
179
Rear air blower
63
Rear screen, demisting
65
Rechargeable hybrid system
5, 26, 116, 126,
167
Recharging the battery
211, 214
Recirculation, air
62, 64
Recorder, total distance
20
Recovery
215–218
Recovery of the vehicle
216
Reduction of electrical load
179
Regeneration of the particle filter
183
Regenerative braking (deceleration
by engine braking)
125
Reinitialisation of the under-inflation
detection system
130
Reinitialising the remote control
34
Reminder, key in ignition
11 6
Reminder, lighting on
79