2020 PEUGEOT 5008 boot
[x] Cancel search: bootPage 57 of 308
55
Ease of use and comfort
3If this system fails (paddle D), the third
row passengers can also get out after
having folded the backrest of the second row
seats using strap C.
Do not let children operate the seats
unsupervised.
Third row seats
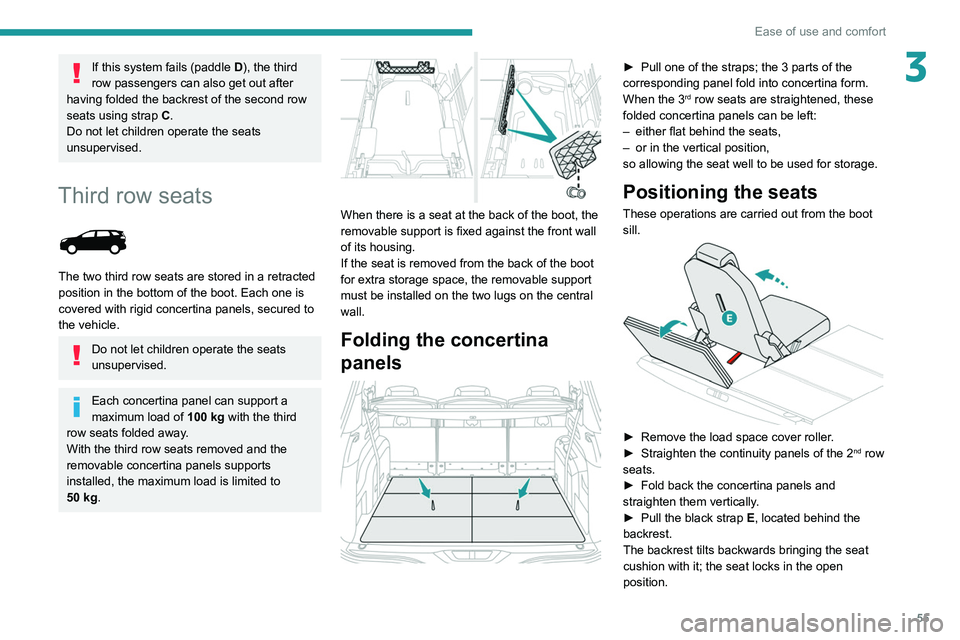
The two third row seats are stored in a retracted
position in the bottom of the boot. Each one is
covered with rigid concertina panels, secured to
the vehicle.
Do not let children operate the seats
unsupervised.
Each concertina panel can support a
maximum load of 100
kg with the third
row seats folded away.
With the third row seats removed and the
removable concertina panels supports
installed, the maximum load is limited to
50
kg.
When there is a seat at the back of the boot, the
removable support is fixed against the front wall
of its housing.
If the seat is removed from the back of the boot
for extra storage space, the removable support
must be installed on the two lugs on the central
wall.
Folding the concertina
panels
► Pull one of the straps; the 3 parts of the
corresponding panel fold into concertina form.
When the 3
rd row seats are straightened, these
folded concertina panels can be left:
–
either flat behind the seats,
–
or in the vertical position,
so allowing the seat well to be used for storage.
Positioning the seats
These operations are carried out from the boot
sill.
► Remove the load space cover roller .
► Straighten the continuity panels of the 2nd row
seats.
►
Fold back the concertina panels and
straighten them vertically
.
►
Pull the black strap E
, located behind the
backrest.
The backrest tilts backwards bringing the seat
cushion with it; the seat locks in the open
position.
Page 58 of 308
56
Ease of use and comfort
The load space cover roller can be stored behind
the backrests of the 3rd row seats.
For more information on the Interior fittings,
and in particular the load space cover roller, refer
to the corresponding section.
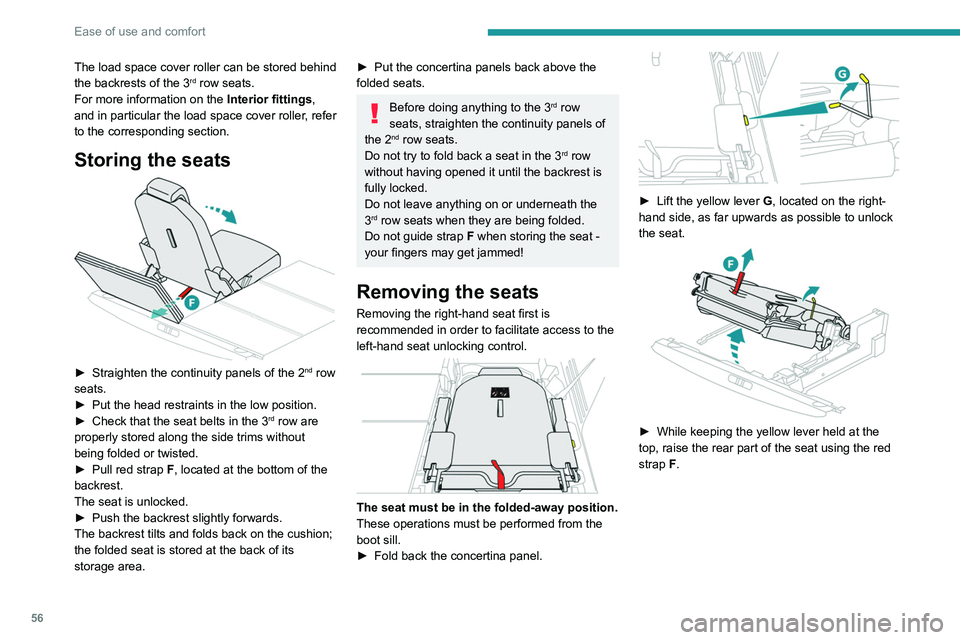
Storing the seats
► Straighten the continuity panels of the 2nd row
seats.
►
Put the head restraints in the low position.
►
Check that the seat belts in the 3rd row are
properly stored along the side trims without
being folded or twisted.
►
Pull red strap
F, located at the bottom of the
backrest.
The seat is unlocked.
►
Push the backrest slightly forwards.
The backrest tilts and folds back on the cushion;
the folded seat is stored at the back of its
storage area.
► Put the concertina panels back above the
folded seats.
Before doing anything to the 3rd row
seats, straighten the continuity panels of
the 2
nd row seats.
Do not try to fold back a seat in the 3rd row
without having opened it until the backrest is
fully locked.
Do not leave anything on or underneath the
3
rd row seats when they are being folded.
Do not guide strap F when storing the seat -
your fingers may get jammed!
Removing the seats
Removing the right-hand seat first is
recommended in order to facilitate access to the
left-hand seat unlocking control.
The seat must be in the folded-away position.
These operations must be performed from the
boot sill.
►
Fold back the concertina panel.
► Lift the yellow lever G , located on the right-
hand side, as far upwards as possible to unlock
the seat.
► While keeping the yellow lever held at the
top, raise the rear part of the seat using the red
strap
F.
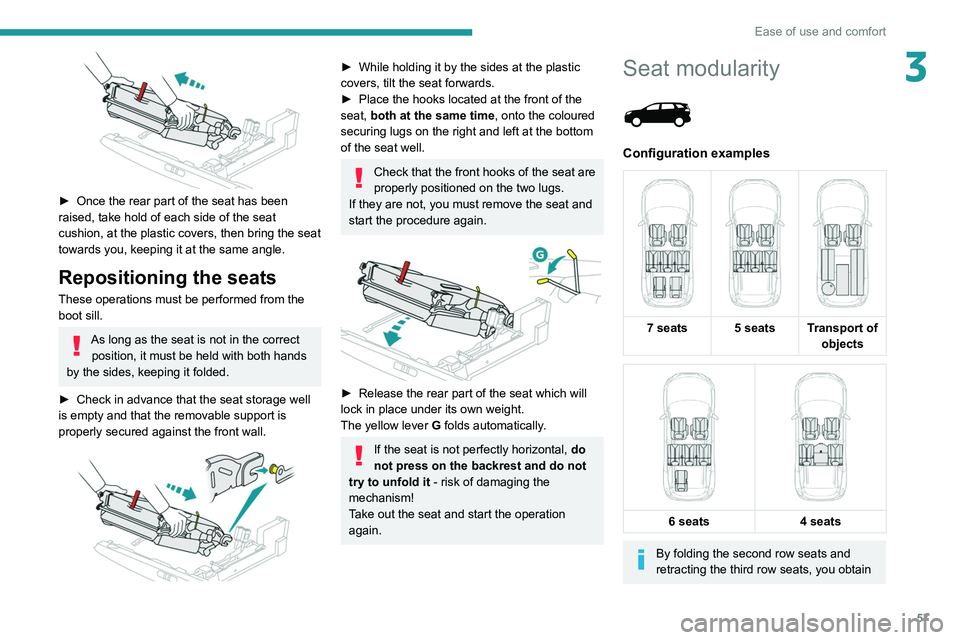
► Once the rear part of the seat has been
raised, take hold of each side of the seat
cushion, at the plastic covers, then bring the seat
towards you, keeping it at the same angle.
Repositioning the seats
These operations must be performed from the
boot sill.
As long as the seat is not in the correct position, it must be held with both hands
by the sides, keeping it folded.
► Check in advance that the seat storage well
is empty and that the removable support is
properly secured against the front wall.
Page 59 of 308
57
Ease of use and comfort
3
► Once the rear part of the seat has been
raised, take hold of each side of the seat
cushion, at the plastic covers, then bring the seat
towards you, keeping it at the same angle.
Repositioning the seats
These operations must be performed from the
boot sill.
As long as the seat is not in the correct position, it must be held with both hands
by the sides, keeping it folded.
►
Check in advance that the seat storage well
is empty and that the removable support is
properly secured against the front wall.
► While holding it by the sides at the plastic
covers, tilt the seat forwards.
►
Place the hooks located at the front of the
seat,
both at the same time, onto the coloured
securing lugs on the right and left at the bottom
of the seat well.
Check that the front hooks of the seat are
properly positioned on the two lugs.
If they are not, you must remove the seat and
start the procedure again.
► Release the rear part of the seat which will
lock in place under its own weight.
The yellow lever G
folds automatically.
If the seat is not perfectly horizontal, do
not press on the backrest and do not
try to unfold it - risk of damaging the
mechanism!
Take out the seat and start the operation
again.
Seat modularity
Configuration examples
7 seats 5 seats Transport of
objects
6 seats
4 seats
By folding the second row seats and
retracting the third row seats, you obtain
Page 60 of 308

58
Ease of use and comfort
a continuous storage floor through to the back
of the front seats.
By placing the front passenger seat in the
table position, you obtain a continuous
storage floor through to the dashboard.
Operations on the seats must only be
done when the vehicle is stationary.
Heating and Ventilation
Air intake
The air circulating in the passenger compartment
is filtered and originates either from the
exterior, via the grille located at the base of the
windscreen, or from the inside in air recirculation
mode.
Controls
Depending on version, the controls are
accessible in the "Air conditioning" touch
screen menu or are grouped together in the
control panel on the centre console.
Air distribution
1. Windscreen demisting/defrosting vents
2. Front side window demisting/defrosting vents
3. Adjustable and closable side air vents
4. Adjustable and closable central air vents
5. Air outlets to the front footwells
6. Air outlets to the rear footwells
7. Adjustable and closable air vents, with blower
(depending on version)
Advice
Using the ventilation and air
conditioning system
►
T
o ensure that air is distributed evenly,
keep the external air intake grilles at the base
of the windscreen, the nozzles, the vents, the
air outlets and the air extractor in the boot
free from obstructions.
►
Do not cover the sunshine sensor located
on the dashboard; this sensor is used to
regulate the automatic air conditioning
system.
►
Operate the air conditioning system for at
least 5 to 10 minutes once or twice a month to
keep it in perfect working order
.
►
If the system does not produce cold air
,
switch it off and contact a PEUGEOT dealer
or a qualified workshop.
When towing the maximum load on a steep
gradient in high temperatures, switching off
the air conditioning increases the available
engine power, enhancing the towing capacity.
Avoid driving for too long with the ventilation off or with prolonged operation
of interior air recirculation. Risk of misting and
deterioration of the air quality!
If the interior temperature is very high
after the vehicle has stood for a long
time in the sunshine, air the passenger
compartment for a few moments.
Put the air flow control at a setting high
enough to quickly change the air in the
passenger compartment.
Condensation created by the air
conditioning results in a discharge of
water underneath the vehicle. This is perfectly
normal.
Servicing the ventilation and air
conditioning system
► Ensure that the passenger compartment
filter is in good condition and have the filter
elements replaced regularly.
We recommend using a composite passenger
compartment filter. Thanks to its special active
additive, this type of filter helps to purify the
air breathed by the occupants and keep the
passenger compartment clean (by reducing
allergic symptoms, unpleasant odours and
greasy deposits).
► To ensure correct operation of the
air conditioning system, have it checked
according to the recommendations in the
Maintenance and Warranty Guide.
Stop & Start
The heating and air conditioning systems
only operate when the engine is running.
Temporarily deactivate the Stop & Start
system to maintain a comfortable temperature
in the passenger compartment.
For more information on the Stop & Start,
refer to the corresponding section.
Manual air conditioning
The air conditioning system only operates with
the engine running.
Page 73 of 308
71
Ease of use and comfort
3The connection of an electrical device not approved by PEUGEOT, such as a
USB charger, may adversely affect the
operation of vehicle electrical systems,
causing faults such as poor radio reception or
interference with displays in the screens.
Rear armrest
The armrest incorporates two cup holders.
Ski flap
Mechanism for storing and transporting long
objects.
Opening
► Lower the rear armrest.
► Pull the flap handle downwards.
► Lower the flap.
► Load the objects from inside the boot.
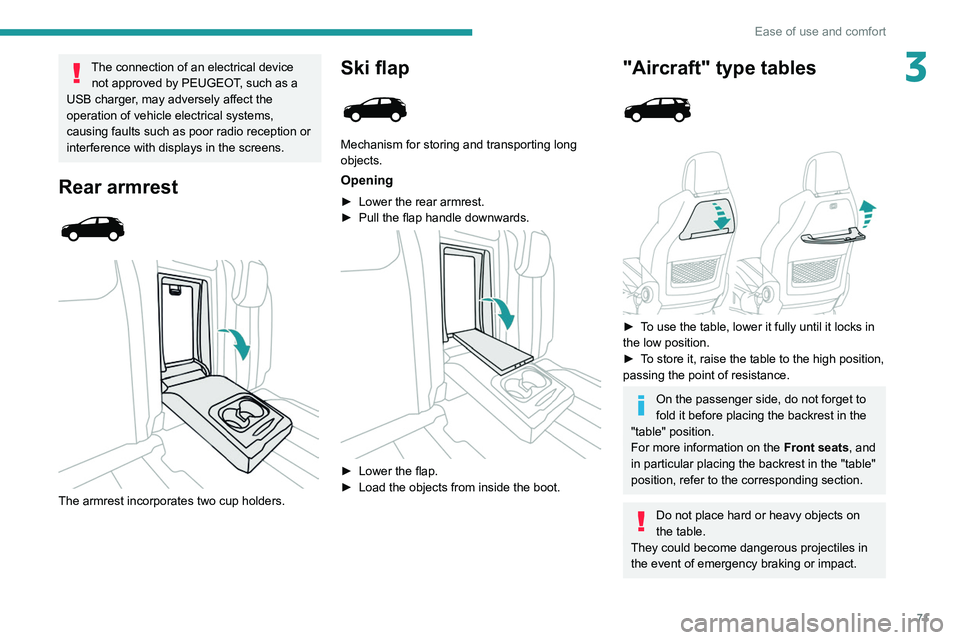
"Aircraft" type tables
► To use the table, lower it fully until it locks in
the low position.
►
T
o store it, raise the table to the high position,
passing the point of resistance.
On the passenger side, do not forget to
fold it before placing the backrest in the
"table" position.
For more information on the Front seats, and
in particular placing the backrest in the "table"
position, refer to the corresponding section.
Do not place hard or heavy objects on
the table.
They could become dangerous projectiles in
the event of emergency braking or impact.
Page 74 of 308
72
Ease of use and comfort
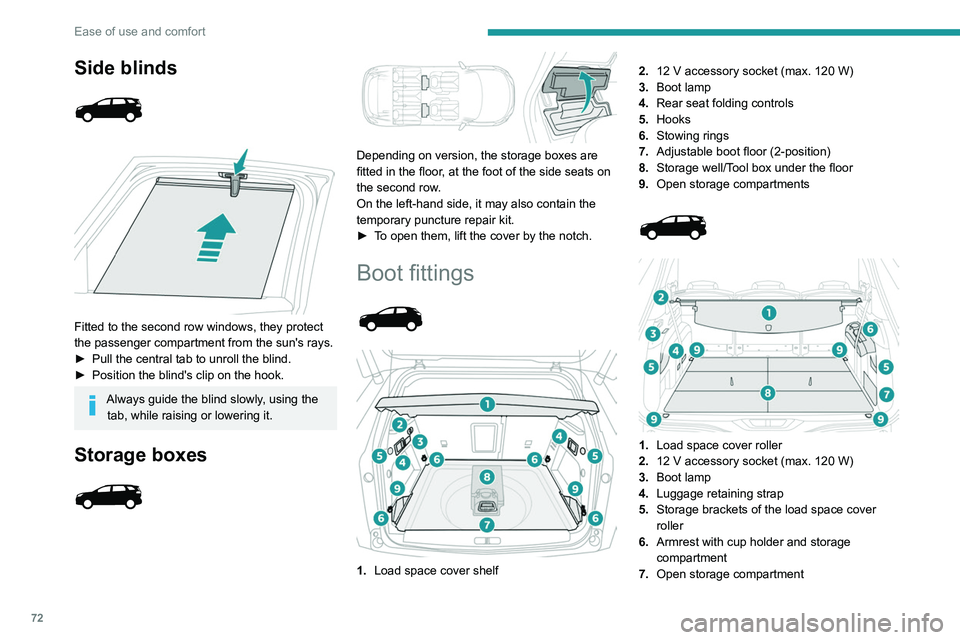
Side blinds
Fitted to the second row windows, they protect
the passenger compartment from the sun's rays.
►
Pull the central tab to unroll the blind.
►
Position the blind's clip on the hook.
Always guide the blind slowly, using the tab, while raising or lowering it.
Storage boxes
Depending on version, the storage boxes are
fitted in the floor, at the foot of the side seats on
the second row.
On the left-hand side, it may also contain the
temporary puncture repair kit.
►
T
o open them, lift the cover by the notch.
Boot fittings
1. Load space cover shelf 2.
12 V accessory socket (max. 120 W)
3. Boot lamp
4. Rear seat folding controls
5. Hooks
6. Stowing rings
7. Adjustable boot floor (2-position)
8. Storage well/Tool box under the floor
9. Open storage compartments
1. Load space cover roller
2. 12 V accessory socket (max. 120 W)
3. Boot lamp
4. Luggage retaining strap
5. Storage brackets of the load space cover
roller
6. Armrest with cup holder and storage
compartment
7. Open storage compartment
8.Concertina panels
9. Stowing rings
The stowing rings are designed to secure
luggage using different types of retaining
nets.
These retaining nets are available as an
option or as an accessory.
For more information, contact a PEUGEOT
dealer.
For information on installing the High load
retaining net , refer to the corresponding
section.
Load space cover shelf
It consists of two sections:
– a fixed section with an open storage space.
Page 75 of 308
73
Ease of use and comfort
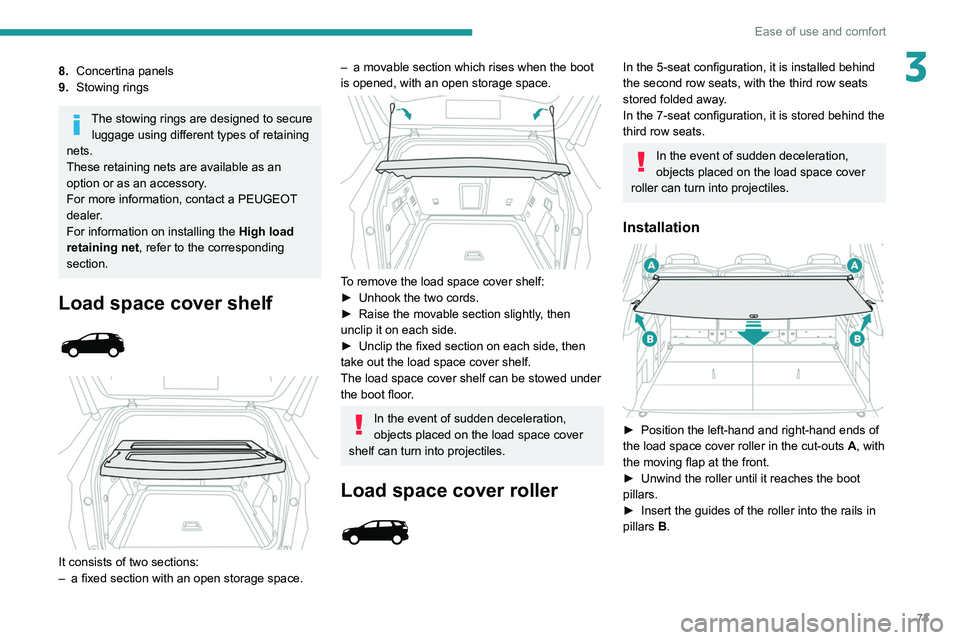
38.Concertina panels
9. Stowing rings
The stowing rings are designed to secure
luggage using different types of retaining
nets.
These retaining nets are available as an
option or as an accessory.
For more information, contact a PEUGEOT
dealer.
For information on installing the
High load
retaining net , refer to the corresponding
section.
Load space cover shelf
It consists of two sections:
– a fixed section with an open storage space.
– a movable section which rises when the boot
is opened, with an open storage space.
To remove the load space cover shelf:
► Unhook the two cords.
►
Raise the movable section slightly
, then
unclip it on each side.
►
Unclip the fixed section on each side, then
take out the load space cover shelf.
The load space cover shelf can be stowed under
the boot floor
.
In the event of sudden deceleration,
objects placed on the load space cover
shelf can turn into projectiles.
Load space cover roller
In the 5-seat configuration, it is installed behind
the second row seats, with the third row seats
stored folded away.
In the 7-seat configuration, it is stored behind the
third row seats.
In the event of sudden deceleration,
objects placed on the load space cover
roller can turn into projectiles.
Installation
► Position the left-hand and right-hand ends of
the load space cover roller in the cut-outs A , with
the moving flap at the front.
►
Unwind the roller until it reaches the boot
pillars.
►
Insert the guides of the roller into the rails in
pillars B
.
Page 76 of 308
74
Ease of use and comfort
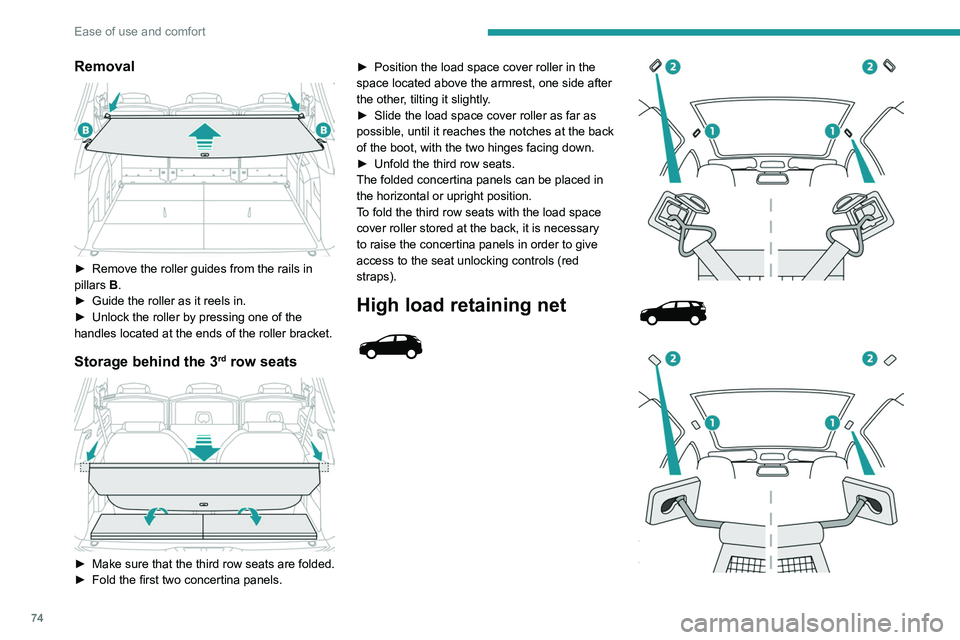
Removal
► Remove the roller guides from the rails in
pillars B
.
►
Guide the roller as it reels in.
►
Unlock the roller by pressing one of the
handles located at the ends of the roller bracket.
Storage behind the 3rd row seats
► Make sure that the third row seats are folded.
► Fold the first two concertina panels. ►
Position the load space cover roller in the
space located above the armrest, one side after
the other
, tilting it slightly.
►
Slide the load space cover roller as far as
possible, until it reaches the notches at the back
of the boot, with the two hinges facing down.
►
Unfold the third row seats.
The folded concertina panels can be placed in
the horizontal or upright position.
T
o fold the third row seats with the load space
cover roller stored at the back, it is necessary
to raise the concertina panels in order to give
access to the seat unlocking controls (red
straps).
High load retaining net
This removable net allows the entire loading
volume up to the roof to be used:
– behind the front seats (1
st row) when the rear
seats are folded down.
– behind the rear seats (2
nd row) when the load
space cover is removed.
It protects the occupants in case of
sudden braking.
Behind the front seats
(Depending on version)
► Fold down the rear seats.
► Remove the trim covers on each side,
located in the upper section in the roof.
► Position the net's upper hooks in the roof.