2020 PEUGEOT 3008 parking brake
[x] Cancel search: parking brakePage 127 of 308

125
Driving
6N: neutral.
D1 to D8: automatic forward gear.
B1 to B8: automatic forward gear with
regenerative braking function activated.
In all-electric driving, the gear engaged is not
indicated.
The state of the gearbox remains displayed in
the instrument panel for a few seconds after
switching off the ignition.
Regenerative braking
The regenerative braking function emulates
engine braking, slowing the vehicle with no need
to depress the brake pedal. When the driver
releases the accelerator pedal, the vehicle slows
down more quickly and recharges the battery.
►
From mode
D/B, moving the push selector
backwards activates/deactivates the function.
The D on the instrument panel is replaced with
a B.
The state of the function is not saved when the
ignition is switched off.
The driver must always be ready to use the brake pedal: in certain situations (e.g.
full battery, extreme temperatures), the
regenerative braking level may be temporarily
limited and deceleration may be reduced.
Hill start assist
This system keeps your vehicle briefly stationary
(for approximately 2 seconds) when making a hill
start, while you transfer your foot from the brake
pedal to the accelerator pedal.
This system is only active when:
–
The vehicle is completely stationary
, with your
foot on the brake pedal.
–
Certain slope conditions are met.
–
The driver
’s door is closed.
Do not leave the vehicle while it is being
held temporarily by hill start assist.
If someone needs to get out of the vehicle
with the engine running, apply the parking
brake manually. After that, ensure that the
parking brake indicator lamp and the indicator
lamp
P in the electric parking brake control
lever are on fixed.
The hill start assist function cannot be deactivated. However, use of the parking
brake to immobilise the vehicle interrupts its
operation.
Operation
On an ascending slope, with the vehicle
stationary, the vehicle is held for a short time
when you release the brake pedal:
–
provided you are in first gear or neutral with a
manual gearbox.
–
provided you are in mode D
or M with an
automatic gearbox.
On a descending slope, with the vehicle
stationary and reverse gear engaged, the
vehicle is held for a short time when you
release the brake pedal.
Malfunction
These warning lamps come on in the event of a malfunction.
Contact a PEUGEOT dealer or a qualified
workshop to have the system checked.
Dynamic pack
This pack governs the following elements:
– Acoustic ambience of the engine.
–
Power steering.
Page 130 of 308
128
Driving
Restarting the engine (START mode)
The engine automatically restarts as soon as the
driver indicates the intention of moving off again.
– With a manual gearbox: with the clutch pedal
fully depressed.
– With an automatic gearbox:
• With the selector in position D or M: with the
brake pedal released.
• With the selector in position N and the brake
pedal released: with the selector at D or M.
• With the selector in position P and the brake
pedal depressed: with the selector at R, N,
D or M.
Special cases
The engine will restart automatically if all
conditions for operation are met again and in the
following cases.
– Vehicle speed exceeds 16 mph (25 km/h) on
2.0 BlueHDi versions with automatic gearbox in
mode D, or 2 mph (3 km/h) on other versions.
– The electric parking brake is being applied.
In these cases, this indicator lamp flashes
for a few seconds, then goes off.
Malfunctions
In the event of a malfunction, this warning
lamp flashes for a few moments, then
remains on, accompanied by an onscreen
message.
Have the vehicle checked by a PEUGEOT
dealer or a qualified workshop.
When the function is deactivated, the orange=
indicator lamp is lit; if the engine was in standby,=
it restarts immediately.
With the touch screen button
It is set via the Driving / Vehicle touch
screen menu.
A message in the instrument panel confirms the
change of status.
When the function is deactivated, if the engine
was in standby, it restarts immediately.
Associated indicator lamps
Function activated.
Function deactivated or malfunction.
Opening the bonnet
Before doing anything under the bonnet,
deactivate the Stop & Start system to avoid
any risk of injury caused by the engine
restarting automatically.
Driving on flooded roads
Before entering into a flooded area, it is
strongly recommended that you deactivate
the Stop & Start system.
For more information on Driving
recommendations, particularly on flooded
roads, refer to the corresponding section.
Operation
Main conditions for operation
– The driver ’s door must be closed.
–
The driver's seat belt must be fastened.
–
The state of charge of the battery must be
sufficient.
–
The temperature of the engine must be within
its nominal operating range.
–
The outside temperature must be between
0°C and 35
°C.
Putting the engine into standby
(STOP mode)
The engine automatically enters standby mode
as soon as the driver indicates their intention to
stop.
–
W
ith a manual gearbox, at speeds below 2
mph (3 km/h) on 1.5 BlueHDi versions, or with
the vehicle stationary on 1.2 PureTech versions,
when you place the gear lever in neutral and
release the clutch pedal.
–
W
ith an automatic gearbox, at speeds below
12 mph (20 km/h) on BlueHDi versions, or with
the vehicle stationary on other versions, when
you depress the brake pedal or place the gear
selector in mode N.
Time counter
A time counter adds up the time spent in standby
during the journey. It is reset to zero every time
the ignition is switched on using the key or the
START/STOP button.
Special cases:
The engine will not go into standby if all of the
conditions for operation are not met and in the
following cases.
–
Steep slope (ascending or descending).
–
V
ehicle has not exceeded 6 mph (10 km/h)
since the last engine start (with the key or the
“START/STOP” button).
–
The electric parking brake is applied or being
applied.
–
Needed
to maintain a comfortable temperature
in the passenger compartment.
–
Demisting active.
In these cases, this indicator lamp flashes
for a few seconds, then goes off.
After the engine has restarted, STOP mode is not available until the vehicle
has reached a speed of 5 mph (8
km/h).
During parking manoeuvres, STOP mode
is not available for a few seconds after
coming out of reverse gear or turning the
steering wheel.
Page 131 of 308
129
Driving
6Restarting the engine (START mode)
The engine automatically restarts as soon as the
driver indicates the intention of moving off again.
–
W
ith a manual gearbox: with the clutch pedal
fully depressed.
–
W
ith an automatic gearbox:
•
With the selector in position D
or M: with the
brake pedal released.
•
With the selector in position N
and the brake
pedal released: with the selector at D or M.
•
With the selector in position P
and the brake
pedal depressed: with the selector at R, N,
D or M.
Special cases
The engine will restart automatically if all
conditions for operation are met again and in the
following cases.
–
V
ehicle speed exceeds 16 mph (25 km/h) on
2.0 BlueHDi versions with automatic gearbox in
mode D, or 2 mph (3 km/h) on other versions.
–
The electric parking brake is being applied.
In these cases, this indicator lamp flashes
for a few seconds, then goes off.
Malfunctions
In the event of a malfunction, this warning
lamp flashes for a few moments, then
remains on, accompanied by an onscreen
message.
Have the vehicle checked by a PEUGEOT
dealer or a qualified workshop.
The vehicle stalls in STOP mode
All of the instrument panel warning lamps come
on if there is a fault.
►
Switch off the ignition then start the engine
again with the key or the " ST
ART/STOP" button.
The Stop & Start system requires a 12 V
battery of specific technology and
specification.
All work concerning the battery must be
carried out only by a PEUGEOT
dealer or a
qualified workshop.
Under-inflation detection
This system automatically checks the pressures of the tyres while driving.
It compares the information given by the wheel
speed sensors with reference values, which
must be reinitialised every time the tyre
pressures are adjusted or a wheel changed.
The system triggers an alert as soon as it
detects a drop in the inflation pressure of one or
more tyres.
Under-inflation detection does not
replace the need for vigilance on the part
of the driver.
This system does not avoid the need to
regularly check the tyre pressures (including
the spare wheel), especially before a long
journey.
Driving with under-inflated tyres, particularly
in adverse conditions (heavy load, high
speed, long journey):
–
worsens road-holding.
–
lengthens braking distances.
–
causes premature wear of the tyres.
–
increases energy consumption.
The inflation pressures defined for the vehicle can be found on the tyre pressure
label.
For more information on the Identification
markings, refer to the corresponding section.
Checking tyre pressures
This check should be done when the
tyres are "cold" (vehicle stopped for 1 hour or
after a journey of less than 6 miles (10
km) at
moderate speeds).
Otherwise, add 0.3 bar to the pressures
shown on the label.
Snow chains
The system does not have to be
reinitialised after fitting or removing snow
chains.
Under-inflation alert
This is signalled by the fixed illumination of this warning lamp, accompanied by an
Page 142 of 308
140
Driving
To prevent sudden acceleration or deceleration of the vehicle, select a
speed setting relatively close to the vehicle's
current speed.
Changing the inter-vehicle distance
► Press 6 to display the distance setting
thresholds ("Distant", "Normal" or "Close"), then
press again to select a threshold.
After a few seconds, the option is accepted and
will be memorised when the ignition is switched
off.
Temporarily exceeding the speed setting
► Fully depress the accelerator pedal. Distance
monitoring and cruise control are deactivated
while acceleration is maintained. "Cruise control
suspended" is displayed.
Deactivating the system
► Turn the thumbwheel 1 upwards to the OFF
position.
Displays in the instrument
panel
The following information can be seen in the
instrument panel in "DRIVING" display mode.
4. Pausing / resumption of cruise control with
the speed setting previously stored
Confirmation of the restarting of the vehicle
after automatic stop (versions with Stop & Go
function)
5. Depending on version:
Display of speed thresholds recorded using
Memorising speeds
or
Use the speed suggested by the Speed Limit
Recognition and Recommendation ( MEM
display)
6. Display and adjustment of the distance
setting to the vehicle in front
Use
Activating the system (pause)
► With the engine running, turn the thumbwheel
1 downwards to the CRUISE position. Cruise
control is ready to operate (grey display).
Switching on cruise control and setting
the speed
With a manual gearbox, your speed must be
between 19 and 112 mph (30 and 180 km/h).
With an automatic gearbox, mode
D
or M must
be selected and your speed must be between 19
and 112
mph (30 and 180 km/h).
With an Electric automatic gearbox (Hybrid),
your speed must be between 0 and 112 mph (0
and 180 km/h).
► Press button 2 or 3: the current speed
becomes the speed setting (minimum 19 mph
(30
km/h)) and cruise control is immediately
activated (green display).
►
Press
3 to increase or 2 to decrease the
speed setting (steps of 5
mph (km/h) if held
pressed).
Pressing and holding button 2 or
3 results in a rapid change in the speed
of the vehicle.
Pausing / resumption of cruise control
► Press 4 or depress the brake pedal. To
pause cruise control, it is also possible to: •
shift from mode
D to N;
•
depress the clutch pedal for more than 10
seconds;
•
press the electric parking brake control.
►
Press
4 to restart cruise control. Cruise
control may have been paused automatically: •
when
the speed of the vehicle goes below 19
mph (30
km/h) with a manual gearbox.
•
when the speed of the engine goes below
1
100 rpm with a manual gearbox.
•
by triggering of the ESC system.
With a manual gearbox, the driver should
depress the accelerator pedal to move off, then,
when above 19 mph (30
km/h), reactivate the
system by pressing one of the buttons 2, 3 or 4.
With an automatic gearbox, following braking
that has brought the vehicle to a complete stop,
the system holds the vehicle stationary; cruise
control is paused. The driver should depress the
accelerator pedal to move off, then, when above
19 mph (30
km/h), reactivate the system by
pressing one of the buttons 2, 3 or 4.
With an Electric automatic gearbox (Hybrid),
following braking that has brought the vehicle to
a complete stop, if the traffic conditions do not
allow the vehicle to begin moving again within
3 seconds of stopping, press button 4 or the
accelerator pedal to move off.
If the driver takes no action after the vehicle
has been stopped, the electric parking brake is
applied automatically after about 5 minutes.
Cruise control remains active after
changing gear, regardless of the gearbox
type.
When the driver attempts to reactivate
cruise control, after the function has been
paused, the message "Activation not possible,
unsuitable conditions" is briefly displayed if
reactivation is not possible (safety conditions
not met).
Changing the programmed speed setting
with the Speed Limit Recognition and
Recommendation function
► Press 5 to accept the speed suggested by
the function on the instrument panel, then press
again to confirm.
Page 163 of 308
161
Driving
6180° view
The 180° view assists with exiting from a parking
space in forward gear, making it possible to
see the approach of vehicles, pedestrians and
cyclists.
This view is not recommended for carrying out a
complete manoeuvre.
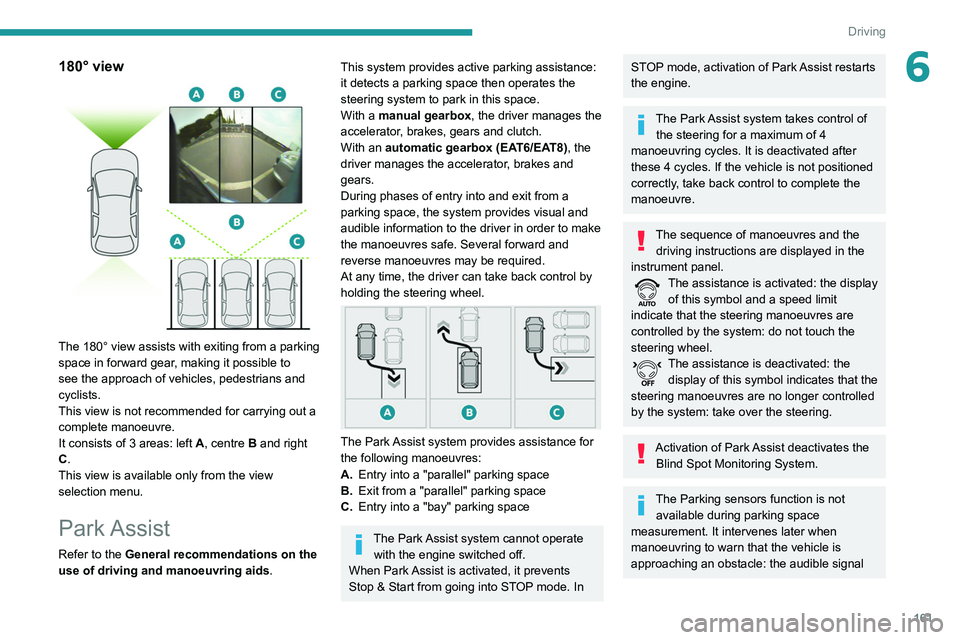
It consists of 3 areas: left A, centre B and right
C.
This view is available only from the view
selection menu.
Park Assist
Refer to the General recommendations on the
use of driving and manoeuvring aids .
This system provides active parking assistance:
it detects a parking space then operates the
steering system to park in this space.
With a
manual gearbox, the driver manages the
accelerator, brakes, gears and clutch.
With an automatic gearbox (EAT6/EAT8), the
driver manages the accelerator, brakes and
gears.
During phases of entry into and exit from a
parking space, the system provides visual and
audible information to the driver in order to make
the manoeuvres safe. Several forward and
reverse manoeuvres may be required.
At any time, the driver can take back control by
holding the steering wheel.
The Park Assist system provides assistance for
the following manoeuvres:
A. Entry into a "parallel" parking space
B. Exit from a "parallel" parking space
C. Entry into a "bay" parking space
The Park Assist system cannot operate
with the engine switched off.
When Park Assist is activated, it prevents
Stop & Start from going into STOP mode. In
STOP mode, activation of Park Assist restarts
the engine.
The Park Assist system takes control of the steering for a maximum of 4
manoeuvring cycles. It is deactivated after
these 4 cycles. If the vehicle is not positioned
correctly, take back control to complete the
manoeuvre.
The sequence of manoeuvres and the driving instructions are displayed in the
instrument panel.
The assistance is activated: the display of this symbol and a speed limit
indicate that the steering manoeuvres are
controlled by the system: do not touch the
steering wheel.
The assistance is deactivated: the display of this symbol indicates that the
steering manoeuvres are no longer controlled
by the system: take over the steering.
Activation of Park Assist deactivates the Blind Spot Monitoring System.
The Parking sensors function is not available during parking space
measurement. It intervenes later when
manoeuvring to warn that the vehicle is
approaching an obstacle: the audible signal
Page 179 of 308

177
Practical information
7Fitting directly to the roof
You must only attach the transverse bars to
the four fixing points located on the roof frame.
These points are concealed by the vehicle doors
when the doors are closed.
The roof bar fixings have a stud which must be
inserted into the opening of each fixing point.
Maximum load distributed over the
transverse roof bars, for a loading height
not exceeding 40 cm (except bicycle carrier):
80 kg.
As this value may change, please verify the
maximum load quoted in the guide supplied
with the roof bars.
If the height exceeds 40 cm, adapt the speed
of the vehicle to the profile of the road to
avoid damaging the roof bars and the fixings
on the vehicle.
Be sure to refer to national legislation in order
to comply with the regulations for transporting
objects that are longer than the vehicle.
Recommendations
Distribute the load uniformly, taking care
to avoid overloading one of the sides.
Arrange the heaviest part of the load as close
as possible to the roof.
Secure the load securely.
Drive gently: the vehicle will be more
susceptible to the effects of side winds and its
stability may be affected.
Regularly check the security and tight
fastening of the roof bars, at least before each
trip.
Remove the roof bars once they are no longer
needed.
Sunroof
Check that the load does not pass below
the roof bars so that it does not impede the
movements of the sunroof - risk of major
damage!
Snow chains
In wintry conditions, snow chains improve
traction as well as the behaviour of the vehicle
when braking.
The snow chains must be fitted only to the front wheels. They must never be
fitted to "space-saver" type spare wheels.
Take account of the legislation specific to each country on the use of snow chains
and the maximum authorised speed.
Use only chains designed to be fitted to the type
of wheel fitted to the vehicle:
Original tyre size Maximum link size 215/65 R17 9 mm
225/55 R18 9 mm
205/55 R19 9 mm
235/50 R19 Not suitable for
chains
For more information on snow chains, contact a
PEUGEOT dealer or a qualified workshop.
Installation tips
► To fit the chains during a journey, stop the
vehicle on a flat surface on the side of the road.
►
Apply the parking brake and position any
wheel chocks under the wheels to prevent
movement of the vehicle.
►
Fit the chains following the instructions
provided by the manufacturer
.
►
Move off gently and drive for a few moments,
without exceeding 31
mph (50 km/h).
Page 186 of 308
184
Practical information
AdBlue® (BlueHDi)
To respect the environment and ensure
compliance with the Euro 6 standard, without
adversely affecting the performance or fuel
consumption of its Diesel engines, PEUGEOT
has taken the decision to equip its vehicles
with a system that associates SCR (Selective
Catalytic Reduction) with a Diesel Particle Filter
(DPF) for the treatment of exhaust gases.
SCR system
Using a liquid called AdBlue® that contains urea,
a catalytic converter turns up to 85% of nitrogen
oxides (NOx) into nitrogen and water, which are
harmless to health and the environment.
The AdBlue® is contained in a special
tank holding about 17 litres.
Its capacity allows a driving range of
approximately 5,600 miles (9,000 km), highly
dependent on your driving style.
An alert system is triggered automatically once
the reserve level is reached: you can then drive
Manual gearbox
The gearbox does not require any maintenance (no oil change).
Automatic gearbox
The gearbox does not require any maintenance (no oil change).
Electric parking brake
This system does not require any routine servicing. However, in the event of a
problem, do not hesitate to have the system
checked by a PEUGEOT dealer or a qualified
workshop.
For more information on the Electric
parking brake, refer to the
corresponding section.
Brake pads
Brake wear depends on the style of
driving, particularly in the case of vehicles
used in town, over short distances. It may be
necessary to have the condition of the brakes
checked, even between vehicle services.
Unless there is a leak in the circuit, a drop in the
brake fluid level indicates that the brake pads
are worn.
After washing the vehicle, moisture, or in wintry conditions, ice can form on the
brake discs and pads: braking efficiency may
be reduced. Gently dab the brakes to dry and
defrost them.
Brake disc wear
For information on checking brake disc
wear, contact a PEUGEOT dealer or a
qualified workshop.
Wheels and tyres
The inflation pressure of all tyres, including the spare wheel, must be
checked on "cold” tyres.
The pressures indicated on the tyre pressure
label are valid for "cold" tyres. If you have driven
for more than 10 minutes or more than 6 miles
(10 kilometres) at over 31 mph (50
km/h), add
0.3 bar (30 kPa) to the values indicated on the
label.
Under-inflation increases fuel
consumption. Non-compliant tyre
pressure causes premature wear on tyres and
has an adverse effect on the vehicle's road
holding - risk of an accident!
Driving with worn or damaged tyres reduces the
braking and road holding performance of the
vehicle. It is recommended to regularly check the
condition of the tyres (tread and sidewalls) and
wheel rims as well as the presence of the valves.
When the wear indicators no longer appear set
back from the tread, the depth of the grooves is less than 1.6 mm; it is imperative to replace the
tyres.
Using different size wheels and tyres from those
specified can affect the lifetime of tyres, wheel
rotation, ground clearance, the speedometer
reading and have an adverse effect on road
holding.
Fitting different tyres on the front and rear axles
can cause the ESC to mistime.
Shock absorbers
It is not easy for drivers to detect when
shock absorbers are worn. Nevertheless,
the shock absorbers have a major impact on
road-holding and braking performance.
For your safety and driving comfort, it is
important to have them regularly checked by a
PEUGEOT dealer or a qualified workshop.
Timing and accessory kits
Timing and accessory kits are used from
the time the engine is started until it is
switched off. It is normal for them to wear over
time.
A
faulty timing or accessory kit can damage
the engine, rendering it unusable. Observe the
recommended replacement frequency, stated in
distance travelled or time elapsed, whichever is
reached first.
Page 188 of 308
186
Practical information
The system only registers AdBlue® top-ups of
5 litres or more.
If the AdBlue® tank is completely empty
– which is confirmed by the message
"Top up AdBlue: Starting impossible" – it is
essential to add at least 5 litres.
Free-wheeling
In certain situations, you must allow the vehicle
to free-wheel (while being towed, on a rolling
road, in an automatic car wash, or being
transported by rail or sea freight, etc.).
The procedure varies according to the type of
gearbox and parking brake.
With a manual gearbox and
electric parking brake
/
Release procedure
► With the engine running and while depressing
the brake pedal, move the gear selector to the
neutral position.
► While depressing the brake pedal, switch off
the ignition.
► Release the brake pedal, then switch on the
ignition again.
► While depressing the brake pedal, press the
control lever to release the parking brake.
Precautions for use
AdBlue® is a urea-based solution. This fluid is
non-flammable, colourless and odourless (when
kept in a cool place).
In the event of contact with the skin, wash the
affected area with soap and running water. In the
event of contact with the eyes, immediately rinse
the eyes with large amounts of water or with an
eye wash solution for at least 15 minutes. Seek
medical attention if you feel a persistent burning
sensation or irritation.
If swallowed, immediately wash out the mouth
with clean water and then drink plenty of water.
In certain conditions (high temperature, for
example), the risk of release of ammonia cannot
be excluded: do not inhale the fluid. Ammonia
vapours have an irritant effect on mucous
membranes (eyes, nose and throat).
Store AdBlue® out of the reach of
children, in its original container.
Procedure
Before starting the top-up procedure, ensure that
the vehicle is parked on a flat and level surface.
In wintry conditions, ensure that the temperature
of the vehicle is above -11
°C. Otherwise the
AdBlue
® may be frozen and so cannot be poured
into its tank. Park the vehicle in a warmer area
for a few hours to allow the top-up to be carried
out.
Never put the AdBlue® into the Diesel
fuel tank.
If any AdBlue® is splashed, or if there are
any spillages on the bodywork, rinse
immediately with cold water or wipe with a
damp cloth.
If the fluid has crystallised, clean it off using a
sponge and hot water.
Important: in the event of a top-up after
a breakdown because of a lack of
AdBlue, it is essential to wait around 5
minutes before switching on the ignition,
without opening the driver’s door,
unlocking the vehicle, introducing the key
into the ignition switch, or introducing the
key of the “Keyless Entry and Starting
”
system into the passenger compartment
.
Switch on the ignition, then wait for 10
seconds before starting the engine.
►
Switch off the ignition and remove the key
from the switch to switch off the engine.
or
►
With Keyless Entry and Starting, press the
"
START/STOP" button to switch off the engine.
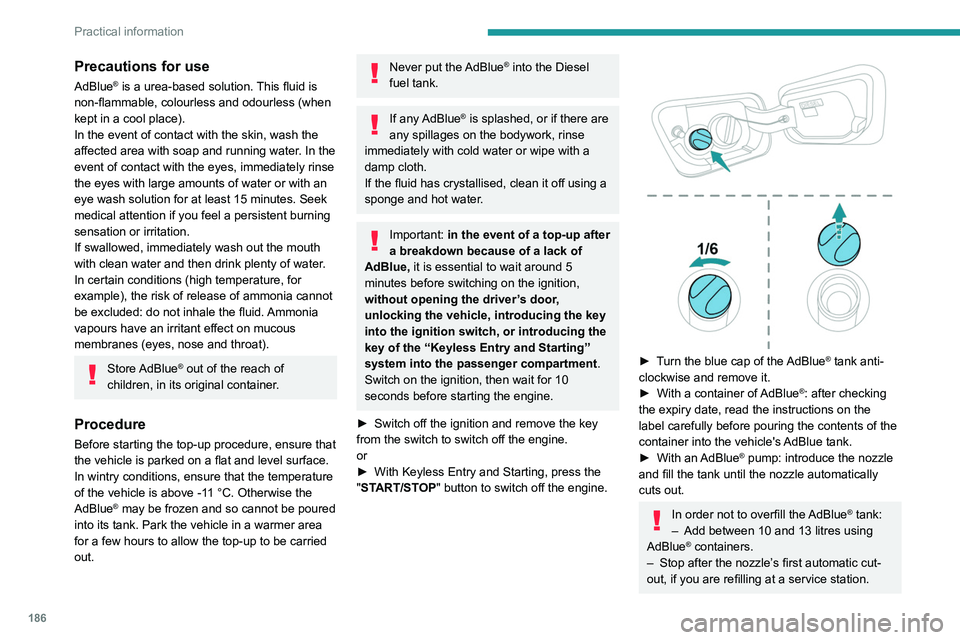
► Turn the blue cap of the AdBlue® tank anti-
clockwise and remove it.
►
With a container of
AdBlue
®: after checking
the expiry date, read the instructions on the
label carefully before pouring the contents of the
container
into the vehicle's AdBlue tank.
►
With an
AdBlue® pump: introduce the nozzle
and fill the tank until the nozzle automatically
cuts out.
In order not to overfill the AdBlue® tank:
–
Add between 10 and 13 litres using
AdBlue® containers.
–
Stop after the nozzle’ s first automatic cut-
out, if you are refilling at a service station.