2020 PEUGEOT 3008 instrument panel
[x] Cancel search: instrument panelPage 28 of 308
26
Instruments
Activation, deactivation and settings for certain
functions.
The functions are organised in 2 tabs : "Driving
functions" and "Vehicle settings".
Telephone
See "Audio equipment and telematics"
section..
Applications
For the other functions, refer to the "Audio
equipment and telematics" section.
Hybrid
Access to the hybrid system features
(energy flow, consumption statistics, deferred
charge, eSave function).
For more information on Charging the battery
(Hybrid), refer to the corresponding section.
Volume adjustment/mute.
See "Audio equipment and telematics"
section.
Hybrid menu
Energy flow
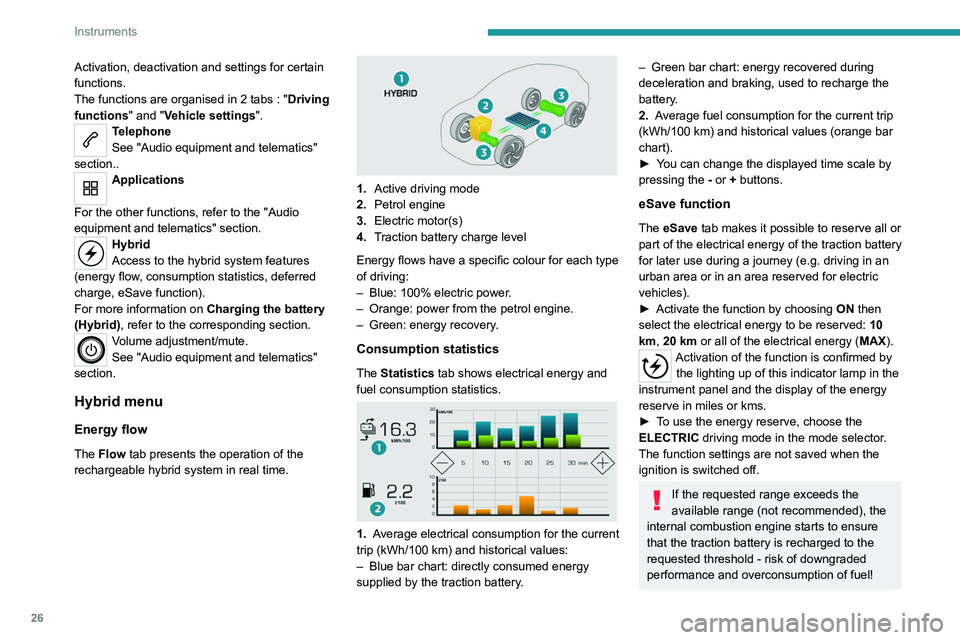
The Flow tab presents the operation of the
rechargeable hybrid system in real time.
1. Active driving mode
2. Petrol engine
3. Electric motor(s)
4. Traction battery charge level
Energy flows have a specific colour for each type
of driving:
–
Blue: 100% electric power
.
–
Orange: power from the petrol engine.
–
Green: energy recovery
.
Consumption statistics
The Statistics tab shows electrical energy and
fuel consumption statistics.
1. Average electrical consumption for the current
trip (kWh/100 km) and historical values:
–
Blue bar chart: directly consumed energy
supplied by the traction battery
.
– Green bar chart: energy recovered during
deceleration and braking, used to recharge the
battery
.
2. Average fuel consumption for the current trip
(kWh/100
km) and historical values (orange bar
chart).
►
Y
ou can change the displayed time scale by
pressing the
-
or + buttons.
eSave function
The eSave tab makes it possible to reserve all or
part of the electrical energy of the traction battery
for later use during a journey (e.g. driving in an
urban area or in an area reserved for electric
vehicles).
►
Activate the function by choosing ON
then
select the electrical energy to be reserved: 10
km, 20 km or all of the electrical energy ( MAX).
Activation of the function is confirmed by
the lighting up of this indicator lamp in the
instrument panel and the display of the energy
reserve in miles or kms.
►
T
o use the energy reserve, choose the
ELECTRIC driving mode in the mode selector.
The function settings are not saved when the
ignition is switched off.
If the requested range exceeds the
available range (not recommended), the
internal combustion engine starts to ensure
that the traction battery is recharged to the
requested threshold - risk of downgraded
performance and overconsumption of fuel!
Page 29 of 308
27
Instruments
1Upper bar
Certain information is displayed permanently in
the upper bar of the touch screen:
–
T
ime and exterior temperature (a blue warning
lamp appears when there is a risk of ice).
–
Reminder of the air conditioning information,
and direct access to the corresponding menu.
–
Reminder of information from the
RadioMedia
and Telephone menus and
navigation instructions (depending on
equipment).
–
Notifications.
–
Access to the
Settings for the touch screen
and the digital instrument panel (date/time,
languages, units, etc.).
Remote features (Hybrid)
These features are accessible
using a smartphone, via the
MyPeugeot
application:
–
Battery charge
management.
–
T
emperature pre-conditioning management.
–
Consumption, charge status and driving range
statistics.
Installation procedure
► Download the MyPeugeot app from the
appropriate online store for your smartphone.
► Create an account.
► Enter the vehicle’ s VIN (code beginning with
"VF" on the vehicle registration document).
For more information on Identification
markings, refer to the corresponding section.
Network coverage
In order to be able to use the various
remotely operable features, ensure that your
vehicle is located in an area covered by the
mobile network.
A lack of network coverage may prevent
communication with the vehicle (for example,
if it is in an underground car park). In such
cases, the application will display a message
indicating that the connection with the vehicle
could not be established.
Page 35 of 308
33
Access
2► Insert the key in the door lock.
► T urn the key towards the front/rear to unlock/
lock the vehicle.
►
T
urn the key rearwards again within
5
seconds to deadlock the vehicle.
If the vehicle is fitted with an alarm, it will
not be activated when locking with the
key.
If the alarm is activated, the siren sounds
when the door is opened; switch on the
ignition to stop it.
Central locking not
functioning
Use these procedures in the following cases:
– Central locking malfunction.
–
Battery disconnected or discharged.
In the event of a malfunction of the
central locking system, the battery must
be disconnected to ensure that the vehicle is
locked fully.
Driver's door
► Turn the key towards the rear of the vehicle
to lock it, or towards the front to unlock it.
Passenger doors
Unlocking
► Pull the interior door opening control.
Locking
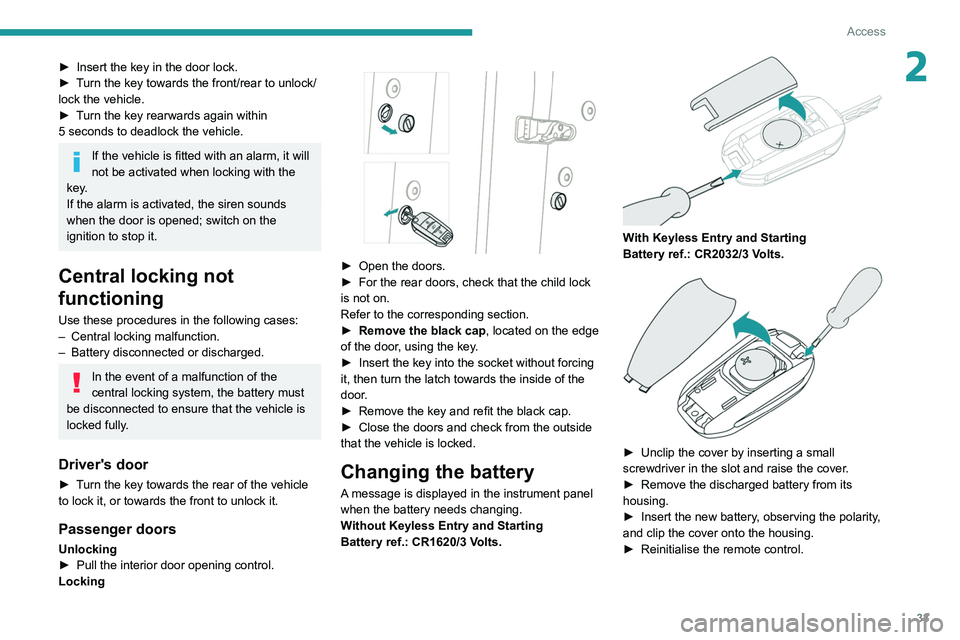
► Open the doors.
► For the rear doors, check that the child lock
is not on.
Refer to the corresponding section.
►
Remove the black cap
, located on the edge
of the door, using the key.
►
Insert the key into the socket without forcing
it, then turn the latch towards the inside of the
door
.
►
Remove the key and refit the black cap.
►
Close the doors and check from the outside
that the vehicle is locked.
Changing the battery
A message is displayed in the instrument panel
when the battery needs changing.
Without Keyless Entry and Starting
Battery ref.: CR1620/3 Volts.
With Keyless Entry and Starting
Battery ref.: CR2032/3 Volts.
► Unclip the cover by inserting a small
screwdriver in the slot and raise the cover .
►
Remove the discharged battery from its
housing.
►
Insert the new battery
, observing the polarity,
and clip the cover onto the housing.
►
Reinitialise the remote control.
Page 46 of 308
44
Ease of use and comfort
Driving position
Correct seating position
Adopting a good driving position helps improve
your comfort and protection.
It also optimises interior and exterior visibility as
well as access to controls.
Whether or not the vehicle has certain seat
adjustments described in this section depends
on the trim level and country of sale.
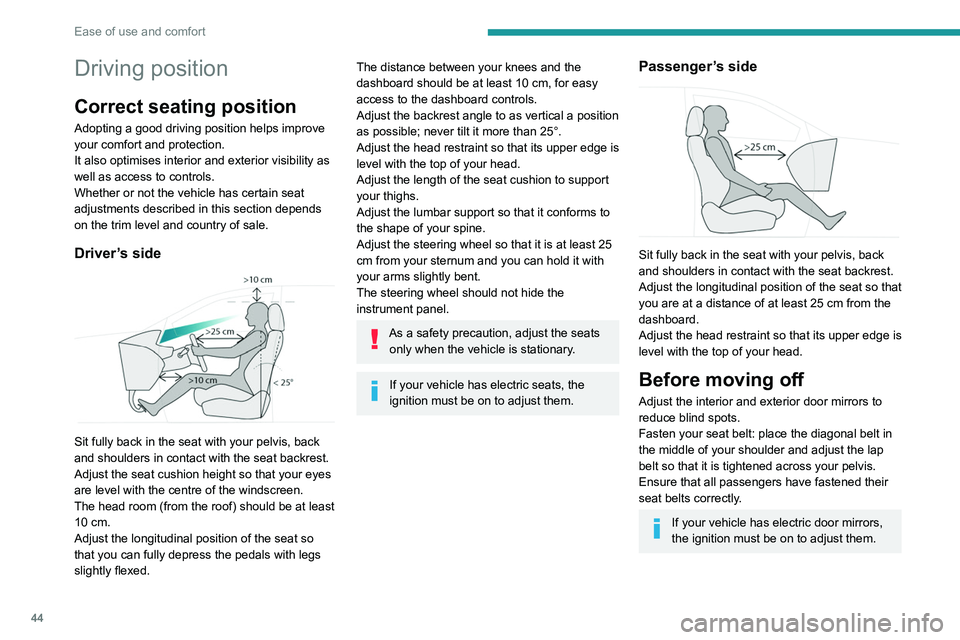
Driver’s side
Sit fully back in the seat with your pelvis, back
and shoulders in contact with the seat backrest.
Adjust the seat cushion height so that your eyes
are level with the centre of the windscreen.
The head room (from the roof) should be at least
10 cm.
Adjust the longitudinal position of the seat so
that you can fully depress the pedals with legs
slightly flexed.
The distance between your knees and the
dashboard should be at least 10 cm, for easy
access to the dashboard controls.
Adjust the backrest angle to as vertical a position
as possible; never tilt it more than 25°.
Adjust the head restraint so that its upper edge is
level with the top of your head.
Adjust the length of the seat cushion to support
your thighs.
Adjust the lumbar support so that it conforms to
the shape of your spine.
Adjust the steering wheel so that it is at least 25
cm from your sternum and you can hold it with
your arms slightly bent.
The steering wheel should not hide the
instrument panel.
As a safety precaution, adjust the seats only when the vehicle is stationary.
If your vehicle has electric seats, the
ignition must be on to adjust them.
Passenger’s side
Sit fully back in the seat with your pelvis, back
and shoulders in contact with the seat backrest.
Adjust the longitudinal position of the seat so that
you are at a distance of at least 25 cm from the
dashboard.
Adjust the head restraint so that its upper edge is
level with the top of your head.
Before moving off
Adjust the interior and exterior door mirrors to
reduce blind spots.
Fasten your seat belt: place the diagonal belt in
the middle of your shoulder and adjust the lap
belt so that it is tightened across your pelvis.
Ensure that all passengers have fastened their
seat belts correctly.
If your vehicle has electric door mirrors,
the ignition must be on to adjust them.
When driving
Maintain a good driving position and hold the
steering wheel with both hands at the 'quarter to
three' position, so that you can easily and quickly
reach the controls behind and near the steering
wheel.
Never adjust the seats or steering wheel
when driving.
Always keep your feet on the floor.
Front seats
Before moving the seat backwards,
ensure that there is no person or object
that might prevent the full travel of the seat.
There is a risk of trapping or pinching
passengers if present in the rear seats or of
jamming the seat if large objects are placed
on the floor behind the seat.
Page 80 of 308
78
Lighting and visibility
Exterior lighting control
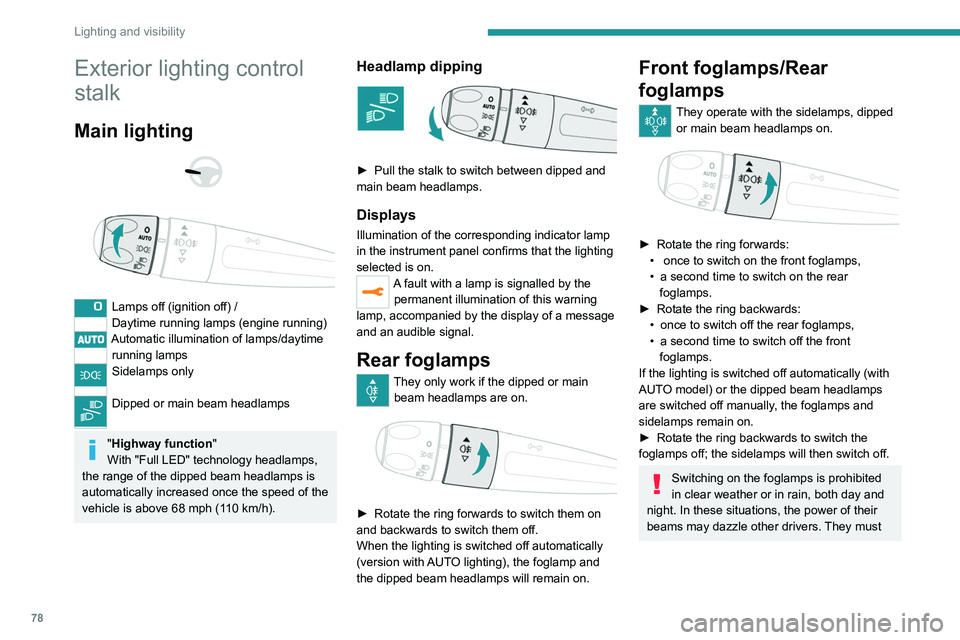
stalk
Main lighting
Lamps off (ignition off) /
Daytime running lamps (engine running)
Automatic illumination of lamps/daytime running lamps
Sidelamps only
Dipped or main beam headlamps
"Highway function "
With "Full LED" technology headlamps,
the range of the dipped beam headlamps is
automatically increased once the speed of the
vehicle is above 68 mph (110
km/h).
Headlamp dipping
► Pull the stalk to switch between dipped and
main beam headlamps.
Displays
Illumination of the corresponding indicator lamp
in the instrument panel confirms that the lighting
selected is on.
A fault with a lamp is signalled by the permanent illumination of this warning
lamp, accompanied by the display of a message
and an audible signal.
Rear foglamps
They only work if the dipped or main beam headlamps are on.
► Rotate the ring forwards to switch them on
and backwards to switch them off.
When the lighting is switched off automatically
(version with
AUTO lighting), the foglamp and
the dipped beam headlamps will remain on.
Front foglamps/Rear
foglamps
They operate with the sidelamps, dipped or main beam headlamps on.
► Rotate the ring forwards:
• once to switch on the front foglamps,
•
a second time to switch on the rear
foglamps.
►
Rotate
the ring backwards:
•
once to switch off the rear foglamps,
•
a second time to switch off the front
foglamps.
If the lighting is switched off automatically (with
AUT
O model) or the dipped beam headlamps
are switched off manually, the foglamps and
sidelamps remain on.
►
Rotate the ring backwards to switch the
foglamps off; the sidelamps will then switch off.
Switching on the foglamps is prohibited
in clear weather or in rain, both day and
night. In these situations, the power of their
beams may dazzle other drivers. They must
only be used in fog or falling snow (rules may
vary depending on country).
Do not forget to switch off the foglamps when
they are no longer necessary.
Switching off of the lamps when the
ignition is switched off
When the ignition is switched off, all of the
lamps turn off immediately, except for dipped
beam headlamps if automatic guide-me-home
lighting is activated.
Switching on the lamps after
switching off the ignition
If the driver's door is opened, a temporary
audible signal warns the driver that the lamps
are on.
In some weather conditions (e.g. low
temperature or humidity), misting on the
internal surface of the glass of the headlamps
and rear lamps is normal, and will disappear
after the lamps have been on for a few
minutes.
Never look too closely at the luminous
beam of Full LED headlamps: risk of
serious eye injury!
Travelling abroad
Vehicles equipped with halogen
headlamps:
Page 81 of 308
79
Lighting and visibility
4only be used in fog or falling snow (rules may
vary depending on country).
Do not forget to switch off the foglamps when
they are no longer necessary.
Switching off of the lamps when the
ignition is switched off
When the ignition is switched off, all of the
lamps turn off immediately, except for dipped
beam headlamps if automatic guide-me-home
lighting is activated.
Switching on the lamps after
switching off the ignition
If the driver's door is opened, a temporary
audible signal warns the driver that the lamps
are on.
In some weather conditions (e.g. low
temperature or humidity), misting on the
internal surface of the glass of the headlamps
and rear lamps is normal, and will disappear
after the lamps have been on for a few
minutes.
Never look too closely at the luminous
beam of Full LED headlamps: risk of
serious eye injury!
Travelling abroad
Vehicles equipped with halogen
headlamps:
If planning to use your vehicle in a country
that drives on the other side of the road, the
headlamp dipped beams must be adjusted to
avoid dazzling oncoming drivers. Contact a
PEUGEOT dealer or a qualified workshop.
Daytime running lamps /
Sidelamps
These LED lamps at the front and rear of the
vehicle light up automatically when the engine
starts.
They perform the following functions:
–
Daytime running lamps (lighting control stalk
at position "
0" or "AUTO" with adequate ambient
light).
–
Sidelamps (lighting control stalk at position
"
AUTO" with low ambient light or "Sidelamps
only" or "Dipped/main beam headlamps").
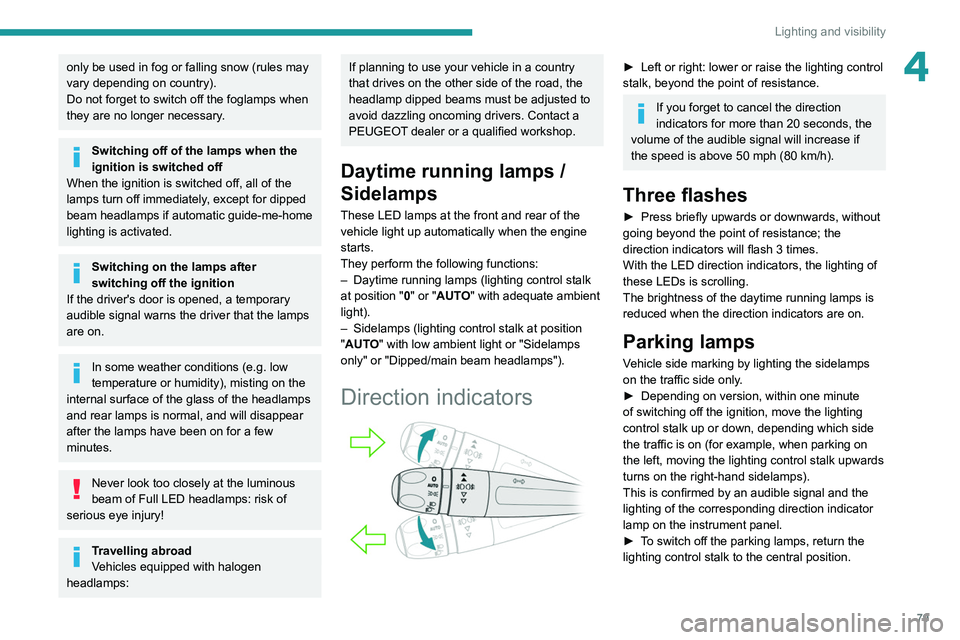
Direction indicators
► Left or right: lower or raise the lighting control
stalk, beyond the point of resistance.
If you forget to cancel the direction
indicators for more than 20 seconds, the
volume of the audible signal will increase if
the speed is above 50 mph (80 km/h).
Three flashes
► Press briefly upwards or downwards, without
going beyond the point of resistance; the
direction indicators will flash 3 times.
With the LED direction indicators, the lighting of
these LEDs is scrolling.
The brightness of the daytime running lamps is
reduced when the direction indicators are on.
Parking lamps
Vehicle side marking by lighting the sidelamps
on the traffic side only.
►
Depending on version, within one minute
of switching off the ignition, move the lighting
control stalk up or down, depending which side
the traffic is on (for example, when parking on
the left, moving the lighting control stalk upwards
turns on the right-hand sidelamps).
This is confirmed by an audible signal and the
lighting of the corresponding direction indicator
lamp on the instrument panel.
►
T
o switch off the parking lamps, return the
lighting control stalk to the central position.
Page 82 of 308
80
Lighting and visibility
Headlamp beam height
adjustment
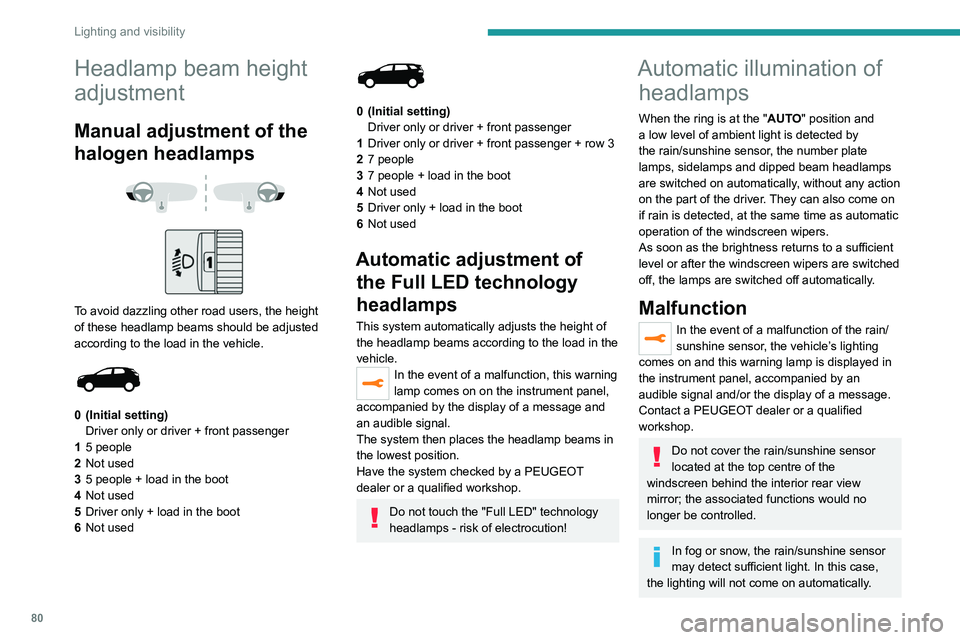
Manual adjustment of the
halogen headlamps
To avoid dazzling other road users, the height
of these headlamp beams should be adjusted
according to the load in the vehicle.
0 (Initial setting) Driver only or driver + front passenger
1 5 people
2 Not used
3 5 people + load in the boot
4 Not used
5 Driver only + load in the boot
6 Not used
0 (Initial setting)
Driver only or driver + front passenger
1 Driver only or driver + front passenger + row 3
2 7 people
3 7 people + load in the boot
4 Not used
5 Driver only + load in the boot
6 Not used
Automatic adjustment of
the Full LED technology
headlamps
This system automatically adjusts the height of
the headlamp beams according to the load in the
vehicle.
In the event of a malfunction, this warning
lamp comes on on the instrument panel,
accompanied by the display of a message and
an audible signal.
The system then places the headlamp beams in
the lowest position.
Have the system checked by a PEUGEOT
dealer or a qualified workshop.
Do not touch the "Full LED" technology
headlamps - risk of electrocution!
Automatic illumination of headlamps
When the ring is at the "AUTO" position and
a low level of ambient light is detected by
the rain/sunshine sensor
, the number plate
lamps,
sidelamps and dipped beam headlamps
are switched on automatically, without any action
on the part of the driver. They can also come on
if rain is detected, at the same time as automatic
operation of the windscreen wipers.
As soon as the brightness returns to a sufficient
level or after the windscreen wipers are switched
off, the lamps are switched off automatically.
Malfunction
In the event of a malfunction of the rain/
sunshine sensor, the vehicle’s lighting
comes on and this warning lamp is displayed in
the instrument panel, accompanied by an
audible signal and/or the display of a message.
Contact a PEUGEOT dealer or a qualified
workshop.
Do not cover the rain/sunshine sensor
located at the top centre of the
windscreen behind the interior rear view
mirror; the associated functions would no
longer be controlled.
In fog or snow, the rain/sunshine sensor
may detect sufficient light. In this case,
the lighting will not come on automatically.
Guide-me-home and
welcome lighting
Guide-me-home lighting
Automatic
With the ring in the "AUTO" position, when the
light is poor, the dipped beam headlamps come
on automatically when the ignition is switched
off.
You can activate/deactivate this function and adjust the guide-me-
home lighting duration in the vehicle
configuration menu.
Manual
► With the ignition off, pull the lighting control
stalk toward you ("headlamp flash") to activate/
deactivate the function.
Manual guide-me-home lighting goes off
automatically after a period of time.
Page 84 of 308
82
Lighting and visibility
The system becomes operational when the vehicle exceeds 16 mph (25 km/h).
When the speed falls below 9 mph (15 km/h),
the function is no longer operational.
Activation/Deactivation
It is set via the Driving / Vehicle touch
screen menu.
The state of the system stays in the memory
when switching off the ignition.
Operation
If the ambient light level is sufficient and/or the
traffic conditions do not allow the main beam
headlamps to be lit:
– The dipped beam head lamps
remain lit. These indicator lamps
come on on the instrument panel.
If the ambient light level is very low and traffic
conditions permit:
– The main beam headla mps
come on automatically. These
indicator lamps come on on the instrument
panel.
The function is deactivated if the fog lamps are
switched on or the system detects dense fog.
When the fog lamps are switched off or the
vehicle leaves the area of dense fog, the function
is automatically reactivated.
This indicator lamp goes out when the function is deactivated.
Pause
If the situation requires a change of headlamp
beam, the driver can take over at any time.
►
A
"headlamp flash" pauses the function:
•
if the "AUT
O" and "Dipped beam" indicator
lamps were on, the system changes to main
beam,
•
if the "AUT
O" and "Main beam" indicator
lamps were on, the system changes to
dipped beam.
To reactivate the system, flash the headlamps
again.
The system may be disrupted or not work correctly:
–
When visibility conditions are poor
(snowfall, heavy rain, etc.).
–
If the windscreen in front of the camera is
dirty
, misted or obscured (for example, by a
sticker).
–
If the vehicle is facing highly reflective
signs.
When the system detects thick fog, it
temporarily deactivates the function.
The system is not able to detect:
–
Road users that do not have their own
lighting, such as pedestrians.
–
V
ehicles whose lighting is obscured (for
example, vehicles driving behind a safety
barrier on a motorway).
–
V
ehicles at the top or bottom of a steep
slope, on winding roads, on crossroads.
Clean the windscreen regularly,
particularly the area in front of the
camera.
The internal surface of the windscreen can
also become misted around the camera.
In humid and cold weather, demist the
windscreen regularly.
Do not allow snow to accumulate on the
bonnet or roof of the vehicle as this could
obstruct the detection camera.
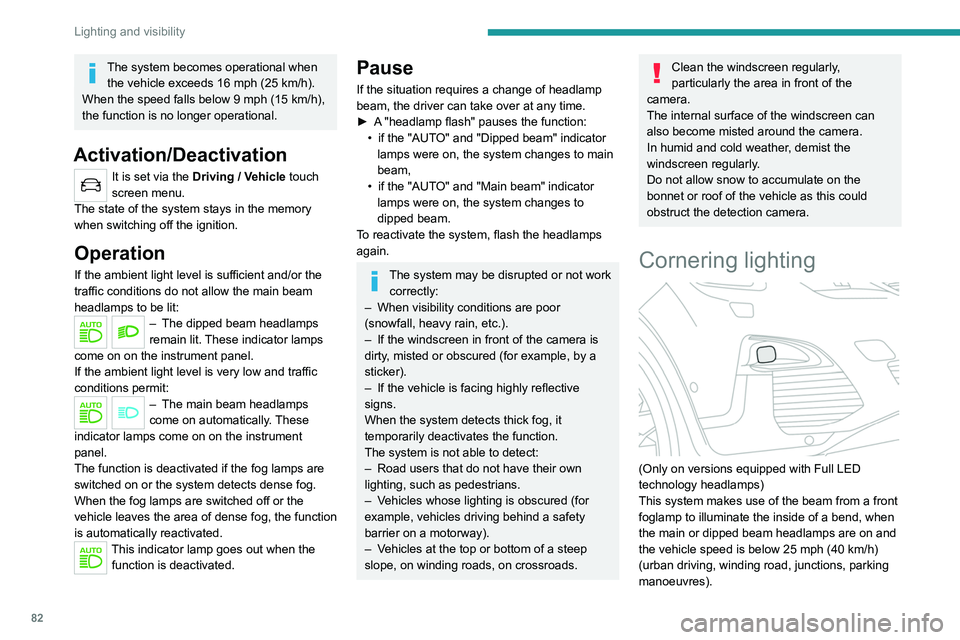
Cornering lighting
(Only on versions equipped with Full LED
technology headlamps)
This system makes use of the beam from a front
foglamp to illuminate the inside of a bend, when
the main or dipped beam headlamps are on and
the vehicle speed is below 25 mph (40
km/h)
(urban driving, winding road, junctions, parking
manoeuvres).
Without/With cornering lighting
Activation / Deactivation
It is set via the Driving / Vehicle touch
screen menu.
Switching on / off
This system starts:
– when the corresponding direction indicator is
switched on.
or
– from a certain angle of rotation of the steering
wheel.
It becomes inactive:
– below a certain angle of rotation of the
steering wheel.
– above 25 mph (40 km/h).
– when reverse gear is engaged.
Wiper control stalk
In wintry conditions, remove snow, ice or
frost present on the windscreen, around