2020 PEUGEOT 3008 fold seats
[x] Cancel search: fold seatsPage 78 of 308

76
Ease of use and comfort
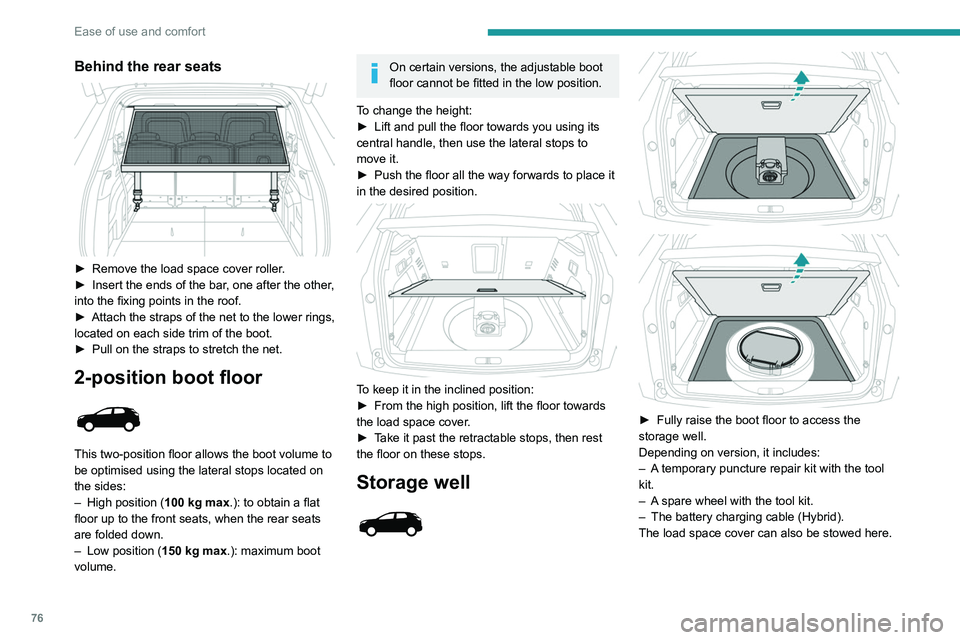
Behind the rear seats
► Remove the load space cover roller.
► Insert the ends of the bar , one after the other,
into the fixing points in the roof.
►
Attach the straps of the net to the lower rings,
located on each side trim of the boot.
►
Pull on the straps to stretch the net.
2-position boot floor
This two-position floor allows the boot volume to
be optimised using the lateral stops located on
the sides:
–
High position ( 100
kg max.): to obtain a flat
floor up to the front seats, when the rear seats
are folded down.
–
Low position ( 150
kg max.): maximum boot
volume.
On certain versions, the adjustable boot
floor cannot be fitted in the low position.
To change the height:
►
Lift and pull the floor towards you using its
central handle, then use the lateral stops to
move it.
►
Push the floor all the way forwards to place it
in the desired position.
To keep it in the inclined position:
► From the high position, lift the floor towards
the load space cover
.
►
T
ake it past the retractable stops, then rest
the floor on these stops.
Storage well
► Fully raise the boot floor to access the
storage well.
Depending on version, it includes:
–
A
temporary puncture repair kit with the tool
kit.
–
A
spare wheel with the tool kit.
–
The battery charging cable (Hybrid).
The load space cover can also be stowed here.
12 V accessory socket
► To connect a 12 V accessory (maximum
power: 120 W), lift the cover and plug in a
suitable adaptor.
► Switch on the ignition.
The connection of an electrical device
not approved by PEUGEOT, such as a
USB charger, may adversely affect the
operation of vehicle electrical systems,
causing faults such as poor radio reception or
interference with displays in the screens.
Boot lamp
It comes on automatically when the boot is
opened and goes off automatically when the
boot is closed.
The lighting time varies according to the
circumstances:
– When the ignition is off, approximately 10
minutes.
– In energy saving mode, approximately 30
seconds.
– With the engine running, unlimited.
Page 99 of 308

97
Safety
5Not fastened at the rear
When the ignition is switched on, with the engine
running or the vehicle moving at a speed below
12 mph (20 km/h), the warning lamp and the
corresponding indicator lamps light up for around
thirty seconds, if one or more rear seat belts are
not fastened.
Unfastened
After the ignition is switched on, the warning
lamp and the corresponding indicator lamps light
up if the driver and/or one or more passengers
unfasten their seat belts.
At a speed greater than 12 mph (20 km/h), these
warning lamps flash, accompanied by an audible
signal for approximately two minutes. After this
time, these warning lamps remain on as long as
the seatbelts are not refastened.
Advice
The driver must ensure that passengers use the seat belts correctly and that they
are all fastened before setting off.
Wherever seated in the vehicle, you must
always fasten the seat belt, even for short
journeys.
Do not interchange the seat belt buckles, as
they will not fulfil their role fully.
Before and after use, ensure that the seat belt
is reeled in correctly.
After folding or moving a seat or rear bench
seat, ensure that the seat belt is positioned
and reeled in correctly.
Installation
The lower part of the strap must be
positioned as low as possible on the pelvis.
The upper part must be positioned in the
hollow of the shoulder.
In order to be effective, a seat belt:
–
must be tightened as close to the body as
possible;
–
must be pulled in front of you with a smooth
movement, ensuring that it is not twisted;
–
must only be used to secure one person;
–
must not show signs of tearing or fraying;
–
must not be changed or modified, in order
to avoid affecting its performance.
Recommendations for children
Use a suitable child seat if the passenger
is less than 12 years old or shorter than one
and a half metres.
Never use the same seat belt to secure more
than one child.
Never carry a child on your lap.
For more information on Child seats, refer to
the corresponding section.
Maintenance
In accordance with current safety
regulations, for all repairs on your vehicle's
seat belts, go to a qualified workshop with
the skills and equipment needed, which a
PEUGEOT dealer is able to provide.
Have the seat belts checked regularly by a
PEUGEOT dealer or a qualified workshop,
particularly if the straps show signs of
damage.
Clean the seat belt straps with soapy water or
a textile cleaning product, sold by PEUGEOT
dealers.
Airbags
General information
System designed to help improve the safety
of the occupants sitting in the front seats and
the rear outer seats, in the event of a violent
collision. The airbags supplement the action
of the seat belts equipped with a force limiting
system.
Electronic detectors record and analyse the
front and side impacts sustained in the impact
detection zones:
–
In the event of violent impact, the airbags
deploy instantly and help better protect the
occupants of the vehicle; immediately after the
impact, the airbags deflate rapidly in order not
to hinder the visibility or the possible exit of the
occupants.
–
In the event of a slight impact, a rear impact
and under certain rollover conditions, the airbags
Page 194 of 308

192
In the event of a breakdown
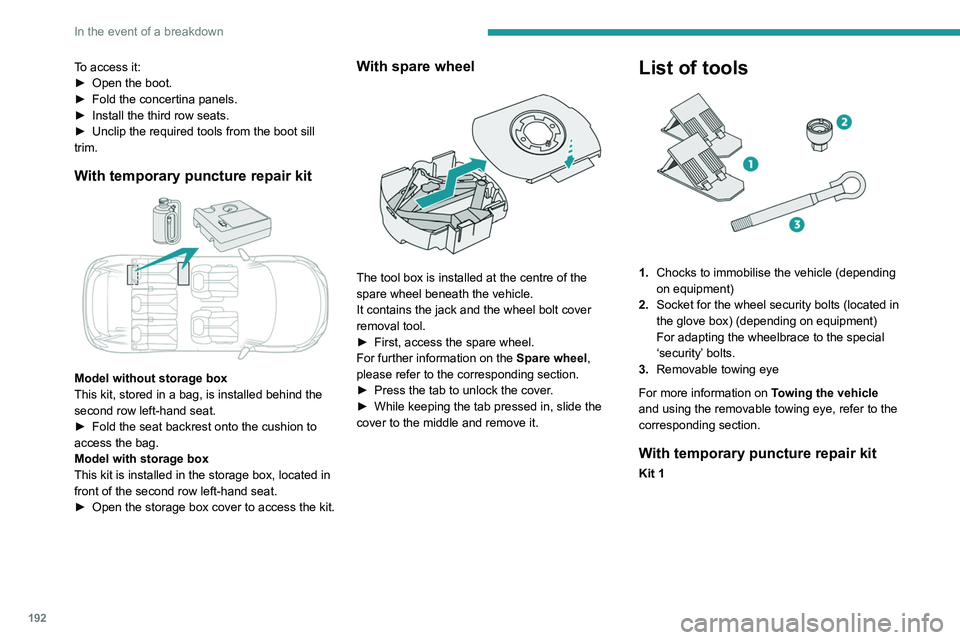
To access it:
► Open the boot.
►
Fold the concertina panels.
►
Install the third row seats.
►
Unclip the required tools from the boot sill
trim.
With temporary puncture repair kit
Model without storage box
This kit, stored in a bag, is installed behind the
second row left-hand seat.
►
Fold the seat backrest onto the cushion to
access the bag.
Model with storage box
This kit is installed in the storage box, located in
front of the second row left-hand seat.
►
Open the storage box cover to access the kit.
With spare wheel
The tool box is installed at the centre of the
spare wheel beneath the vehicle.
It contains the jack and the wheel bolt cover
removal tool.
►
First, access the spare wheel.
For further information on the
Spare wheel,
please refer to the corresponding section.
►
Press the tab to unlock the cover
.
►
While keeping the tab pressed in, slide the
cover to the middle and remove it.
List of tools
1. Chocks to immobilise the vehicle (depending
on equipment)
2. Socket for the wheel security bolts (located in
the glove box) (depending on equipment)
For adapting the wheelbrace to the special
‘security’ bolts.
3. Removable towing eye
For more information on Towing the vehicle
and using the removable towing eye, refer to the
corresponding section.
With temporary puncture repair kit
Kit 1
Page 283 of 308

281
Alphabetical index
Electric windows 41
Electronic brake force distribution (EBFD)
90
Emergency braking assistance (EBA)
90
Emergency call
88
Emergency switching off
117–118
Emergency warning lamps
87, 190
Emissions control system, SCR
19, 185
Energy economy mode
179
Energy flows
26
Energy recovery
20, 125
Engine
184
Engine compartment
179–180
Engine, Diesel
166, 180, 190, 222
Engine, petrol
126, 180, 220
Engines
219–220, 222
Environment
7, 34
e-Save function (energy reserve)
26
ESC (electronic stability control)
90
F
Fatigue detection 149
Filling the AdBlue® tank
182, 186
Filling the fuel tank
166–167
Filter, air
183
Filter, oil
183
Filter, particle
182–183
Filter, passenger compartment
58, 183
Fitting a wheel
199–200
Fitting roof bars
176–177
Fittings, boot
73
Fittings, front 66
Fittings, interior
66
Fittings, rear
70
Flap, charging
168, 171–173
Flap, fuel filler
166–167
Flashing indicators
79, 203
Flat bed (recovery)
216
Floor, boot, adjustable
76
Floor, concertina
55
Fluid, brake
182
Fluid, engine coolant
182
Foglamps, front
78, 82, 202–203
Foglamps, rear
78, 205
Folding the rear seats
51–54
Four-wheel drive (4WD)
127, 178
Frequency (radio)
268–269
Fuel
7, 166
Fuel consumption
7, 20
Fuel tank
166–167
Fusebox, dashboard
206
Fusebox, engine compartment
206, 208–209
Fuses
205–206, 208–209
G
Gauge, fuel 166
Gearbox, automatic
121–126, 128, 184, 211
Gearbox, manual
120, 125–126, 128, 184
Gear lever, automatic gearbox
122
Gear lever, manual gearbox
120
Gear shift indicator ~ Gear efficiency
indicator
127
Glove box
66
G.P.S.
262
Grab handles
66
H
Hands-free access 39
Hands-free tailgate
37, 39–40
Hazard warning lamps
87, 190
headlamp adjustment
80
Headlamp adjustment
80
Headlamps, automatic dipping
81–82
Headlamps, automatic illumination
80
Headlamps, dipped beam
202–203
Headlamps, halogen
80, 202–203
Headlamps, main beam
202–203
Head restraints, front
46–47
Head restraints, rear
50–52
Heating
58–59
Heating, programmable
27, 65
Hi-Fi system
67
Hill Assist Descent Control (HADC)
93
Hill start assist
125
Histogramme, fuel consumption
26–27
Horn
88
Horn for pedestrians
88
Hybrid
26, 116, 167, 225
Hybrid engine
225