2020 PEUGEOT 3008 check engine light
[x] Cancel search: check engine lightPage 149 of 308
147
Driving
6
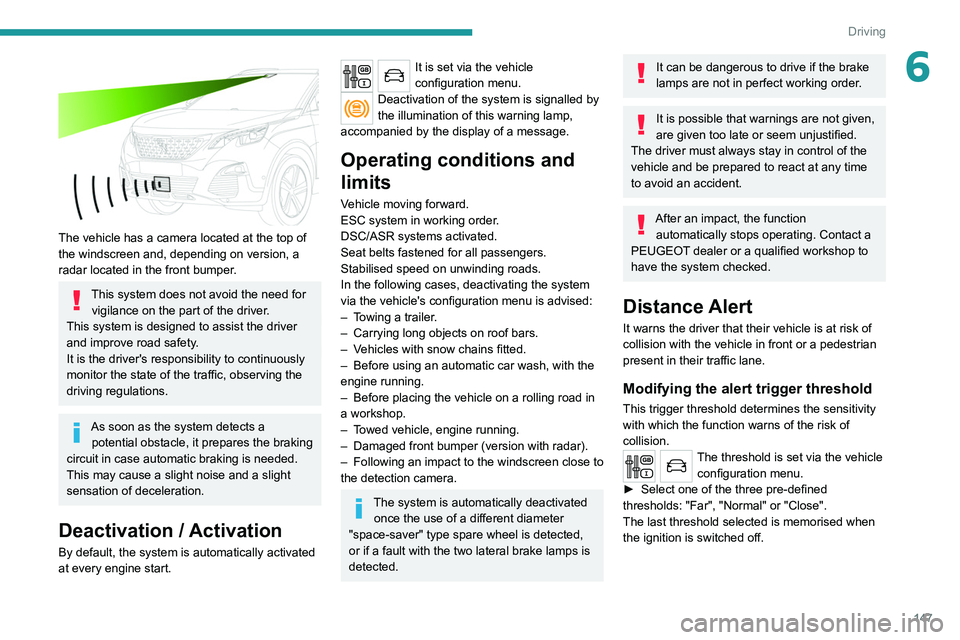
The vehicle has a camera located at the top of
the windscreen and, depending on version, a
radar located in the front bumper.
This system does not avoid the need for vigilance on the part of the driver.
This system is designed to assist the driver
and improve road safety.
It is the driver's responsibility to continuously
monitor the state of the traffic, observing the
driving regulations.
As soon as the system detects a potential obstacle, it prepares the braking
circuit in case automatic braking is needed.
This may cause a slight noise and a slight
sensation of deceleration.
Deactivation / Activation
By default, the system is automatically activated
at every engine start.
It is set via the vehicle
configuration menu.
Deactivation of the system is signalled by
the illumination of this warning lamp,
accompanied by the display of a message.
Operating conditions and
limits
Vehicle moving forward.
ESC system in working order.
DSC/ASR systems activated.
Seat belts fastened for all passengers.
Stabilised speed on unwinding roads.
In the following cases, deactivating the system
via the vehicle's configuration menu is advised:
–
T
owing a trailer.
–
Carrying long objects on roof bars.
–
V
ehicles with snow chains fitted.
–
Before using an automatic car wash, with the
engine running.
–
Before placing the vehicle on a rolling road in
a workshop.
–
T
owed vehicle, engine running.
–
Damaged front bumper (version with radar).
–
Following
an impact to the windscreen close to
the detection camera.
The system is automatically deactivated once the use of a different diameter
"space-saver" type spare wheel is detected,
or if a fault with the two lateral brake lamps is
detected.
It can be dangerous to drive if the brake
lamps are not in perfect working order.
It is possible that warnings are not given,
are given too late or seem unjustified.
The driver must always stay in control of the
vehicle and be prepared to react at any time
to avoid an accident.
After an impact, the function automatically stops operating. Contact a
PEUGEOT dealer or a qualified workshop to
have the system checked.
Distance Alert
It warns the driver that their vehicle is at risk of
collision with the vehicle in front or a pedestrian
present in their traffic lane.
Modifying the alert trigger threshold
This trigger threshold determines the sensitivity
with which the function warns of the risk of
collision.
The threshold is set via the vehicle configuration menu.
►
Select one of the three pre-defined
thresholds: "Far", "Normal" or "Close".
The last threshold selected is memorised when
the ignition is switched off.
Page 150 of 308
148
Driving
Malfunction
In the event of a fault with the system, you
are alerted by the fixed illumination of this
warning lamp, accompanied by the display of a
message and an audible signal.
Contact a PEUGEOT dealer or a qualified
workshop to have the system checked.
Distraction detection
Refer to the General recommendations on the
use of driving and manoeuvring aids .
Take a break in case of feeling tired or at least
every 2 hours.
Depending on version, the function comprises
either the "Driver Attention Alert" system alone
or combined with the "Driver Attention Alert by
camera" system.
These systems are in no way designed to keep the driver awake or to prevent
the driver from falling asleep at the wheel.
It is the driver’s responsibility to stop if feeling
tired.
Activation / Deactivation
It is set via the vehicle
configuration menu.
The state of the system stays in the memory
when the ignition is switched off.
Operation
Depending on the degree of risk of collision
detected by the system and the alert threshold
chosen by the driver, several different levels
of alert may be triggered and displayed in the
instrument panel.
They take account of the vehicle dynamics, the
speed of your vehicle and the one in front, the
environmental conditions and the operation of
the vehicle (cornering, actions on the pedals,
etc.) to trigger the alert at the best moment.
Level 1 (orange): visual alert only,
signalling that the vehicle in front is very
close.
The message "
Vehicle close" is displayed.
Level 2 (red): visual and audible alert,
signalling that a collision is imminent.
The message "
Brake!" is displayed.
Where the speed of your vehicle is too
high approaching another vehicle, the
first level of alert may not be displayed: the
level 2 alert may be displayed directly.
Important: the level
1 alert is never displayed
for a stationary obstacle or when the " Close"
trigger threshold has been selected.
Intelligent emergency
braking assistance
If the driver brakes, but not sufficiently to avoid a
collision, this system will supplement the braking,
within the limits of the laws of physics. This assistance will only be provided if the driver
presses the brake pedal.
Active Safety Brake
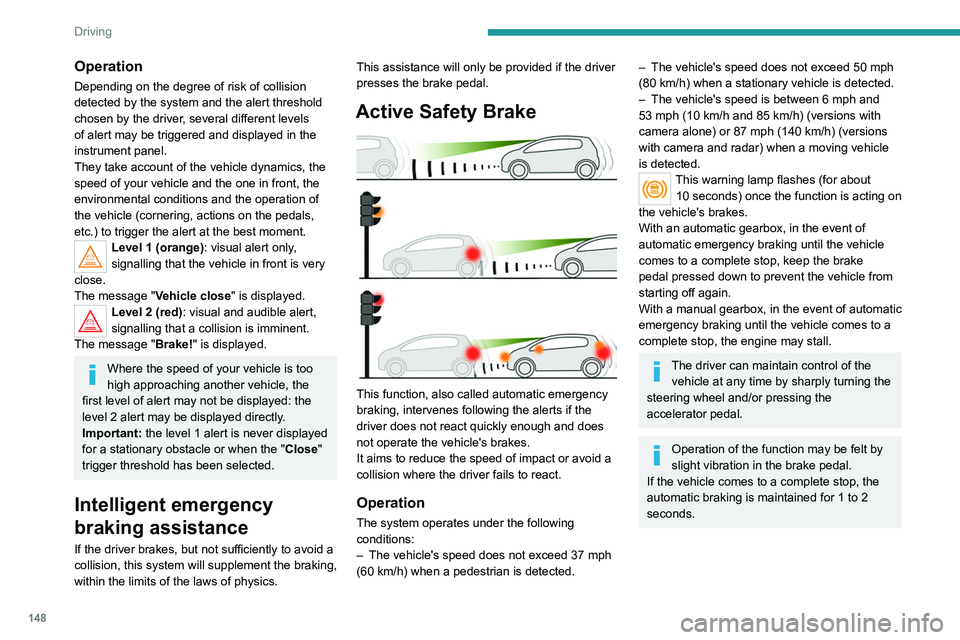
This function, also called automatic emergency
braking, intervenes following the alerts if the
driver does not react quickly enough and does
not operate the vehicle's brakes.
It aims to reduce the speed of impact or avoid a
collision where the driver fails to react.
Operation
The system operates under the following
conditions:
–
The vehicle's speed does not exceed 37 mph
(60 km/h) when a pedestrian is detected.
– The vehicle's speed does not exceed 50 mph
(80 km/h) when a stationary vehicle is detected.
–
The vehicle's speed is between 6 mph and
53 mph (10
km/h and 85 km/h) (versions with
camera alone) or 87 mph (140 km/h) (versions
with camera and radar) when a moving vehicle
is detected.
This warning lamp flashes (for about 10 seconds) once the function is acting on
the vehicle's brakes.
With an automatic gearbox, in the event of
automatic emergency braking until the vehicle
comes to a complete stop, keep the brake
pedal pressed down to prevent the vehicle from
starting off again.
With a manual gearbox, in the event of automatic
emergency braking until the vehicle comes to a
complete stop, the engine may stall.
The driver can maintain control of the vehicle at any time by sharply turning the
steering wheel and/or pressing the
accelerator pedal.
Operation of the function may be felt by
slight vibration in the brake pedal.
If the vehicle comes to a complete stop, the
automatic braking is maintained for 1 to 2
seconds.
Page 204 of 308
202
In the event of a breakdown
Always replace a failed bulb with a new bulb
of the same type and specification. To avoid
lighting imbalance, replace the bulbs in pairs.
Refitting the lamp units
Perform the operations in the reverse
order to dismantling.
Light-emitting diode (LED)
headlamps and lamps
Depending on version, the affected types of
headlamps / lamps are:
–
Full LED technology headlamps.
–
Direction indicator side repeaters.
–
Side spotlamps.
–
Third brake lamp.
For the replacement of this type of bulb,
you must contact a PEUGEOT dealer or
a qualified workshop.
Do not touch the "Full LED" technology
headlamps - risk of electrocution!
Front lamps
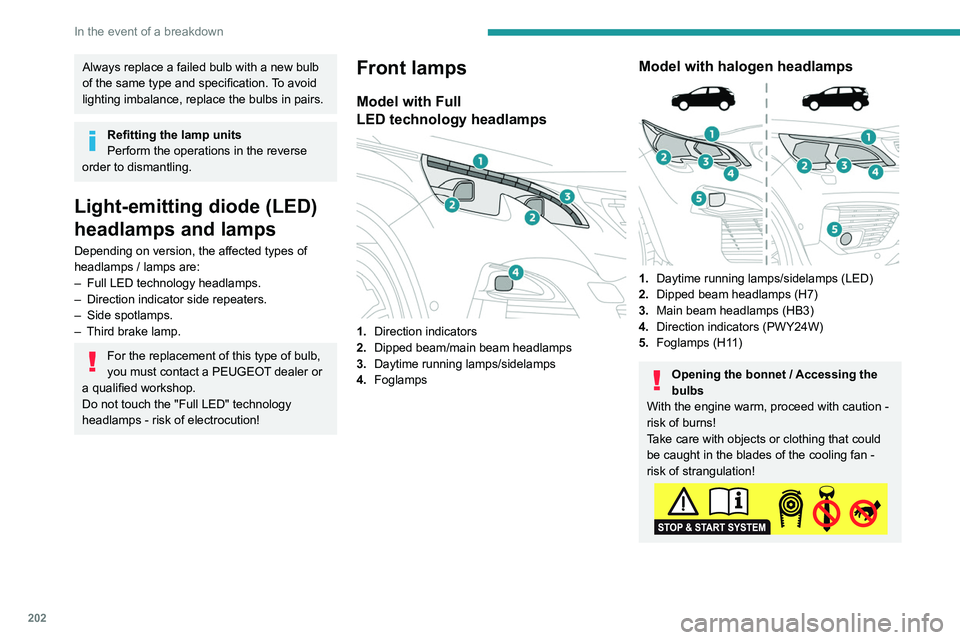
Model with Full
LED technology headlamps
1.Direction indicators
2. Dipped beam/main beam headlamps
3. Daytime running lamps/sidelamps
4. Foglamps
Model with halogen headlamps
1.Daytime running lamps/sidelamps (LED)
2. Dipped beam headlamps (H7)
3. Main beam headlamps (HB3)
4. Direction indicators (PWY24W)
5. Foglamps (H11)
Opening the bonnet / Accessing the
bulbs
With the engine warm, proceed with caution -
risk of burns!
Take care with objects or clothing that could
be caught in the blades of the cooling fan -
risk of strangulation!
Halogen bulbs (Hx)
To ensure good quality lighting, check
that the bulb is correctly positioned in its
housing.
Direction indicators
Rapid flashing of a direction indicator
lamp (left or right) indicates that one of
the bulbs on the corresponding side has
failed.
► Turn the connector a quarter turn
anti-clockwise.
► Pull the bulb connector.
► Remove the bulb and replace it.
Amber coloured bulbs must be replaced
by bulbs with identical specifications and
colour.
Page 212 of 308
210
In the event of a breakdown
Version 2 (Eco)
Fuse N°Rating (A)Functions
F16 25 AFront foglamps.
F18 10 ARight-hand main beam headlamp.
F19 10 ALeft-hand main beam headlamp.
12 V battery
Procedure for starting the engine using another
battery or charging a discharged battery.
Lead-acid starter batteries
These batteries contain harmful
substances (sulphuric acid and lead).
They must be disposed of in accordance
with regulations and must never under any
circumstances be discarded with household
waste.
Take used remote control batteries and
vehicle batteries to a special collection point.
Protect your eyes and face before
handling the battery.
All operations on the battery must be carried
out in a well ventilated area and away from
naked flames and sources of sparks, to avoid
any risk of explosion or fire.
Wash your hands afterwards.
Access to the battery
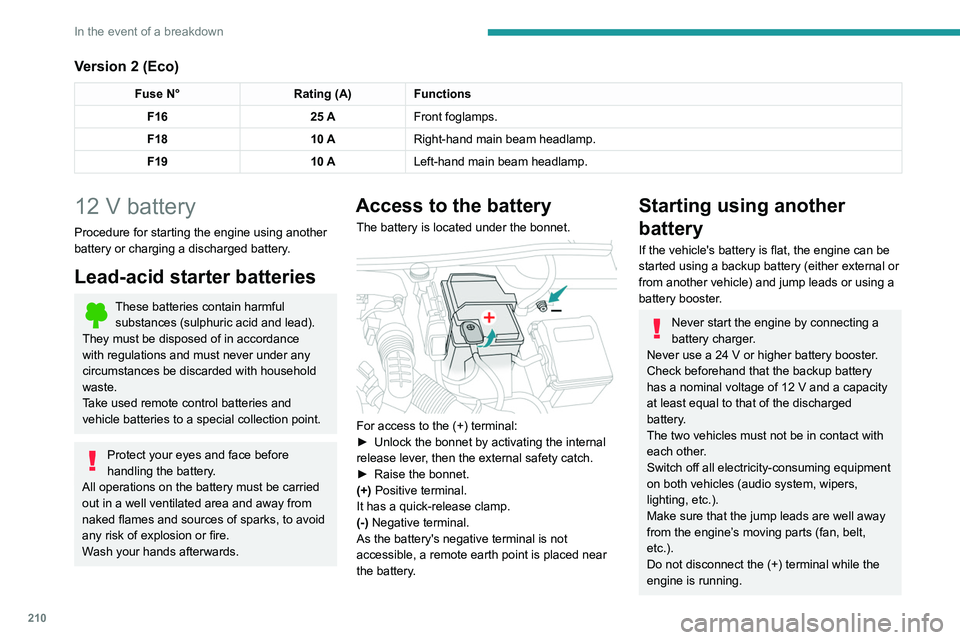
The battery is located under the bonnet.
For access to the (+) terminal:
► Unlock the bonnet by activating the internal
release lever
, then the external safety catch.
►
Raise the bonnet.
(+)
Positive terminal.
It has a quick-release clamp.
(-) Negative terminal.
As the battery's negative terminal is not
accessible, a remote earth point is placed near
the battery.
Starting using another
battery
If the vehicle's battery is flat, the engine can be
started using a backup battery (either external or
from another vehicle) and jump leads or using a
battery booster.
Never start the engine by connecting a
battery charger.
Never use a 24
V or higher battery booster.
Check beforehand that the backup battery
has a nominal voltage of 12
V and a capacity
at least equal to that of the discharged
battery.
The two vehicles must not be in contact with
each other.
Switch off all electricity-consuming equipment
on both vehicles (audio system, wipers,
lighting, etc.).
Make sure that the jump leads are well away
from the engine’s moving parts (fan, belt,
etc.).
Do not disconnect the (+) terminal while the
engine is running.
Page 214 of 308

212
In the event of a breakdown
► At the end of the charging operation, switch
off charger B
before disconnecting the cables
from battery A.
24v 12v
If this label is present, use only a 12 V
charger to avoid causing irreversible
damage to the electrical components related
to the Stop & Start system.
Never try to charge a frozen battery - risk
of explosion!
If the battery has frozen, have it checked by a
PEUGEOT dealer or by a qualified workshop
who will verify that the internal components
have not been damaged and that the case
has not cracked, which would mean a risk of
toxic and corrosive acid leaking.
Some functions, including Stop & Start,
are not available if the battery is not
sufficiently charged.
Disconnecting the battery
In order to maintain an adequate state of charge
for starting the engine, it is recommended that
the battery be disconnected if the vehicle is
taken out of service for a long period. Before disconnecting the battery:
►
Close all openings (doors, boot, windows,
roof).
►
Switch off all electrical consumers (audio
system, wipers, lighting, etc.).
►
Switch off the ignition and wait for 4
minutes.
At the battery, it is only necessary to disconnect
the (+) terminal.
Quick-release terminal clamp
Disconnecting the (+) terminal
► Depending on equipment, lift the plastic cover
on the (+) terminal.
►
Raise lever
A
fully to release clamp
B
.
►
Remove clamp
B
by lifting it off.
Reconnecting the (+) terminal
► Raise lever A fully.
► Refit the open clamp B on the (+) terminal.
►
Push clamp
B fully down.
►
Lower lever
A
to lock clamp B.
►
Depending on equipment, lower the plastic
cover on the
(+) terminal.
Do not force the lever as locking will be
impossible if the clamp is not positioned
correctly; start the procedure again.
After reconnection
After reconnecting the battery, turn on the
ignition and wait 1 minute before starting the
engine, to enable the electronic systems to
initialise.
For right-hand drive versions, when the
total distance recorder has reached
62
miles (100 km), you must wait
approximately 15 minutes before starting the
engine.
If minor problems nevertheless persist following
this operation, contact a PEUGEOT dealer or a
qualified workshop.
Referring to the relevant section, reset certain
equipment:
– Remote control key or electronic key
(depending on version).
– Sunroof and electric sun blind.
– Electric windows.
– Date and time.
– Preset radio stations.
After reconnection of the battery, the
“Collision risk detection system fault”
message is displayed on the instrument panel
when the ignition is switched on. This
operation is perfectly normal. The message
will disappear while driving.
The Stop & Start system may not be operational during the trip following the
first engine start.
In this case, the system will only be available
again after a continuous period with the
vehicle immobilised, the duration of which
depends on the exterior temperature and the
state of charge of the battery (up to about 8
hours).
Page 239 of 308
237
Bluetooth® audio system
10Interactive voice response
From the contextual menu, select "DTMF
tones" and confirm to use the digital
keypad to navigate in the interactive voice
response menu.
Confirm with OK.
Consultation call
From the contextual menu, select
"Switch" and validate to return to a call
left on hold.
Confirm with OK.
Directory
To access the directory, press and hold SRC/TEL.
Select "Directory" to see the list of
contacts.
Confirm with OK.
To modify the contacts saved in the system, press MENU then select
"Telephone" and confirm.
Select "Directory management " and confirm.
You can:
–
"Consult an entry",
–
"Delete an entry",
–
"Delete all entries".
The system accesses the telephone's contacts directory, depending on its
compatibility, and while it is connected via
Bluetooth.
With certain telephones connected by
Bluetooth you can send a contact to the
directory of the audio system.
Contacts imported in this way are saved in a
permanent directory visible to all, whatever the
telephone connected.
The menu for the directory is not accessible if it
is empty.
Voice recognition
This function allows you to use your
smartphone's voice recognition via the system.
To start voice recognition, depending on the type
of steering mounted controls:
Make a long press on the end of the lighting
control stalk.
OR
Press this button.
Voice recognition requires the use of a
compatible smartphone first connected to
the vehicle by Bluetooth.
Frequently asked
questions
The following information groups together the answers to the most frequently asked questions
concerning your audio system. With the engine off, the audio system
switches off after a few minutes of use.
When the engine is switched off, the audio
system operating time depends on the state of
charge of the battery.
The switch-off is normal: the audio system
switches to economy mode and switches off to
avoid discharging the vehicle's battery.
►
Start the vehicle’
s engine to increase the
charge of the battery.
The message "the audio system is
overheated" is displayed onscreen.
To protect the installation if the ambient
temperature is too high, the audio system
switches to an automatic thermal protection
mode, in which the volume may be decreased or
the CD player stopped.
►
Switch the audio system off for a few minutes
to allow the system to cool.
Radio
There is a difference in sound quality
between the different audio sources (radio,
CD, etc.).
For optimal listening quality, the audio settings
(Volume, Bass, Treble, Ambience and Loudness)
can be adjusted to different audio sources,
resulting in audible differences when switching
between sources (radio, CD, etc.).
►
Check that the audio settings (V
olume, Bass,
Treble, Ambience and Loudness) are appropriate
to the sources being listened to. We recommend
setting the audio functions (Bass, Treble, Fr-Re
Page 282 of 308
280
Alphabetical index
CD, MP3 233, 246
Central locking
31–32
Changing a bulb
201–202, 204–205
Changing a fuse
205–206, 208–209
Changing a wheel
191–192, 196–198
Changing a wiper blade
84–85
Changing the remote control battery
33
Charge level indicator
20
Charger, induction
67
Charger, wireless
67
Charging cable
169–170, 172
Charging connector
168, 171–172
CHECK
20
Checking the engine oil level
17
Checking the levels
181–182
Checking tyre pressures (using the kit)
193, 195
Checks
180, 183–184
Checks, routine
183–184
Child lock
11 2
Children
97, 103, 105, 107, 110–111
Children (safety)
11 2
Child seats
97, 100–103, 107, 110–111
Child seats, conventional
102–103
Child seats, i-Size
11 0
Child seats, ISOFIX
105, 107, 110
Cleaning (advice)
168, 187–189
Closing the boot
31, 37
Closing the doors
31, 36
Collision Risk Alert
146–147
Configurations, seats
57
Configuration, vehicle
23–25, 27
Connected applications
266–267Connection, Bluetooth 235, 248–249,
267, 271–272
Connection, MirrorLink
247–248, 266
Connection, Wi-Fi network
267–268
Connectivity
265
Consumption figures
26
Container, AdBlue®
185–186
Control, emergency boot release
37
Control, emergency door
32–33
Control, heated seats
48
Controls, steering mounted
121–124
Control stalk, lighting
78–79
Control stalk, wipers
83–86
Control unit
169–170, 172
Courtesy lamps
69
Cover, load space
73
Cruise control
132, 134, 136–138
Cruise control, adaptive
139
Cruise control by speed limit recognition
134
Cruise control, dynamic with Stop function
134
Cup holder
66
D
DAB (Digital Audio Broadcasting) -
Digital radio
231–232, 245, 269
Date (setting)
23–24, 251, 275
Daytime running lamps
79, 202
Deactivating the passenger
airbag
98, 101–102
Deadlocking
29, 31
Deferred charging 27, 168, 171, 173
Defrosting
64
Defrosting, front
64
Demisting
64
Demisting, front
64
Demisting, rear
65
Demisting, rear screen
65
Dials and gauges
9
Digital instrument panel
9–10
Dimensions
226
Dipstick
17, 181
Direction indicators
79, 202–204
Domestic charging
170, 173
Door pockets
66
Doors
36
Drive Assist Plus
139
Driver’s attention warning
149
Driving
44–45, 113
Driving aids camera (warnings)
131
Driving aids (recommendations)
130
Driving economically
7
Driving positions (storing)
47–48
Dynamic pack
125–126
Dynamic stability control (DSC)
90–92
E
EBFD 90
Eco-driving (advice)
7
Economy mode
179
Electric automatic gearbox (Hybrid)
124
Page 284 of 308
282
Alphabetical index
I
i-Cockpit® amplify function 48, 125–126
Ignition
117, 273
Ignition on
11 7
Ignition switch
114, 116
Immobiliser, electronic
11 4
Indicator, AdBlue® range
18
Indicator, coolant temperature
18
Indicator, engine oil level
17, 20
Indicators, direction
79, 203
Inflating tyres
184, 227
Inflating tyres and accessories
(using the kit)
193, 195
Infrared camera
131
Instrument panel
9–10, 20–22, 132
Instrument panel (Hybrid)
9
Intelligent Traction Control
90
Internet browser
263, 267
ISOFIX mountings
105
J
Jack 193, 196–198, 270
Jump starting
210
K
Key 28–29, 32–33
Key, electronic
30–31
Keyless Entry and Starting 30–31, 116–117
Key not recognised
117–118
Key with remote control
28, 114
Kit, hands-free
234–235, 248–249, 271–272
Kit, puncture repair
191–192
Kit, temporary puncture repair
191–195
L
Labels, identification 227
Lamp, boot
77
Lamps, parking
79
Lamps, rear
204
Lams with Full LED technology
80, 82
Lane assist
139, 143–144, 146
Lane departure warning active
150, 155
Lane Departure Warning System (LDWS)
150
Leather (care)
189
LEDs - Light-emitting diodes
79, 202, 204
Level, AdBlue®
182
Level, brake fluid
182
Level, Diesel additive
182–183
Level, engine coolant
18, 182
Level, engine oil
17, 181
Levels and checks
180–182
Level, screenwash fluid
84, 182
Light-emitting diodes - LEDs
79, 202, 204
Lighting, cornering
82
Lighting dimmer
21
Lighting, exterior
78
Lighting, guide-me home
29, 81
Lighting, interior 69–70
Lighting, mood
21, 70
Lighting, welcome
81
Loading
75–76, 176–177
Load reduction mode
179
Locating your vehicle
29
Locking
29, 31
Locking from the inside
32
Locking the doors
32
Long objects, transporting
71
Low fuel level
166
M
Mains socket (domestic network) 169, 173
Maintenance (advice)
168, 187
Maintenance, routine
131, 183
Manoeuvring aids (recommendations)
130
Map reading lamps
69
Markings, identification
227
Massage function
48
Massage, multi-point
48
Mat
69, 132
Memorising a speed
132
Menu
247
Menu, main
25, 229
Menus (audio)
242–243, 255–256
Menu short cuts
25
Messages
273
Messages, quick
273
Mirror, rear view
50