2020 PEUGEOT 3008 seat adjustment
[x] Cancel search: seat adjustmentPage 51 of 308
49
Ease of use and comfort
3► Next, proceed with the passenger's seat in
the same way .
The changes are applied immediately.
Once activated, the system starts a one hour
massage cycle, made up of sequences of 6
minutes of massage followed by 3 minutes at
rest.
The system automatically stops at the end of the
cycle; the indicator lamp for the button goes off.
Steering wheel
adjustment
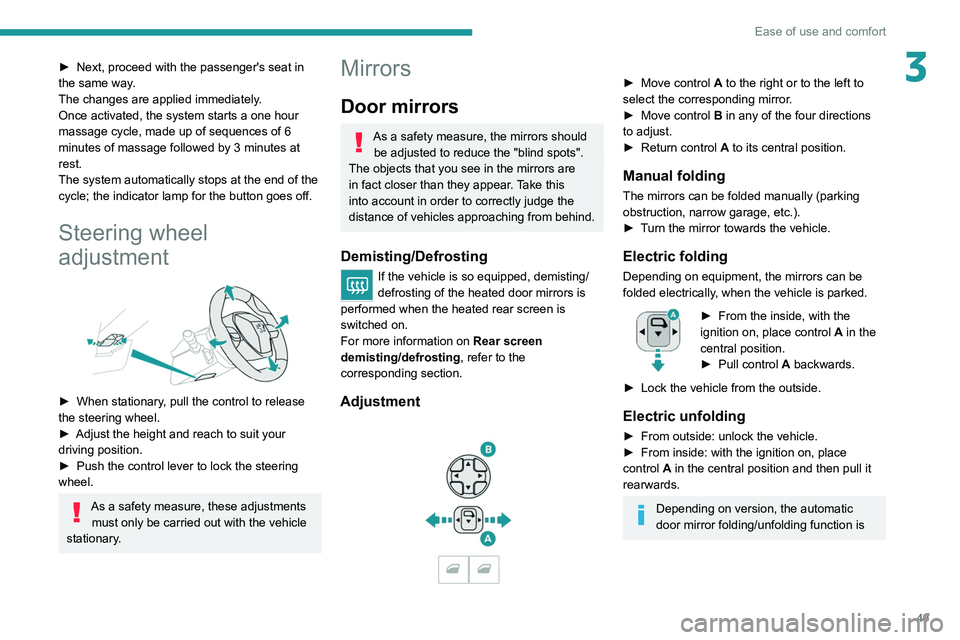
► When stationary , pull the control to release
the steering wheel.
►
Adjust the height and reach to suit your
driving position.
►
Push the control lever to lock the steering
wheel.
As a safety measure, these adjustments must only be carried out with the vehicle
stationary.
Mirrors
Door mirrors
As a safety measure, the mirrors should be adjusted to reduce the "blind spots".
The objects that you see in the mirrors are
in fact closer than they appear. Take this
into account in order to correctly judge the
distance of vehicles approaching from behind.
Demisting/Defrosting
If the vehicle is so equipped, demisting/
defrosting of the heated door mirrors is
performed when the heated rear screen is
switched on.
For more information on Rear screen
demisting/defrosting , refer to the
corresponding section.
Adjustment
► Move control A to the right or to the left to
select the corresponding mirror.
►
Move control
B in any of the four directions
to adjust.
►
Return control A
to its central position.
Manual folding
The mirrors can be folded manually (parking
obstruction, narrow garage, etc.).
►
T
urn the mirror towards the vehicle.
Electric folding
Depending on equipment, the mirrors can be
folded electrically, when the vehicle is parked.
► From the inside, with the
ignition on, place control A
in the
central position.
►
Pull control A
backwards.
►
Lock the vehicle from the outside.
Electric unfolding
► From outside: unlock the vehicle.
► From inside: with the ignition on, place
control
A in the central position and then pull it
rearwards.
Depending on version, the automatic
door mirror folding/unfolding function is
Page 52 of 308
50
Ease of use and comfort
configured via the Driving / Vehicle touch
screen menu.
Otherwise, this setting can be carried out at a
PEUGEOT dealer or a qualified workshop.
Automatic tilting in reverse gear
Depending on version, this function allows to
automatically tilt the mirrors downwards to assist
with parking manoeuvres in reverse gear.
With the engine running, on engaging reverse
gear, the mirror glasses tilt downwards.
They return to their initial position:
–
A
few seconds after coming out of reverse
gear.
–
Once the vehicle speed exceeds 6 mph
(10
km/h).
–
When the engine is switched off.
This function is set via the Driving/Vehicle touch screen menu.
Interior rear view mirror
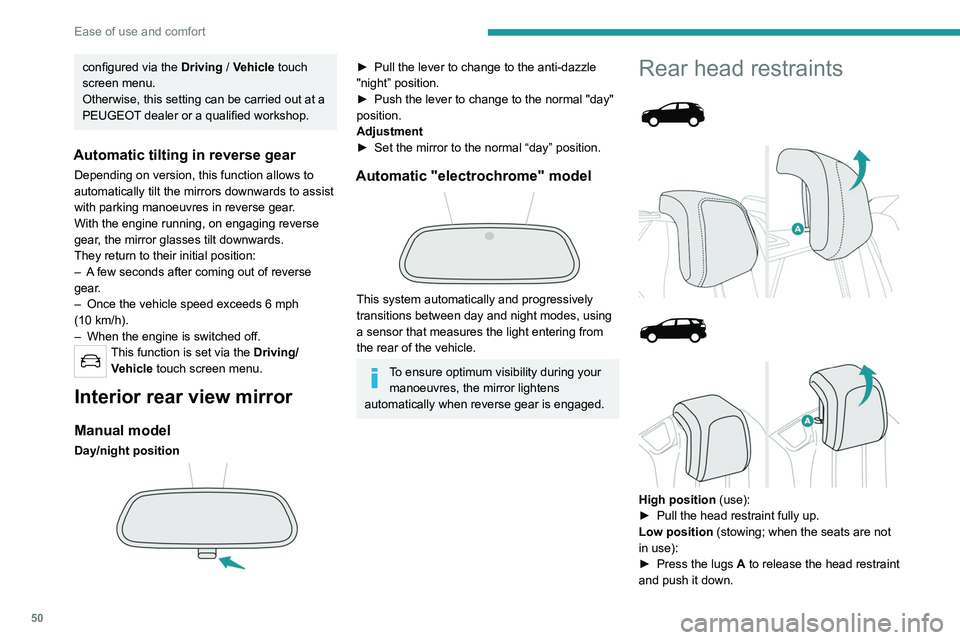
Manual model
Day/night position
► Pull the lever to change to the anti-dazzle
"night” position.
►
Push the lever to change to the normal "day"
position.
Adjustment
►
Set the mirror to the normal “day” position.
Automatic "electrochrome" model
This system automatically and progressively
transitions between day and night modes, using
a sensor that measures the light entering from
the rear of the vehicle.
To ensure optimum visibility during your manoeuvres, the mirror lightens
automatically when reverse gear is engaged.
Rear head restraints
High position (use):
► Pull the head restraint fully up.
Low position (stowing; when the seats are not
in use):
►
Press the lugs
A to release the head restraint
and push it down.
The rear head restraints can be removed.
Removing a head restraint
► Pull the head restraint fully up.
► Press the lugs A to release the head restraint
and remove it completely.
► Store the head restraint.
Refitting a head restraint
► Insert the head restraint rods into the guides
in the corresponding seat backrest.
► Push the head restraint down as far as it will
go.
► Press the lugs A to release the head restraint
and push it down.
Never drive with passengers seated at
the rear when the head restraints are
removed; the head restraints should be in
place and in the high position.
The head restraint for the central seat and those for the side seats
are not interchangeable.
Rear bench seat
Bench seat with fixed cushions and split folding
backrests (2/3-1/3) to adapt the boot load space.
Page 54 of 308
52
Ease of use and comfort
Folding from the boot
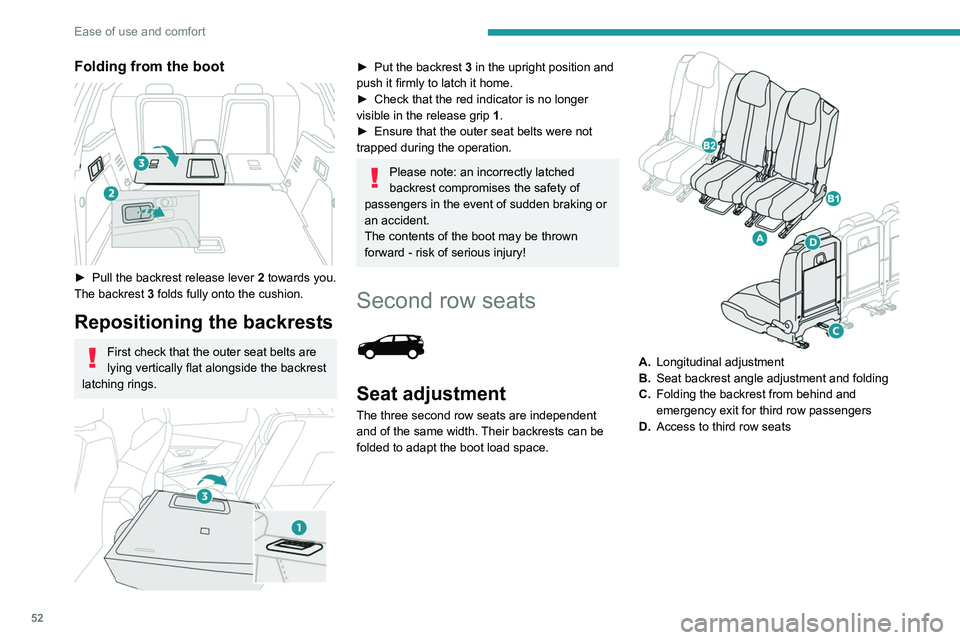
► Pull the backrest release lever 2 towards you.
The backrest 3 folds fully onto the cushion.
Repositioning the backrests
First check that the outer seat belts are
lying vertically flat alongside the backrest
latching rings.
► Put the backrest 3 in the upright position and
push it firmly to latch it home.
►
Check that the red indicator is no longer
visible in the release grip 1
.
►
Ensure that the outer seat belts were not
trapped during the operation.
Please note: an incorrectly latched
backrest compromises the safety of
passengers in the event of sudden braking or
an accident.
The contents of the boot may be thrown
forward - risk of serious injury!
Second row seats
Seat adjustment
The three second row seats are independent
and of the same width. Their backrests can be
folded to adapt the boot load space.
A. Longitudinal adjustment
B. Seat backrest angle adjustment and folding
C. Folding the backrest from behind and
emergency exit for third row passengers
D. Access to third row seats
Page 55 of 308
53
Ease of use and comfort
3Longitudinal adjustment
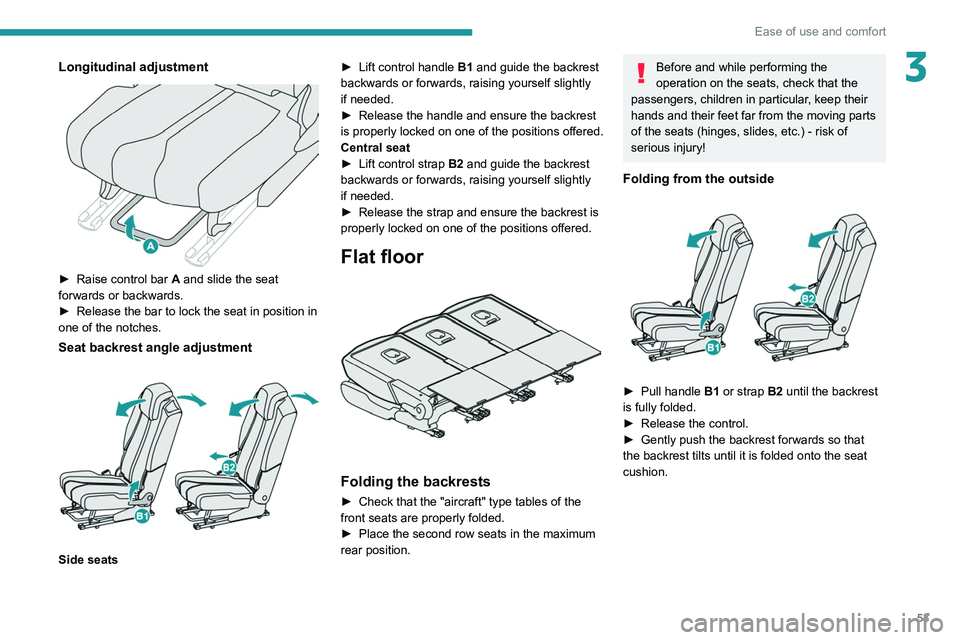
► Raise control bar A and slide the seat
forwards or backwards.
►
Release the bar to lock the seat in position in
one of the notches.
Seat backrest angle adjustment
Side seats ►
Lift control handle
B1
and guide the backrest
backwards or forwards, raising yourself slightly
if needed.
►
Release the handle and ensure the backrest
is
properly locked on one of the positions offered.
Central seat
►
Lift control strap
B2 and guide the backrest
backwards or forwards, raising yourself slightly
if needed.
►
Release the strap and ensure the backrest is
properly locked on one of the positions offered.
Flat floor
Folding the backrests
► Check that the "aircraft" type tables of the
front seats are properly folded.
►
Place the second row seats in the maximum
rear position.
Before and while performing the
operation on the seats, check that the
passengers, children in particular, keep their
hands and their feet far from the moving parts
of the seats (hinges, slides, etc.) - risk of
serious injury!
Folding from the outside
► Pull handle B1 or strap B2 until the backrest
is fully folded.
►
Release the control.
►
Gently push the backrest forwards so that
the backrest tilts until it is folded onto the seat
cushion.
Page 56 of 308

54
Ease of use and comfort
Folding from the boot
When loading, for example, or from the third row
seats:
►
Pull strap
C to unlock the desired seat and
give the backrest a slight push forwards.
Repositioning the seat
► Place the continuity panels of the 2nd row
seats back against the backrests.
► Straighten the backrest until it locks.
Before performing any operations on the
rear seats, to avoid damage to the seat
belts, check that the lateral seat belts are
properly tensioned. The central seat belt must
be stored in the headlining.
Continuity panels
Each seat has a continuity panel at the bottom of
the backrest, which, once unfolded:
–
allows for a continuous loading surface in the
boot, whatever the position of the seats,
–
prevents objects from sliding beneath the 2nd
row seats.
The continuity panels are held against the
backrests with a magnetic fixing element.
These continuity panels are not designed to support a weight greater than 30 kg.
Before deploying the continuity panels,
check that the 2nd row seats are pulled as
far back as possible.
Accessing third row seats
The third row seats are accessed via the second
row side seats.
From the outside or from the third row seats:
► Check that the "aircraft" type tables of the
front seats are properly folded up.
►
Pull paddle D
and guide the backrest
forwards to tilt it and move the seat forwards.
To put the seat back in place:
►
Straighten the backrest until the seat locks.
Whatever the initial position of the seat, it is
placed automatically a third of the way along
the longitudinal adjustment range in order to
preserve enough space for passengers in the
third row seats.
If this system fails (paddle D), the third
row passengers can also get out after
having folded the backrest of the second row
seats using strap C.
Do not let children operate the seats
unsupervised.
Third row seats
The two third row seats are stored in a retracted
position in the bottom of the boot. Each one is
covered with rigid concertina panels, secured to
the vehicle.
Do not let children operate the seats
unsupervised.
Each concertina panel can support a
maximum load of 100 kg with the third
row seats folded away.
With the third row seats removed and the
removable concertina panels supports
installed, the maximum load is limited to
50 kg.
Page 64 of 308

62
Ease of use and comfort
You can adjust the intensity of the
automatic Comfort programme by using the
"OPTIONS"
button to select a profile:
–
"Soft": provides soft and quiet operation by
limiting air flow.
–
"Normal": offers the best compromise
between a comfortable temperature and quiet
operation (default setting).
–
"Fast": provides strong and effective air flow.
To change the current profile (shown by the
corresponding indicator lamp), press button
11
repeatedly until the desired profile is displayed:
The "
Normal" or "Fast" profiles are the most
comfortable for passengers in the rear seats.
This profile setting is associated with automatic
mode only. However, on deactivation of the
AUTO mode, the indicator lamp for the most
recently selected profile remains on.
Changing the profile setting does not reactivate
AUTO mode if it was deactivated.
In cold weather with the engine cold, the
air flow is increased gradually until the
comfort setting has been reached, in order to
limit the delivery of cold air into the passenger
compartment.
On entering the vehicle, if the interior
temperature is much colder or warmer than
the comfort setting requested, there is no
need to alter the value displayed to more
quickly reach the required level of comfort.
The system automatically corrects the
temperature difference as quickly as possible.
Automatic Visibility programme
For more information on button 8, refer to the
“Front Demisting/Defrosting ” section.
"Air Quality System" (AQS)
function
Using a pollution sensor, this function
automatically activates recirculation of the
interior air once a certain level of polluting
substances in the exterior air is detected.
When the air quality returns to a satisfactory
level, recirculation of interior air is automatically
deactivated.
This function is not designed to detect
unpleasant odours.
Recirculation is automatically activated when the
windscreen wash is used or when reverse gear
is engaged.
The function does not operate if the exterior
temperature is below 5
°C, to avoid the risk of
misting of the windscreen and side windows.
To activate or deactivate the function, go to the
secondary page by using the " OPTIONS" button,
then press button 12.
Manual control
You can manually adjust one or more of these
functions, while retaining automatic control of the
other functions by the system:
–
air flow
, –
air distribution.
As soon as you modify a setting, the indicator
lamp in the "
AUTO" button goes off.
►
Press button
9 again to reactivate the
automatic comfort programme.
Air flow adjustment
► Press one of the buttons 2 (- or +) to
decrease or increase the speed of the air
booster fan.
The air flow symbol (a fan) is filled in
progressively as the speed of the fan is
increased.
When the air flow is reduced to a minimum,
ventilation stops.
"OFF " is displayed alongside the fan.
Adjusting the air distribution
► Press the buttons 3 to adjust the air flow
distribution inside the passenger compartment.
Windscreen and side windows.
Central and side air vents.
Footwells.
The lighting of the button indicates that air is
being blown in the specified direction.
For a uniform distribution of air in the passenger
compartment, the three buttons can be activated
simultaneously.
In AUTO mode, the indicator lamps in all three
buttons 3 are off.
Air conditioning on / off
The air conditioning is designed to operate
effectively in all seasons, with the windows
closed.
It is used to:
– lower the temperature in summer;
– increase the effectiveness of the demisting in
winter, above 3°C.
► Press button 5 to activate / deactivate the air
conditioning system.
When the system is activated, the indicator lamp
of the button comes on.
The air conditioning does not operate when the air flow is deactivated.
To obtain cool air more quickly, use
recirculation of the interior air for a few
moments. Then return to the intake of exterior
air.
Switching off the air conditioning may result in
some discomfort (humidity, misting).
Maximum air conditioning
This function automatically adjusts the
temperature setting to the lowest possible, the
air distribution towards the central and side air
vents, the air flow to maximum and activates
interior air recirculation.
► Press button 6 to activate / deactivate the
function (the indicator lamp will come on/switch
off).
Page 96 of 308

94
Safety
Fastening
► Pull the strap, then insert the tongue in the
buckle.
► Check that the seat belt is fastened correctly
by pulling on the strap.
Unfastening
► Press the red button on the buckle.
► Guide the seat belt as it is reeled in.
Height adjustment
► To adjust the height of the anchorage point,
squeeze control A and slide it to the notch
desired.
Rear seat belts
► The system becomes active at speeds
below 19 mph (30 km/h); this lamp comes
on in green in the instrument panel.
►
When the vehicle begins its descent, you can
release the accelerator and brake pedals; the
system regulates the speed:
– if the gearbox is in first or second gear ,
the speed decreases and the
indicator
lamp flashes rapidly,
–
if the gearbox is in neutral or if the clutch pedal
is depressed, the speed decreases and the
indicator
lamp flashes slowly; in this case, the
maintained descent speed is lower.
On a descent, with the vehicle stationary, if you
release the accelerator and brake pedals, the
system will release the brakes to set the vehicle
gradually in motion.
The brake lamps light up automatically when the
system is regulating.
If the speed exceeds 19 mph (30
km/h),
regulation is paused automatically, the
indicator
lamp goes back to grey in the
instrument panel, but the green indicator lamp in
the button remains on.
Regulation resumes automatically when the
speed falls below 19 mph (30
km/h) again, if the
slope and pedal release conditions are met.
You can depress the accelerator or brake pedal
again at any time.
Off
► Press the button until its indicator lamp goes
off; the indicator lamp on the instrument panel
also goes off.
At speeds above 43 mph (70
km/h), the system
is automatically deactivated; the indicator lamp in
the button goes off.
Malfunction
If a fault occurs with the system, this
warning lamp comes on in green,
accompanied by the display of a message in the
instrument panel.
Have the system checked by a PEUGEOT
dealer or a qualified workshop.
Seat belts
Inertia reel
The seat belts are equipped with an inertia reel
which allows the strap length to automatically
adjust to your shape. The seat belt returns to its
storage automatically when it is not used.
The inertia reels are fitted with a device which
automatically locks the strap in the event of a
collision, emergency braking or if the vehicle rolls
over. It can be released by pulling the strap firmly
and then releasing it so that it reels in slightly.
Pyrotechnic pretensioning
This system improves safety in the event of a
frontal or side impact.
Depending on the severity of the impact, the
pyrotechnic pretensioning system instantly
tightens the seat belts against the body of the
occupants.
The pyrotechnic pretensioning seat belts are
enabled when the ignition is on.
Force limiter
This system reduces the pressure of the seat
belt on the chest of the occupant, thus improving
their protection.
In the event of an impact
Depending on the nature and
seriousness of impacts, the pyrotechnic
pretensioner device may trigger before
and independently of airbag deployment.
Deployment of the pretensioners is
accompanied by a slight discharge of
harmless smoke and a noise, due to the
activation of the pyrotechnic cartridge
incorporated in the system.
In all cases, the airbag warning lamp comes
on.
Following an impact, have the seat belt
system checked, and if necessary replaced,
by a PEUGEOT dealer or a qualified
workshop.
Front seat belts
The front seat belts are fitted with a pyrotechnic
pretensioning system and force limiter.
Page 97 of 308
95
Safety
5Fastening
► Pull the strap, then insert the tongue in the
buckle.
►
Check that the seat belt is fastened correctly
by pulling on the strap.
Unfastening
► Press the red button on the buckle.
► Guide the seat belt as it is reeled in.
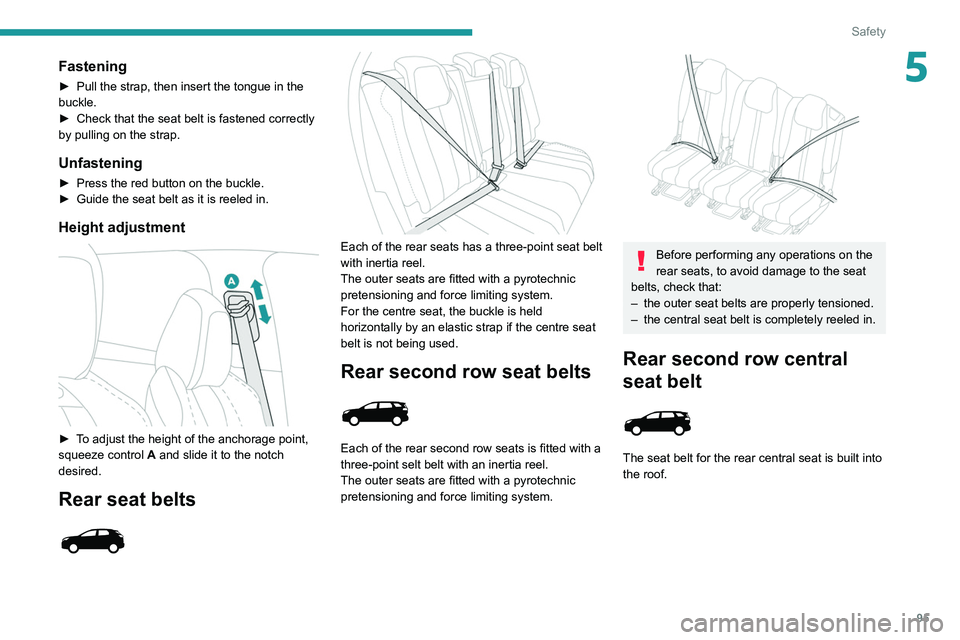
Height adjustment
► To adjust the height of the anchorage point,
squeeze control A and slide it to the notch
desired.
Rear seat belts
Each of the rear seats has a three-point seat belt
with inertia reel.
The outer seats are fitted with a pyrotechnic
pretensioning and force limiting system.
For the centre seat, the buckle is held
horizontally by an elastic strap if the centre seat
belt is not being used.
Rear second row seat belts
Each of the rear second row seats is fitted with a
three-point selt belt with an inertia reel.
The outer seats are fitted with a pyrotechnic
pretensioning and force limiting system.
Before performing any operations on the
rear seats, to avoid damage to the seat
belts, check that:
–
the outer seat belts are properly tensioned.
–
the central seat belt is completely reeled in.
Rear second row central
seat belt
The seat belt for the rear central seat is built into
the roof.