Page 205 of 308

203
In the event of a breakdown
8Halogen bulbs (Hx)
To ensure good quality lighting, check
that the bulb is correctly positioned in its
housing.
Direction indicators
Rapid flashing of a direction indicator
lamp (left or right) indicates that one of
the bulbs on the corresponding side has
failed.
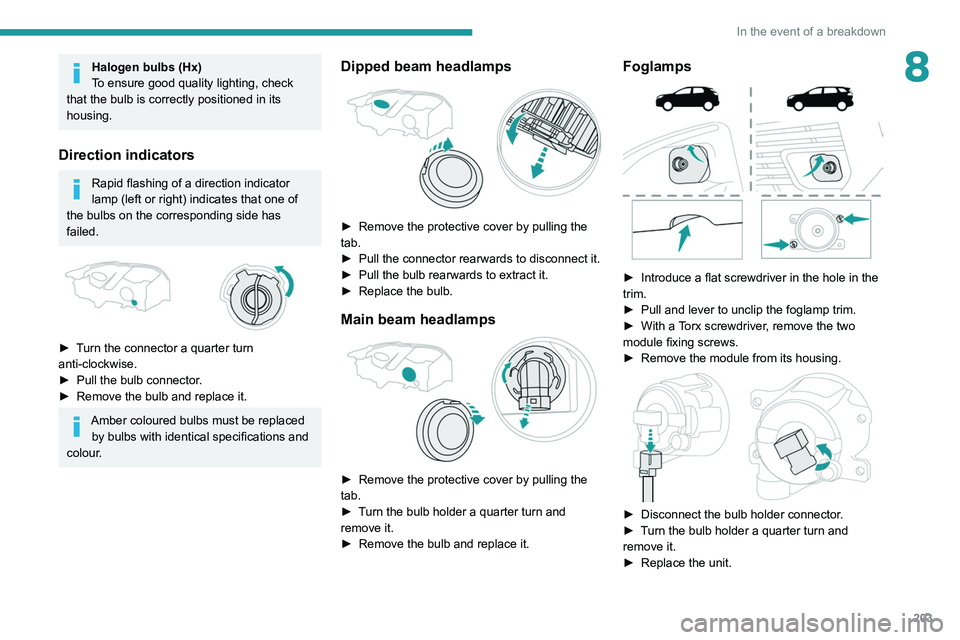
► Turn the connector a quarter turn
anti-clockwise.
►
Pull the bulb connector
.
►
Remove the bulb and replace it.
Amber coloured bulbs must be replaced by bulbs with identical specifications and
colour.
Dipped beam headlamps
► Remove the protective cover by pulling the
tab.
►
Pull the connector rearwards to disconnect it.
►
Pull the bulb rearwards to extract it.
►
Replace the bulb.
Main beam headlamps
► Remove the protective cover by pulling the
tab.
►
T
urn the bulb holder a quarter turn and
remove it.
►
Remove the bulb and replace it.
Foglamps
► Introduce a flat screwdriver in the hole in the
trim.
►
Pull and lever to unclip the foglamp trim.
►
With a
Torx screwdriver, remove the two
module fixing screws.
►
Remove the module from its housing.
► Disconnect the bulb holder connector .
► T urn the bulb holder a quarter turn and
remove it.
►
Replace the unit.
Page 206 of 308
204
In the event of a breakdown
To replace this type of bulb, you can also contact a PEUGEOT dealer or a qualified
workshop.
Rear lamps
1. Brake lamps (LED)
2. Sidelamps/daytime running lamps (LED)
3. Direction indicators (WY16W amber)
4. Reversing lamps (W16W)
5. Foglamps (P21W)
Direction indicators (on the wings)
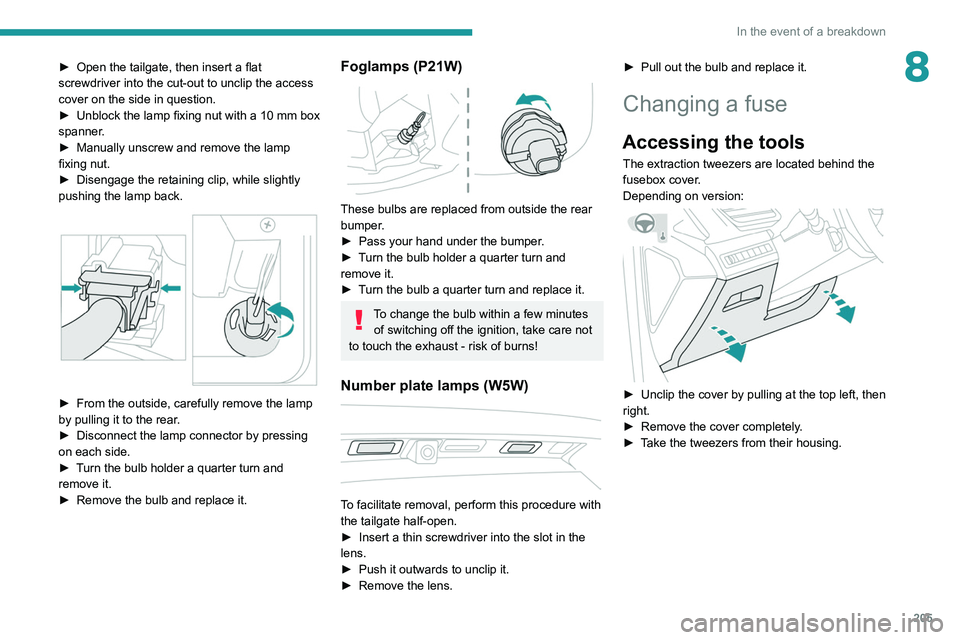
► Open the tailgate, then unclip the access
cover on the side in question.
►
Unblock the lamp fixing nut with a 10
mm box
spanner.
►
T
o avoid losing the nut in the wing trim if it
drops, first place a cloth below it.
►
Manually unscrew and remove the lamp
fixing nut.
►
Disengage the retaining clip, while slightly
pushing the lamp back.
► From the outside, carefully remove the lamp
by pulling it to the rear , then up.
►
Disconnect the lamp connector
.
►
T
urn the bulb holder a quarter turn using a
universal pair of pliers, if necessary, and pull it
out.
►
Remove the bulb and replace it.
Reversing lamps (on the tailgate)
Page 207 of 308

205
In the event of a breakdown
8► Open the tailgate, then insert a flat
screwdriver into the cut-out to unclip the access
cover on the side in question.
►
Unblock the lamp fixing nut with a 10
mm box
spanner.
►
Manually unscrew and remove the lamp
fixing nut.
►
Disengage the retaining clip, while slightly
pushing the lamp back.
► From the outside, carefully remove the lamp
by pulling it to the rear .
►
Disconnect the lamp connector by pressing
on each side.
►
T
urn the bulb holder a quarter turn and
remove it.
►
Remove the bulb and replace it.
Foglamps (P21W)
These bulbs are replaced from outside the rear
bumper.
►
Pass your hand under the bumper
.
►
T
urn the bulb holder a quarter turn and
remove it.
►
T
urn the bulb a quarter turn and replace it.
To change the bulb within a few minutes of switching off the ignition, take care not
to touch the exhaust - risk of burns!
Number plate lamps (W5W)
To facilitate removal, perform this procedure with
the tailgate half-open.
►
Insert a thin screwdriver into the slot in the
lens.
►
Push it outwards to unclip it.
►
Remove the lens. ►
Pull out the bulb and replace it.
Changing a fuse
Accessing the tools
The extraction tweezers are located behind the
fusebox cover.
Depending on version:
► Unclip the cover by pulling at the top left, then
right.
►
Remove the cover completely
.
►
T
ake the tweezers from their housing.
Page 212 of 308

210
In the event of a breakdown
Version 2 (Eco)
Fuse N°Rating (A)Functions
F16 25 AFront foglamps.
F18 10 ARight-hand main beam headlamp.
F19 10 ALeft-hand main beam headlamp.
12 V battery
Procedure for starting the engine using another
battery or charging a discharged battery.
Lead-acid starter batteries
These batteries contain harmful
substances (sulphuric acid and lead).
They must be disposed of in accordance
with regulations and must never under any
circumstances be discarded with household
waste.
Take used remote control batteries and
vehicle batteries to a special collection point.
Protect your eyes and face before
handling the battery.
All operations on the battery must be carried
out in a well ventilated area and away from
naked flames and sources of sparks, to avoid
any risk of explosion or fire.
Wash your hands afterwards.
Access to the battery
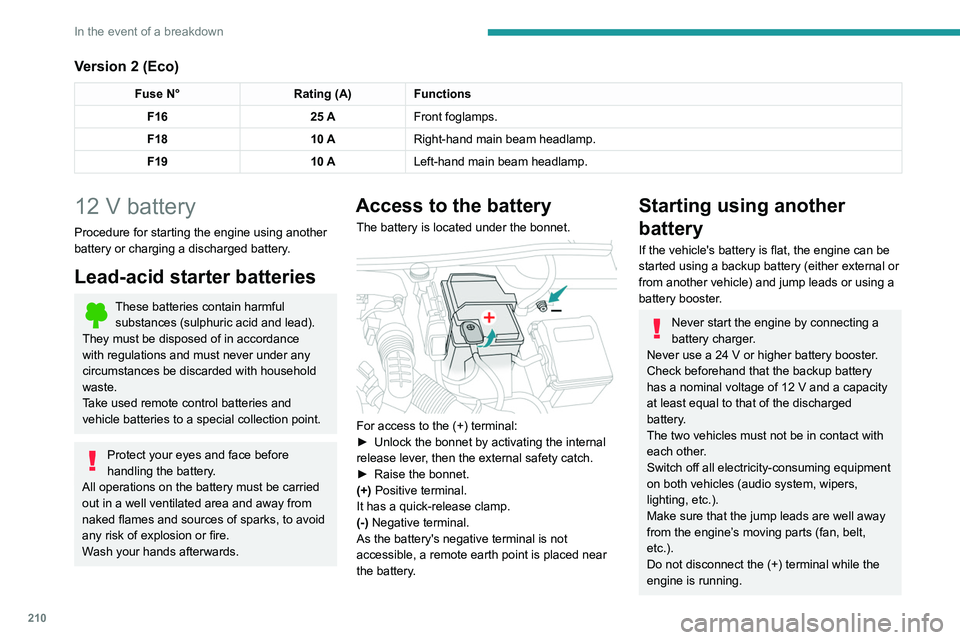
The battery is located under the bonnet.
For access to the (+) terminal:
► Unlock the bonnet by activating the internal
release lever
, then the external safety catch.
►
Raise the bonnet.
(+)
Positive terminal.
It has a quick-release clamp.
(-) Negative terminal.
As the battery's negative terminal is not
accessible, a remote earth point is placed near
the battery.
Starting using another
battery
If the vehicle's battery is flat, the engine can be
started using a backup battery (either external or
from another vehicle) and jump leads or using a
battery booster.
Never start the engine by connecting a
battery charger.
Never use a 24
V or higher battery booster.
Check beforehand that the backup battery
has a nominal voltage of 12
V and a capacity
at least equal to that of the discharged
battery.
The two vehicles must not be in contact with
each other.
Switch off all electricity-consuming equipment
on both vehicles (audio system, wipers,
lighting, etc.).
Make sure that the jump leads are well away
from the engine’s moving parts (fan, belt,
etc.).
Do not disconnect the (+) terminal while the
engine is running.