2020 OPEL CORSA F brake disc
[x] Cancel search: brake discPage 103 of 229

Driving and operating1019Warning
If the vehicle battery is discharged,
the vehicle must not be towed,
tow-started or jump-started as the
steering wheel lock cannot be
disengaged.
Smart access
This function enables the starting of the vehicle via a mobile device. The
vehicle is controlled via an
application.
After entering into the vehicle and
confirming a message, there are
10 seconds to start the vehicle.
When no message pops up, place the smart phone in the designated area.
Operation on vehicles with
electronic key system in case of
failure
If either the electronic key fails or the battery of the electronic key is weak,
a message may be displayed in the
Driver Information Centre.
Hold the electronic key at the marking on the steering column cover as
shown in the illustration.
On vehicles with manual
transmission, select neutral gear,
operate the clutch pedal, the brake
pedal and press Start/Stop.
On vehicles with automatic
transmission, set the selector lever to position P, operate the brake pedal
and press Start/Stop.
This option is intended for
emergencies only. Replace the
electronic key battery as soon as
possible 3 11.
For unlocking or locking the doors,
see fault in radio remote control unit
or electronic key system 3 12.
Starting the engine
Vehicles with ignition switch
Turn key to position 1 to release the
steering wheel lock.
Manual transmission: operate clutch
and brake pedal.
Automatic transmission: operate
brake pedal and move selector lever
to P or N.
Do not operate accelerator pedal.
Page 106 of 229

104Driving and operatingAutostopVehicles with manual transmission
Activate an Autostop as follows:
● Set the selector lever to neutral.
● Release the clutch pedal.
The engine will be switched off while
the ignition stays on.Vehicles with automatic transmission If the vehicle is at a standstill with
depressed brake pedal, Autostop is
activated automatically.
The engine will be switched off while
the ignition stays on.
The stop-start system will be disabled
on steep inclines.
Indication
An Autostop is indicated by control
indicator n.
During an Autostop, the heating and
brake performance will be
maintained.
Conditions for an Autostop
The stop-start system checks if each
of the following conditions is fulfilled.
● The stop-start system is not manually deactivated.
● The driver's door is closed or the driver's seat belt is fastened.
● The vehicle battery is sufficiently charged and in good condition.
● The engine is warmed up.
● The engine coolant temperature is not too high.
● The engine exhaust temperature is not too high, e.g. after driving
with high engine load.
● The ambient temperature is not too low or too high.
● The climate control system allows an Autostop.
● The brake vacuum is sufficient.● The self-cleaning function of the exhaust filter is not active.
● The vehicle was driven at least at
walking speed since the last
Autostop.
Otherwise an Autostop will be
inhibited.
Note
The Autostop may be inhibited for
several hours after a battery
replacement or reconnection.
Certain settings of the climate control
system may inhibit an Autostop.
Climate control 3 90.
Immediately after higher speed
driving an Autostop may be inhibited.
New vehicle running-in 3 99.
Vehicle battery discharge protection
To ensure reliable engine restarts,
several vehicle battery discharge
protection features are implemented
as part of the stop-start system.
Page 118 of 229

116Driving and operating9Warning
Always apply parking brake firmly
without operating the release
button, and apply as firmly as
possible on a downhill or uphill
slope.
To release the parking brake, pull
the lever up slightly, press the
release button and fully lower the
lever.
To reduce the operating forces of
the parking brake, depress the
foot brake at the same time.
Control indicator h 3 68.
Electric parking brake
Applying when vehicle is stationary
9 Warning
Pull switch m for a minimum of
1 second until control indicator m
illuminates constantly and electric
parking brake is applied 3 69 . The
electric parking brake operates automatically with adequate force.
Before leaving the vehicle, check
the electric parking brake status.
Control indicator m 3 69.
The electric parking brake can always
be activated, even if the ignition is off.
Do not operate electric parking brake
system too often without engine
running as this will discharge the
vehicle battery.
Releasing
Switch on ignition. Keep foot brake
pedal depressed and then push
switch j.
Drive away function
Vehicles with manual transmission:
Depressing the clutch pedal and then slightly releasing the clutch pedal and
slightly depressing the accelerator
pedal releases the electric parking
brake automatically. This is only
possible if the automatic operation of
the electric parking brake is activated. It is not possible when switch j is
pulled at the same time.
Vehicles with automatic transmission: Engaging R, D or M and then
depressing the accelerator pedal
releases the electric parking brake
automatically. This is only possible if
the automatic operation of the electric
Page 164 of 229

162Vehicle careCaution
When transporting the vehicle on
a train or on a recovery vehicle, the
mud flaps might be damaged.
Vehicle storage
Storage for a long period of time
If the vehicle is to be stored for several months:
● Wash and wax the vehicle.
● Have the wax in the engine compartment and underbody
checked.
● Clean and preserve the rubber seals.
● Fill up fuel tank completely.
● Change the engine oil.
● Drain the washer fluid reservoir.
● Check the coolant antifreeze and
corrosion protection.
● Adjust tyre pressure to the value specified for full load.
● Park the vehicle in a dry, wellventilated place. Engage first or
reverse gear or set selector lever
to P. Prevent the vehicle from
rolling.
● Do not apply the parking brake.
● Open the bonnet, close all doors and lock the vehicle.
● Disconnect the clamp from the negative terminal of the vehicle
battery. Note that all systems are
not functional, e.g. anti-theft
alarm system.
Putting back into operation
When the vehicle is to be put back into operation:
● Connect the clamp to the negative terminal of the vehicle
battery. Initialise the power
windows 3 23.
● Check tyre pressure.
● Fill up the washer fluid reservoir.
● Check the engine oil level.
● Check the coolant level.
● Fit the number plate if necessary.End-of-life vehicle recovery
Information on end-of-life vehicle
recovery centres and the recycling of
end-of-life vehicles is available on our website, where legally required. Only
entrust this work to an authorised
recycling centre.
Page 168 of 229
166Vehicle careCaution
Only washer fluid with a sufficient
antifreeze concentration provides
protection at low temperatures or
a sudden drop in temperature.
Washer fluid 3 201.
Brakes In the event of minimum thickness of
the brake lining, a squealing noise
sounds during braking.
Continued driving is possible but
have the brake lining replaced as
soon as possible.
Once new brake linings are installed,
do not brake unnecessarily hard for
the first few journeys.
Brake fluid
9 Warning
Brake fluid is poisonous and
corrosive. Avoid contact with eyes,
skin, fabrics and painted surfaces.
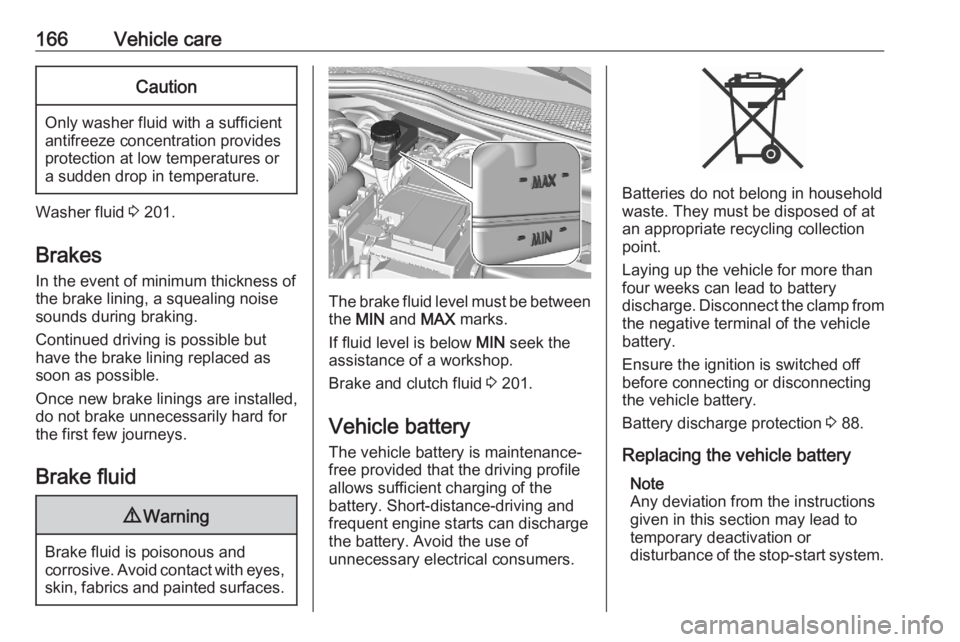
The brake fluid level must be betweenthe MIN and MAX marks.
If fluid level is below MIN seek the
assistance of a workshop.
Brake and clutch fluid 3 201.
Vehicle battery
The vehicle battery is maintenance-
free provided that the driving profile
allows sufficient charging of the
battery. Short-distance-driving and
frequent engine starts can discharge
the battery. Avoid the use of
unnecessary electrical consumers.
Batteries do not belong in household
waste. They must be disposed of at
an appropriate recycling collection
point.
Laying up the vehicle for more than
four weeks can lead to battery
discharge. Disconnect the clamp from the negative terminal of the vehicle
battery.
Ensure the ignition is switched off
before connecting or disconnecting
the vehicle battery.
Battery discharge protection 3 88.
Replacing the vehicle battery Note
Any deviation from the instructions
given in this section may lead to temporary deactivation or
disturbance of the stop-start system.
Page 193 of 229

Vehicle care191Jump starting
Do not start with quick charger.
A vehicle with a discharged vehicle
battery can be started using jump
leads and the vehicle battery of
another vehicle.9 Warning
Be extremely careful when starting
with jump leads. Any deviation
from the following instructions can
lead to injuries or damage caused
by battery explosion or damage to the electrical systems of both
vehicles.
9 Warning
Avoid contact of the battery with
eyes, skin, fabrics and painted
surfaces. The fluid contains
sulphuric acid which can cause
injuries and damage in the event
of direct contact.
● Never expose the vehicle battery
to naked flames or sparks.
● A discharged vehicle battery can already freeze at a temperature
of 0 °C. Defrost the frozen battery before connecting jump leads.
● Wear eye protection and protective clothing when
handling a battery.
● Use a booster battery with the same voltage (12 V). Its capacity
(Ah) must not be much less than
that of the discharged vehicle battery.
● Use jump leads with insulated terminals and a cross section of
at least 16 mm 2
(25 mm 2
for
diesel engines).
● Do not disconnect the discharged
vehicle battery from the vehicle.
● Switch off all unnecessary electrical consumers.
● Do not lean over the vehicle battery during jump starting.
● Do not allow the terminals of one
lead to touch those of the other
lead.● The vehicles must not come into contact with each other during
the jump starting process.
● Apply the parking brake, transmission in neutral,
automatic transmission in P.
Lead connection order:
1. Connect the red lead to the positive terminal of the booster
battery.
2. Connect the other end of the red lead to the positive terminal of the
discharged battery.
Page 198 of 229

196Vehicle careInterior careInterior and upholstery
Only clean the vehicle interior,
including the instrument panel fascia
and panelling, with a dry cloth or
interior cleaner.
Clean the leather upholstery with
clear water and a soft cloth. In case of
heavy soiling, use leather care.
The instrument cluster and the
displays should only be cleaned using a soft damp cloth. If necessary use aweak soap solution.
Clean fabric upholstery with a
vacuum cleaner and brush. Remove
stains with an upholstery cleaner.
Clothing fabrics may not be
colourfast. This could cause visible
discolourations, especially on light-
coloured upholstery. Removable
stains and discolourations should be
cleaned as soon as possible.
Clean seat belts with lukewarm water or interior cleaner.Caution
Close Velcro fasteners as open
Velcro fasteners on clothing could damage seat upholstery.
The same applies to clothing with
sharp-edged objects, like zips or
belts or studded jeans.
Plastic and rubber parts
Plastic and rubber parts can be
cleaned with the same cleaner as
used to clean the body. Use interior cleaner if necessary. Do not use any
other agent. Avoid solvents and petrol in particular. Do not use high-
pressure jet cleaners.
Floor mats
9 Warning
If a floor mat has the wrong size or
is not properly installed, it can
interfere with the accelerator pedal
and/or brake pedal, what can
cause unintended acceleration
and/or increased stopping
distance which can cause a crash and injury.
Use the following guidelines for
proper floor mat usage.
● The original equipment floor mats
were designed for your vehicle. If the floor mats need replacing, it
is recommended that certified
floor mats be purchased. Always
check that the floor mats do not
interfere with the pedals.
● Use the floor mat with the correct
side up. Do not turn it over.
● Do not place anything on top of the driver side floor mat.
● Use only a single floor mat on the
driver side.
● Do not place one floor mat on top
of another.
Inserting and removing the floor
mats
The driver side floor mat is held in
place by two retainers.
Page 224 of 229

222IndexAAccessories and vehicle modifications .......................... 161
Active emergency braking ....73, 132
Adaptive cruise control ..............124
AdBlue .................................. 71, 107
Adjustable air vents .....................96
Advanced parking assist ............141
Airbag and belt tensioners ...........67
Airbag deactivation ................39, 67
Airbag label................................... 34 Airbag system .............................. 34
Air conditioning regular operation 97
Air conditioning system ................ 90
Air intake ...................................... 97
Air vents........................................ 96
Antilock brake system ................ 115
Antilock brake system (ABS) .......69
Anti-theft alarm system ................19
Anti-theft locking system .............. 18
Appearance care ........................194
Armrest ......................................... 31
Ashtrays ....................................... 61 Automatic anti-dazzle ..................23
Automatic crash notification (ACN) 78
Automatic light control .................81
Automatic locking ........................16
Automatic operation of electric parking brake off .......................69
Automatic transmission .............110Autostop............................... 72, 103
Auxiliary heater ............................. 96
B Battery discharge protection ........88
BlueInjection ............................... 107
Bonnet ....................................... 163
Brake and clutch fluid .................201
Brake and clutch system .............68
Brake assist ............................... 118
Brake fluid .................................. 166
Brakes ........................................ 166
Breakdown.................................. 192
Bulb replacement ....................... 169
C Capacities .................................. 210
Catalytic converter .....................107
Central locking system ................12
Centre console storage ...............48
Changing tyre and wheel size ...182
Charging system .......................... 67
Child locks ................................... 17
Child restraint installation locations ................................... 44
Child restraints.............................. 41
Child restraint systems ................41
Cigarette lighter ........................... 61
Climate control systems ...............89
Clock............................................. 59
Control indicators.......................... 66