2020 OPEL CORSA F screen
[x] Cancel search: screenPage 21 of 103

Basic operation21Set Synchronization with GPS (UTC)
to OFF and then select the Time field
to set the desired time.
Select the Date tab and then select
the Date: field to set the desired date.
Adjusting the screen
Select Screen configuration .
Text scroll function
Select the Animation tab.
If long texts on the screen should be
scrolled automatically, activate
Automatic scrolling .
If Automatic scrolling is deactivated,
long texts are truncated.
Adjusting the brightness
Select Brightness and set the
brightness of the screen to the
desired level.
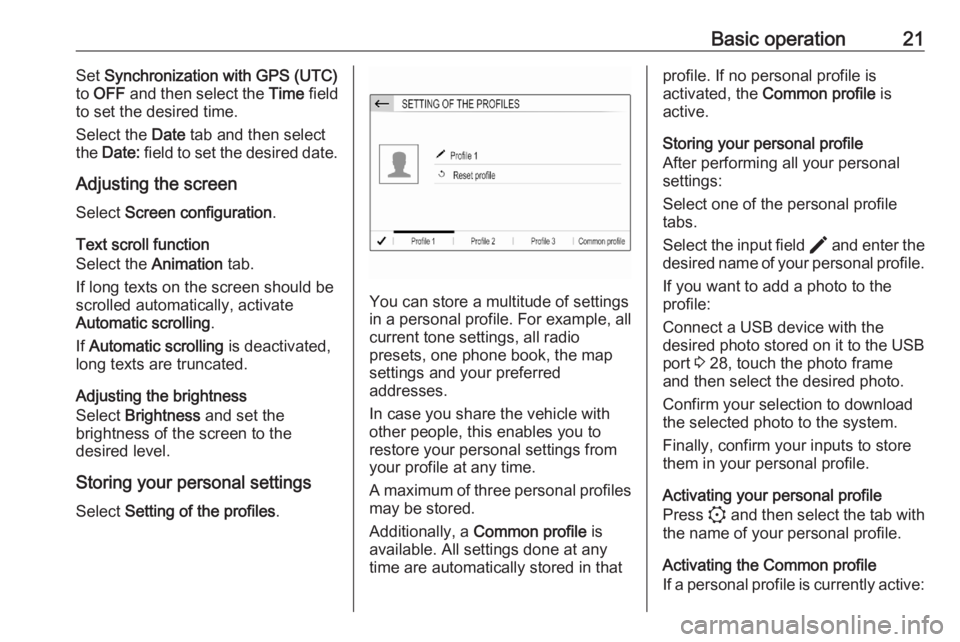
Storing your personal settings
Select Setting of the profiles .
You can store a multitude of settings
in a personal profile. For example, all
current tone settings, all radio
presets, one phone book, the map
settings and your preferred
addresses.
In case you share the vehicle with other people, this enables you to
restore your personal settings from
your profile at any time.
A maximum of three personal profiles may be stored.
Additionally, a Common profile is
available. All settings done at any
time are automatically stored in that
profile. If no personal profile is
activated, the Common profile is
active.
Storing your personal profile
After performing all your personal
settings:
Select one of the personal profile
tabs.
Select the input field > and enter the
desired name of your personal profile.
If you want to add a photo to the
profile:
Connect a USB device with the
desired photo stored on it to the USB
port 3 28, touch the photo frame
and then select the desired photo.
Confirm your selection to download
the selected photo to the system.
Finally, confirm your inputs to store
them in your personal profile.
Activating your personal profile
Press : and then select the tab with
the name of your personal profile.
Activating the Common profile
If a personal profile is currently active:
Page 29 of 103

External devices29Bluetooth audio streamingStreaming allows you to listen to
music from your smartphone.
For a detailed description on how to
establish a Bluetooth connection
3 48.
If audio playback does not start
automatically, it may be necessary to
start the playback on the smartphone.
First adjust the volume on your
smartphone (to a high level). Then
adjust the volume of Infotainment system.
File formats The audio equipment supports
different file formats.
Playing audio
Activating the music function
Connecting the USB or Bluetooth
device 3 28.
If device already connected, but
playback of stored music files not
active:Press b, select SOURCES and then
select the respective source.
Playback of the audio tracks starts
automatically.
Playback functions
Interrupting and resuming playback
Touch 5 to interrupt playback. The
screen button changes to 4.
Touch 4 to resume playback.Playing the previous or next track
Touch P or Q.Fast forwarding and rewinding
Touch and hold P or Q. Release to
return to normal playback mode.Alternatively, you can move the slider showing the current track position to
the left or right.Playing tracks randomly
Touch button repeatedly to toggle
between the available random
modes.
1 : play tracks of currently selected
list (album, artist, etc.) in random
order.
2 : play all tracks stored on
connected device in random order.
k : play tracks of currently
selected list (album, artist, etc.) in
normal playback mode.Repeating tracks
Touch button repeatedly to switch
repeat mode on or off.
3 : repeat tracks of currently
selected list (album, artist, etc.).
f : play tracks of currently selected
list (album, artist, etc.) in normal
playback mode.
Browse music functions
(only available for devices connected
via USB)
Page 30 of 103

30External devicesYou can have your music files sorted
according to different criteria. Two
options are available for browsing the
music files stored on the connected
USB device.Browsing via main menu
If you want to change the currently
active USB source, select
SOURCES and then select the
desired source. The respective main
menu is displayed.
Select the button showing the
currently selected sorting criteria, e.g. Sort: Album or Sort: Artist , and then
select the desired new sorting criteria.
A sorting process is performed.
Select List and then select the desired
track.
Playback of the selected track is
started.Browsing via device menu
Select OPTIONS and then select
Music files .
If you want to change the currently active USB source, select Other.
Select the desired sorting criteria, e.g.
Albums or Artists , and then select the
desired track.Playback of the selected track is
started.
Displaying picturesYou can view pictures stored on a USB device.
Activating the picture viewer Connecting the USB device 3 28.
If device already connected, but
picture viewer not active:
Press b, select OPTIONS and then
select Managing photos .
Select the desired picture.
A slide show of all stored picture files
starts automatically.
Touch the screen to display the menu bar.
Viewing the previous or next
picture
Touch f or g .
Starting or stopping a slide show Select 4 to view the pictures stored
on the USB device in a slide show.
Touch 5 to end the slide show.
Page 31 of 103

External devices31Using smartphone
applications
Phone projection
The phone projection applications
Apple CarPlay and Android Auto
display selected apps from your
smartphone on the Info Display and
allow their operation directly via the
Infotainment controls.
Check with the device's manufacturer if this function is compatible with your
smartphone and if this application is
available in the country you are in.
Preparing the smartphone
iPhone ®
: Make sure Siri ®
is activated
on your phone.
Android phone: Download the
Android Auto app to your phone from
the Google Play™ Store.
Connecting the smartphoneiPhone
Connect the phone to the USB port 3 28.If the phone is already connected via
Bluetooth, upon connecting to the
USB port and launching Apple
CarPlay, the Bluetooth connection
will disconnect.Android phone
Connect the phone via Bluetooth
3 48 and then connect the phone to
the USB port 3 28.
Starting phone projection
Press d and then touch
Apple CarPlay or Android Auto .
The phone projection screen
displayed depends on your
smartphone and software version.
Returning to the Infotainment screen
Press, e.g., the b button on the
control panel.
Page 34 of 103

34NavigationRoute guidance active
● The map view is displayed.
● The active route is indicated by a
coloured line.
● The moving vehicle is marked by
an arrow pointing into the
direction of travel.
● The next turning manoeuvre is shown in a separate field at the
top left of the map view.
Depending on the situation
information on lane guidance or
the second next turning
manoeuvre may be displayed additionally.
● The arrival time and the remaining distance to the
destination is shown at the top
right of the map view.
Customise the map display
Map views
Three different map views are
available: North orientation , Vehicle
orientation and Perspective view .
Repeatedly touch L to toggle
between these map views.
Map colours
Depending on the external lighting
conditions, the colouring of the map
screen (light colours for the day and
dark colours for the night) can be
adapted.
Touch ! to display a menu on the
right side of the screen.
Select Map colour repeatedly to
toggle between light and dark
colours.
POI (Points of Interest) icons on the
map
POIs are points of general interest,
e.g. petrol stations or car parks.
The display of POI categories shown
on the map may be personally
adapted.
Activate the desired POI categories.
The map view changes accordingly.
Page 35 of 103

Navigation35Alternatively, select POI on map to
display a menu with a multitude of
POI categories and subcategories to
choose from. Activate the desired
POI categories.
Traffic events
Traffic events may be indicated on the
map. Additionally, information on
these events may be displayed in a
list.
Select Consult map to switch to an
alternative map display with new
menu options.
The map view is switched to North
orientation mode and and may
display a greater part of the route.
Touch the traffic jam icon to show
traffic events on the map. Touch Ï to
show a list with information on these
traffic events.
If you want to display a different map
section:
Touch + to show the area around the
current location.
Touch , to show the entire route.
Touch . to show the area around the
destination.
To return to the default navigation
view, touch 3.
Autozoom functionIf the autozoom function is activated
( AUTO is displayed below the map
view), the zoom level changes
automatically when approaching a
turning manoeuvre during active
route guidance. This way, you always get a good overview of the respective
manoeuvre.
If the autozoom function is
deactivated, the selected zoom level
remains the same during the whole
route guidance process.
To activate or deactivate the function: Select MENU, select Settings and
then select the Aspect tab.
Activate or deactivate Automatic
zoom setting .
Map manipulation
Moving visible map section
Place your finger anywhere on the
screen and move it in the desired
direction.
The map moves accordingly,
displaying a new section. A new
button bar is shown.
Page 36 of 103

36Navigation
8: show area around current
location again.
9 : show area around home
address.
0 : show area around destination.
To return to the default navigation
view, select 3.
Centring visible map section
Touch the desired location on the screen to centre the map around this
location.
A red K is displayed at the respective
location and the corresponding
address is shown on a label.
Manual zooming
To zoom in on a selected map
location, place two fingers on the
screen and move them away from
each other.
Alternatively, touch + below the map
view.
To zoom out and display a larger area around the selected location, place
two fingers on the screen and move
them towards each other.
Alternatively, touch - below the map
view.
Showing an overview of the route Touch ø, select Consult map and
then touch ö.
The map view is switched to North
orientation and shows an overview of
the current route.
To return to the default navigation
view, touch 3.
Voice guidance
The route guidance process can be
supported by voice prompts given out by the system.
To activate or deactivate the function: Select MENU in the navigation main
menu, select Settings and then select
the Vocal tab.
Activate or deactivate Activate
navigation messages .
Page 41 of 103

Navigation41To return to the navigation main
menu, select Finish.
To display a detailed route list of the
waypoint trip, select the Route tab.
Guidance
Route guidance is provided by the
navigation system through visual
instructions and voice prompts (voice guidance).
Visual instructions
Visual instructions are provided on
the display.
Note
When route guidance is active and
you are not within the navigation
application, turning manoeuvres are shown on the instrument clusterdisplay.
Voice guidance
Navigation voice prompts announce
which direction to follow, when
approaching an intersection at which
you need to turn.
To activate or deactivate the voice
prompts function select MENU in the
navigation main menu, select
Settings , select the Vocal tab and
then activate or deactivate Activate
navigation messages .If voice prompts are activated you can
additionally specify whether street
names should be spoken or not.
To replay the last voice guidance
instruction, touch the turn arrow on
the left side of the screen.
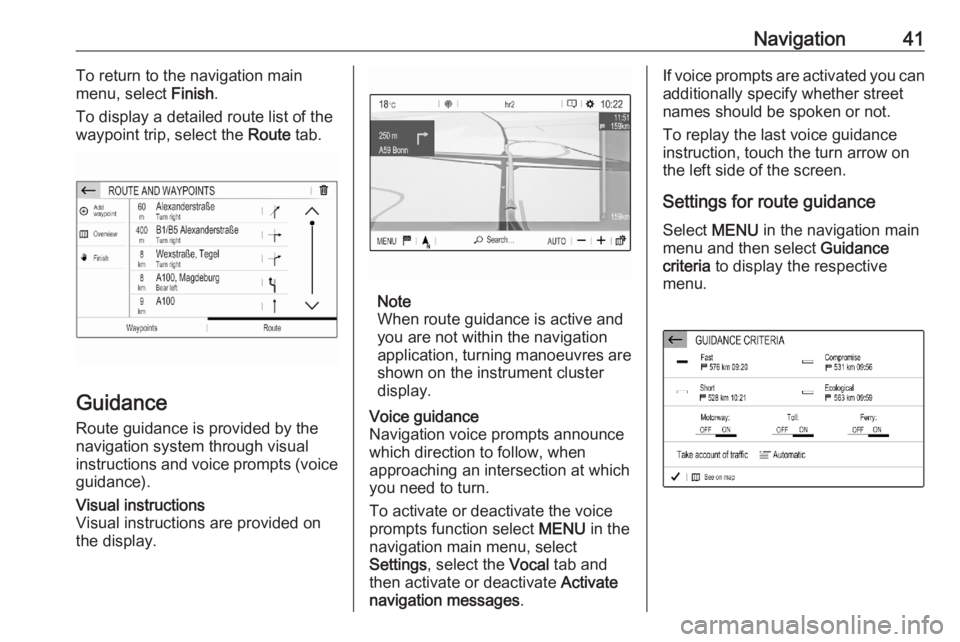
Settings for route guidance
Select MENU in the navigation main
menu and then select Guidance
criteria to display the respective
menu.