2020 NISSAN SENTRA coolant temperature
[x] Cancel search: coolant temperaturePage 90 of 528

2 Instruments and controls
Instrument panel................................2-2
Meters and gauges .............................2-4
Speedometer and odometer .................2-4
Tachometer ..................................2-5
Engine coolant temperature gauge ..........2-6
Fuel gauge ................................... 2-7
Distance To Empty (DTE) ..................... 2-7
Warning lights, indicator lights and audible
reminders .......................................2-8
Checking lights ...............................2-9
Warning lights ................................2-9
Indicator lights .............................. 2-14
Audible reminders ........................... 2-16
Vehicle information display 4.2 inch (11 cm)
TYPE A (if so equipped) ......................... 2-17
How to use the vehicle information
display ...................................... 2-18
Startup display .............................. 2-18
Settings ..................................... 2-18
Vehicle information display indicators .......2-25
Vehicle information display warnings
and indicators ............................... 2-27
Vehicle information display– 7 inch (18 cm)
Type B (if so equipped) ......................... 2-34
How to use the vehicle information
display ...................................... 2-34
Startup display .............................. 2-35Resetting the drive computer
...............2-35
Settings ..................................... 2-35
Vehicle information display indicators .......2-43
Vehicle information display warnings ........2-44
Security systems ............................... 2-52
Vehicle security system (if so equipped) .....2-52
NISSAN Vehicle Immobilizer System .........2-53
Wiper and washer switch .......................2-54
Switch operation ............................ 2-54
Rear window and outside mirror
(if so equipped) defroster switch ...............2-55
Headlight and turn signal switch ...............2-55
Headlight control switch ....................2-55
Daytime Running Lights (DRL) system
(if so equipped) .............................. 2-59
LED Daytime Running Lights (DRL)
system (if so equipped) ......................2-59
Instrument brightness control ..............
2-60
T
urn signal switch ........................... 2-60
Fog light switch (if so equipped) .............2-61
Horn ........................................... 2-62
Heated seat switches (if so equipped) ..........2-62
Heated steering wheel switch (if so equipped) . . 2-63
E-call (SOS) button (if so equipped) .............2-64
Rear Door Alert ................................. 2-64
Power outlet ................................... 2-66
Page 94 of 528
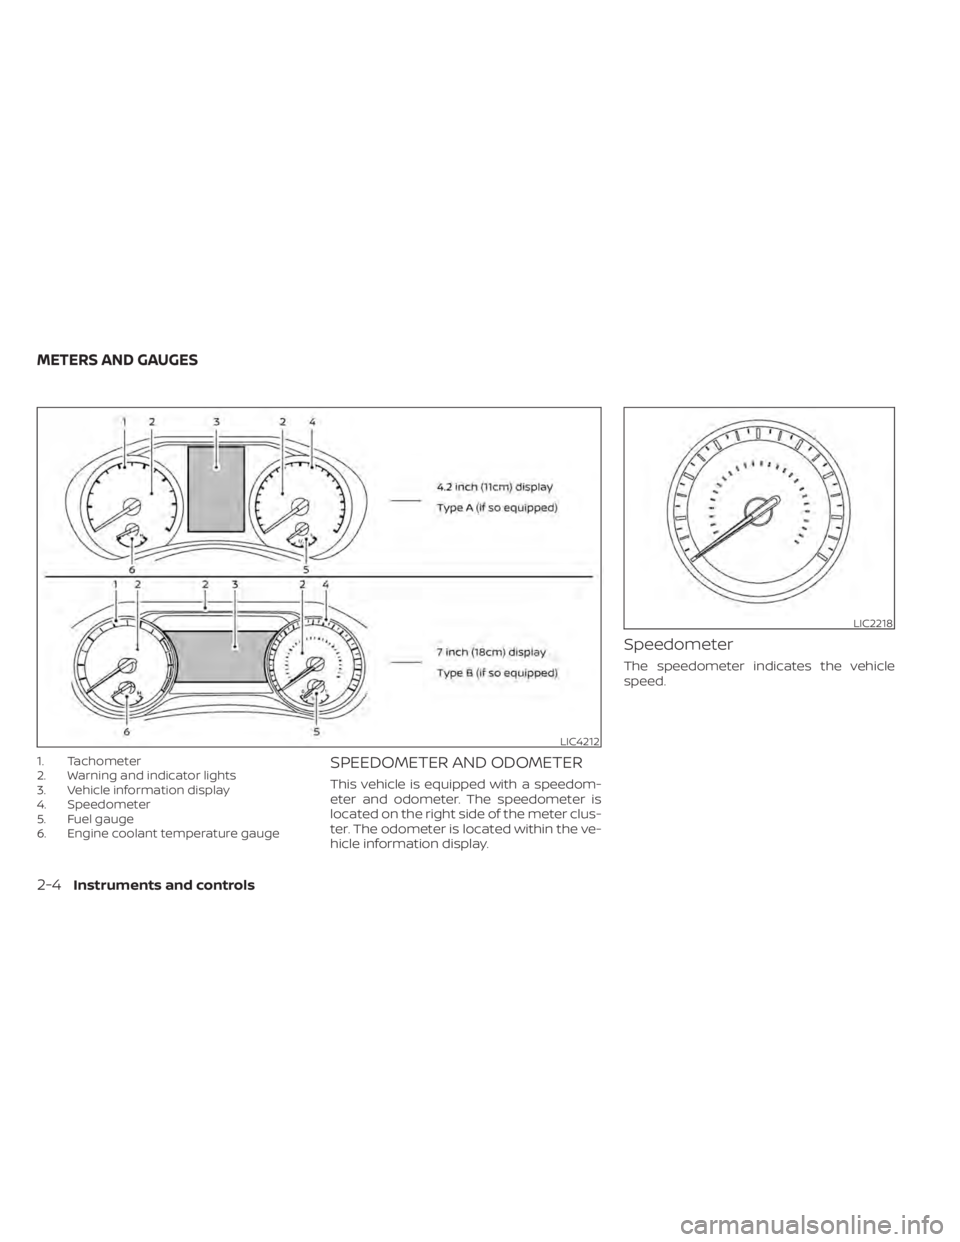
1. Tachometer
2. Warning and indicator lights
3. Vehicle information display
4. Speedometer
5. Fuel gauge
6. Engine coolant temperature gaugeSPEEDOMETER AND ODOMETER
This vehicle is equipped with a speedom-
eter and odometer. The speedometer is
located on the right side of the meter clus-
ter. The odometer is located within the ve-
hicle information display.
Speedometer
The speedometer indicates the vehicle
speed.
LIC4212
LIC2218
METERS AND GAUGES
2-4Instruments and controls
Page 96 of 528
CAUTION
When engine speed approaches the
red zone, shif t to a higher gear or re-
duce engine speed. Operating the en-
gine in the red zone may cause serious
engine damage.
ENGINE COOLANT TEMPERATURE
GAUGE
NOTE:
The ignition switch must be placed in the
ON position for the gauge to give a
reading.
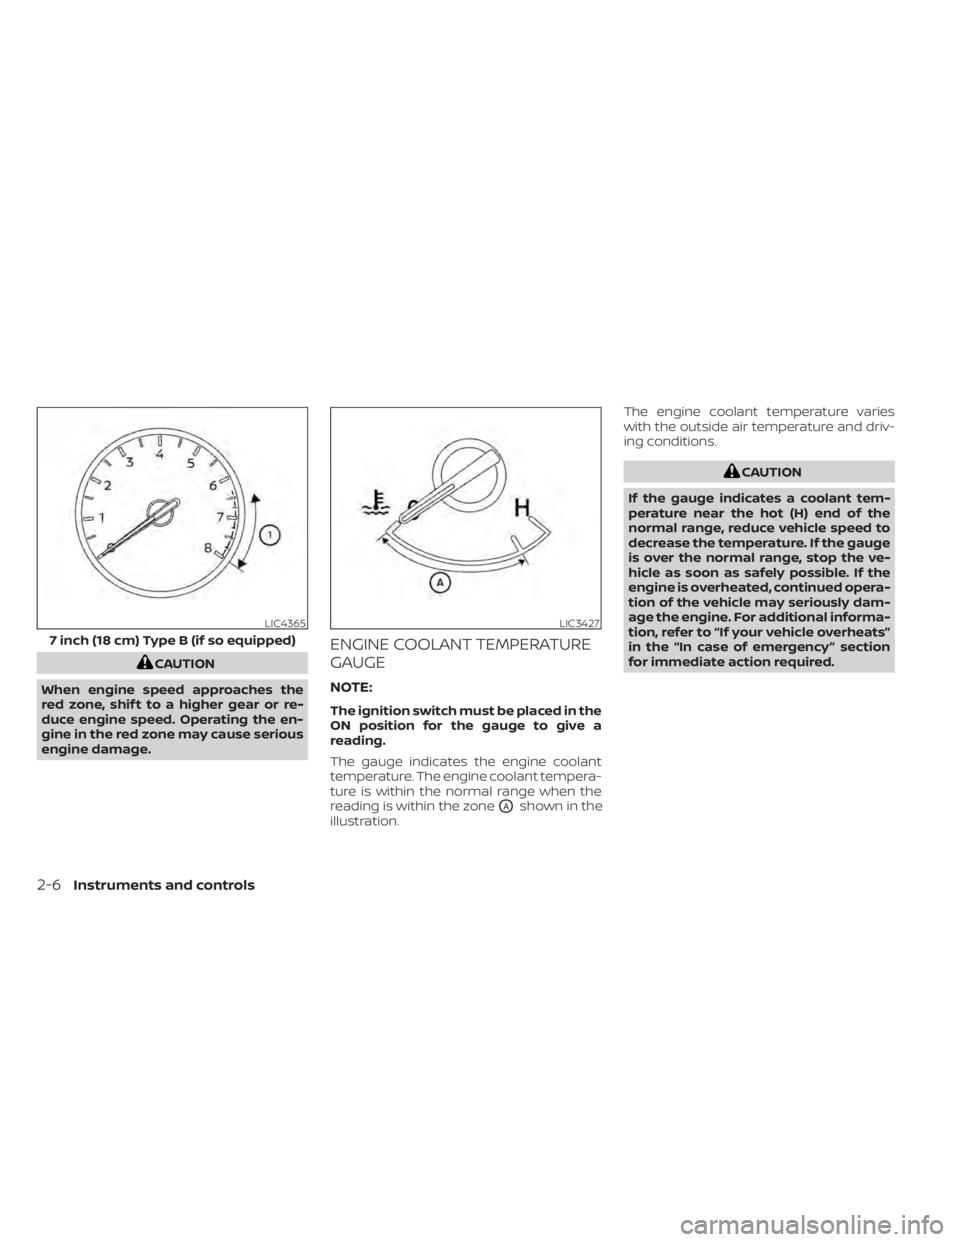
The gauge indicates the engine coolant
temperature. The engine coolant tempera-
ture is within the normal range when the
reading is within the zone
OAshown in the
illustration. The engine coolant temperature varies
with the outside air temperature and driv-
ing conditions.
CAUTION
If the gauge indicates a coolant tem-
perature near the hot (H) end of the
normal range, reduce vehicle speed to
decrease the temperature. If the gauge
is over the normal range, stop the ve-
hicle as soon as safely possible. If the
engine is overheated, continued opera-
tion of the vehicle may seriously dam-
age the engine. For additional informa-
tion, refer to “If your vehicle overheats”
in the “In case of emergency ” section
for immediate action required.
LIC4365
7 inch (18 cm) Type B (if so equipped)
LIC3427
2-6Instruments and controls
Page 238 of 528
Cooling
This mode is used to cool and dehumidif y
the air.
1. Press the
button to the off position.
2. Press the
air flow control button.
3. Turn the
fan speed control dial to
the desired position.
4. Press the A/C button. The indicator light comes on.
5. Turn the temperature control dial to the desired position.
• For quick cooling when the outside tem- perature is high, press the
button to
the ON position. Be sure to return the
to the off position for normal cooling.
MAX A/C may be used for quick cooling.
Dehumidified heating
This mode is used to heat and dehumidif y
the air.
1. Press the
button to the off position.
2. Press the
air flow control button.
3. Turn the
fan speed control dial to
the desired position.
4. Press the A/C (air conditioner) button. The indicator light comes on. 5. Turn the temperature control dial to the
desired position.
Dehumidified defogging
This mode is used to defog the windows
and dehumidif y the air.
1. Press the
air flow control button.
2. Turn the
fan speed control dial to
the desired position.
• When the
orare selected, the
air conditioner automatically turns on if
the outside temperature is more than
36°F (2°C). This dehumidifies the air which
helps defog the windshield. The
mode automatically turns off, allowing
outside air to be drawn into the passen-
ger compartment to further improve the
defogging performance.
3. Turn the temperature control dial to the desired position.
Operating tips
• Keep the windows closed while the airconditioner is in operation. • Af ter parking in the sun, drive for 2 or 3
minutes with the windows open to vent
hot air from the passenger compart-
ment. Then, close the windows. This al-
lows the air conditioner to cool the inte-
rior more quickly.
• The air conditioning system should be operated for approximately 10 minutes at
least once a month. This helps prevent
damage to the system due to lack of lu-
brication.
• A visible mist may be seen coming from the ventilators in hot, humid conditions
as the air is cooled rapidly. This does not
indicate a malfunction.
• If the engine coolant temperature gauge indicates engine coolant temperature
over the normal range, turn the air condi-
tioner off. For additional information, refer
to “If your vehicle overheats” in the “In case
of emergency” section of this manual.
• When Remote Engine Start (if so equipped) is activated, the manual cli-
mate control system will default to the
last used heating or cooling mode.
4-36Monitor, climate, audio, phone and voice recognition systems
Page 246 of 528
• When the climate system is in automaticoperation and the engine coolant tem-
perature and outside air temperature are
low, the air flow outlet may default to de-
froster mode for a maximum of 2 min-
utes 30 seconds. This is not a malfunc-
tion. Af ter the engine coolant
temperature warms up, the air flow outlet
will return to foot mode and operation will
continue normally.
• When the outside and interior cabin tem- peratures are moderate to high, the in-
take setting may default to turn off air
recirculation to allow fresh air into the
passenger compartment. You may no-
tice air flow from the foot mode, bi-level
mode, or side demist vent outlets for a
maximum of 15 seconds. This may occur
when the previous climate setting was
turned off. This is not a malfunction. Af ter
the initial warm air is expelled, the intake
will return to automatic control, the air
flow outlet will return to previous settings,
and operation will continue normally. To
exit, press any climate control button.
• Keep the moonroof (if so equipped) closed while the air conditioner is in op-
eration. • If you feel that the air flow mode you have
selected and the outlets the air is coming
out do not match, select the
mode.
• When you change the air flow mode, you may feel air flow from the foot outlets for
just a moment. This is not a malfunction. The air conditioner system in your NISSAN
vehicle is charged with a refrigerant de-
signed with the environment in mind.
This refrigerant does not harm the
earth's ozone layer.
Special charging equipment and lubricant
is required when servicing your NISSAN air
conditioner. Using improper refrigerants or
lubricants will cause severe damage to
your air conditioner system. For additional
information, refer to “Air conditioner sys-
tem refrigerant and oil recommendations”
in the “Technical and consumer informa-
tion” section of this manual.
It is recommended that you visit a NISSAN
dealer to service your “environmentally
friendly ” air conditioning system.
WARNING
The air conditioner system contains re-
frigerant under high pressure. To avoid
personal injury, any air conditioner ser-
vice should be done only by an experi-
enced technician with proper equip-
ment.
SERVICING AIR CONDITIONER
4-44Monitor, climate, audio, phone and voice recognition systems
Page 413 of 528
•Do not use the cruise control (if so
equipped) on slippery roads.
• Snow can trap dangerous exhaust
gases under your vehicle. Keep snow
clear of the exhaust pipe and from
around your vehicle.
ENGINE BLOCK HEATER (if so
equipped)
Engine block heaters are used to assist
with cold temperature starting.
The engine block heater should be used
when the outside temperature is 20°F (-7°C)
or lower.
WARNING
• Do not use your engine block heater
with an ungrounded electrical sys-
tem or a 2-pronged adapter. You can
be seriously injured by an electrical
shock if you use an ungrounded
connection.
• Disconnect and properly store the
engine block heater cord before
starting the engine. Damage to the
cord could result in an electrical
shock and can cause serious injury. •
Use a heavy-duty 3-wire, 3-pronged
extension cord rated for at least 10 A.
Plug the extension cord into a
Ground Fault Interrupt (GFI) pro-
tected, grounded 110-VAC outlet.
Failure to use the proper extension
cord or a grounded outlet can result
in a fire or electrical shock and cause
serious personal injury.
To use the engine block heater:
1. Turn the engine off.
2. Open the hood and unwrap the engine block heater cord.
3. Plug the engine block heater cord into a grounded 3-wire, 3-pronged extension
cord.
4. Plug the extension cord into a Ground Fault Interrupt (GFI) protected, grounded
110-volt AC (VAC) outlet.
5. The engine block heater must be plugged in for at least2-4hours, de-
pending on outside temperatures, to
properly warm the engine coolant. Use
an appropriate timer to turn the engine
block heater on. 6. Before starting the engine, unplug and
properly store the cord to keep it away
from moving parts.
Starting and driving5-127
Page 425 of 528

CAUTION
• Do not push start this vehicle. The
three-way catalyst may be
damaged.
• Continuously Variable Transmission
(CVT) models and Manual Transmis-
sion (M/T) cannot be push-started or
tow-started. Attempting to do so
may cause transmission damage.
• For Manual Transmission (M/T) mod-
els, never try to start the vehicle by
towing it. When the engine starts, the
forward surge could cause the ve-
hicle to collide with the tow vehicle. If your vehicle is overheating (indicated by
an extremely high temperature gauge
reading), or if you feel a lack of engine
power, detect abnormal noise, etc., take the
following steps.
WARNING
• Do not continue to drive if your ve-
hicle overheats. Doing so could cause
engine damage or a vehicle fire.
• To avoid the danger of being scalded,
never remove the radiator cap while
the engine is still hot. When the radia-
tor cap is removed, pressurized hot
water will spurt out, possibly causing
serious injury.
• Do not open the hood if steam is
coming out.
1. Move the vehicle safely off the road, ap- ply the parking brake and move the shif t
lever to N (Neutral) (manual transmis-
sion) or to P (Park) (CVT).
Do not stop the engine.
2. Turn off the air conditioner (if so equipped). Open all the windows, move
the heater or air conditioner tempera-
ture control to maximum hot and fan
control to high speed. 3. Get out of the vehicle. Look and listen for
steam or coolant escaping from the ra-
diator before opening the hood. (If
steam or coolant is escaping, turn off
the engine.) Do not open the hood fur-
ther until no steam or coolant can be
seen.
4. Open the engine hood.
WARNING
If steam or water is coming from the
engine, stand clear to prevent getting
burned.
5. Visually check drive belts for damage or looseness. Also check if the cooling fan
is running. The radiator hoses and radia-
tor should not leak water. If coolant is
leaking, the water pump belt is missing
or loose, or the cooling fan does not run,
stop the engine.
WARNING
Be careful not to allow your hands, hair,
jewelry or clothing to come into con-
tact with, or get caught in, engine belts
or the engine cooling fan. The engine
cooling fan can start at any time.
PUSH STARTING IF YOUR VEHICLE OVERHEATS
In case of emergency6-11
Page 518 of 528

Bulb replacement...............8-26
C
C.M.V.S.S. certification label.........10-13Capacities and recommended
fuel/lubricants.................10-2Car phone or CB radio............4-67Cargo
(See vehicle loading information).....10-15Chassis control................5-119Check tire pressure..........2-30, 2-47Child restraints.......1-21,1-22,1-23,1-25LATCH (Lower Anchors and Tethers for
CHildren) System..............1-25Precautions on child
restraints............1-30, 1-36, 1-41Top tether strap anchor point
locations...................1-28Child safety rear door lock..........3-7Cleaning exterior and interior......7-2,7-5Clutch
Clutch fluid..................8-11Cold weather driving............5-125Console box................. .2-68Continuously Variable Transmission
(CVT).......................5-16Continuously Variable Transmission (CVT)
fluid......................8-10Driving with Continuously Variable
Transmission (CVT)............5-16Control panel buttons.............4-3Brightness/contrast button.......4-8
Controls
Audio controls (steering wheel).....4-63Heater and air conditioner
controls................4-33, 4-41CoolantCapacities and recommended
fuel/lubricants
...............10-2Changing engine coolant.........8-6Checking engine coolant level......8-6Engine coolant temperature gauge. . .2-6Corrosion protection..............7-8Cruise control................ .5-58Cup holders................. .2-69
D
Daytime Running Light System......2-59Defroster switch
Rear window and outside mirror defroster
switch
................... .2-55Diesel Particulate Filter (DPF)........2-51Dimensions and weights..........10-11Dimmer switch for instrument panel. . .2-60Display controls (see control panel
buttons).................... .4-3Door locks....................3-4Drive belt....................8-14Driving
Cold weather driving...........5-125Driving with Continuously Variable
Transmission (CVT)............5-16Driving with manual transmission. . .5-21
Precautions when starting and
driving.................... .5-4Driving the vehicle...............5-16
E
E-call (SOS) Button..............2-64ECO mode switch...............5-25Economy - fuel................5-111Emergency engine shutoff.......5-13,6-2Emission control information label. . . .10-13Emission control system warranty. . . .10-20Engine
Before starting the engine........5-14Capacities and recommended
fuel/lubricants...............10-2Changing engine coolant.........8-6Changing engine oil.............8-7Changing engine oil filter.........8-7Checking engine coolant level......8-6Checking engine oil level..........8-7Engine compartment check
locations.................. .8-4Engine coolant temperature gauge. . .2-6Engine cooling system...........8-5Engine oil...................8-7Engine oil and oil filter
recommendation.............10-7Engine oil pressure warning light. . . .2-10Engine oil viscosity.............10-7Engine serial number..........10-13Engine specifications...........10-9Starting the engine............5-14
11-2Index