2020 NISSAN ROGUE SPORT warning light
[x] Cancel search: warning lightPage 199 of 492
indicator light will turn off. Push the “I”
switchto turn the system on.
Do not allow any object to cover the
sensors
or apply glass cleaner on
them. Doing so will reduce the sensitiv-
ity of the sensor, resulting in improper
operation.
For the HomeLink® Universal Transceiver
operation, see “HomeLink® Universal
Transceiver” (P.2-80).
OUTSIDE MIRRORS
WARNING
Objects viewed in the outside mirror
on the passenger side are closer
than they appear. Be careful when
moving to the right. Using only this
mirror could cause an accident. Use
the inside mirror or glance over your
shoulder to properly judge distances
to other objects.
JVP0395X
Adjusting outside mirrors
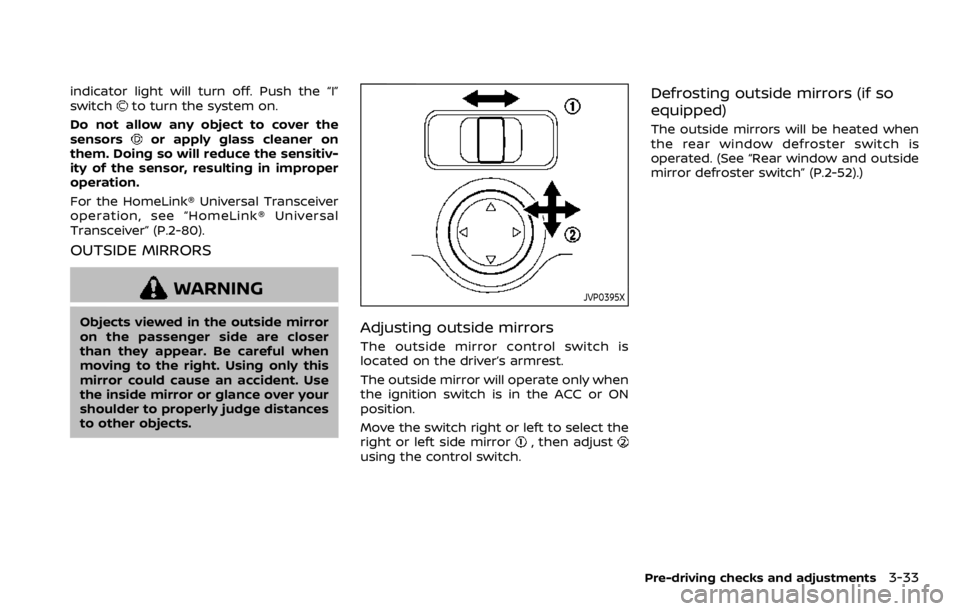
The outside mirror control switch is
located on the driver’s armrest.
The outside mirror will operate only when
the ignition switch is in the ACC or ON
position.
Move the switch right or left to select the
right or left side mirror
, then adjustusing the control switch.
Defrosting outside mirrors (if so
equipped)
The outside mirrors will be heated when
the rear window defroster switch is
operated. (See “Rear window and outside
mirror defroster switch” (P.2-52).)
Pre-driving checks and adjustments3-33
Page 215 of 492
NOTE:
.When the monitor displays the front
view and the steering wheel turns
about 90 degrees or less from the
straight ahead position, both the
right and left predictive course lines
are displayed. When the steering
wheel turns about 90 degrees or
more, the predictive course line is
displayed only on the opposite side
of the turn.
JVH1037X
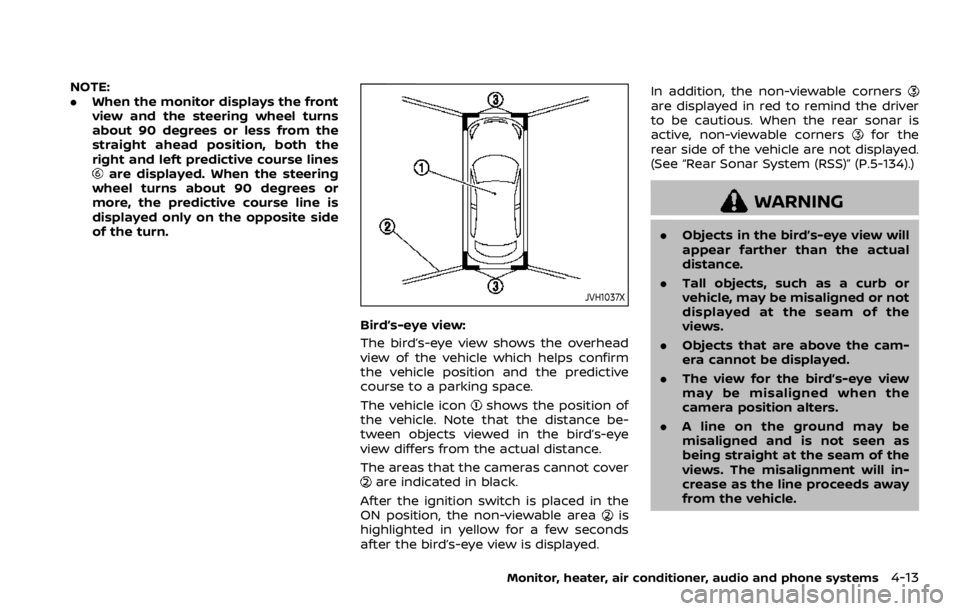
Bird’s-eye view:
The bird’s-eye view shows the overhead
view of the vehicle which helps confirm
the vehicle position and the predictive
course to a parking space.
The vehicle icon
shows the position of
the vehicle. Note that the distance be-
tween objects viewed in the bird’s-eye
view differs from the actual distance.
The areas that the cameras cannot cover
are indicated in black.
After the ignition switch is placed in the
ON position, the non-viewable area
is
highlighted in yellow for a few seconds
after the bird’s-eye view is displayed. In addition, the non-viewable corners
are displayed in red to remind the driver
to be cautious. When the rear sonar is
active, non-viewable corners
for the
rear side of the vehicle are not displayed.
(See “Rear Sonar System (RSS)” (P.5-134).)
WARNING
. Objects in the bird’s-eye view will
appear farther than the actual
distance.
. Tall objects, such as a curb or
vehicle, may be misaligned or not
displayed at the seam of the
views.
. Objects that are above the cam-
era cannot be displayed.
. The view for the bird’s-eye view
may be misaligned when the
camera position alters.
. A line on the ground may be
misaligned and is not seen as
being straight at the seam of the
views. The misalignment will in-
crease as the line proceeds away
from the vehicle.
Monitor, heater, air conditioner, audio and phone systems4-13
Page 225 of 492
JVH1257X
Rear and front-side views
WAE0067XRear view
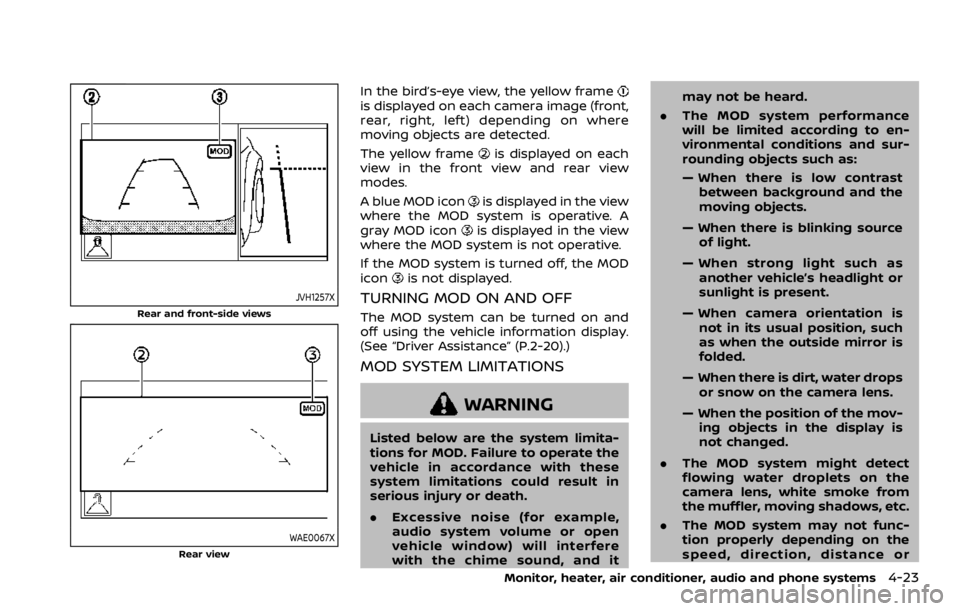
In the bird’s-eye view, the yellow frameis displayed on each camera image (front,
rear, right, left) depending on where
moving objects are detected.
The yellow frame
is displayed on each
view in the front view and rear view
modes.
A blue MOD icon
is displayed in the view
where the MOD system is operative. A
gray MOD icon
is displayed in the view
where the MOD system is not operative.
If the MOD system is turned off, the MOD
icon
is not displayed.
TURNING MOD ON AND OFF
The MOD system can be turned on and
off using the vehicle information display.
(See “Driver Assistance” (P.2-20).)
MOD SYSTEM LIMITATIONS
WARNING
Listed below are the system limita-
tions for MOD. Failure to operate the
vehicle in accordance with these
system limitations could result in
serious injury or death.
. Excessive noise (for example,
audio system volume or open
vehicle window) will interfere
with the chime sound, and it may not be heard.
. The MOD system performance
will be limited according to en-
vironmental conditions and sur-
rounding objects such as:
— When there is low contrast
between background and the
moving objects.
— When there is blinking source of light.
— When strong light such as another vehicle’s headlight or
sunlight is present.
— When camera orientation is not in its usual position, such
as when the outside mirror is
folded.
— When there is dirt, water drops or snow on the camera lens.
— When the position of the mov- ing objects in the display is
not changed.
. The MOD system might detect
flowing water droplets on the
camera lens, white smoke from
the muffler, moving shadows, etc.
. The MOD system may not func-
tion properly depending on the
speed, direction, distance or
Monitor, heater, air conditioner, audio and phone systems4-23
Page 242 of 492
5-6Starting and driving
or wheels on your vehicle to ensure that
the replacement or alternate tires and
wheels allow the TPMS to continue to
function properly.
Additional information
.Since the spare tire (if so equipped) is
not equipped with the TPMS, the TPMS
does not monitor the tire pressure of
the spare tire.
. The TPMS will activate only when the
vehicle is driven at speeds above 16
MPH (25 km/h). Also, this system may
not detect a sudden drop in tire
pressure (for example a flat tire while
driving).
. The low tire pressure warning light
does not automatically turn off when
the tire pressure is adjusted. After the
tire is inflated to the recommended
pressure, the vehicle must be driven at
speeds above 16 MPH (25 km/h) to
activate the TPMS and turn off the low
tire pressure warning light. Use a tire
pressure gauge to check the tire
pressure.
. The “Tire Pressure Low - Add Air”
warning appears in the vehicle infor-
mation display when the low tire
pressure warning light is illuminated
and low tire pressure is detected. The
“Tire Pressure Low - Add Air” warning
turns off when the low tire pressure warning light turns off.
The “Tire Pressure Low - Add Air”
warning does not appear if the low
tire pressure warning light illuminates
to indicate a TPMS malfunction.
. Tire pressure rises and falls depending
on the heat caused by the vehicle’s
operation and the outside tempera-
ture. Do not reduce the tire pressure
after driving because the tire pressure
rises after driving. Low outside tem-
perature can lower the temperature
of the air inside the tire which can
cause a lower tire inflation pressure.
This may cause the low tire pressure
warning light to illuminate. If the
warning light illuminates in low ambi-
ent temperature, check the tire pres-
sure for all four tires.
For additional information, see “Low tire
pressure warning light” (P.2-13) and “Tire
Pressure Monitoring System (TPMS)” (P.6-
3).
WARNING
. If the low tire pressure warning
light illuminates while driving,
avoid sudden steering maneu-
vers or abrupt braking, reduce
vehicle speed, pull off the road
to a safe location and stop the vehicle as soon as possible. Driv-
ing with under-inflated tires may
permanently damage the tires
and increase the likelihood of tire
failure. Serious vehicle damage
could occur and may lead to an
accident and could result in ser-
ious personal injury. Check the
tire pressure for all four tires.
Adjust the tire pressure to the
recommended COLD tire pressure
shown on the Tire and Loading
Information label to turn the low
tire pressure warning light OFF. If
you have a flat tire, replace it with
a spare tire (if so equipped) or
repair it using the emergency tire
puncture repair kit (if so
equipped) as soon as possible.
(See “Flat tire” (P.6-3) for chan-
ging a flat tire.)
. Since the spare tire (if so
equipped) is not equipped with
the TPMS, when a spare tire is
mounted or a wheel is replaced,
the TPMS will not function and
the low tire pressure warning
light will flash for approximately
1 minute. The light will remain on
after 1 minute. Have your tires
replaced and/or TPMS system
reset as soon as possible. It is
Page 243 of 492
recommended you visit a NISSAN
dealer for these services.
. Replacing tires with those not
originally specified by NISSAN
could affect the proper operation
of the TPMS.
. Do not inject any tire liquid or
aerosol tire sealant into the tires,
as this may cause a malfunction
of the tire pressure sensors
(models without emergency tire
puncture repair kit).
. NISSAN recommends using only
Genuine NISSAN Emergency Tire
Sealant provided with your vehi-
cle. Other tire sealants may da-
mage the valve stem seal which
can cause the tire to lose air
pressure. Visit a NISSAN dealer
as soon as possible after using
tire repair sealant (models with
emergency tire puncture repair
kit).
CAUTION
.The TPMS may not function prop-
erly when the wheels are
equipped with tire chains or the
wheels are buried in snow. .
Do not place metalized film or
any metal parts (antenna, etc.) on
the windows. This may cause
poor reception of the signals
from the tire pressure sensors,
and the TPMS will not function
properly.
Some devices and transmitters may tem-
porarily interfere with the operation of
the TPMS and cause the low tire pressure
warning light to illuminate. Some exam-
ples are:
. Facilities or electric devices using
similar radio frequencies are near the
vehicle.
. If a transmitter set to similar frequen-
cies is being used in or near the
vehicle.
. If a computer (or similar equipment) or
a DC/AC converter is being used in or
near the vehicle.
Low tire pressure warning light may
illuminate in the following cases.
. If the vehicle is equipped with a wheel
and tire without TPMS.
. If the TPMS has been replaced and the
ID has not been registered.
. If the wheel is not originally specified
by NISSAN. FCC Notice:
For USA:
This device complies with Part 15 of the
FCC Rules. Operation is subject to the
following two conditions: (1) This device
may not cause harmful interference,
and (2) this device must accept any
interference received, including inter-
ference that may cause undesired op-
eration.
Note: Changes or modifications not
expressly approved by the party re-
sponsible for compliance could void
the user’s authority to operate the
equipment.
For Canada:
This device complies with Industry Ca-
nada licence-exempt RSS standard(s).
Operation is subject to the following
two conditions: (1) this device may not
cause interference, and (2) this device
must accept any interference, including
interference that may cause undesired
operation of the device.
Starting and driving5-7
Page 246 of 492
5-10Starting and driving
WARNING
The following actions can increase
the chance of losing control of the
vehicle if there is a sudden loss of tire
air pressure. Losing control of the
vehicle may cause a collision and
result in personal injury.
.The vehicle generally moves or
pulls in the direction of the flat
tire.
. Do not rapidly apply the brakes.
. Do not rapidly release the accel-
erator pedal.
. Do not rapidly turn the steering
wheel.
1. Remain calm and do not overreact.
2. Maintain a firm grip on the steering wheel with both hands and try to hold
a straight course.
3. When appropriate, slowly release the accelerator pedal to gradually slow
the vehicle.
4. Gradually steer the vehicle to a safe location off the road and away from
traffic if possible. 5. Lightly apply the brake pedal to gra-
dually stop the vehicle.
6. Turn on the hazard warning flashers and either contact a roadside emer-
gency service to change the tire or see
“Changing a flat tire (models with
spare tire)” (P.6-4) of this Owner’s
Manual.
DRINKING ALCOHOL/DRUGS AND
DRIVING
WARNING
Never drive under the influence of
alcohol or drugs. Alcohol in the
bloodstream reduces coordination,
delays reaction time and impairs
judgement. Driving after drinking
alcohol increases the likelihood of
being involved in an accident injuring
yourself and others. Additionally, if
you are injured in an accident, alco-
hol can increase the severity of the
injury.
NISSAN is committed to safe driving.
However, you must choose not to drive
under the influence of alcohol. Every year
thousands of people are injured or killed
in alcohol-related accidents. Although the
local laws vary on what is considered to be legally intoxicated, the fact is that
alcohol affects all people differently and
most people underestimate the effects of
alcohol.
Remember, drinking and driving don’t
mix! And that is true for drugs, too (over-
the-counter, prescription, and illegal
drugs). Don’t drive if your ability to oper-
ate your vehicle is impaired by alcohol,
drugs, or some other physical condition.
DRIVING SAFETY PRECAUTIONS
Your vehicle is designed for both normal
and off-road use. However, avoid driving
in deep water or mud as your vehicle is
mainly designed for leisure use, unlike a
conventional off-road vehicle.
Remember that Two-Wheel Drive (2WD)
models are less capable than All-Wheel
Drive (AWD) models for rough road driving
and extrication when stuck in deep snow,
mud, or the like.
Please observe the following precautions:
WARNING
.
Drive carefully when off the road
and avoid dangerous areas. Every
person who drives or rides in this
vehicle should be seated with
their seat belt fastened. This will
Page 253 of 492

JVS0404X
INTELLIGENT KEY BATTERY DIS-
CHARGE
If the battery of the Intelligent Key is
discharged, or environmental conditions
interfere with the Intelligent Key opera-
tion, start the engine according to the
following procedure:
1. Move the shift lever to the P (Park)position (for CVT models) or the shift
lever to the N (Neutral) position (for MT
models).
2. Firmly apply the foot brake.
3. Touch the ignition switch with the Intelligent Key as illustrated. (A chime
will sound.) 4. Push the ignition switch while depres-
sing the brake pedal within 10 sec-
onds after the chime sounds. The
engine will start.
After step 3 is performed, when the
ignition switch is pushed without depres-
sing the brake pedal, the ignition switch
position will change to ACC.
NOTE:
. When the ignition switch is pushed
to the ON position or the engine is
started by the above procedures, the
“Key Battery Low” warning appears
(on the Vehicle information display)
even if the Intelligent Key is inside
the vehicle. This is not a malfunction.
To turn off the warning, touch the
ignition switch with the Intelligent
Key again.
. If the “Key Battery Low” warning
appears (on the Vehicle information
display), replace the battery as soon
as possible. (See “Intelligent Key
battery replacement” (P.8-23).)
.Make sure the area around the vehicle
is clear.
. Check fluid levels such as engine oil,
coolant, brake fluid, and window
washer fluid as frequently as possible,
or at least whenever you refuel.
. Check that all windows and lights are
clean.
. Visually inspect tires for their appear-
ance and condition. Also check tires
for proper inflation.
. Lock all doors.
. Position seat and adjust head re-
straints.
. Adjust inside and outside mirrors.
. Fasten seat belts and ask all passen-
gers to do likewise.
. Check the operation of warning lights
when the ignition switch is placed in
the ON position. (See “Warning lights,
indicator lights and audible remin-
ders” (P.2-10).)
Starting and driving5-17
BEFORE STARTING THE ENGINE
Page 259 of 492

M4 (4th), M3 (3rd) and M2 (2nd) :
Use these positions for hill climbing or
engine braking on downhill grades.
M1 (1st):
Use this position when climbing steep
hills slowly or driving slowly through deep
snow, sand or mud, or for maximum
engine braking on steep downhill grades.
.Remember not to drive at high speeds
for extended periods of time in lower
than M7 range. This reduces fuel
economy.
. In the manual shift mode, the trans-
mission may not shift to the se-
lected range. This helps maintain
driving performance and reduces
the chance of vehicle damage or
loss of control.
. In the manual shift mode, the trans-
mission automatically shifts down
to 1st gear before the vehicle comes
to a stop. When accelerating again, it
is necessary to shift up to the
desired range.
. When the CVT fluid temperature is
extremely low, the manual shift mode
may not work and automatically shift
as a drive mode. This is not a mal-
function. In this case, return the shift
lever to the D (Drive) position and drive
for a while and then shift to the manual shift mode.
. When the CVT fluid temperature is
high, the shift range may upshift at a
lower engine speed than usual. This is
not a malfunction.Accelerator downshift — In D posi-
tion —
For passing or hill climbing, fully depress
the accelerator pedal to the floor. This
shifts the transmission down into a lower
gear, depending on the vehicle speed.
High fluid temperature protection
mode
This transmission has a high fluid tem-
perature protection mode. If the fluid
temperature becomes too high (for ex-
ample, when climbing steep grades in
high temperature with heavy loads), en-
gine power and, under some conditions,
vehicle speed will be decreased automa-
tically to reduce the chance of transmis-
sion damage. Vehicle speed can be
controlled with the accelerator pedal,
but the engine and vehicle speed may
be limited.
Fail-safe
If the vehicle is driven under extreme
conditions, such as excessive wheel
spinning and subsequent hard braking,
the fail-safe system may be activated.
The MIL may illuminate to indicate the
fail-safe mode is activated. (See “Mal-
function Indicator Light (MIL)” (P.2-17).)
This will occur even if all electrical
circuits are functioning properly. In this
case, place the ignition switch in the
OFF position and wait for 10 seconds.
Then turn the switch back to the ON
position. The vehicle should return to its
normal operating condition. If it does
not return to its normal operating con-
dition, have the transmission checked
and repaired, if necessary. It is recom-
mended you visit a NISSAN dealer for
this service.
WARNING
When the high fluid temperature
protection mode or fail-safe opera-
tion occurs, vehicle speed may be
gradually reduced. The reduced
speed may be lower than other
traffic, which could increase the
chance of a collision. Be especially
careful when driving. If necessary,
pull to the side of the road at a safe
Starting and driving5-23