2020 NISSAN ROGUE SPORT check engine
[x] Cancel search: check enginePage 407 of 492

8 Do-it-yourself
Maintenance precautions ...................................................... 8-2
Engine compartment check locations ........................ 8-3MR20DD engine model ..................................................... 8-4
Engine cooling system ............................................................. 8-4 Checking engine coolant level .................................... 8-5
Changing engine coolant ................................................ 8-6
Engine oil ........................................................................\
..................... 8-6 Checking engine oil level ................................................. 8-6
Changing engine oil and filter ..................................... 8-6
Continuously Variable Transmission (CVT)
fluid ........................................................................\
.................................. 8-9
Brake and clutch (if so equipped) fluid ....................... 8-9
Window washer fluid .............................................................. 8-10
Battery ........................................................................\
........................ 8-11 Jump starting ........................................................................\
. 8-12
Variable voltage control system ................................... 8-13
Drive belt ........................................................................\
.................. 8-13
Spark plugs ........................................................................\
............. 8-14 Replacing spark plugs ..................................................... 8-14
Air cleaner ........................................................................\
............... 8-15
Air duct removal .................................................................. 8-15
Air cleaner filter replacement ................................... 8-15 Windshield wiper blades ..................................................... 8-16
Cleaning ........................................................................\
........... 8-16
Replacing ........................................................................\
........ 8-16
Rear window wiper blade .................................................. 8-17
Brakes ........................................................................\
........................ 8-17 Self-adjusting brakes ..................................................... 8-17
Brake pad wear warning ............................................ 8-17
Fuses ........................................................................\
........................... 8-18 Engine compartment .................................................... 8-18
Passenger compartment ........................................... 8-20
Key fob battery replacement .......................................... 8-21
Intelligent Key battery replacement .......................... 8-23
Lights ........................................................................\
.......................... 8-25 Headlights ........................................................................\
...... 8-25
Exterior and interior lights ........................................ 8-27
Wheels and tires ........................................................................\
8-29
Tire pressure ........................................................................\
8-29
Tire labeling ........................................................................\
.. 8-33
Types of tires ....................................................................... 8-35
Tire chains ........................................................................\
...... 8-36
Changing wheels and tires ...................................... 8-37
Page 409 of 492
off and wait until it cools down.
. Avoid direct contact with used
engine oil and coolant. Impro-
perly disposed engine oil, and
engine coolant and/or other ve-
hicle fluids can damage the en-
vironment. Always conform to
local regulations for disposal of
vehicle fluid.
. Never leave the engine or the CVT
related component harnesses
disconnected while the ignition
switch is in the ON position.
. Never connect or disconnect the
battery or any transistorized
component while the ignition
switch is in the ON position.
. Your vehicle is equipped with an
automatic engine cooling fan. It
may come on at any time without
warning, even if the ignition key is
in the OFF position and the en-
gine is not running. To avoid
injury, always disconnect the ne-
gative battery cable before work-
ing near the fan.
This “8. Do-it-yourself” section gives in-
structions regarding only those items
which are relatively easy for an owner to
perform. A genuine NISSAN Service Manual is also
available. (See “Owner’s manual/service
manual order information” (P.10-20).)
You should be aware that incomplete or
improper servicing may result in operat-
ing difficulties or excessive emissions, and
could affect your warranty coverage.
If in
doubt about any servicing, it is recom-
mended you have it done by a NISSAN
dealer.
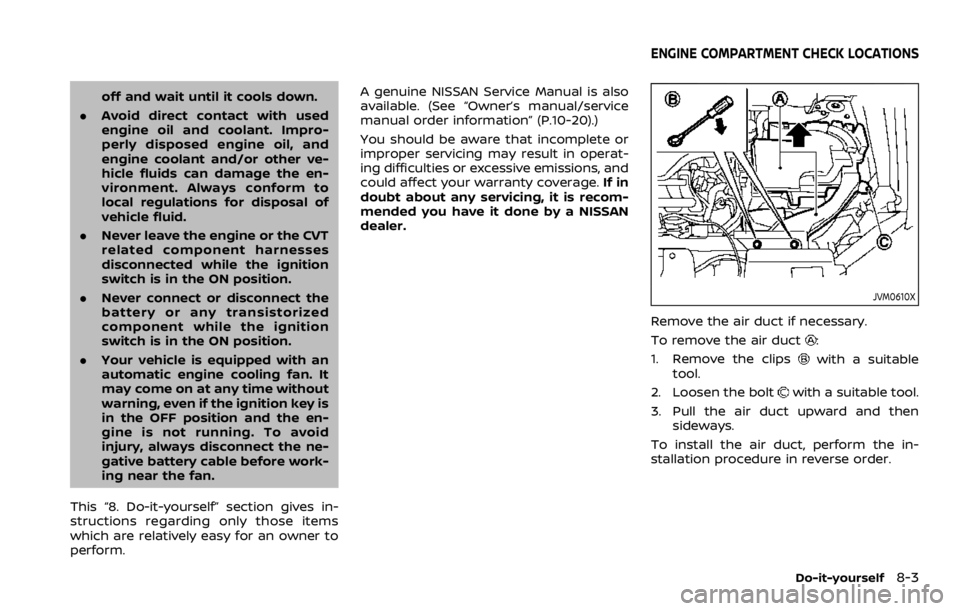
JVM0610X
Remove the air duct if necessary.
To remove the air duct
:
1. Remove the clips
with a suitable
tool.
2. Loosen the bolt
with a suitable tool.
3. Pull the air duct upward and then sideways.
To install the air duct, perform the in-
stallation procedure in reverse order.
Do-it-yourself8-3
ENGINE COMPARTMENT CHECK LOCATIONS
Page 411 of 492
partment. When the cooling fan is
operating, be sure that hands or
other items do not get caught in
it.
CAUTION
.Never use any cooling system
additives such as radiator sealer.
Additives may clog the cooling
system and cause damage to
the engine, transmission and/or
cooling system.
. When adding or replacing cool-
ant, be sure to use only Genuine
NISSAN Long Life Antifreeze/
Coolant (blue) or equivalent. Gen-
uine NISSAN Long Life Antifreeze/
Coolant (blue) is pre-diluted to
provide antifreeze protection to
-34°F(-37°C). If additional freeze
protection is needed due to
weather where you operate your
vehicle, add Genuine NISSAN Long
Life Antifreeze/Coolant (blue)
concentrate following the direc-
tions on the container. If an
equivalent coolant other than
Genuine NISSAN Long Life Anti-
freeze/Coolant (blue) is used, fol- low the coolant manufacture’s
instructions to maintain mini-
mum antifreeze protection to
-34°F (-37°C). The use of other
types of coolant solutions other
than Genuine NISSAN Long Life
Antifreeze/Coolant (blue) or
equivalent may damage the en-
gine cooling system.
. The life expectancy of the fac-
tory-fill coolant is 105,000 miles
(168,000 km) or 7 years. Mixing
any other type of coolant other
than Genuine NISSAN Long Life
Antifreeze/Coolant (blue), includ-
ing Genuine NISSAN Long Life
Antifreeze/Coolant (green), or
the use of non-distilled water will
reduce the life expectancy of the
factory-fill coolant. Refer to the
“9. Maintenance and schedules”
section of this manual for more
details.
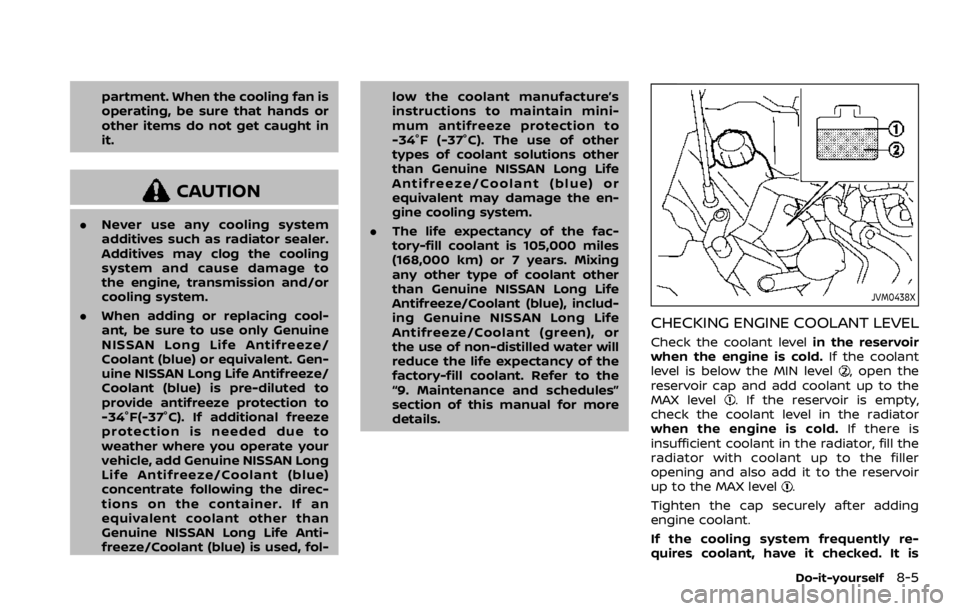
JVM0438X
CHECKING ENGINE COOLANT LEVEL
Check the coolant level in the reservoir
when the engine is cold. If the coolant
level is below the MIN level
, open the
reservoir cap and add coolant up to the
MAX level
. If the reservoir is empty,
check the coolant level in the radiator
when the engine is cold. If there is
insufficient coolant in the radiator, fill the
radiator with coolant up to the filler
opening and also add it to the reservoir
up to the MAX level
.
Tighten the cap securely after adding
engine coolant.
If the cooling system frequently re-
quires coolant, have it checked. It is
Do-it-yourself8-5
Page 412 of 492
8-6Do-it-yourself
recommended you visit a NISSAN dealer
for this service.
CHANGING ENGINE COOLANT
A NISSAN dealer can change the engine
coolant. The service procedure can be
found in the NISSAN Service Manual.
Improper servicing can result in re-
duced heater performance and engine
overheating.
WARNING
.To avoid being scalded, never
change the coolant when the
engine is hot.
. Never remove the radiator or
coolant reservoir cap when the
engine is hot. Serious burns could
be caused by high pressure fluid
escaping from the radiator.
. Avoid direct skin contact with
used coolant. If skin contact is
made, wash thoroughly with soap
or hand cleaner as soon as pos-
sible.
. Keep coolant out of the reach of
children and pets.
Engine coolant must be disposed of
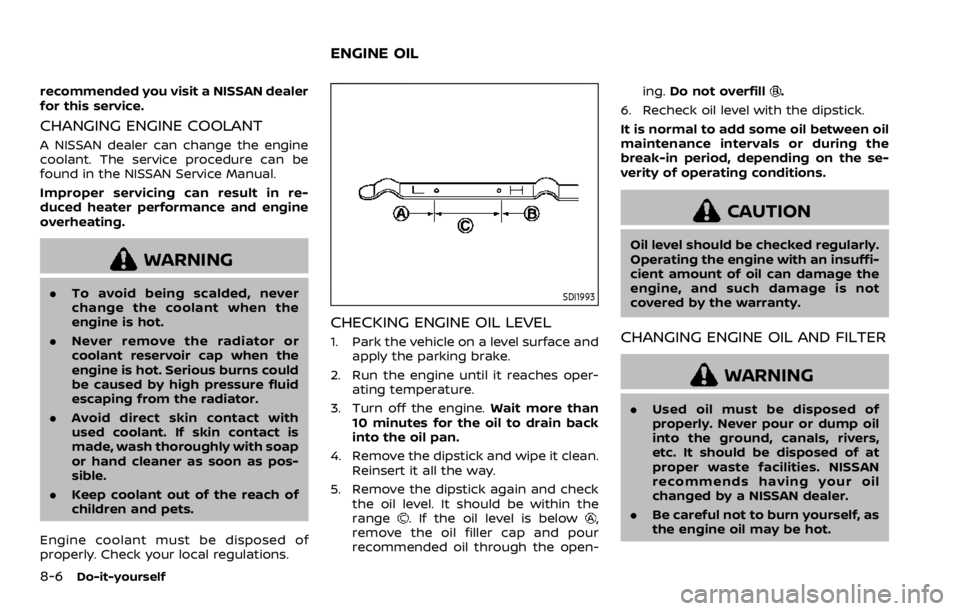
properly. Check your local regulations.SDI1993
CHECKING ENGINE OIL LEVEL
1. Park the vehicle on a level surface and apply the parking brake.
2. Run the engine until it reaches oper- ating temperature.
3. Turn off the engine. Wait more than
10 minutes for the oil to drain back
into the oil pan.
4. Remove the dipstick and wipe it clean. Reinsert it all the way.
5. Remove the dipstick again and check the oil level. It should be within the
range
. If the oil level is below,
remove the oil filler cap and pour
recommended oil through the open- ing.
Do not overfill
.
6. Recheck oil level with the dipstick.
It is normal to add some oil between oil
maintenance intervals or during the
break-in period, depending on the se-
verity of operating conditions.
CAUTION
Oil level should be checked regularly.
Operating the engine with an insuffi-
cient amount of oil can damage the
engine, and such damage is not
covered by the warranty.
CHANGING ENGINE OIL AND FILTER
WARNING
. Used oil must be disposed of
properly. Never pour or dump oil
into the ground, canals, rivers,
etc. It should be disposed of at
proper waste facilities. NISSAN
recommends having your oil
changed by a NISSAN dealer.
. Be careful not to burn yourself, as
the engine oil may be hot.
ENGINE OIL
Page 414 of 492
8-8Do-it-yourself
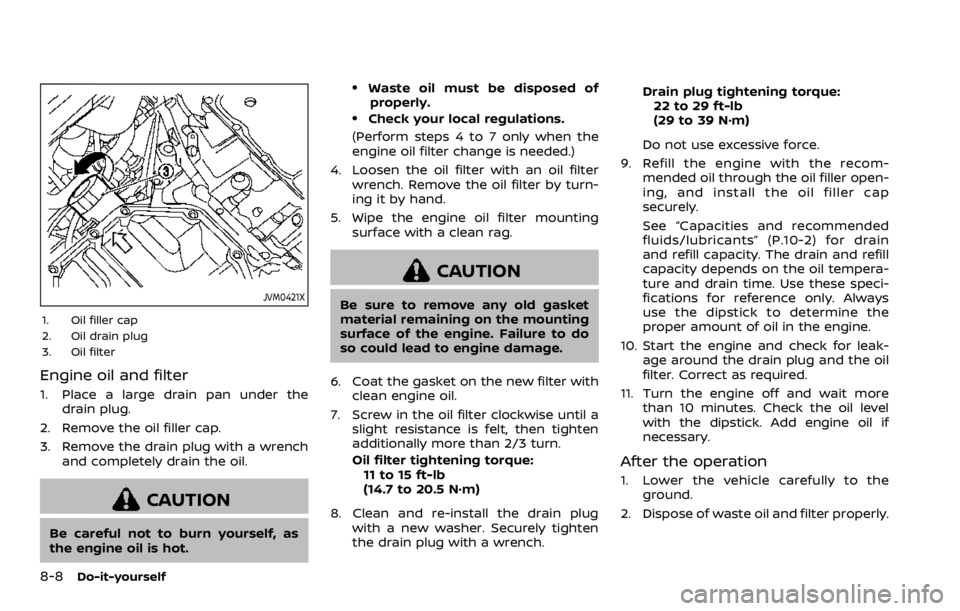
JVM0421X
1. Oil filler cap
2. Oil drain plug
3. Oil filter
Engine oil and filter
1. Place a large drain pan under thedrain plug.
2. Remove the oil filler cap.
3. Remove the drain plug with a wrench and completely drain the oil.
CAUTION
Be careful not to burn yourself, as
the engine oil is hot.
.Waste oil must be disposed ofproperly.
.Check your local regulations.
(Perform steps 4 to 7 only when the
engine oil filter change is needed.)
4. Loosen the oil filter with an oil filter wrench. Remove the oil filter by turn-
ing it by hand.
5. Wipe the engine oil filter mounting surface with a clean rag.
CAUTION
Be sure to remove any old gasket
material remaining on the mounting
surface of the engine. Failure to do
so could lead to engine damage.
6. Coat the gasket on the new filter with clean engine oil.
7. Screw in the oil filter clockwise until a slight resistance is felt, then tighten
additionally more than 2/3 turn.
Oil filter tightening torque:11 to 15 ft-lb
(14.7 to 20.5 N·m)
8. Clean and re-install the drain plug with a new washer. Securely tighten
the drain plug with a wrench. Drain plug tightening torque:
22 to 29 ft-lb
(29 to 39 N·m)
Do not use excessive force.
9. Refill the engine with the recom- mended oil through the oil filler open-
ing, and install the oil filler cap
securely.
See “Capacities and recommended
fluids/lubricants” (P.10-2) for drain
and refill capacity. The drain and refill
capacity depends on the oil tempera-
ture and drain time. Use these speci-
fications for reference only. Always
use the dipstick to determine the
proper amount of oil in the engine.
10. Start the engine and check for leak- age around the drain plug and the oil
filter. Correct as required.
11. Turn the engine off and wait more than 10 minutes. Check the oil level
with the dipstick. Add engine oil if
necessary.
After the operation
1. Lower the vehicle carefully to the
ground.
2. Dispose of waste oil and filter properly.
Page 415 of 492
WARNING
.Prolonged and repeated contact
with used engine oil may cause
skin cancer.
. Try to avoid direct skin contact
with used oil. If skin contact is
made, wash thoroughly with soap
or hand cleaner as soon as pos-
sible.
. Keep used engine oil out of reach
of children. When checking or replacement is re-
quired, we recommend a NISSAN dealer
for servicing.
CAUTION
.
NISSAN recommends using Gen-
uine NISSAN CVT Fluid NS-3 (or
equivalent) ONLY in NISSAN CVTs.
Do not mix with other fluids.
. Do not use Automatic transmis-
sion fluid (ATF) or Manual Trans-
mission fluid in a NISSAN CVT, as
it may damage the CVT. Damage
caused by the use of fluids other
than as recommended is not
covered by the NISSAN’s New
Vehicle Limited Warranty.
. Using fluids that are not equiva-
lent to Genuine NISSAN CVT Fluid
NS-3 may also damage the CVT.
Damage caused by the use of
fluids other than as recom-
mended is not covered by the
NISSAN’s New Vehicle Limited
Warranty. For additional brake and clutch fluid
information, see “Capacities and recom-
mended fluids/lubricants” (P.10-2) of this
manual.
WARNING
.
Use only new fluid from a sealed
container. Old, inferior or con-
taminated fluid may damage the
brake and clutch systems. The
use of improper fluids can da-
mage the brake and clutch sys-
tems, and affect the vehicle’s
stopping ability.
. Clean the filler cap before remov-
ing.
. Brake and clutch fluid is poiso-
nous and should be stored care-
fully in marked containers out of
the reach of children.
CAUTION
Do not spill the fluid on any painted
surfaces. This will damage the paint.
If fluid is spilled, immediately wash
the surface with water.
Do-it-yourself8-9
CONTINUOUSLY VARIABLE
TRANSMISSION (CVT) FLUIDBRAKE AND CLUTCH (if so equipped) FLUID
Page 418 of 492

8-12Do-it-yourself
DI0137MA
Check the fluid level in each cell. It should
be between the UPPER LEVELand
LOWER LEVELlines.
If it is necessary to add fluid, add only
distilled water to bring the level to the
indicator in each filler opening. Do not
overfill.
SDI1480C
1. Remove the cell plugs.
2. Add distilled water up to the UPPER LEVEL
line.
If the side of the battery is not clear,
check the distilled water level by
looking directly above the cell; the
condition
indicates OK and the
conditionneeds more to be added.
3. Tighten cell plugs
.
Vehicles operated in high temperatures
or under severe conditions require fre-
quent checks of the battery fluid level.
JUMP STARTING
If jump starting is necessary, see “Jump
starting” (P.6-14). If the engine does not
start by jump starting, the battery may
have to be replaced. It is recommended
you visit a NISSAN dealer for this service.
Page 419 of 492
CAUTION
.Do not ground accessories di-
rectly to the battery terminal.
Doing so will bypass the variable
voltage control system and the
vehicle battery may not charge
completely.
. Use electrical accessories with
the engine running to avoid dis-
charging the vehicle battery.
The variable voltage control system mea-
sures the amount of electrical discharge
from the battery and controls voltage
generated by the generator.
SDI1881
1. Alternator
2. Drive belt auto-tensioner
3. Crankshaft pulley
4. Air conditioner compressor
5. Water pump
WARNING
Be sure the ignition switch is in the
OFF or LOCK position before servi-
cing drive belts. The engine could
rotate unexpectedly.
1. Visually inspect the belt for signs of unusual wear, cuts, fraying or loosen-
ess. If the belt is in poor condition or loose, have it replaced or adjusted. It is
recommended you visit a NISSAN
dealer for this service.
2. Have the belt condition checked reg- ularly.
Do-it-yourself8-13
VARIABLE VOLTAGE CONTROL SYSTEMDRIVE BELT