2020 NISSAN ROGUE SPORT warning lights
[x] Cancel search: warning lightsPage 326 of 492
5-90Starting and driving
Steering assist limitations
WARNING
.In the following situations, the
camera may not detect lane mar-
kers correctly or may detect lane
markers incorrectly and the
steering assist may not operate
properly:
— When driving on roads where
there are multiple parallel
lane markers, lane markers
that are faded or not painted
clearly, non-standard lane
markers, or lane markers cov-
ered with water, dirt, snow,
etc.
— When driving on roads with discontinued lane markers
— When driving on roads with a widening or narrowing lane
width
— When driving on roads where there are multiple lanes or
unclear lane markers due to
road construction
— When driving on roads where there are sharply contrasting
objects, such as shadows, snow, water, wheel ruts,
seams, or lines remaining
after road repairs (the steer-
ing assist could detect these
items as lane markers)
— When driving on roads where the traveling lane merges or
separates
. Do not use the steering assist
under the following conditions
because the system may not
properly detect lane markers.
Doing so could cause a loss of
vehicle control and result in an
accident.
— During bad weather (rain, fog,
snow, dust, etc.)
— When rain, snow, sand, etc., is thrown up by the wheels of
other vehicles
— When dirt, oil, ice, snow, water, or another object adheres to
the camera unit
— When the lens of the camera unit is foggy
— When strong light (for exam- ple, sunlight or high beams
from oncoming vehicles)
shines on the camera — When the headlights are not
bright due to dirt on the lens
or the headlights are off in
tunnels or darkness
— When a sudden change in brightness occurs (for exam-
ple, when the vehicle enters or
exits a tunnel or is under a
bridge)
— When driving on roads where the traveling lane merges or
separates or where there are
temporary lane markers be-
cause of road construction
— When there is a lane closure due to road repairs
— When driving on a bumpy road surface, such as an uneven
dirt road
— When driving on sharp curves or winding roads
— When driving on repeated up- hill and downhill roads
. Do not use the steering assist
under the following conditions
because the system will not op-
erate properly:
— When driving with a tire that is
not within normal tire condi-
Page 337 of 492
— The camera area of wind-shield is fogged up, or covered
with dirt, water drops, ice,
snow, etc.
— Strong light (for example, sun- light or high beams from on-
coming vehicles) enters the
front camera. Strong light
causes the area around the
pedestrian to be cast in a
shadow, making it difficult to
see.
— A sudden change in bright- ness occurs. (For example,
when the vehicle enters or
exits a tunnel or a shaded
area or lightning flashes.)
— The poor contrast of a person to the background, such as
having clothing color or pat-
tern which is similar to the
background.
— The pedestrian’s profile is par- tially obscured or unidentifi-
able due to the pedestrian
transporting cargo, wearing
bulky or very loose-fitting
clothing or accessories.
. The system performance may
degrade in the following condi- tions:
— The vehicle is driven on a
slippery road.
— The vehicle is driven on a slope.
— Excessively heavy baggage is loaded in the rear seat or the
cargo area of your vehicle.
. The system is designed to auto-
matically check the sensor (radar
and camera)’s functionality, with-
in certain limitations. The system
may not detect blockage of sen-
sor areas covered by ice, snow or
stickers, for example. In these
cases, the system may not be
able to warn the driver properly.
Be sure that you check, clean and
clear sensor areas regularly.
. In some road and traffic condi-
tions, the AEB with pedestrian
detection system may unexpect-
edly apply partial braking. When
acceleration is necessary, de-
press the accelerator pedal to
override the system.
. The AEB with pedestrian detec-
tion system may operate when
the following are similar to the
outlines of vehicles or pedes- trians, or if they are the same size
and position as a vehicle’s tail
lights.
— Paint or a pattern on the road
or a wall (including faded and
unusual road markings).
— A shape formed by road struc- tures ahead (such as tunnels,
viaducts, traffic signs, reflec-
tors installed on the side of
vehicles, reflection sheets,
and guardrails).
. Braking distances increase on
slippery surfaces.
. Excessive noise will interfere with
the warning chime sound, and
the chime may not be heard.
Starting and driving5-101
Page 351 of 492

WAF0068X
RAB system warning light and RAB sys-
tem warning indicator
Steering-wheel-mounted controls (left
side)
Center display (if so equipped)
RAB SYSTEM OPERATION
When the shift lever is in the R (Reverse)
position and the vehicle speed is less than
approximately 9 MPH (15 km/h), the RAB
system operates.
If a risk of a collision with an obstacle is
detected when your vehicle is backing up,
the RAB system warning indicator will
flash in the vehicle information display, a
red frame will appear in the center display
(models with the Intelligent Around
View
Monitor system), and the system
will chime three times. The system will
then automatically apply the brakes. After
the automatic brake application, the dri-
ver must depress the brake pedal to
maintain brake pressure.
NOTE:
. The stop lights of the vehicle come
on when braking is performed by
the RAB system.
. When the brakes operate, a noise
may be heard. This is not a malfunc-
tion.
TURNING THE RAB SYSTEM ON/OFF
Perform the following steps to turn the
RAB system ON or OFF.
Starting and driving5-115
Page 378 of 492
6-2In case of emergency
SIC2574
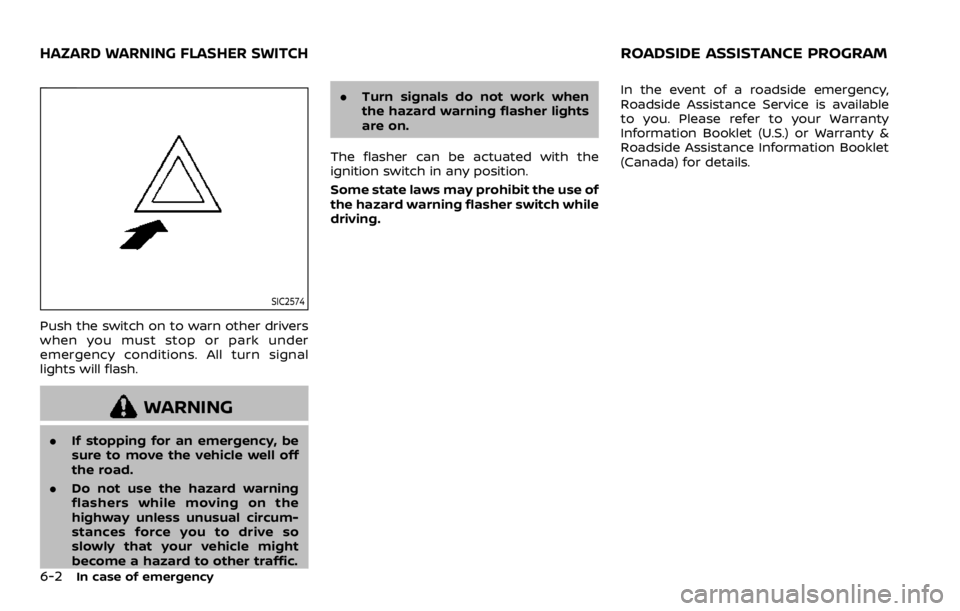
Push the switch on to warn other drivers
when you must stop or park under
emergency conditions. All turn signal
lights will flash.
WARNING
.If stopping for an emergency, be
sure to move the vehicle well off
the road.
. Do not use the hazard warning
flashers while moving on the
highway unless unusual circum-
stances force you to drive so
slowly that your vehicle might
become a hazard to other traffic. .
Turn signals do not work when
the hazard warning flasher lights
are on.
The flasher can be actuated with the
ignition switch in any position.
Some state laws may prohibit the use of
the hazard warning flasher switch while
driving. In the event of a roadside emergency,
Roadside Assistance Service is available
to you. Please refer to your Warranty
Information Booklet (U.S.) or Warranty &
Roadside Assistance Information Booklet
(Canada) for details.
HAZARD WARNING FLASHER SWITCHROADSIDE ASSISTANCE PROGRAM
Page 379 of 492
To shut off the engine in an emergency
situation while driving, perform the fol-
lowing procedure:
.Rapidly push the push-button ignition
switch 3 consecutive times in less
than 1.5 seconds, or
. Push and hold the push-button igni-
tion switch for more than 2 seconds.TIRE PRESSURE MONITORING SYS-
TEM (TPMS)
This vehicle is equipped with the Tire
Pressure Monitoring System (TPMS). It
monitors tire pressure of all tires except
the spare (if so equipped). When the low
tire pressure warning light is lit, and the
“Tire Pressure Low - Add Air” warning
message is displayed in the vehicle in-
formation display, one or more of your
tires is significantly under-inflated. If the
vehicle is being driven with low tire
pressure, the TPMS will activate and warn
you of it by the low tire pressure warning
light. This system will activate only when
the vehicle is driven at speeds above 16
MPH (25 km/h). For more details, see
“Warning lights, indicator lights and audi-
ble reminders” (P.2-10) and “Tire Pressure
Monitoring System (TPMS)” (P.5-5).
WARNING
.If the low tire pressure warning
light illuminates while driving,
avoid sudden steering maneu-
vers or abrupt braking, reduce
vehicle speed, pull off the road
to a safe location and stop the
vehicle as soon as possible. Driv-
ing with under-inflated tires may
permanently damage the tires and increase the likelihood of tire
failure. Serious vehicle damage
could occur and may lead to an
accident and could result in ser-
ious personal injury. Check the
tire pressure for all four tires.
Adjust the tire pressure to the
recommended COLD tire pressure
shown on the Tire and Loading
Information label to turn the low
tire pressure warning light OFF. If
the light still illuminates while
driving after adjusting the tire
pressure, a tire may be flat. If
you have a flat tire, replace it with
a spare tire (if so equipped) or
repair it using the emergency tire
puncture repair kit (if so
equipped) as soon as possible.
. Since the spare tire (if so
equipped) is not equipped with
the TPMS, when a spare tire is
mounted or a wheel is replaced,
the TPMS will not function and
the low tire pressure warning
light will flash for approximately
1 minute. The light will remain on
after 1 minute. Have your tires
replaced and/or TPMS system
reset as soon as possible. It is
recommended you visit a NISSAN
dealer for these services.
In case of emergency6-3
EMERGENCY ENGINE SHUT OFF (models
with push-button ignition switch)FLAT TIRE
Page 391 of 492
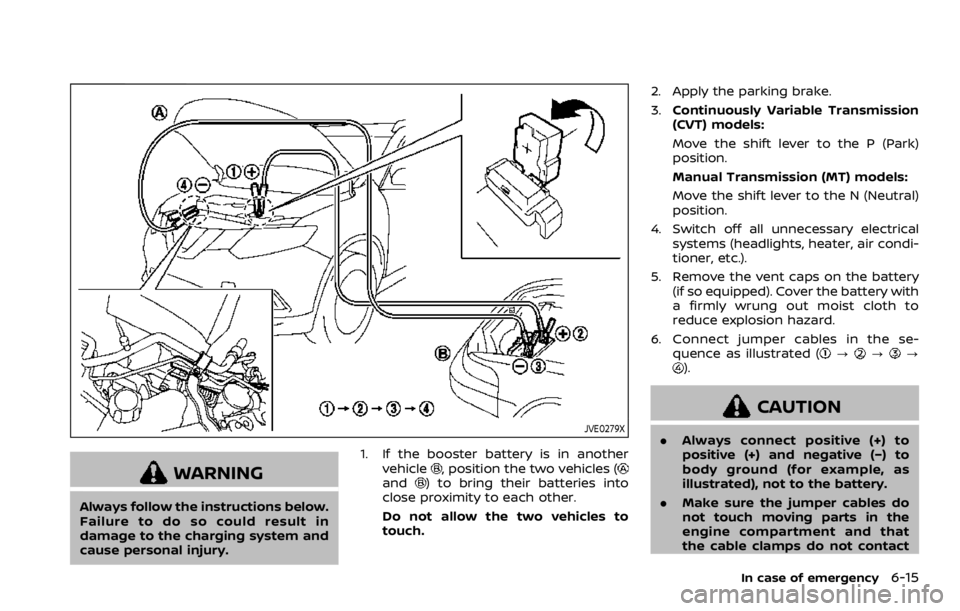
JVE0279X
WARNING
Always follow the instructions below.
Failure to do so could result in
damage to the charging system and
cause personal injury.1. If the booster battery is in another
vehicle
, position the two vehicles (and) to bring their batteries into
close proximity to each other.
Do not allow the two vehicles to
touch. 2. Apply the parking brake.
3.
Continuously Variable Transmission
(CVT) models:
Move the shift lever to the P (Park)
position.
Manual Transmission (MT) models:
Move the shift lever to the N (Neutral)
position.
4. Switch off all unnecessary electrical systems (headlights, heater, air condi-
tioner, etc.).
5. Remove the vent caps on the battery (if so equipped). Cover the battery with
a firmly wrung out moist cloth to
reduce explosion hazard.
6. Connect jumper cables in the se- quence as illustrated (
???).
CAUTION
.Always connect positive (+) to
positive (+) and negative (−) to
body ground (for example, as
illustrated), not to the battery.
. Make sure the jumper cables do
not touch moving parts in the
engine compartment and that
the cable clamps do not contact
In case of emergency6-15
Page 407 of 492

8 Do-it-yourself
Maintenance precautions ...................................................... 8-2
Engine compartment check locations ........................ 8-3MR20DD engine model ..................................................... 8-4
Engine cooling system ............................................................. 8-4 Checking engine coolant level .................................... 8-5
Changing engine coolant ................................................ 8-6
Engine oil ........................................................................\
..................... 8-6 Checking engine oil level ................................................. 8-6
Changing engine oil and filter ..................................... 8-6
Continuously Variable Transmission (CVT)
fluid ........................................................................\
.................................. 8-9
Brake and clutch (if so equipped) fluid ....................... 8-9
Window washer fluid .............................................................. 8-10
Battery ........................................................................\
........................ 8-11 Jump starting ........................................................................\
. 8-12
Variable voltage control system ................................... 8-13
Drive belt ........................................................................\
.................. 8-13
Spark plugs ........................................................................\
............. 8-14 Replacing spark plugs ..................................................... 8-14
Air cleaner ........................................................................\
............... 8-15
Air duct removal .................................................................. 8-15
Air cleaner filter replacement ................................... 8-15 Windshield wiper blades ..................................................... 8-16
Cleaning ........................................................................\
........... 8-16
Replacing ........................................................................\
........ 8-16
Rear window wiper blade .................................................. 8-17
Brakes ........................................................................\
........................ 8-17 Self-adjusting brakes ..................................................... 8-17
Brake pad wear warning ............................................ 8-17
Fuses ........................................................................\
........................... 8-18 Engine compartment .................................................... 8-18
Passenger compartment ........................................... 8-20
Key fob battery replacement .......................................... 8-21
Intelligent Key battery replacement .......................... 8-23
Lights ........................................................................\
.......................... 8-25 Headlights ........................................................................\
...... 8-25
Exterior and interior lights ........................................ 8-27
Wheels and tires ........................................................................\
8-29
Tire pressure ........................................................................\
8-29
Tire labeling ........................................................................\
.. 8-33
Types of tires ....................................................................... 8-35
Tire chains ........................................................................\
...... 8-36
Changing wheels and tires ...................................... 8-37
Page 452 of 492

9-4Maintenance and schedules
as seat adjusters, seatback recliners, etc.
to ensure they operate smoothly and that
all latches lock securely in every position.
Check that the head restraints move up
and down smoothly and that the locks (if
so equipped) hold securely in all latched
positions.
Steering wheel:Check for changes in the
steering conditions, such as excessive
free play, hard steering or strange noises.
Warning lights and chimes: Make sure
that all warning lights and chimes are
operating properly.
Windshield defroster: Check that the air
comes out of the defroster outlets prop-
erly and in sufficient quantity when oper-
ating the heater or air conditioner.
Windshield wiper and washer*: Check
that the wipers and washers operate
properly and that the wipers do not
streak.
Under the hood and vehicle
The maintenance items listed here should
be checked periodically (for example,
each time you check the engine oil or
refuel).
Battery*: Check the fluid level in each cell.
It should be between the MAX and MIN
lines. Vehicles operated in high tempera-
tures or under severe condition require frequent checks of the battery fluid level.
NOTE:
Care should be taken to avoid situations
that can lead to potential battery dis-
charge and potential no-start condi-
tions such as:
1.
Installation or extended use of elec-
tronic accessories that consume
battery power when the engine is
not running (Phone chargers, GPS,
DVD players, etc.)
2. Vehicle is not driven regularly and/
or only driven short distances.
In these cases, the battery may need to
be charged to maintain battery health.
Brake and clutch fluid level*: Make sure
that the brake and clutch fluid level is
between the MAX and MIN lines on the
reservoir.
Engine coolant level*: Check the coolant
level when the engine is cold.
Engine drive belt*: Make sure that the
drive belt is not frayed, worn, cracked or
oily.
Engine oil level*: Check the level after
parking the vehicle on a level surface and
turning off the engine. Wait more than 10
minutes for the oil to drain back into the
oil pan.
Exhaust system: Make sure there are no loose supports, cracks or holes. If the
sound of the exhaust seems unusual or
there is a smell of exhaust fumes, im-
mediately have the exhaust system in-
spected. It is recommended you visit a
NISSAN dealer for this service. (See “Pre-
cautions when starting and driving” (P.5-
4) for exhaust gas (carbon monoxide).)
Fluid leaks:
Check under the vehicle for
fuel, oil, water or other fluid leaks after the
vehicle has been parked for a while. Water
dripping from the air conditioner after use
is normal. If you should notice any leaks
or if gasoline fumes are evident, check for
the cause and have it corrected immedi-
ately.
Radiator and hoses: Check the front of
the radiator and clean off any dirt, insects,
leaves, etc., that may have accumulated.
Make sure the hoses have no cracks,
deformation, rot or loose connections.
Underbody: The underbody is frequently
exposed to corrosive substances such as
those used on icy roads or to control
dust. It is very important to remove these
substances, otherwise rust will form on
the floor pan, frame, fuel lines and around
the exhaust system. At the end of winter,
the underbody should be thoroughly
flushed with plain water, being careful to
clean those areas where mud and dirt
may accumulate. For additional informa-