2020 NISSAN ROGUE SPORT battery
[x] Cancel search: batteryPage 162 of 492

2-80Instruments and controls
SIC3869
VANITY MIRROR LIGHT (if so
equipped)
The light on the vanity mirror will turn on
when the cover on the vanity mirror is
opened.
When the cover is closed, the light will
turn off.
The lights will also turn off after a
period of time when the lights remain
illuminated to prevent the battery from
becoming discharged.
CARGO LIGHT
The cargo lights illuminate when the
liftgate is opened. When the liftgate is
closed, the lights will turn off.
The light will also turn off after a period
of time when the light remains illumi-
nated after the ignition switch has been
pushed to the OFF position to prevent
the battery from becoming discharged.
The HomeLink® Universal Transceiver
provides a convenient way to consolidate
the functions of up to three individual
hand-held transmitters into one built-in
device.
HomeLink® Universal Transceiver:
.Will operate most Radio Frequency
(RF) devices such as garage doors,
gates, home and office lighting, entry
door locks and security systems.
. Is powered by your vehicle’s battery.
No separate batteries are required. If
the vehicle’s battery is discharged or is
disconnected, HomeLink® will retain
all programming.
When the HomeLink® Universal Trans-
ceiver is programmed, retain the origi-
nal transmitter for future programming
procedures (Example: new vehicle pur-
chases). Upon sale of the vehicle, the
programmed HomeLink® Universal
Transceiver buttons should be erased
for security purposes. For additional
information, refer to “Programming
HomeLink®” (P.2-81).
WARNING
. Do not use the HomeLink® Uni-
versal Transceiver with any gar-
age door opener that lacks safety
HomeLink® UNIVERSAL
TRANSCEIVER (if so equipped)
Page 163 of 492

stop and reverse features as re-
quired by federal safety stan-
dards. (These standards became
effective for opener models man-
ufactured after April 1, 1982.) A
garage door opener which cannot
detect an object in the path of a
closing garage door and then
automatically stop and reverse,
does not meet current federal
safety standards. Using a garage
door opener without these fea-
tures increases the risk of serious
injury or death.
. During the programming proce-
dure your garage door or security
gate will open and close (if the
transmitter is within range). Make
sure that people or objects are
clear of the garage door, gate,
etc. that you are programming.
. Your vehicle’s engine should be
turned off while programming
the HomeLink® Universal Trans-
ceiver. Do not breathe exhaust
gases; they contain colorless
and odorless carbon monoxide.
Carbon monoxide is dangerous. It
can cause unconsciousness or
death.PROGRAMMING HomeLink®
The following steps show generic instruc-
tions how to program a HomeLink®
button. If you have any questions or are
having difficulty programming your
HomeLink® buttons, refer to the
HomeLink® web site at: www.homelink.
com/nissan or call 1-800-355-3515.
NOTE:
It is also recommended that a new
battery be placed in the hand-held
transmitter of the device being pro-
grammed to HomeLink® for quicker
programming and accurate transmis-
sion of the radio-frequency.
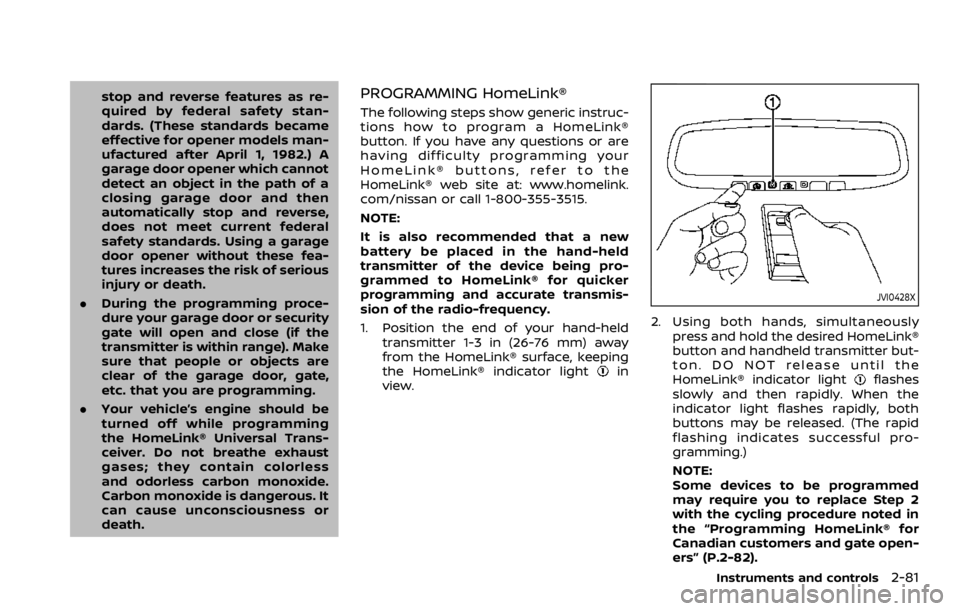
1. Position the end of your hand-held
transmitter 1-3 in (26-76 mm) away
from the HomeLink® surface, keeping
the HomeLink® indicator light
in
view.
JVI0428X
2. Using both hands, simultaneously
press and hold the desired HomeLink®
button and handheld transmitter but-
ton. DO NOT release until the
HomeLink® indicator light
flashes
slowly and then rapidly. When the
indicator light flashes rapidly, both
buttons may be released. (The rapid
flashing indicates successful pro-
gramming.)
NOTE:
Some devices to be programmed
may require you to replace Step 2
with the cycling procedure noted in
the “Programming HomeLink® for
Canadian customers and gate open-
ers” (P.2-82).
Instruments and controls2-81
Page 165 of 492

held transmitter every two seconds until
the frequency signal has been learned.
The HomeLink® indicator light will flash
slowly and then rapidly after several
seconds upon successful programming.
DO NOTrelease until the HomeLink®
indicator light flashes slowly and then
rapidly. When the indicator light flashes
rapidly, both buttons may be released.
The rapid flashing indicates successful
programming.
Proceed with “Programming HomeLink®”
step 3 to complete.
Remember to plug the device back in
when programming is completed.
OPERATING THE HomeLink® UNI-
VERSAL TRANSCEIVER
The HomeLink® Universal Transceiver,
after it is programmed, can be used to
activate the programmed device. To op-
erate, simply press and release the appro-
priate programmed HomeLink® Universal
Transceiver button. The amber indicator
light will illuminate while the signal is
being transmitted.
For convenience, the hand-held transmit-
ter of the device may also be used at any
time.
PROGRAMMING TROUBLESHOOT-
ING
If the HomeLink® does not quickly learn
the hand-held transmitter information:
. replace the hand-held transmitter
batteries with new batteries.
. position the hand-held transmitter
with its battery area facing away from
the HomeLink® surface.
. press and hold both the HomeLink®
and hand-held transmitter buttons
without interruption.
. position the hand-held transmitter 1-3
in (26-76 mm) away from the
HomeLink® surface. Hold the transmit-
ter in that position for up to 15
seconds. If HomeLink® is not pro-
grammed within that time, try holding
the transmitter in another position -
keeping the indicator light in view at
all times.
If you have any questions or are having
difficulty programming your HomeLink®
buttons, refer to the HomeLink® web site
at: www.homelink.com/nissan or 1-800-
355-3515.
CLEARING THE PROGRAMMED IN-
FORMATION
The following procedure clears the pro-
grammed information from both buttons.
Individual buttons cannot be cleared.
However, individual buttons can be re-
programmed, see “Reprogramming a sin-
gle HomeLink® button” (P.2-83).
To clear all programming
1. Press and hold the two outer HomeLink® buttons until the indicator
light begins to flash in approximately
10 seconds. Do not hold for longer
than 20 seconds.
2. Release both buttons.
HomeLink® is now in the programming
mode and can be programmed at any
time beginning with “Programming
HomeLink®” - Step 1.
REPROGRAMMING A SINGLE
HomeLink® BUTTON
To reprogram a HomeLink® Universal
Transceiver button, complete the follow-
ing.
1. Press and hold the desired HomeLink® button. Do notrelease the button.
2. The indicator light will begin to flash after 20 seconds. Without releasing
the HomeLink® button, proceed with
Instruments and controls2-83
Page 167 of 492

3 Pre-driving checks and adjustments
Keys ........................................................................\
................................. 3-2NISSAN Vehicle Immobilizer System key (if
so equipped) ........................................................................\
...... 3-2
Intelligent Key (if so equipped) ................................... 3-3
Doors ........................................................................\
.............................. 3-5 Locking with key .................................................................... 3-5
Locking with inside lock knob ..................................... 3-6
Locking with power door lock switch ................... 3-7
Automatic door locks ......................................................... 3-7
Child safety rear door lock ............................................. 3-7
Remote keyless entry system (if so equipped) ...... 3-8 How to use remote keyless entry system ......... 3-9
Intelligent Key system (if so equipped) .................... 3-11
Intelligent Key operating range .............................. 3-13
Door locks/unlocks precaution ............................... 3-13
Intelligent Key operation .............................................. 3-14
Battery saver system ....................................................... 3-16
Warning lights and audible reminders .............. 3-16
Troubleshooting guide ................................................... 3-17
How to use remote keyless entry function ...... 3-19
Remote engine start (if so equipped) ....................... 3-23 Remote engine start operating range ............... 3-23 Remote starting the engine .................................... 3-23
Extending engine run time ....................................... 3-24
Canceling a remote engine start ........................ 3-24
Conditions the remote engine start will
not work ........................................................................\
.......... 3-24
Hood ........................................................................\
............................ 3-25
Liftgate ........................................................................\
...................... 3-26 Liftgate release lever ..................................................... 3-27
Fuel-filler door ........................................................................\
..... 3-28 Opening the fuel-filler door ...................................... 3-28
Fuel-filler cap ....................................................................... 3-28
Tilt/telescopic steering ........................................................ 3-30 Tilt or telescopic operation ...................................... 3-31
Sun visors ........................................................................\
................ 3-31
Mirrors ........................................................................\
...................... 3-32 Inside mirror ........................................................................\
. 3-32
Outside mirrors .................................................................. 3-33
Vanity mirror ........................................................................\
3-34
Automatic Drive Positioner (if so equipped) ....... 3-34 Memory storage function .......................................... 3-35
Entry/Exit function .......................................................... 3-35
System operation ............................................................. 3-36
Page 170 of 492

3-4Pre-driving checks and adjustments
— The Intelligent Key is waterresistant; however, wetting
may damage the Intelligent
Key. If the Intelligent Key gets
wet, immediately wipe until it
is completely dry.
— Do not bend, drop or strike it against another object.
— If the outside temperature is below 14°F (-10°C) degrees, the
battery of the Intelligent Key
may not function properly.
— Do not place the Intelligent Key for an extended period in
a place where temperatures
exceed 140°F (60°C).
— Do not change or modify the Intelligent Key.
— Do not use a magnet key holder.
— Do not place the Intelligent Key near an electric appliance
such as a television set, per-
sonal computer or cellular
phone.
— Do not allow the Intelligent Key to come into contact with
water or salt water, and do
not wash it in a washing machine. This could affect
the system function.
. If an Intelligent Key is lost or
stolen, NISSAN recommends
erasing the ID code of that Intel-
ligent Key. This will prevent the
Intelligent Key from unauthorized
use to unlock the vehicle. For
information regarding the eras-
ing procedure, it is recommended
you visit a NISSAN dealer.
SPA2033
Mechanical key
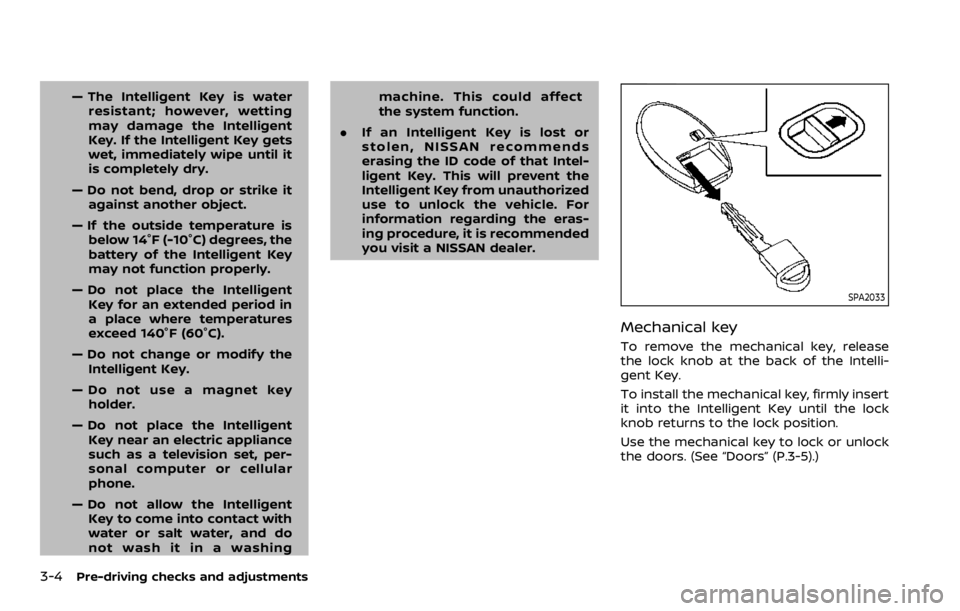
To remove the mechanical key, release
the lock knob at the back of the Intelli-
gent Key.
To install the mechanical key, firmly insert
it into the Intelligent Key until the lock
knob returns to the lock position.
Use the mechanical key to lock or unlock
the doors. (See “Doors” (P.3-5).)
Page 174 of 492

3-8Pre-driving checks and adjustments
It is possible to lock/unlock all doors
(including the liftgate), and activate the
panic alarm by using the key fob from
outside the vehicle.
Before locking the doors, make sure the
key is not left in the vehicle.
The key fob can operate at a distance of
approximately 33 ft (10 m) from the
vehicle. (The effective distance depends
upon the conditions around the vehicle.)
As many as 4 key fobs can be used with
one vehicle. For information concerning
the purchase and use of additional key
fobs, contact a NISSAN dealer.
The key fob will not function:
.When the key fob is not within the
operational range.
. When the doors are open or not
closed securely.
. When the key is in the ignition switch.
. When the battery is discharged.
WARNING
The remote keyless entry key fob
transmits radio waves when the
buttons are pushed. The FAA advises
that the radio waves may affect
aircraft navigation and communica-
tion systems. Do not operate the key fob while on an airplane. Make sure
the buttons are not operated unin-
tentionally when the unit is stored
during a flight.
CAUTION
The following conditions or occur-
rences will damage the key fob.
.
Do not allow the key fob to
become wet.
. Do not drop the key fob.
. Do not strike the key fob sharply
against another object.
. If the outside temperature is be-
low 14°F (-10°C) degrees, the bat-
tery of key fob may not function
properly.
. Do not place the key fob for an
extended period in an area where
temperatures exceed 140°F
(60°C).
If a key fob is lost or stolen, NISSAN
recommends erasing the ID code of
that key fob. This will prevent the key
fob from unauthorized use to unlock
the vehicle. For information regard-
ing the erasing procedure, it is re-
commended that you visit a NISSAN dealer.
For information regarding the replace-
ment of a battery, see “Key fob battery
replacement” (P.8-21).
REMOTE KEYLESS ENTRY SYSTEM
(if so equipped)
Page 175 of 492

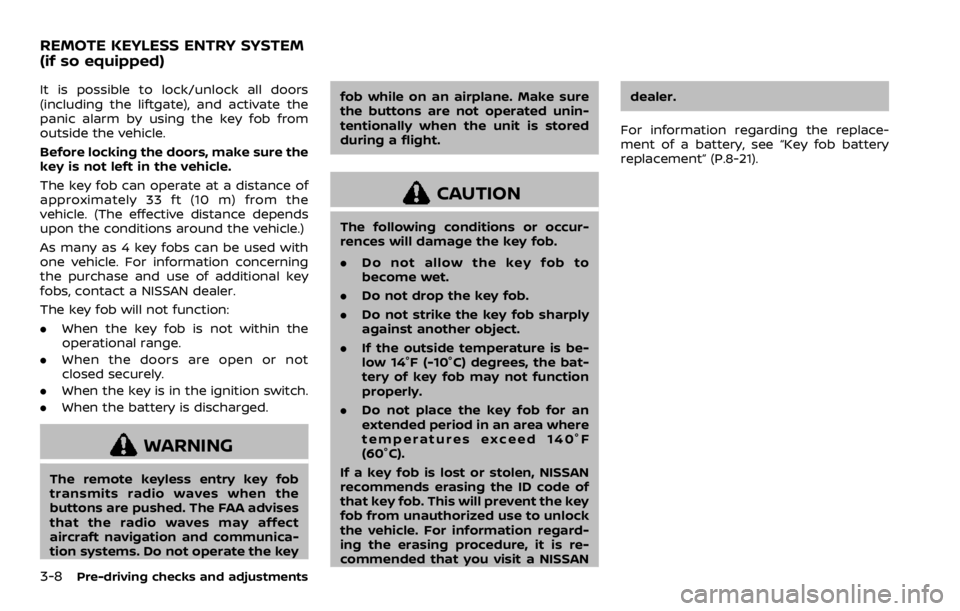
JVP0308X
Jackknife type key release buttonLOCK buttonUNLOCK buttonPANIC buttonBattery indicator light
HOW TO USE REMOTE KEYLESS
ENTRY SYSTEM
Welcome light and farewell light
function
When you lock or unlock the doors or the
liftgate, the daytime running lights, park-
ing lights and the tail lights will illuminate
for a period of time. The welcome light
and farewell light function can be dis-
abled. For information about disablingthe welcome light and farewell light
function, see “Vehicle Settings” (P.2-23).
Locking doors
1. Remove the key from the ignition
switch.
2. Close all the doors.
3. Push the LOCK
buttonon the
key fob.
4. All the doors will lock. All of the doors will lock when the
LOCK
button is pushed even
though a door remains open.
5. The hazard indicator flashes twice and the horn chirps once.
. When the LOCK
button is pushed
with all doors locked, the hazard
indicator flashes twice and the horn
chirps once as a reminder that the
doors are already locked.
. Operate the door handles to confirm
that the doors have been securely
locked.
Unlocking doors
1. Push the UNLOCKbuttonon
the key fob.
.The driver’s door unlocks..The hazard indicator flashes once if
all doors are completely closed. 2. Push the UNLOCK
button again
within 5 seconds.
.All the doors and the liftgate unlock..The hazard indicator flashes once if all doors are completely closed.
All doors will be locked automatically
unless one of the following operations is
performed within 1 minute of pushing the
UNLOCK
button.
. Any door or liftgate is opened.
. The ignition switch is placed in the ON
position.
NOTE:
The unlocking operation can be chan-
ged in selective unlock in the Vehicle
Settings of the vehicle information dis-
play. For additional information, refer to
“Vehicle Settings” (P.2-23).
Using panic alarm
If you are near your vehicle and feel
threatened, you may activate the alarm
to call attention as follows:
1. Push the PANIC
buttonon the
key fob for more than 0.5 seconds.
2. The theft warning alarm and head- lights will stay on for 25 seconds.
3. The panic alarm stops when:
.It has run for 25 seconds, or
Pre-driving checks and adjustments3-9
Page 176 of 492

3-10Pre-driving checks and adjustments
.Any of the buttons on the key fob ispushed. (Note: the PANIC button
must be pushed for more than 1
second.)
Battery indicator light
The battery indicator lightilluminates
when you push any button. If the light
does not illuminate, the battery is weak or
needs replacement. For information re-
garding replacement of a battery, see
“Key fob battery replacement” (P.8-21).
Setting hazard indicator and horn
mode
This vehicle is set in hazard indicator and
horn mode when you first receive the
vehicle.
In hazard indicator and horn mode, when
the LOCK
buttonis pushed, the
hazard indicator flashes twice and the
horn chirps once. When the UNLOCK
buttonis pushed, the hazard indicator
flashes once.
If the horn chirp is not necessary, you can
switch to hazard indicator only mode by
following the switching procedure.
In hazard indicator only mode, when the
LOCK
button is pushed, the hazard
indicator flashes twice. When the UNLOCK
button is pushed, neither the hazard
indicator nor the horn operates.
Mode (Pushing theorbutton) DOOR LOCK
DOOR UNLOCK
Hazard indicator and horn mode HAZARD -
twice
HORN - once HAZARD -
once
HORN - none
Hazard indicator mode HAZARD - twiceHAZARD - none