Page 381 of 492
MCE0001A
Blocking wheels
Place suitable blocksat both the front
and back of the wheel diagonally oppo-
site the flat tire to prevent the vehicle
from moving when it is jacked up.
WARNING
Be sure to block the wheel as the
vehicle may move and result in
personal injury.
JVE0270X
Getting the spare tire and tools
Remove the jack, necessary tools and the
spare tire from the storage area.
The spare tire, jack and tools are located
under the flexible luggage boards (if so
equipped) and cover.
JVE0402X
Pull up the flexible luggage boards (if so
equipped) and cover.
Remove the jack and tools from the
storage area.
In case of emergency6-5
Page 382 of 492

6-6In case of emergency
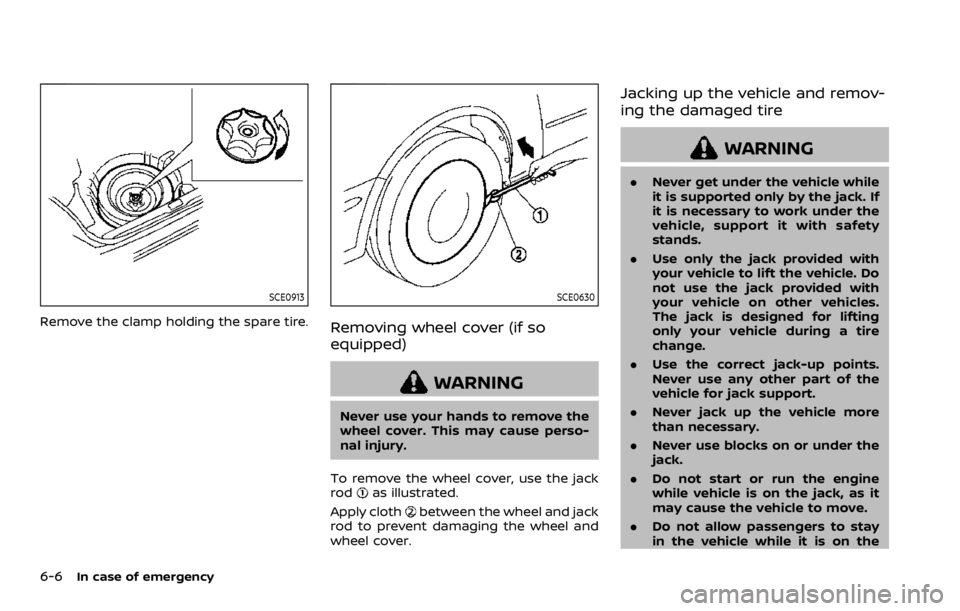
SCE0913
Remove the clamp holding the spare tire.
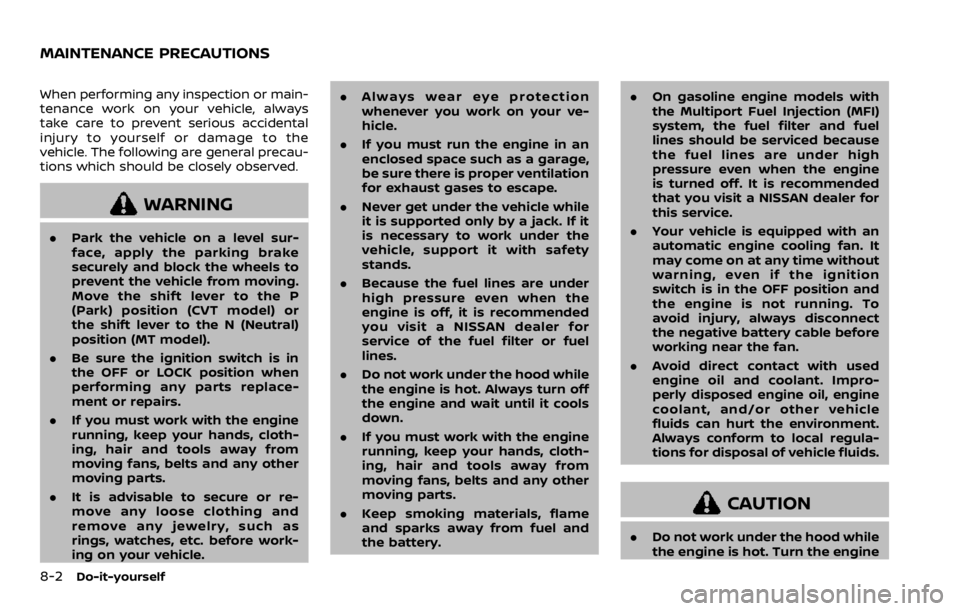
SCE0630
Removing wheel cover (if so
equipped)
WARNING
Never use your hands to remove the
wheel cover. This may cause perso-
nal injury.
To remove the wheel cover, use the jack
rod
as illustrated.
Apply cloth
between the wheel and jack
rod to prevent damaging the wheel and
wheel cover.
Jacking up the vehicle and remov-
ing the damaged tire
WARNING
. Never get under the vehicle while
it is supported only by the jack. If
it is necessary to work under the
vehicle, support it with safety
stands.
. Use only the jack provided with
your vehicle to lift the vehicle. Do
not use the jack provided with
your vehicle on other vehicles.
The jack is designed for lifting
only your vehicle during a tire
change.
. Use the correct jack-up points.
Never use any other part of the
vehicle for jack support.
. Never jack up the vehicle more
than necessary.
. Never use blocks on or under the
jack.
. Do not start or run the engine
while vehicle is on the jack, as it
may cause the vehicle to move.
. Do not allow passengers to stay
in the vehicle while it is on the
Page 384 of 492
6-8In case of emergency
SCE0504
2. Loosen each wheel nut one or twoturns by turning it counterclockwise
with the wheel nut wrench. Do not
remove the wheel nuts until the tire
is off the ground.
3. To lift the vehicle, securely hold the jack lever and rod with both hands as
shown above. Carefully raise the ve-
hicle until the tire clears the ground.
Remove the wheel nuts, and then
remove the tire.
SCE0933
Installing the spare tire
The spare tire is designed for emer-
gency use. (See specific instructions
under the heading “Wheels and tires”
(P.8-29).)
1. Clean any mud or dirt from the sur-face between the wheel and hub.
2. Carefully put the spare tire on and tighten the wheel nuts finger tight.
Check that all the wheel nuts contact
the wheel surface horizontally.
3. With the wheel nut wrench, tighten wheel nuts alternately and evenly in
the sequence illustrated (
,,,,),
more than 2 times, until they are tight.
Page 388 of 492
6-12In case of emergency
SCE0868
2. Take the hoseand the power plugout of the air compressor. Remove the
cap of the bottle holder from the air
compressor.
SCE0869
3. Remove the cap of the tire sealantbottle, and screw the bottle clockwise
onto the bottle holder. (Leave the
bottle seal intact. Screwing the bottle
onto the bottle holder will pierce the
seal of the bottle.)
4. Remove the cap of the tire valve on the flat tire.
SCE0870
5. Remove the protective capof the
hose and screw the hose securely
onto the tire valve. Make sure that
the pressure release valve
is se-
curely tightened. Make sure that the
air compressor switch is in the OFF
(*) position, and then insert its power
plug into the power outlet in the
vehicle.
Page 408 of 492

8-2Do-it-yourself
When performing any inspection or main-
tenance work on your vehicle, always
take care to prevent serious accidental
injury to yourself or damage to the
vehicle. The following are general precau-
tions which should be closely observed.
WARNING
.Park the vehicle on a level sur-
face, apply the parking brake
securely and block the wheels to
prevent the vehicle from moving.
Move the shift lever to the P
(Park) position (CVT model) or
the shift lever to the N (Neutral)
position (MT model).
. Be sure the ignition switch is in
the OFF or LOCK position when
performing any parts replace-
ment or repairs.
. If you must work with the engine
running, keep your hands, cloth-
ing, hair and tools away from
moving fans, belts and any other
moving parts.
. It is advisable to secure or re-
move any loose clothing and
remove any jewelry, such as
rings, watches, etc. before work-
ing on your vehicle. .
Always wear eye protection
whenever you work on your ve-
hicle.
. If you must run the engine in an
enclosed space such as a garage,
be sure there is proper ventilation
for exhaust gases to escape.
. Never get under the vehicle while
it is supported only by a jack. If it
is necessary to work under the
vehicle, support it with safety
stands.
. Because the fuel lines are under
high pressure even when the
engine is off, it is recommended
you visit a NISSAN dealer for
service of the fuel filter or fuel
lines.
. Do not work under the hood while
the engine is hot. Always turn off
the engine and wait until it cools
down.
. If you must work with the engine
running, keep your hands, cloth-
ing, hair and tools away from
moving fans, belts and any other
moving parts.
. Keep smoking materials, flame
and sparks away from fuel and
the battery. .
On gasoline engine models with
the Multiport Fuel Injection (MFI)
system, the fuel filter and fuel
lines should be serviced because
the fuel lines are under high
pressure even when the engine
is turned off. It is recommended
that you visit a NISSAN dealer for
this service.
. Your vehicle is equipped with an
automatic engine cooling fan. It
may come on at any time without
warning, even if the ignition
switch is in the OFF position and
the engine is not running. To
avoid injury, always disconnect
the negative battery cable before
working near the fan.
. Avoid direct contact with used
engine oil and coolant. Impro-
perly disposed engine oil, engine
coolant, and/or other vehicle
fluids can hurt the environment.
Always conform to local regula-
tions for disposal of vehicle fluids.
CAUTION
.Do not work under the hood while
the engine is hot. Turn the engine
MAINTENANCE PRECAUTIONS
Page 414 of 492

8-8Do-it-yourself
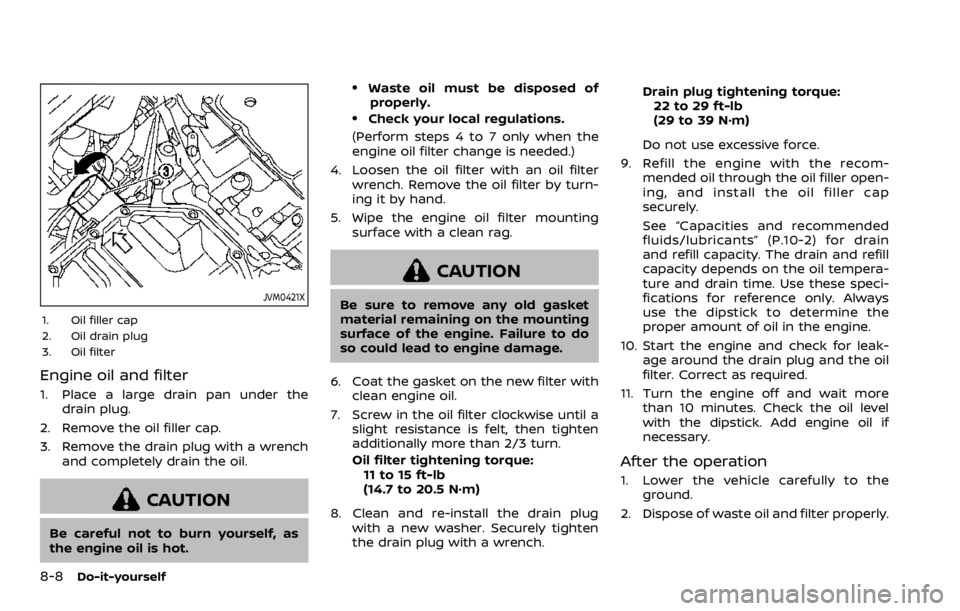
JVM0421X
1. Oil filler cap
2. Oil drain plug
3. Oil filter
Engine oil and filter
1. Place a large drain pan under thedrain plug.
2. Remove the oil filler cap.
3. Remove the drain plug with a wrench and completely drain the oil.
CAUTION
Be careful not to burn yourself, as
the engine oil is hot.
.Waste oil must be disposed ofproperly.
.Check your local regulations.
(Perform steps 4 to 7 only when the
engine oil filter change is needed.)
4. Loosen the oil filter with an oil filter wrench. Remove the oil filter by turn-
ing it by hand.
5. Wipe the engine oil filter mounting surface with a clean rag.
CAUTION
Be sure to remove any old gasket
material remaining on the mounting
surface of the engine. Failure to do
so could lead to engine damage.
6. Coat the gasket on the new filter with clean engine oil.
7. Screw in the oil filter clockwise until a slight resistance is felt, then tighten
additionally more than 2/3 turn.
Oil filter tightening torque:11 to 15 ft-lb
(14.7 to 20.5 N·m)
8. Clean and re-install the drain plug with a new washer. Securely tighten
the drain plug with a wrench. Drain plug tightening torque:
22 to 29 ft-lb
(29 to 39 N·m)
Do not use excessive force.
9. Refill the engine with the recom- mended oil through the oil filler open-
ing, and install the oil filler cap
securely.
See “Capacities and recommended
fluids/lubricants” (P.10-2) for drain
and refill capacity. The drain and refill
capacity depends on the oil tempera-
ture and drain time. Use these speci-
fications for reference only. Always
use the dipstick to determine the
proper amount of oil in the engine.
10. Start the engine and check for leak- age around the drain plug and the oil
filter. Correct as required.
11. Turn the engine off and wait more than 10 minutes. Check the oil level
with the dipstick. Add engine oil if
necessary.
After the operation
1. Lower the vehicle carefully to the
ground.
2. Dispose of waste oil and filter properly.
Page 419 of 492

CAUTION
.Do not ground accessories di-
rectly to the battery terminal.
Doing so will bypass the variable
voltage control system and the
vehicle battery may not charge
completely.
. Use electrical accessories with
the engine running to avoid dis-
charging the vehicle battery.
The variable voltage control system mea-
sures the amount of electrical discharge
from the battery and controls voltage
generated by the generator.
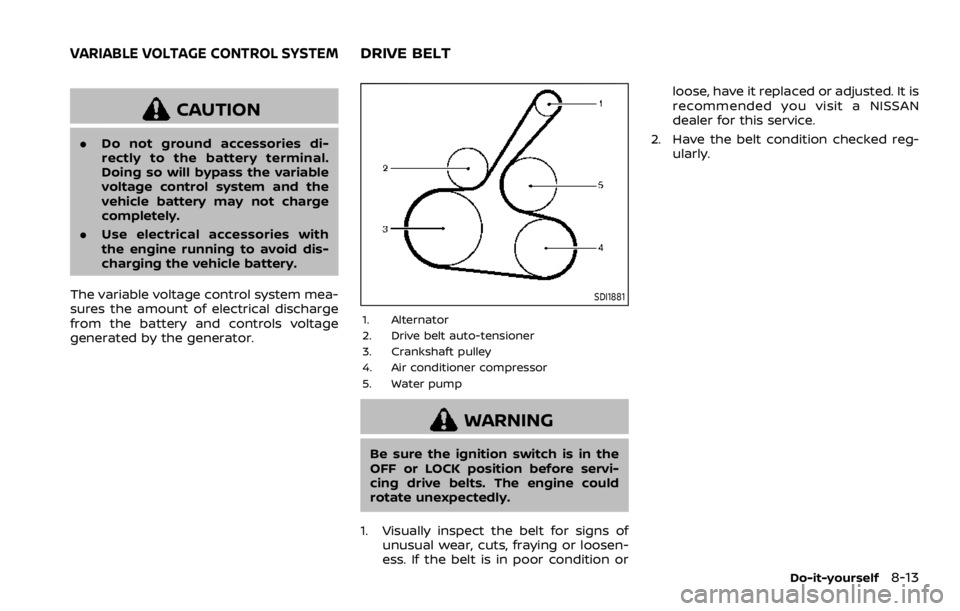
SDI1881
1. Alternator
2. Drive belt auto-tensioner
3. Crankshaft pulley
4. Air conditioner compressor
5. Water pump
WARNING
Be sure the ignition switch is in the
OFF or LOCK position before servi-
cing drive belts. The engine could
rotate unexpectedly.
1. Visually inspect the belt for signs of unusual wear, cuts, fraying or loosen-
ess. If the belt is in poor condition or loose, have it replaced or adjusted. It is
recommended you visit a NISSAN
dealer for this service.
2. Have the belt condition checked reg- ularly.
Do-it-yourself8-13
VARIABLE VOLTAGE CONTROL SYSTEMDRIVE BELT
Page 421 of 492
WAI0091X
AIR DUCT REMOVAL
1. Remove the clipwith a suitable tool.
2. While pulling off the lock, pull out the
clipand pull up the air duct.
WAI0092X
AIR CLEANER FILTER REPLACEMENT
1. Remove the clipsand open the air
cleaner filter cover.
2. Pull up the air cleaner filter
.
WARNING
. Operating the engine with the air
cleaner filter off can cause you or
others to be burned. The air
cleaner filter not only cleans the
intake air, it also stops flame if
the engine backfires. If the air
cleaner filter is not installed and
the engine backfires, you could
be burned. Never drive with the
air cleaner filter off. Be cautious
working on the engine when the
air cleaner filter is off.
. Never pour fuel into the throttle
body or attempt to start the
engine with the air cleaner re-
moved. Doing so could result in
serious injury.
Do-it-yourself8-15
AIR CLEANER