Page 112 of 300
∙ To help avoid risk of injury or deaththrough unintended operation of the
vehicle and/or its systems, including
entrapment in windows or inadver-
tent door lock activation, do not leave
children, people who require the as-
sistance of others or pets unattended
in your vehicle. Additionally, the tem-
perature inside a closed vehicle on a
warm day can quickly become high
enough to cause a significant risk of
injury or death to people and pets.
LOCKING WITH KEY
To lock or unlock the vehicle, turn the key as
shown.
Manual (if so equipped)
To lock a front door, turn the key toward the
front of the vehicle
�1. To unlock, turn the
key toward the rear
�2. To lock a sliding door, turn the key toward
the front of the vehicle
�1. To unlock, turn
the key toward the rear
�2.
Page 115 of 300
Lockout protection
When the power door lock switch (driver’s
or front passenger’s side) is moved to the
lock position with the key in the ignition
switch while any door is open, all doors will
lock and then unlock automatically. This
helps to prevent the keys from being acci-
dently locked inside the vehicle.
OPERATING THE SLIDING DOORS
Page 118 of 300
NOTE:
The back door wire mesh (if so equipped)
is not designed as either an ejection
mitigation feature or an anti-thef t fea-
ture. Do not hang items on the back door
wire mesh. Any damage or failure caused
by misuse is not covered under the
NISSAN New Vehicle Limited Warranty.
AUTOMATIC DOOR LOCKS
∙ All doors lock automatically when thevehicle speed reaches 15 mph
(24 km/h).
∙ All doors unlock automatically when the transmission is placed in the P (Park)
position, when the ignition is turned to
the OFF position, or when the key is re-
moved from the ignition.
Page 122 of 300
WARNING
∙ Make sure the hood is completelyclosed and latched before driving.
Failure to do so could cause the hood
to fly open and result in an accident.
∙ If you see steam or smoke coming from the engine compartment, to
avoid injury do not open the hood.
OPENER OPERATION
The fuel-filler door release is located below
the instrument panel. To open the fuel-filler
door, pull the release. To lock, close the fuel-
filler door securely.
FUEL-FILLER CAP
Page 125 of 300
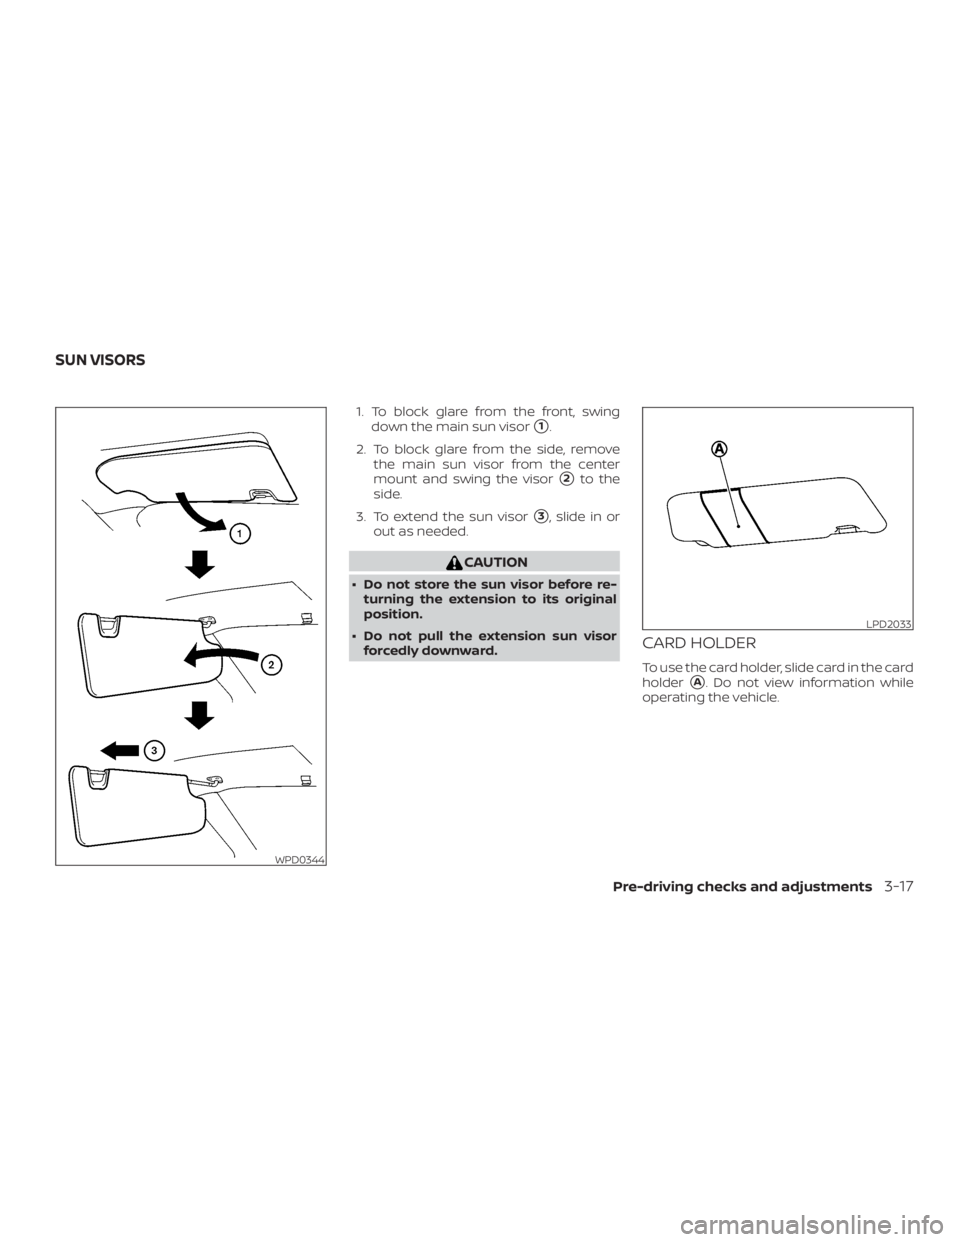
1. To block glare from the front, swingdown the main sun visor
�1.
2. To block glare from the side, remove the main sun visor from the center
mount and swing the visor
�2to the
side.
3. To extend the sun visor
�3, slide in or
out as needed.
Page 173 of 300
∙ HEADED DOWNHILL WITH CURB�A:
Turn the wheels into the curb and
move the vehicle forward until the curb
side wheel gently touches the curb.
∙ HEADED UPHILL WITH CURB
�B:
Turn the wheels away from the curb
and move the vehicle back until the
curb side wheel gently touches the
curb.
∙ HEADED UPHILL OR DOWNHILL, NO CURB
�C:
Turn the wheels toward the side of the
road so the vehicle will move away
from the center of the road if it moves.
4. Place the ignition switch in the LOCK position.
Page 175 of 300

– When installing a spare tire, makesure that it is the proper size and
type as specified on the Tire and
Loading Information label. For ad-
ditional information, refer to “Tire
and Loading Information label” in
the “Technical and consumer infor-
mation” section of this manual.
– For additional information, refer to “Wheels and tires” in the “Do-it-
yourself ” section of this manual.
The ABS controls the brakes so the wheels
do not lock during hard braking or when
braking on slippery surfaces. The system
detects the rotation speed at each wheel
and varies the brake fluid pressure to pre-
vent each wheel from locking and sliding.
By preventing each wheel from locking, the
system helps the driver maintain steering
control and helps to minimize swerving
and spinning on slippery surfaces.
Using the system
Depress the brake pedal and hold it down.
Depress the brake pedal with firm steady
pressure, but do not pump the brakes. The
Anti-lock Braking System will operate to
prevent the wheels from locking up. Steer
the vehicle to avoid obstacles.
Page 184 of 300

DRAINING OF COOLANT WATER
If the vehicle is to be lef t outside without
antifreeze, drain the cooling system, includ-
ing the engine block. Refill before operating
the vehicle. For additional information, refer
to “Changing engine coolant” in the “Do-it-
yourself ” section of this manual.
TIRE EQUIPMENT
1. SUMMER tires have a tread designed toprovide superior performance on dry
pavement. However, the performance
of these tires will be substantially re-
duced in snowy and icy conditions. If
you operate your vehicle on snowy or
icy roads, NISSAN recommends the use
of MUD & SNOW or ALL SEASON TIRES
on all four wheels. It is recommended
that you visit a NISSAN dealer for the tire
type, size, speed rating and availability
information.
2. For additional traction on icy roads, studded tires may be used. However,
some U.S. states and Canadian prov-
inces prohibit their use. Check local,
state and provincial laws before install-
ing studded tires. Skid and traction capabilities of studded
snow tires on wet or dry surfaces may be
poorer than that of non-studded snow
tires.
3. Tire chains may be used. For additional information, refer to “Tire chains” in the
“Do-it-yourself ” section of this manual.
SPECIAL WINTER EQUIPMENT
It is recommended that the following items
be carried in the vehicle during winter:
∙ A scraper and stiff-bristled brush to re- move ice and snow from the windows
and wiper blades.
∙ A sturdy, flat board to be placed under the jack to give it firm support.
∙ A shovel to dig the vehicle out of snow- drif ts.
∙ Extra washer fluid to refill the windshield-washer fluid reservoir.
DRIVING ON SNOW OR ICE

 is moved to the
lock position with the key in the ignition
switch while any door is open, all doors will
loc")

is not designed as either an ejection
mitigation feature or an anti-thef t fea-
ture. Do not hang items on the back door
wire mesh. Any damage or failure")