2020 NISSAN MURANO child lock
[x] Cancel search: child lockPage 79 of 518

8. Af ter attaching the child restraint, test itbefore you place the child in it. Push it
from side to side while holding the child
restraint near the seat belt path. The
child restraint should not move more
than 1 inch (25 mm), from side to side. Try
to tug it forward and check to see if the
belt holds the restraint in place. If the
restraint is not secure, tighten the seat
belt as necessary, or put the restraint in
another seat and test it again. You may
need to try a different child restraint. Not
all child restraints fit in all types of
vehicles. 9. Check to make sure the child restraint is
properly secured prior to each use. If the
seat belt is not locked, repeat steps 2
through 8.
10. If the child restraint is installed in thefront passenger seat, place the ignition
switch in the ON position. The front
passenger air bag status light
should illuminate. If this light is not illu-
minated refer to “Front passenger air
bag and status light” in this section.
Move the child restraint to another
seating position. Have the system
checked. It is recommended that you
visit a NISSAN dealer for this service.
Af ter the child restraint is removed and the
seat belt is fully retracted, the ALR mode
(child restraint mode) is canceled.
WRS0698
Forward-facing – step 8
LRS0865
Forward-facing – step 10
Safety-Seats, seat belts and supplemental restraint system1-43
Page 82 of 518

Booster seats of various sizes are offered
by several manufacturers. When selecting
any booster seat, keep the following points
in mind:
• Choose only a booster seat with a labelcertif ying that it complies with Federal
Motor Vehicle Safety Standard 213 or Ca-
nadian Motor Vehicle Safety Standard 213.
• Check the booster seat in your vehicle to be sure it is compatible with the vehicle’s
seat and seat belt system. • Make sure the child’s head will be properly
supported by the booster seat or vehicle
seat. The seatback must be at or above
the center of the child’s ears. For example,
if a low back booster seat is chosen, the
vehicle seatback must be at or above the
center of the child’s ears. If the seatback is
lower than the center of the child’s ears, a
high back booster seat should be used.
• If the booster seat is compatible with your vehicle, place the child in the booster
seat and check the various adjustments
to be sure the booster seat is compatible
with the child. Always follow all recom-
mended procedures.
All U.S. states and Canadian provinces or
territories require that infants and small
children be restrained in an approved
child restraint at all times while the ve-
hicle is being operated.
The instructions in this section apply to
booster seat installation in the rear seats
or the front passenger seat.
Booster seat installation
WARNING
To avoid injury to child, do not use the
lap/shoulder belt in the Automatic
Locking Retractor (ALR) mode when us-
ing a booster seat with the seat belts.
For additional information, refer to all Warn-
ings and Cautions in the “Child safety,”
“Child restraints” and “Booster seats” sec-
tions of this manual before installing a child
restraint.
Follow these steps to install a booster seat
in the rear bench seats or in the front pas-
senger seat:
LRS0464
1-46Safety-Seats, seat belts and supplemental restraint system
Page 98 of 518

NOTE:
This vehicle’s occupant classification
sensor system generally keeps the clas-
sification locked during driving, so it is
important that you confirm that the
front passenger is properly classified
prior to driving. However, the occupant
classification sensor may recalculate the
weight of the occupant under some con-
ditions (both while driving and when
stopped), so front passenger seat occu-
pants should continue to remain seated
as outlined above.
Troubleshooting
If you think the front passenger air bag
status light is incorrect:
1. If the light is ON with an adult occupyingthe front passenger seat:
• Occupant is a small adult — the air bag light is functioning as intended. The front
passenger air bag and passenger knee
air bag are suppressed.
However, if the occupant is not a small
adult, then this may be due to the following
conditions that may be interfering with the
weight sensors: • Occupant is not sitting upright, leaning
against the seatback, and centered on
the seat cushion with his/her feet com-
fortably extended to the floor.
• A child restraint or other object pressing against the rear of the seatback.
• A rear passenger pushing or pulling on the back of the front passenger seat.
• Forcing the front seat or seatback against an object on the seat or floor be-
hind it.
• An object placed under the front passen- ger seat.
• An object placed between the seat cush- ion and center console or between the
seat cushion and the door.
If the vehicle is moving, please come to a
stop when it is safe to do so. Check and
correct any of the above conditions. Re-
start the vehicle and wait 1 minute.
NOTE:
A system check will be performed during
which the front passenger air bag status
light will remain lit for about 7 seconds
initially.
If the light is still ON af ter this, the person
should be advised not to ride in the front
passenger seat and the vehicle should be checked as soon as possible. It is recom-
mended that you visit a NISSAN dealer for
this service.
2. If the light is OFF with a small adult, child
or child restraint occupying the front
passenger seat.
This may be due to the following condi-
tions that may be interfering with the
weight sensors:
• Small adult or child is not sitting upright, leaning against the seatback, and cen-
tered on the seat cushion with his/her
feet comfortably extended to the floor.
• The child restraint is not properly in- stalled, as outlined in the “Child restraints”
section of this manual.
• An object weighing over 9.1 lbs. (4 kg) hanging on the seat or placed in the seat-
back pocket.
• A child restraint or other object pressing against the rear of the seatback.
• A rear passenger pushing or pulling on the back of the front passenger seat.
• Forcing the front seat or seatback against an object on the seat or floor be-
hind it.
• An object placed under the front passen- ger seat.
1-62Safety-Seats, seat belts and supplemental restraint system
Page 170 of 518

POWER WINDOWS
WARNING
• Make sure that all passengers have
their hands, etc., inside the vehicle
while it is in motion and before clos-
ing the windows. Use the window
lock switch to prevent unexpected
use of the power windows.
• To help avoid risk of injury or death
through unintended operation of the
vehicle and/or its systems, including
entrapment in windows or inadver-
tent door lock activation, do not
leave children, people who require
the assistance of others or pets unat-
tended in your vehicle. Additionally,
the temperature inside a closed ve-
hicle on a warm day can quickly be-
come high enough to cause a signifi-
cant risk of injury or death to people
and pets.
The power windows operate when the ig-
nition switch is placed in the ON position or
for a period of time af ter the ignition switch
is placed in the OFF position. If the driver's
or passenger's door is opened during this
period of time, the power to the windows is
canceled.
Driver's side power window
switch
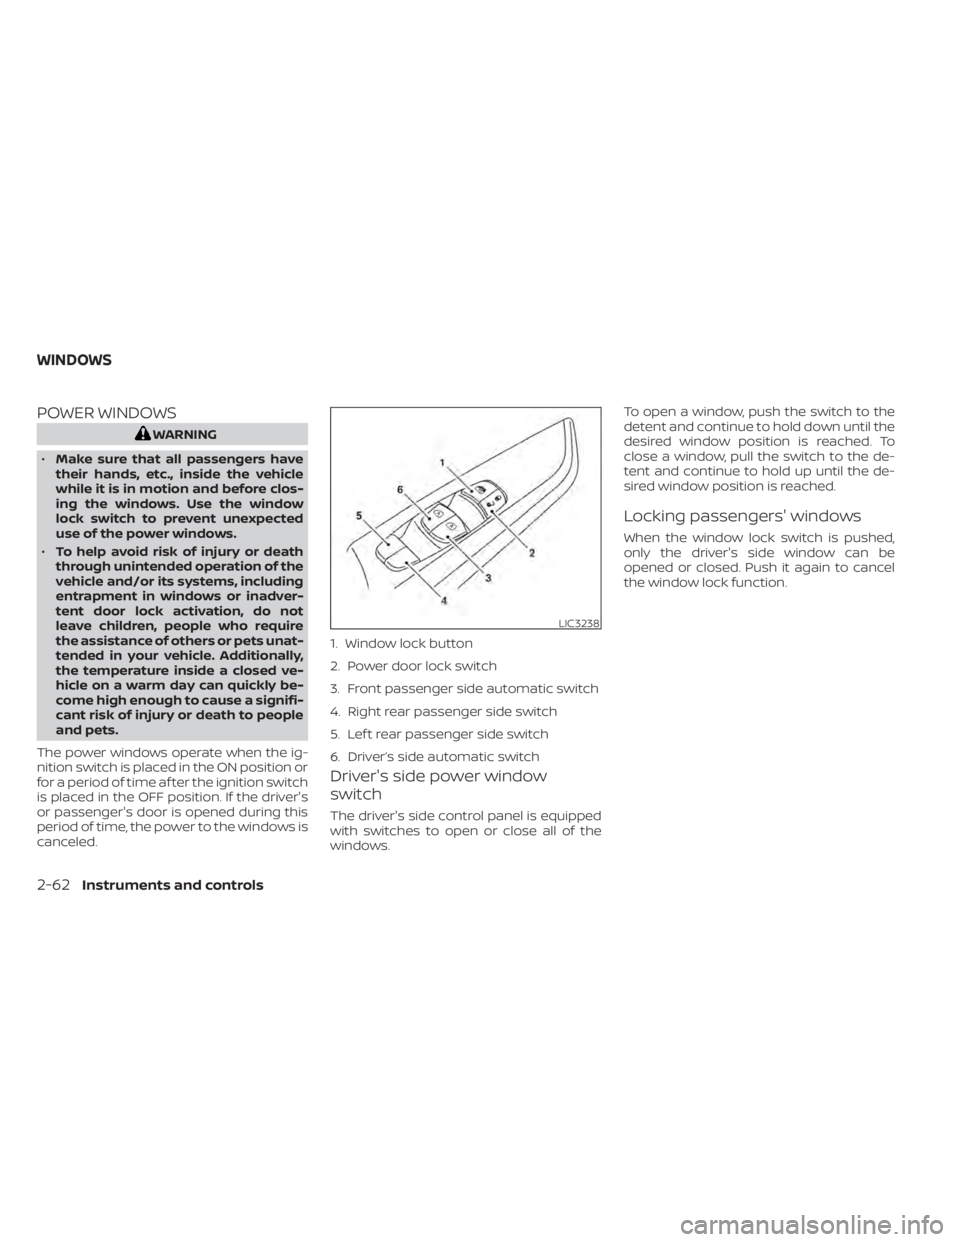
The driver's side control panel is equipped
with switches to open or close all of the
windows. To open a window, push the switch to the
detent and continue to hold down until the
desired window position is reached. To
close a window, pull the switch to the de-
tent and continue to hold up until the de-
sired window position is reached.
Locking passengers' windows
When the window lock switch is pushed,
only the driver's side window can be
opened or closed. Push it again to cancel
the window lock function.
LIC3238
1. Window lock button
2. Power door lock switch
3. Front passenger side automatic switch
4. Right rear passenger side switch
5. Lef t rear passenger side switch
6. Driver’s side automatic switch
WINDOWS
2-62Instruments and controls
Page 182 of 518

3 Pre-driving checks and adjustments
Keys.............................................3-2NISSAN Intelligent Key® .......................3-2
NISSAN Vehicle Immobilizer System
keys..........................................3-4
Doors ...........................................3-5
Locking with key .............................3-5
Locking with inside lock knob ................3-6
Locking with power door lock switch .........3-6
Automatic door locks ........................ 3-7
Child safety rear door lock .................... 3-7
NISSAN Intelligent Key® .......................... 3-7
Operating range .............................3-8
Door locks/unlocks precaution ...............3-9
NISSAN Intelligent Key® Operation ...........3-10
How to use the remote keyless entry
function ..................................... 3-13
Warning signals ............................. 3-16
Troubleshooting guide ......................3-16
Remote Engine Start (if so equipped) ...........3-19
Remote Engine Start operating range .......3-19
Remote starting the vehicle .................3-19
Extending engine run time ..................3-20
Canceling a Remote Engine Start ...........3-20
Conditions the Remote Engine Start will
notwork .................................... 3-21
Hood ........................................... 3-22Lif tgate
........................................ 3-22
Operating the manual lif tgate
(if so equipped) .............................. 3-23
Operating the power lif tgate
(if so equipped) .............................. 3-23
Motion-Activated Lif tgate
(if so equipped) .............................. 3-26
Lif tgate release ............................. 3-27
Lif tgate position setting
(if so equipped) .............................. 3-29
Fuel-filler door .................................. 3-29
Opener operation ........................... 3-29
Fuel-filler cap ................................ 3-30
Steering wheel ................................. 3-32
Manual operation (if so equipped) ...........3-32
Automatic operation (if so equipped) ........3-33
Sun visors ...................................... 3-34
Vanity mirrors ............................... 3-34
Card holder ................................. 3-35
Mirrors .........................................
3-35
Manual
anti-glare rearview mirror
(if so equipped) .............................. 3-35
Automatic anti-glare rearview mirror
(if so equipped) .............................. 3-35
Outside mirrors ............................. 3-36
Page 187 of 518

When the doors are locked using one of the
following methods, the doors cannot be
opened using the inside or outside door
handles. The doors must be unlocked to
open the doors.
WARNING
• Always have the doors locked while
driving. Along with the use of seat
belts, this provides greater safety in
the event of an accident by helping to
prevent persons from being thrown
from the vehicle. This also helps keep
children and others from uninten-
tionally opening the doors, and will
help keep out intruders.
• Before opening any door, always look
for and avoid oncoming traffic. •
To help avoid risk of injury or death
through unintended operation of the
vehicle and/or its systems, including
entrapment in windows or inadver-
tent door lock activation, do not
leave children, people who require
the assistance of others or pets unat-
tended in your vehicle. Additionally,
the temperature inside a closed ve-
hicle on a warm day can quickly be-
come high enough to cause a signifi-
cant risk of injury or death to people
and pets.
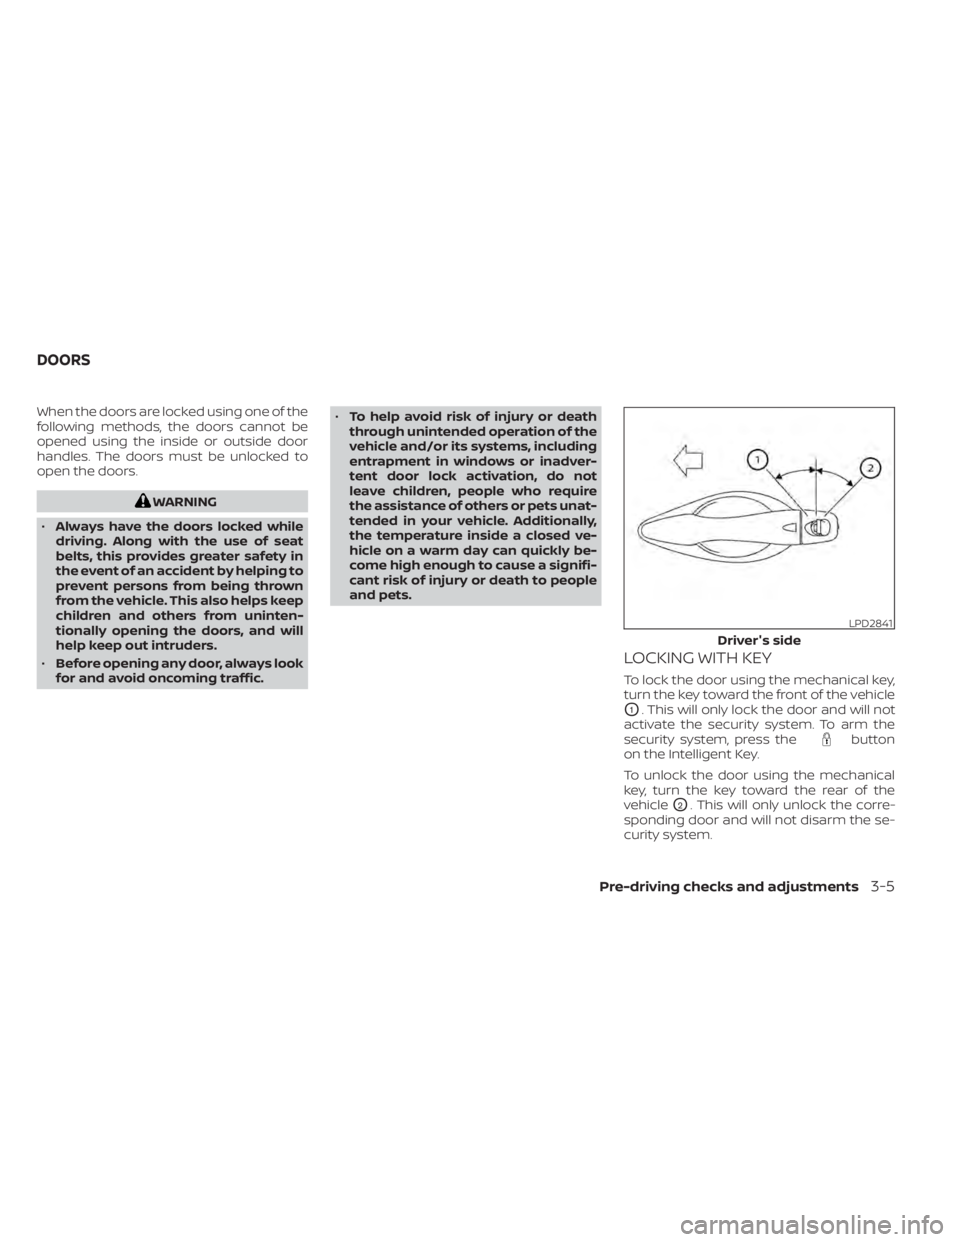
LOCKING WITH KEY
To lock the door using the mechanical key,
turn the key toward the front of the vehicle
O1. This will only lock the door and will not
activate the security system. To arm the
security system, press the
button
on the Intelligent Key.
To unlock the door using the mechanical
key, turn the key toward the rear of the
vehicle
O2. This will only unlock the corre-
sponding door and will not disarm the se-
curity system.
LPD2841
Driver's side
DOORS
Pre-driving checks and adjustments3-5
Page 189 of 518

AUTOMATIC DOOR LOCKS
• All doors lock automatically when the ve-hicle speed reaches 15 mph (24 km/h).
• All doors unlock automatically when the transmission is placed in the P (Park) po-
sition or when the ignition switch is
placed in the OFF position, depending on
the option selected in the “Vehicle Set-
tings” menu.
NOTE:The Auto Door Unlock (if so equipped)
feature can be changed using the “Ve-
hicle Settings” menu on the vehicle in-
formation display. For additional infor-
mation, refer to “Vehicle information
display ” in the “Instruments and con-
trols” section of this manual.
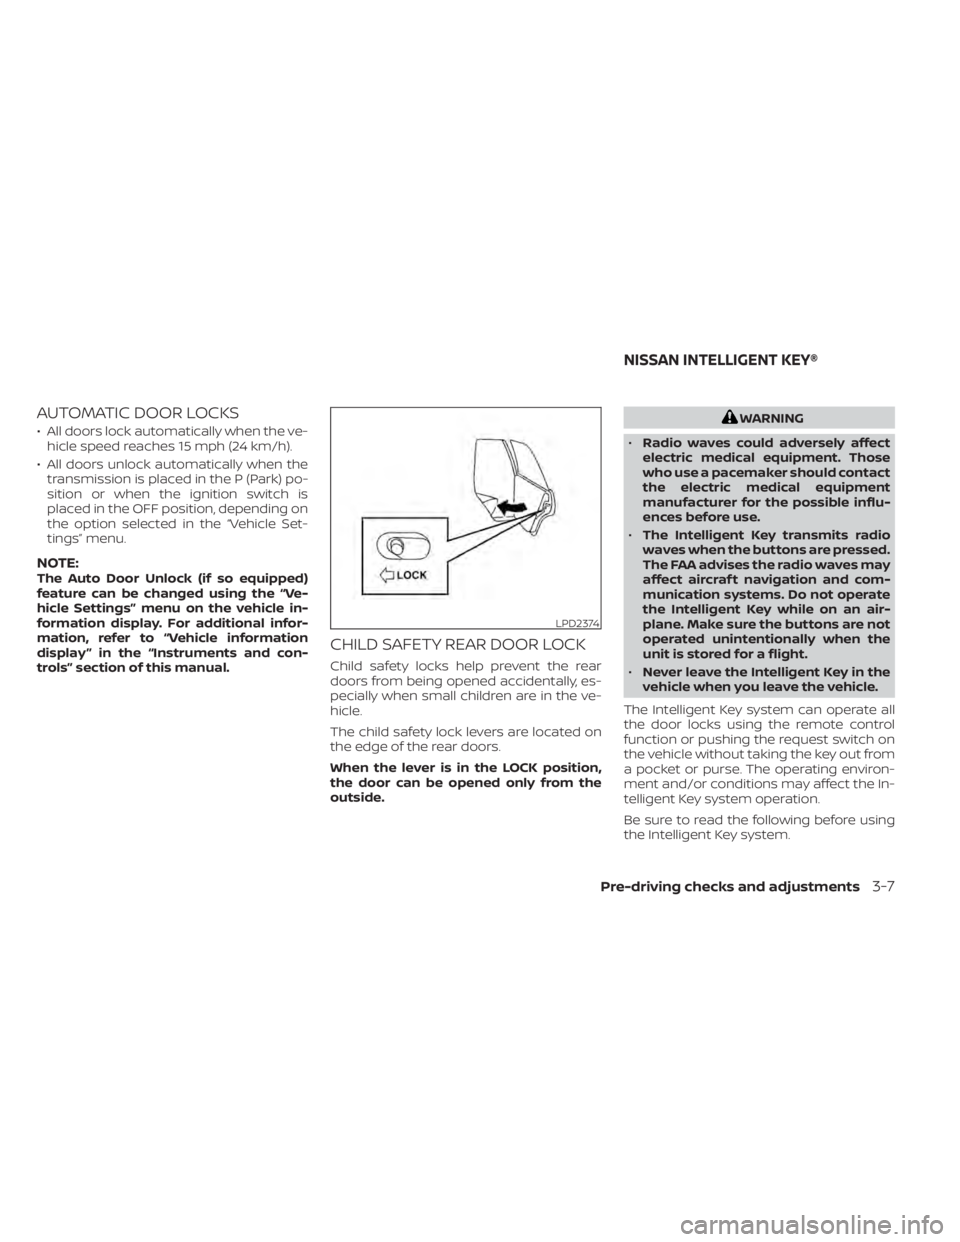
CHILD SAFETY REAR DOOR LOCK
Child safety locks help prevent the rear
doors from being opened accidentally, es-
pecially when small children are in the ve-
hicle.
The child safety lock levers are located on
the edge of the rear doors.
When the lever is in the LOCK position,
the door can be opened only from the
outside.
WARNING
• Radio waves could adversely affect
electric medical equipment. Those
who use a pacemaker should contact
the electric medical equipment
manufacturer for the possible influ-
ences before use.
• The Intelligent Key transmits radio
waves when the buttons are pressed.
The FAA advises the radio waves may
affect aircraf t navigation and com-
munication systems. Do not operate
the Intelligent Key while on an air-
plane. Make sure the buttons are not
operated unintentionally when the
unit is stored for a flight.
• Never leave the Intelligent Key in the
vehicle when you leave the vehicle.
The Intelligent Key system can operate all
the door locks using the remote control
function or pushing the request switch on
the vehicle without taking the key out from
a pocket or purse. The operating environ-
ment and/or conditions may affect the In-
telligent Key system operation.
Be sure to read the following before using
the Intelligent Key system.
LPD2374
NISSAN INTELLIGENT KEY®
Pre-driving checks and adjustments3-7
Page 204 of 518

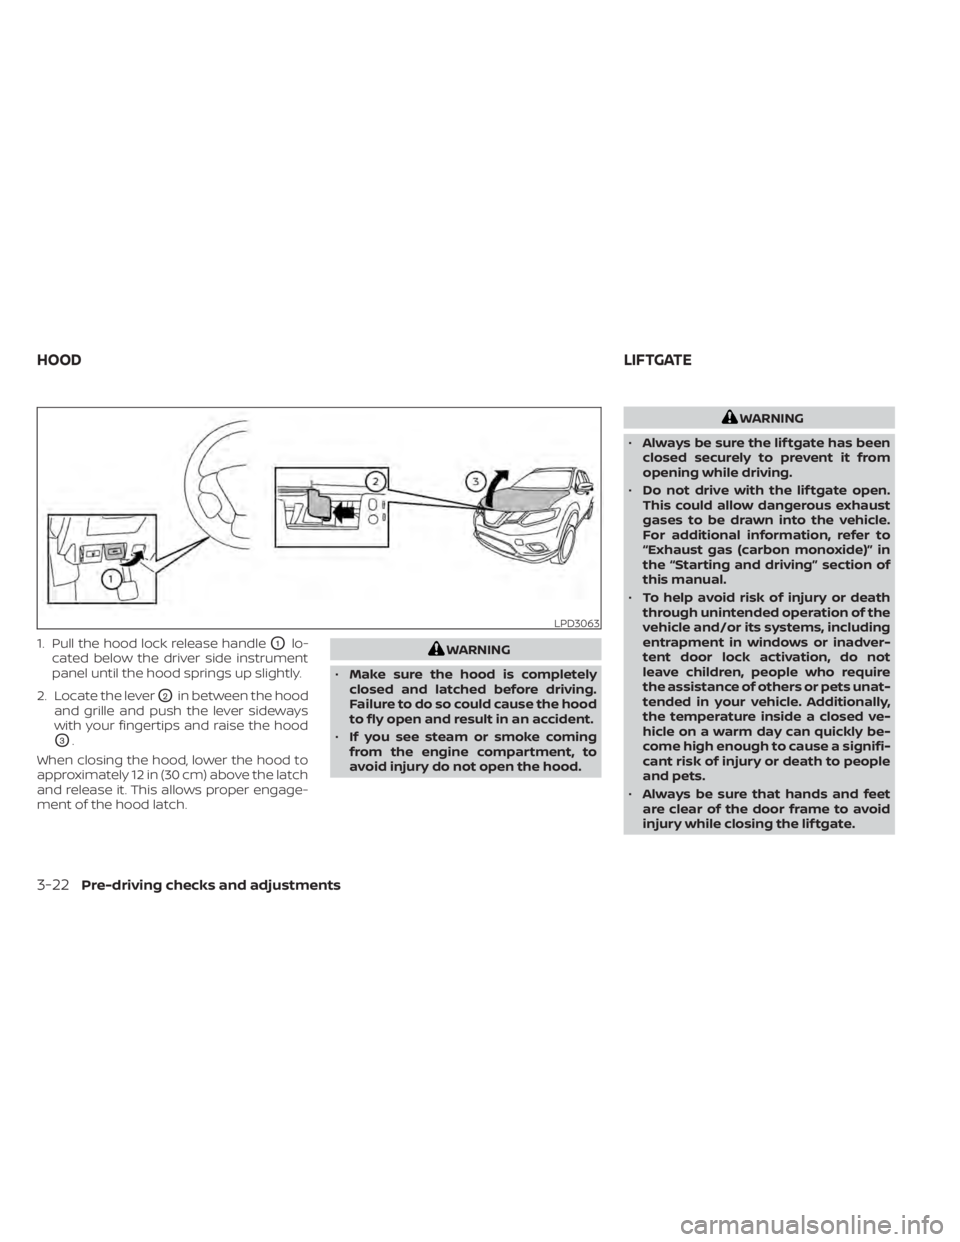
1. Pull the hood lock release handleO1lo-
cated below the driver side instrument
panel until the hood springs up slightly.
2. Locate the lever
O2in between the hood
and grille and push the lever sideways
with your fingertips and raise the hood
O3.
When closing the hood, lower the hood to
approximately 12 in (30 cm) above the latch
and release it. This allows proper engage-
ment of the hood latch.
WARNING
• Make sure the hood is completely
closed and latched before driving.
Failure to do so could cause the hood
to fly open and result in an accident.
• If you see steam or smoke coming
from the engine compartment, to
avoid injury do not open the hood.
WARNING
• Always be sure the lif tgate has been
closed securely to prevent it from
opening while driving.
• Do not drive with the lif tgate open.
This could allow dangerous exhaust
gases to be drawn into the vehicle.
For additional information, refer to
“Exhaust gas (carbon monoxide)” in
the “Starting and driving” section of
this manual.
• To help avoid risk of injury or death
through unintended operation of the
vehicle and/or its systems, including
entrapment in windows or inadver-
tent door lock activation, do not
leave children, people who require
the assistance of others or pets unat-
tended in your vehicle. Additionally,
the temperature inside a closed ve-
hicle on a warm day can quickly be-
come high enough to cause a signifi-
cant risk of injury or death to people
and pets.
• Always be sure that hands and feet
are clear of the door frame to avoid
injury while closing the lif tgate.
LPD3063
HOOD LIFTGATE
3-22Pre-driving checks and adjustments