2020 NISSAN MURANO jump start
[x] Cancel search: jump startPage 172 of 518

Auto-reverse function
The auto-reverse function can be acti-
vated when a window is closed by auto-
matic operation.
Depending on the environment or driv-
ing conditions, the auto-reverse func-
tion may be activated if an impact or
load similar to something being caught
in the window occurs.
WARNING
There are some small distances imme-
diately before the closed position
which cannot be detected. Make sure
that all passengers have their hands,
etc., inside the vehicle before closing
the window.
If the vehicle's battery is disconnected, re-
placed, or jump started, the power window
auto-reverse function may not operate
properly. Have the power window auto-
reverse system re-initialized. It is recom-
mended that you visit a NISSAN dealer for
this service. If the control unit detects something
caught in a window equipped with auto-
matic operation as it is closing, the window
will be immediately lowered.
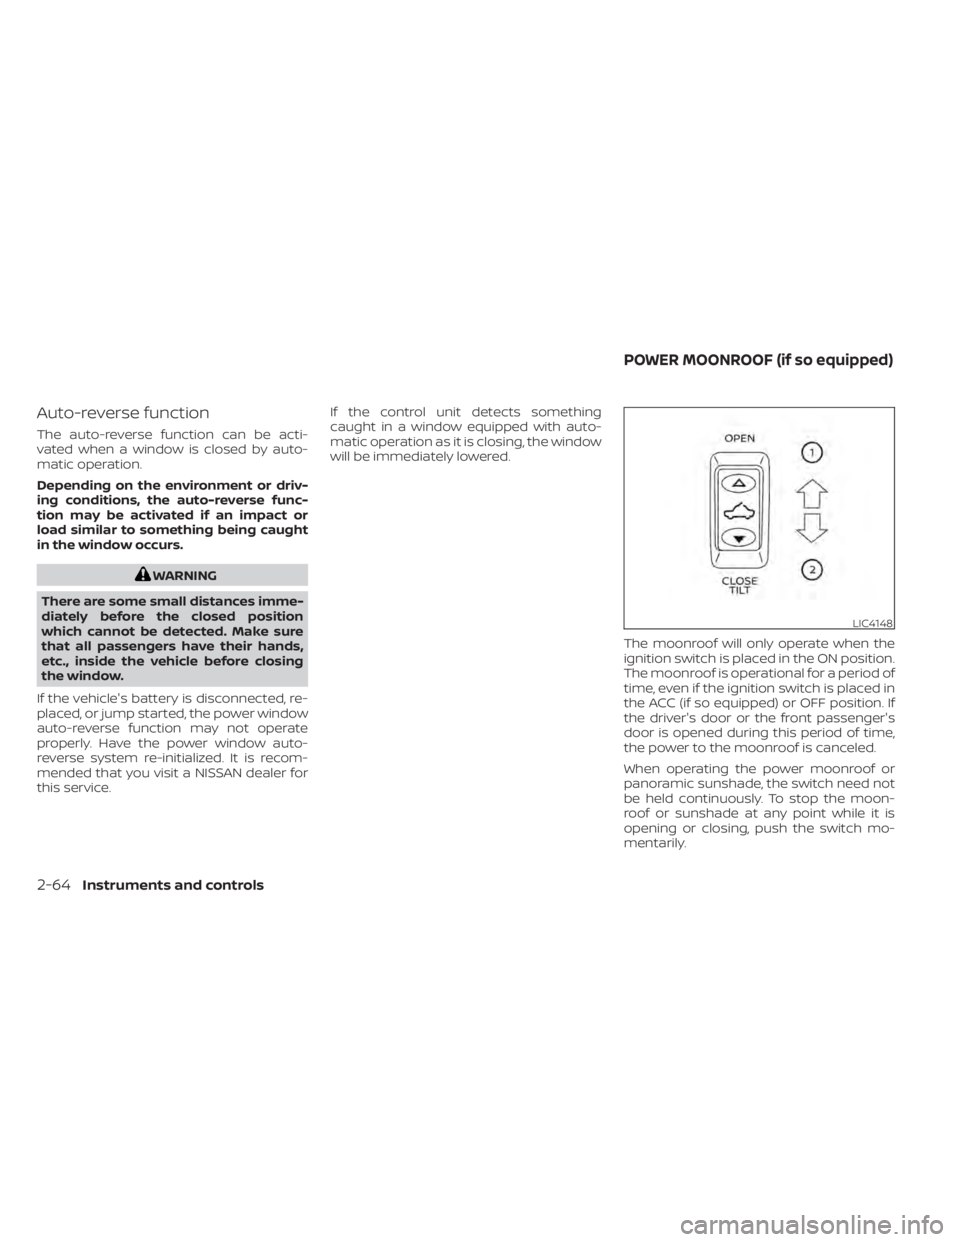
The moonroof will only operate when the
ignition switch is placed in the ON position.
The moonroof is operational for a period of
time, even if the ignition switch is placed in
the ACC (if so equipped) or OFF position. If
the driver's door or the front passenger's
door is opened during this period of time,
the power to the moonroof is canceled.
When operating the power moonroof or
panoramic sunshade, the switch need not
be held continuously. To stop the moon-
roof or sunshade at any point while it is
opening or closing, push the switch mo-
mentarily.
LIC4148
POWER MOONROOF (if so equipped)
2-64Instruments and controls
Page 395 of 518

6 In case of emergency
Hazard warning flasher switch..................6-2
Emergency engine shut off ......................6-2
Flat tire ..........................................6-3
Tire Pressure Monitoring System
(TPMS) .......................................6-3
Changing a flat tire ...........................6-4
Jump starting ...................................6-9 Push starting
.................................... 6-11
If your vehicle overheats .........................6-11
Towing your vehicle ............................ 6-12
Towing recommended by NISSAN ...........6-13
Vehicle recovery
(freeing a stuck vehicle) .....................6-14
Page 403 of 518

4. Lower the vehicle slowly until the tiretouches the ground. Then, with the
wheel nut wrench, tighten the wheel
nuts securely in the sequence illustrated
(
OA,OB,OC,OD,OE). Lower the vehicle
completely.
5. Securely store the jack and tools back in their storage compartment. Ensure the
jack is expanded and tools snapped into
place to prevent rattle noise from hap-
pening while driving.
WARNING
• Incorrect wheel nuts or improperly
tightened wheel nuts can cause the
wheel to become loose or come off.
This could cause an accident.
• Do not use oil or grease on the wheel
studs or nuts. This could cause the
nuts to become loose.
• Retighten the wheel nuts when the
vehicle has been driven for 621 miles
(1,000 km) (also in cases of a flat tire,
etc.). As soon as possible, tighten the wheel
nuts to the specified torque with a
torque wrench.
Wheel nut tightening torque:
83 f t-lb (113 N·m)
The wheel nuts must be kept tightened
to specification at all times. It is recom-
mended that wheel nuts be tightened to
specifications at each lubrication inter-
val.
Adjust tire pressure to the COLD pres-
sure.
COLD pressure: Af ter vehicle has been
parked for 3 hours or more or driven less
than 1 mile (1.6 km).
COLD tire pressures are shown on the tire
and loading information label affixed to
the driver side center pillar. To start your engine with a booster battery,
the instructions and precautions below
must be followed.
WARNING
• If done incorrectly, jump starting can
lead to a battery explosion, resulting
in severe injury or death. It could also
damage your vehicle.
• Explosive hydrogen gas is always
present in the vicinity of the battery.
Keep all sparks and flames away
from the battery.
• Do not allow battery fluid to come
into contact with eyes, skin, clothing
or painted surfaces. Battery fluid is a
corrosive sulfuric acid solution which
can cause severe burns. If the fluid
should come into contact with any-
thing, immediately flush the con-
tacted area with water.
• Keep battery out of the reach of
children.
• The booster battery must be rated at
12 volts. Use of an improperly rated
battery can damage your vehicle.
JUMP STARTING
In case of emergency6-9
Page 404 of 518

•Whenever working on or near a bat-
tery, always wear suitable eye pro-
tectors (for example, goggles or in-
dustrial safety spectacles) and
remove rings, metal bands, or any
other jewelry. Do not lean over the
battery when jump starting.
• Do not attempt to jump start a frozen
battery. It could explode and cause
serious injury.
• Your vehicle has an automatic engine
cooling fan. It could come on at any
time. Keep hands and other objects
away from it.
WARNING
Always follow the instructions below.
Failure to do so could result in damage
to the charging system and cause per-
sonal injury.
1. If the booster battery is in another ve- hicle, position the two vehicles to bring
their batteries near each other.
Do not allow the two vehicles to touch.
2. Apply the parking brake. Move the shif t lever to P (Park). Switch off all unneces-
sary electrical systems (lights, heater, air
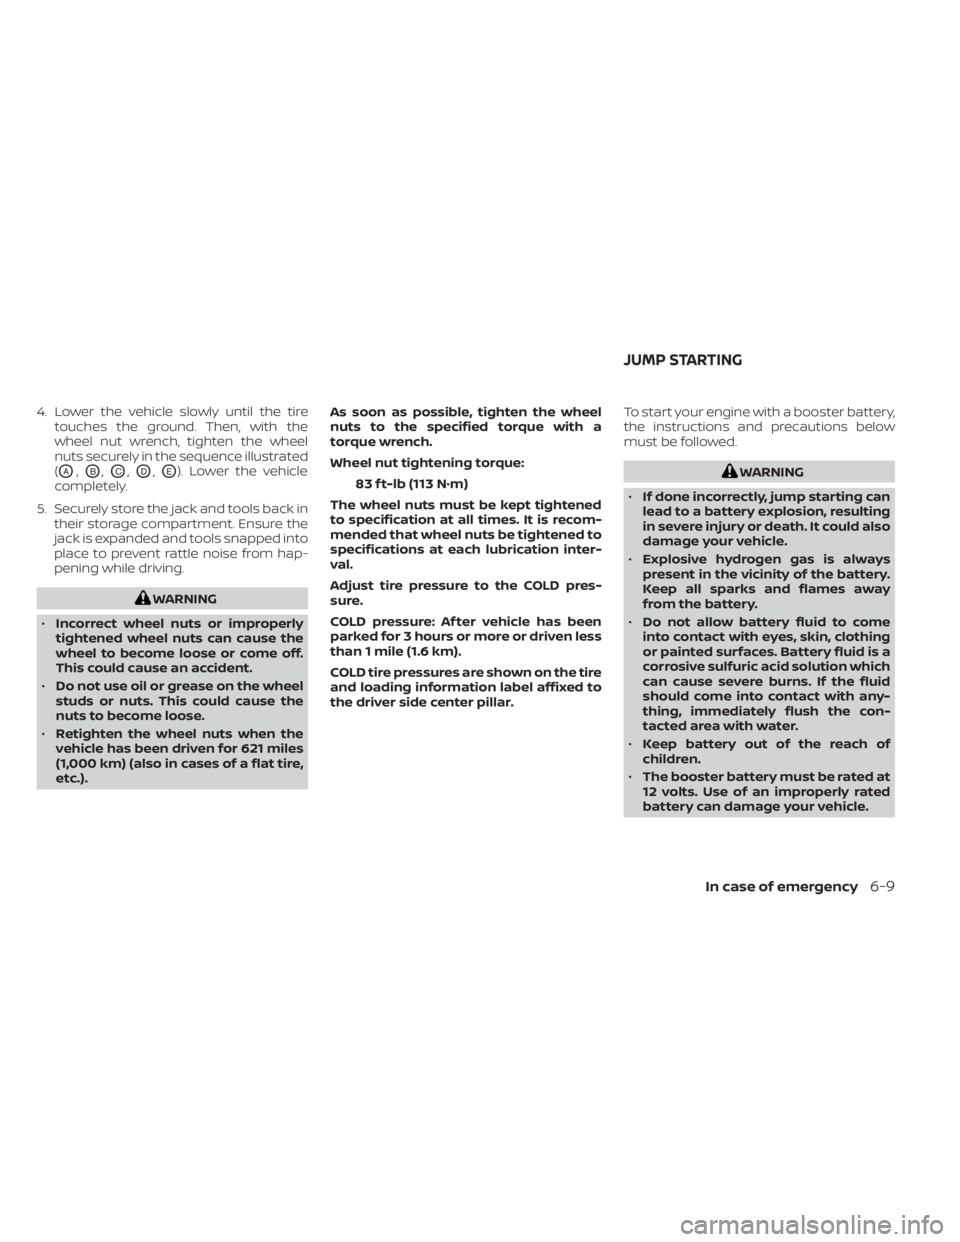
conditioner, etc.). 3. Connect the jumper cables in the se-
quence illustrated (OA,OB,OC,OD).
CAUTION
• Always connect positive (+) to posi-
tive (+) and negative (−) to body
ground (for example, strut mounting
bolt, engine lif t bracket, etc.) — not to
the battery.
• Make sure the jumper cables do not
touch moving parts in the engine
compartment and that the cable
clamps do not contact any other
metal.
LCE2223
6-10In case of emergency
Page 405 of 518

4. Start the engine of the booster vehicleand let it run for a few minutes.
5. Keep the engine speed of the booster vehicle at about 2,000 rpm and start the
engine of the vehicle being jump
started.
CAUTION
Do not keep the starter motor engaged
for more than 10 seconds. If the engine
does not start right away, place the ig-
nition switch in the OFF position and
wait 3 to 4 seconds before trying again.
6. Af ter starting the engine, carefully dis- connect the negative cable and then the
positive cable.
CAUTION
• Continuously Variable Transmission
(CVT) models cannot be push-
started or tow-started. Attempting
to do so may cause transmission
damage.
• Do not push start this vehicle. The
three-way catalyst may be
damaged.WARNING
• Do not continue to drive if your ve-
hicle overheats. Doing so could cause
engine damage or a vehicle fire.
• To avoid the danger of being scalded,
never remove the radiator or coolant
reservoir cap while the engine is still
hot. When the radiator or coolant res-
ervoir cap is removed, pressurized
hot water will spurt out, possibly
causing serious injury.
• Do not open the hood if steam is
coming out.
If your vehicle is overheating (indicated by
an extremely high temperature gauge
reading), or if you feel a lack of engine
power, detect abnormal noise, etc. take the
following steps:
1. Move the vehicle safely off the road, ap- ply the parking brake and move the shif t
lever to P (Park).
Do not stop the engine.
2. Turn off the air conditioner. Open all the windows, move the heater or air condi-
tioner temperature control to maximum
hot and fan control to high speed.
PUSH STARTING IF YOUR VEHICLE OVERHEATS
In case of emergency6-11
Page 419 of 518

8 Do-it-yourself
Maintenance precautions.......................8-2
Engine compartment check locations ...........8-3
Engine cooling system ..........................8-4
Checking engine coolant level ................8-5
Changing engine coolant ....................8-5
Engine oil .......................................8-6
Checking engine oil level .....................8-6
Changing engine oil and oil filter ..............8-6
Continuously Variable Transmission (CVT)
fluid ............................................ 8-10
Power Steering Fluid (PSF) .......................8-11
Brake fluid ....................................... 8-11
Windshield-washer fluid ........................8-12
Windshield-washer fluid reservoir ...........8-12
Battery......................................... 8-13
Jump starting ............................... 8-14
Drive belt ....................................... 8-15
Spark plugs .................................... 8-15
Replacing spark plugs ....................... 8-15
Air cleaner ..................................... 8-16In-cabin microfilter
.......................... 8-16
Windshield wiper blades ........................8-17
Cleaning .................................... 8-17
Replacing ................................... 8-17
Brakes ......................................... 8-18
Fuses .......................................... 8-19
Engine compartment ....................... 8-19
Passenger compartment ...................8-21
Battery replacement ........................... 8-22
NISSAN Intelligent Key® ......................8-22
Lights .......................................... 8-24
Headlights .................................. 8-24
Fog lights (if so equipped) ...................8-24
Exterior and interior lights ...................8-25
Wheels and tires ............................... 8-27
Tire pressure ................................ 8-27
Tire labeling ................................. 8-30
Types of tires ................................
8-33
Tir
e chains .................................. 8-34
Changing wheels and tires ..................8-35
Page 432 of 518

• If the battery is labeled “do not open” it ismaintenance free and battery fluid
should not be checked. It is recom-
mended that you visit a NISSAN dealer or
a qualified specialist workshop to con-
firm the battery’s performance.
• Keep the battery surface clean and dry. Clean the battery with a solution of bak-
ing soda and water.
• Make certain the terminal connections are clean and securely tightened.
• If the vehicle is not to be used for 30 days or longer, disconnect the negative (-) bat-
tery terminal cable to prevent discharge.
NOTE:
Care should be taken to avoid situations
that can lead to potential battery dis-
charge and potential no-start conditions
such as:
1. Installation or extended use of elec-
tronic accessories that consume bat-
tery power when the engine is not run-
ning (Phone chargers, GPS, DVD
players, etc.)
2. Vehicle is not driven regularly and/or
only driven short distances.
In these cases, the battery may need to
be charged to maintain battery health.
WARNING
• Do not expose the battery to flames,
an electrical spark or a cigarette. Hy-
drogen gas generated by the battery
is explosive. Explosive gases can
cause blindness or injury. Do not al-
low battery fluid to contact your skin,
eyes, fabrics or painted surfaces. Sul-
furic acid can cause blindness or in-
jury. Af ter touching a battery or bat-
tery cap, do not touch or rub your
eyes. Thoroughly wash your hands. If
the acid contacts your eyes, skin or
clothing, immediately flush with wa-
ter for at least 15 minutes and seek
medical attention.
• When working on or near a battery,
always wear suitable eye protection
and remove all jewelry.
• Battery posts, terminals and related
accessories contain lead and lead
compounds. Wash hands af ter
handling.
• Keep battery out of the reach of
children.
• Do not tip the battery.
NOTE:
Do not try to open the top of the battery.
This battery is not equipped with remov-
able vent caps.
JUMP STARTING
If jump starting is necessary, refer to “Jump
starting” in the “In case of emergency” sec-
tion of this manual. If the engine does not
start by jump starting, the battery may
have to be replaced. It is recommended
that you visit a NISSAN dealer for this
service.
LDI3302
8-14Do-it-yourself
Page 510 of 518

Interior light..................2-67ISOFIX child restraints.............1-29
J
Jump starting..............6-9, 8-14
K
Key.........................3-2Key fob battery replacement........8-22Keyless entry
With Intelligent Key system
(See Intelligent Key system)
.......3-13KeysNISSAN Intelligent Key®........3-2,3-7NISSAN Vehicle Immobilizer System
keys..................... .3-4
L
Label
Tire and Loading Information label. .10-13LabelsAir conditioner specification label. . .10-13C.M.V.S.S. certification label.......10-12Emission control information label. .10-12Engine serial number..........10-12F.M.V.S.S. certification label........10-12Tire and Loading Information label. .10-13Vehicle identification number (VIN). .10-11
Vehicle identification number (VIN)
plate.................... .10-11Warning labels (for SRS)..........1-69Lane Departure Warning (LDW).......5-27LATCH (Lower Anchors and Tethers for
CHildren) System...............1-29License plate
Installing the license plate........10-13Lif tgate.....................3-22Lif tgate release................3-27LightAir bag warning light........1-70,2-13Brake light (See stop light)........8-25Bulb check/instrument panel......2-9Bulb replacement.............8-25Charge warning light...........2-10Console light................2-67Exterior and Interior lights........8-25Fog light switch..............2-44Fog lights..................8-24Headlight and turn signal switch. . . .2-38Headlight control switch.........2-38Headlights..................8-24Interior light................ .2-67Light bulbs.................8-24Low tire pressure warning light.....2-11Low windshield-washer fluid warning
light......................2-27Personal lights...............2-68Security indicator light..........2-15Spotlights (See map light)........2-68Warning/indicator lights and audible
reminders.................. .2-9Lights......................8-24
Map lights..................2-68Lock
Child safety rear door lock.........3-7Door locks................. .3-5Fuel-filler door lock opener lever. . . .3-29Lif tgate release...............3-27Power door locks..............3-6Loose fuel cap warning...........2-28Low fuel warning light.........2-12,2-27Low tire pressure warning light.......2-11Low windshield-washer fluid warning
light........................2-27Luggage (See vehicle loading
information)..................10-14Luggage hook.................2-60Luggage rack (see roof rack)........2-61
M
Maintenance
General maintenance...........9-2Inside the vehicle..............9-3Maintenance precautions.........8-2Outside the vehicle.............9-2Seat belt maintenance..........1-24Under the hood and vehicle.......9-4Maintenance log................9-11Maintenance requirements..........9-2Maintenance schedules............9-7Maintenance under severe operation
conditions....................9-10Malfunction indicator light..........2-14Manual front seat adjustment........1-3
11-4Index