2020 NISSAN KICKS ignition
[x] Cancel search: ignitionPage 201 of 500
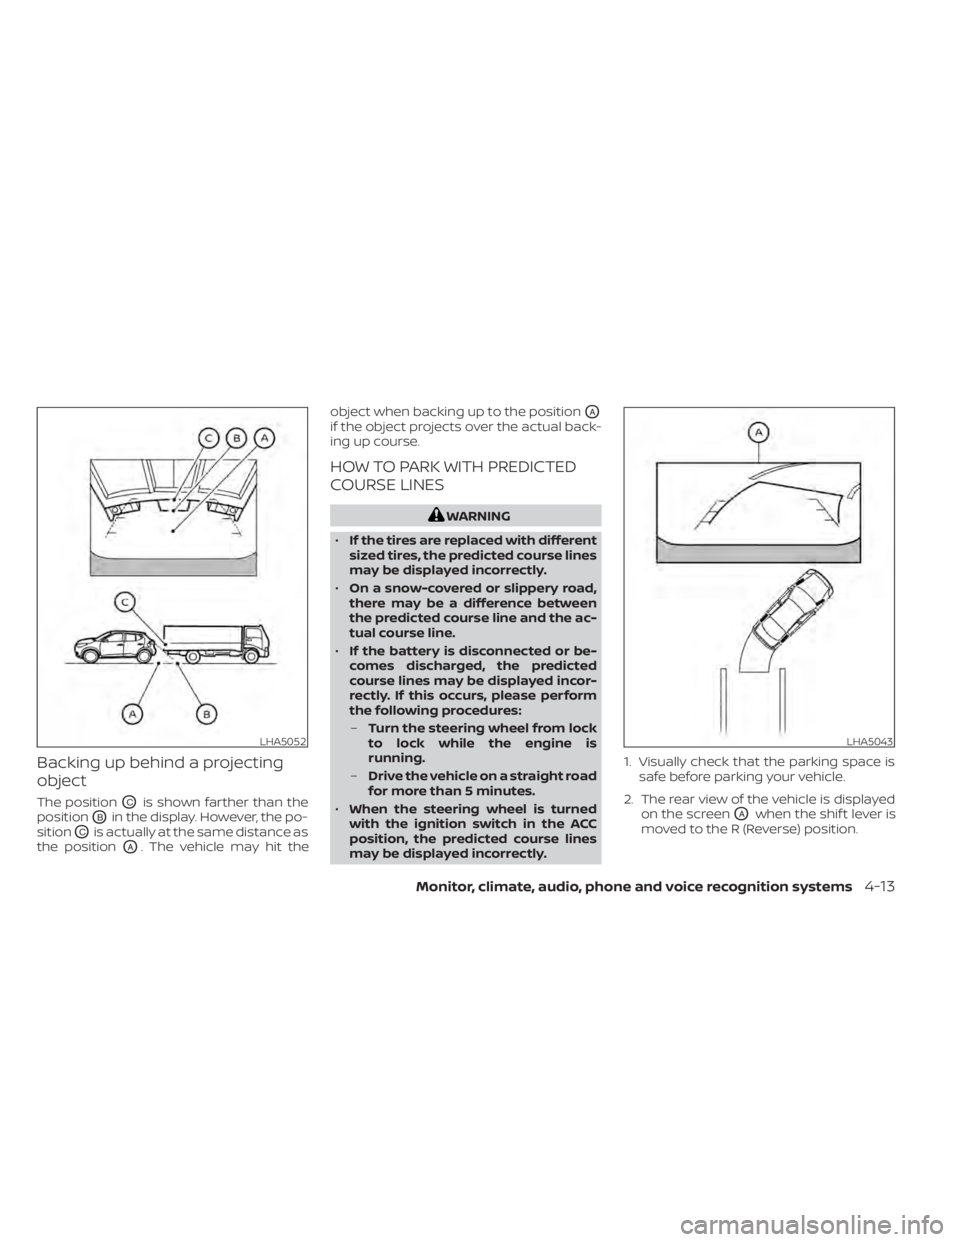
Backing up behind a projecting
object
The positionOCis shown farther than the
position
OBin the display. However, the po-
sition
OCis actually at the same distance as
the position
OA. The vehicle may hit the object when backing up to the position
OA
if the object projects over the actual back-
ing up course.
HOW TO PARK WITH PREDICTED
COURSE LINES
WARNING
• If the tires are replaced with different
sized tires, the predicted course lines
may be displayed incorrectly.
• On a snow-covered or slippery road,
there may be a difference between
the predicted course line and the ac-
tual course line.
• If the battery is disconnected or be-
comes discharged, the predicted
course lines may be displayed incor-
rectly. If this occurs, please perform
the following procedures:
– Turn the steering wheel from lock
to lock while the engine is
running.
– Drive the vehicle on a straight road
for more than 5 minutes.
• When the steering wheel is turned
with the ignition switch in the ACC
position, the predicted course lines
may be displayed incorrectly. 1. Visually check that the parking space is
safe before parking your vehicle.
2. The rear view of the vehicle is displayed on the screen
OAwhen the shif t lever is
moved to the R (Reverse) position.
LHA5052LHA5043
Monitor, climate, audio, phone and voice recognition systems4-13
Page 206 of 500
WARNING
• Failure to follow the warnings and in-
structions for the proper use of the
Intelligent Around View Monitor sys-
tem could result in serious injury or
death.
• The Intelligent Around View Monitor
is a convenience feature and is not a
substitute for proper vehicle opera-
tion because it has areas where ob-
jects cannot be viewed. The four cor-
ners of the vehicle in particular, are
areas where objects do not always
appear in the bird’s-eye, front, or rear
views. Always check your surround-
ings to be sure that it is safe to move
before operating the vehicle. Always
operate the vehicle slowly.
• The driver is always responsible for
safety during parking and other
maneuvers.
CAUTION
Do not scratch the camera lens when
cleaning dirt or snow from the front of
the camera. The Intelligent Around View Monitor sys-
tem is designed as an aid to the driver in
situations such as slot parking or parallel
parking.
The monitor displays various views of the
position of the vehicle in a split screen for-
mat. Not all views are available at all times.
Available views:
• Front View
An approximately 150–degree view of the
front of the vehicle.
• Rear View An approximately 150–degree view of the
rear of the vehicle.
• Bird's-Eye View The surrounding views of the vehicle
from above.
• Front-Side View The view around and ahead of the front
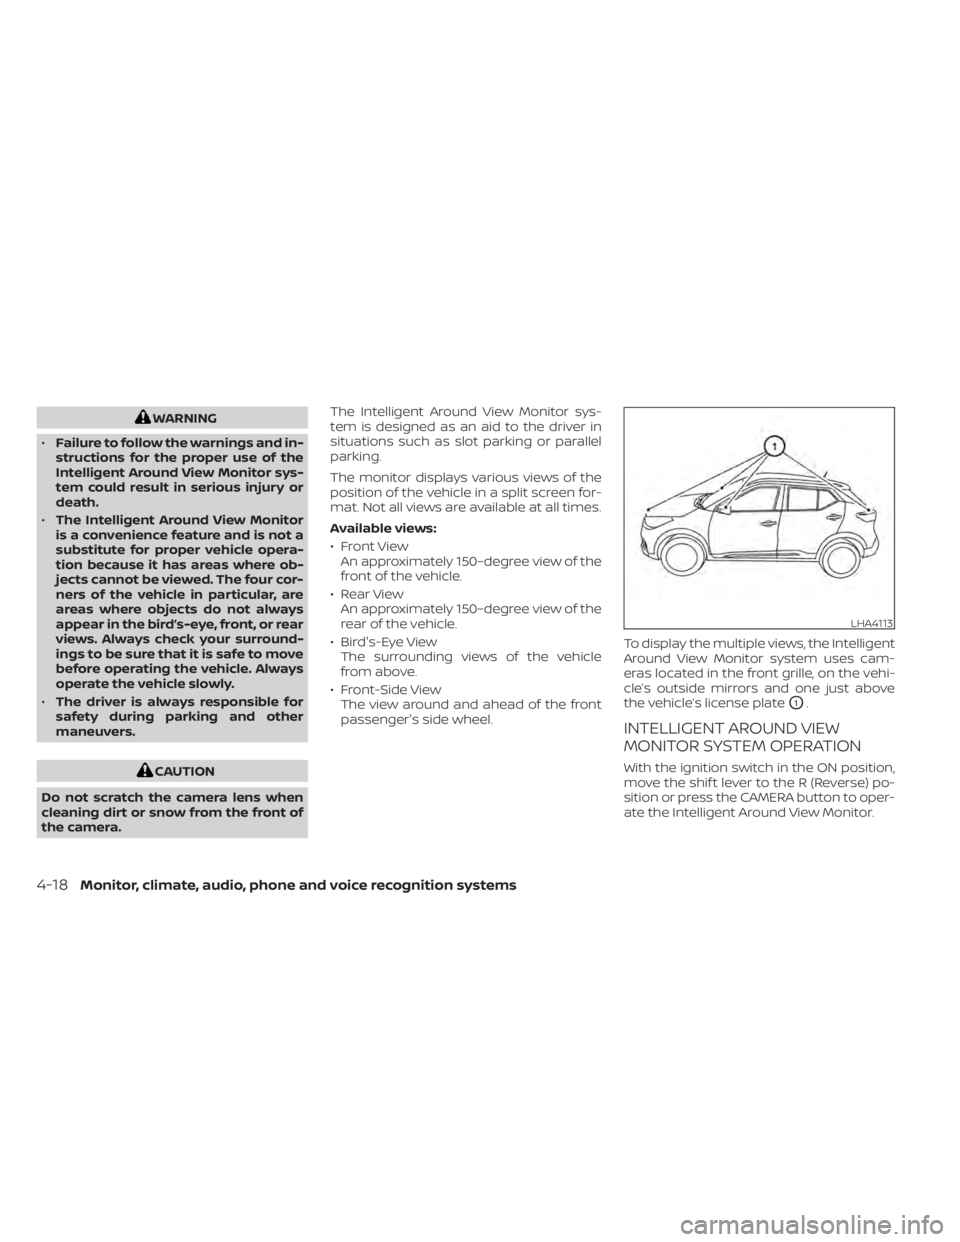
passenger's side wheel. To display the multiple views, the Intelligent
Around View Monitor system uses cam-
eras located in the front grille, on the vehi-
cle’s outside mirrors and one just above
the vehicle’s license plate
O1.
INTELLIGENT AROUND VIEW
MONITOR SYSTEM OPERATION
With the ignition switch in the ON position,
move the shif t lever to the R (Reverse) po-
sition or press the CAMERA button to oper-
ate the Intelligent Around View Monitor.
LHA4113
4-18Monitor, climate, audio, phone and voice recognition systems
Page 209 of 500
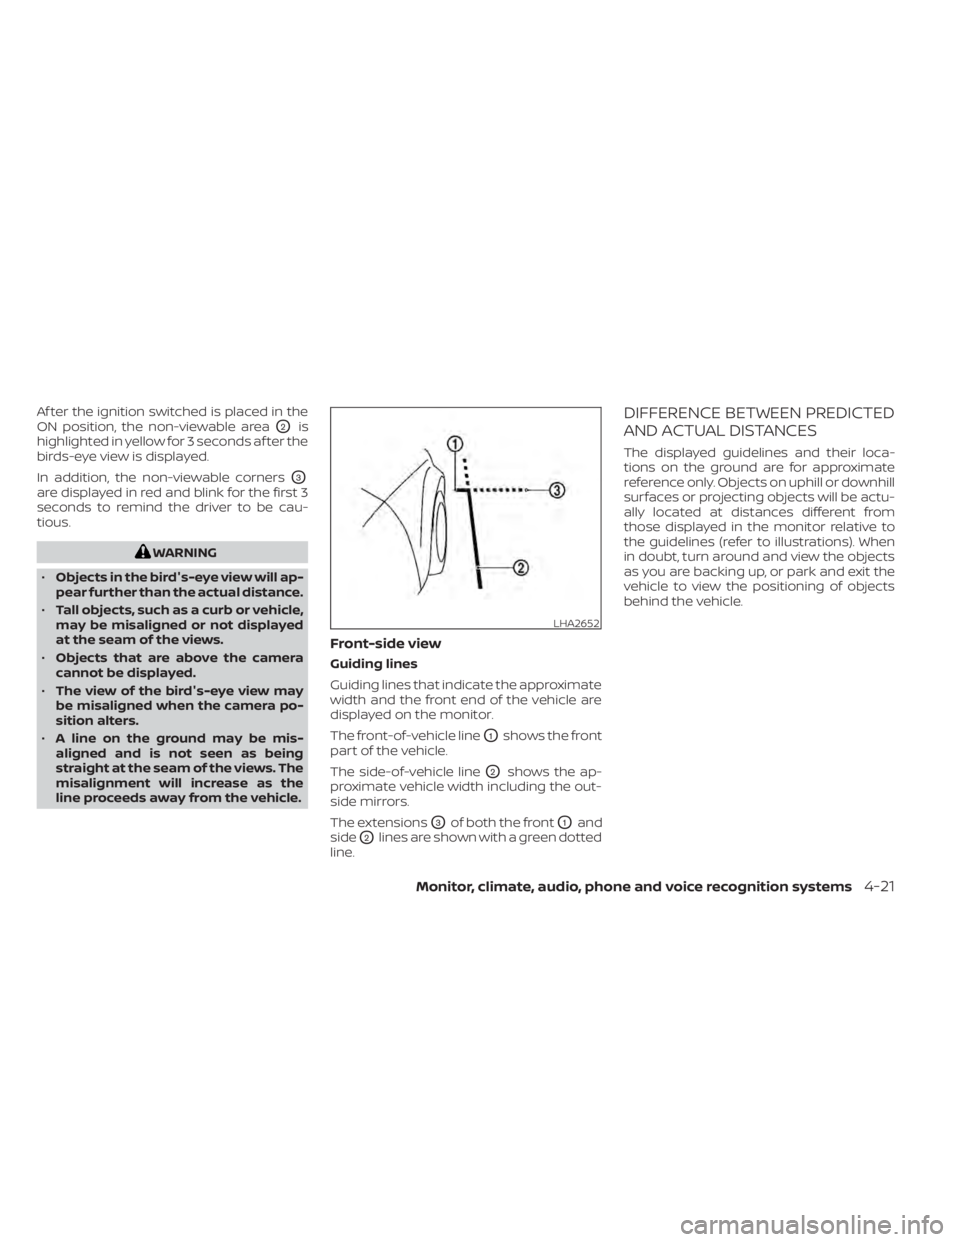
Af ter the ignition switched is placed in the
ON position, the non-viewable area
O2is
highlighted in yellow for 3 seconds af ter the
birds-eye view is displayed.
In addition, the non-viewable corners
O3
are displayed in red and blink for the first 3
seconds to remind the driver to be cau-
tious.
WARNING
• Objects in the bird's-eye view will ap-
pear further than the actual distance.
• Tall objects, such as a curb or vehicle,
may be misaligned or not displayed
at the seam of the views.
• Objects that are above the camera
cannot be displayed.
• The view of the bird's-eye view may
be misaligned when the camera po-
sition alters.
• A line on the ground may be mis-
aligned and is not seen as being
straight at the seam of the views. The
misalignment will increase as the
line proceeds away from the vehicle.
Front-side view
Guiding lines
Guiding lines that indicate the approximate
width and the front end of the vehicle are
displayed on the monitor.
The front-of-vehicle line
O1shows the front
part of the vehicle.
The side-of-vehicle line
O2shows the ap-
proximate vehicle width including the out-
side mirrors.
The extensions
O3of both the frontO1and
side
O2lines are shown with a green dotted
line.
DIFFERENCE BETWEEN PREDICTED
AND ACTUAL DISTANCES
The displayed guidelines and their loca-
tions on the ground are for approximate
reference only. Objects on uphill or downhill
surfaces or projecting objects will be actu-
ally located at distances different from
those displayed in the monitor relative to
the guidelines (refer to illustrations). When
in doubt, turn around and view the objects
as you are backing up, or park and exit the
vehicle to view the positioning of objects
behind the vehicle.
LHA2652
Monitor, climate, audio, phone and voice recognition systems4-21
Page 211 of 500
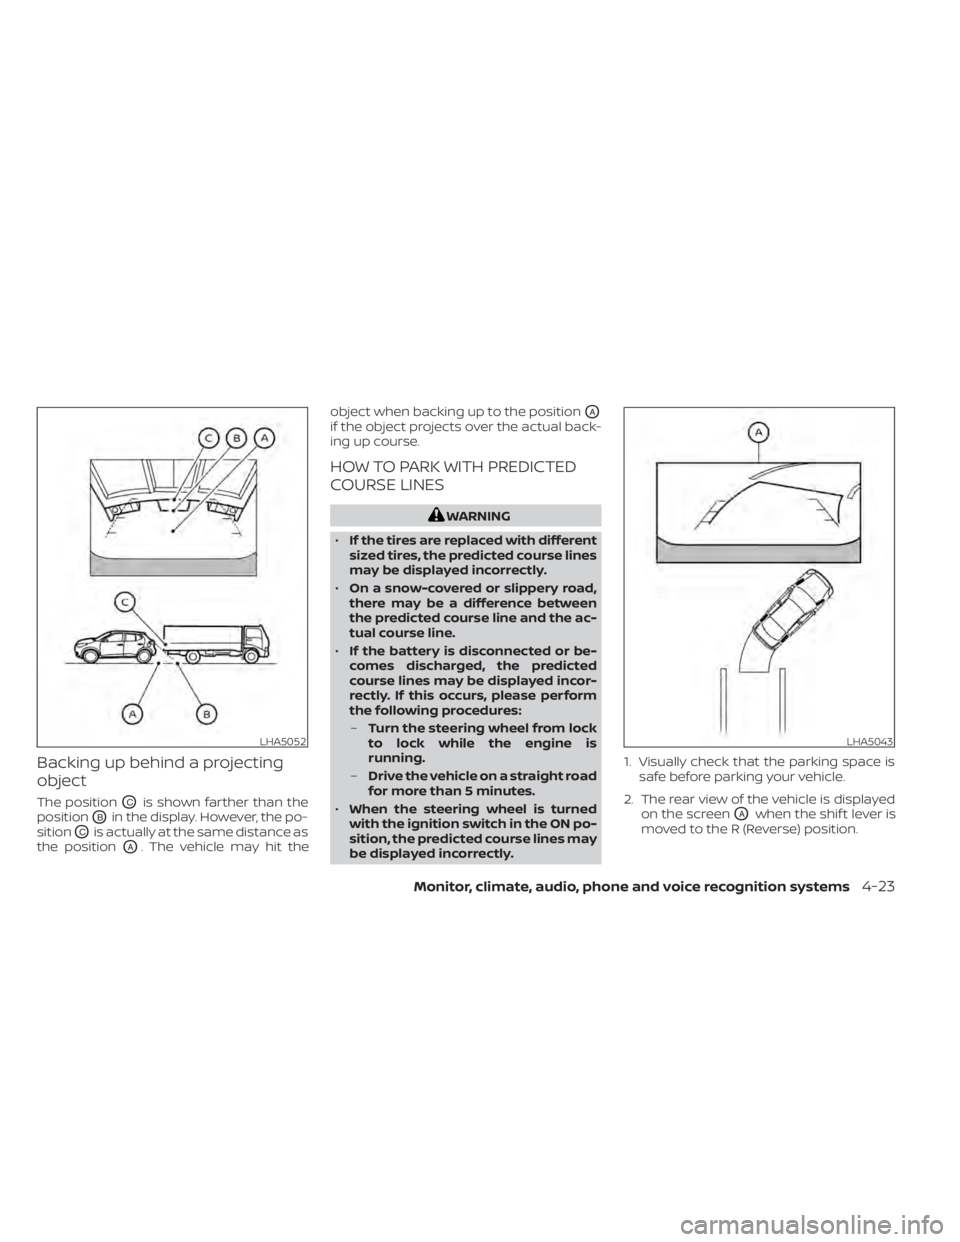
Backing up behind a projecting
object
The positionOCis shown farther than the
position
OBin the display. However, the po-
sition
OCis actually at the same distance as
the position
OA. The vehicle may hit the object when backing up to the position
OA
if the object projects over the actual back-
ing up course.
HOW TO PARK WITH PREDICTED
COURSE LINES
WARNING
• If the tires are replaced with different
sized tires, the predicted course lines
may be displayed incorrectly.
• On a snow-covered or slippery road,
there may be a difference between
the predicted course line and the ac-
tual course line.
• If the battery is disconnected or be-
comes discharged, the predicted
course lines may be displayed incor-
rectly. If this occurs, please perform
the following procedures:
– Turn the steering wheel from lock
to lock while the engine is
running.
– Drive the vehicle on a straight road
for more than 5 minutes.
• When the steering wheel is turned
with the ignition switch in the ON po-
sition, the predicted course lines may
be displayed incorrectly. 1. Visually check that the parking space is
safe before parking your vehicle.
2. The rear view of the vehicle is displayed on the screen
OAwhen the shif t lever is
moved to the R (Reverse) position.
LHA5052LHA5043
Monitor, climate, audio, phone and voice recognition systems4-23
Page 212 of 500
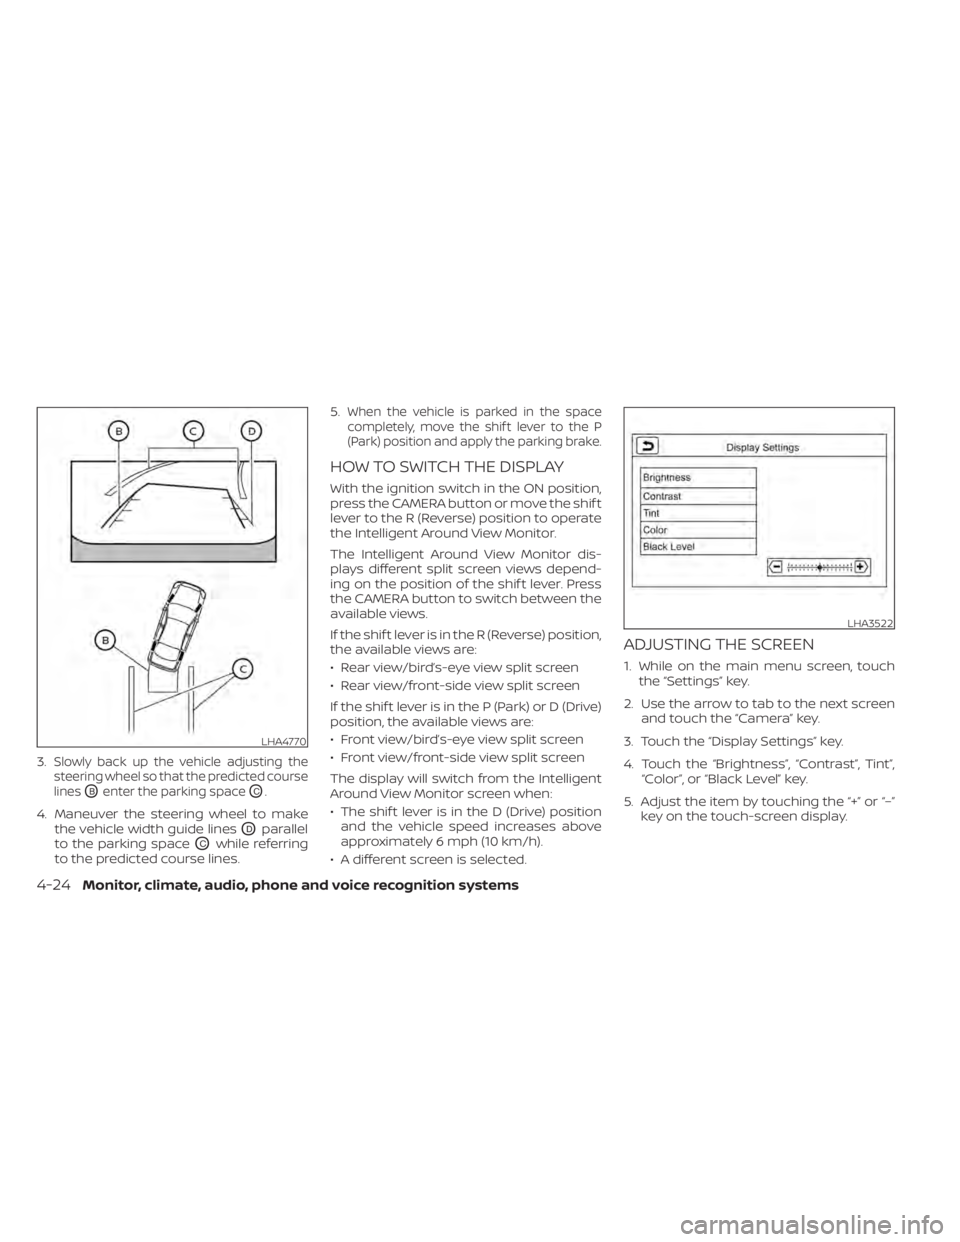
3.Slowly back up the vehicle adjusting the
steering wheel so that the predicted course
lines
OBenter the parking spaceOC.
4. Maneuver the steering wheel to make the vehicle width guide lines
ODparallel
to the parking space
OCwhile referring
to the predicted course lines. 5.
When the vehicle is parked in the space
completely, move the shif t lever to the P
(Park) position and apply the parking brake.
HOW TO SWITCH THE DISPLAY
With the ignition switch in the ON position,
press the CAMERA button or move the shif t
lever to the R (Reverse) position to operate
the Intelligent Around View Monitor.
The Intelligent Around View Monitor dis-
plays different split screen views depend-
ing on the position of the shif t lever. Press
the CAMERA button to switch between the
available views.
If the shif t lever is in the R (Reverse) position,
the available views are:
• Rear view/bird’s-eye view split screen
• Rear view/front-side view split screen
If the shif t lever is in the P (Park) or D (Drive)
position, the available views are:
• Front view/bird’s-eye view split screen
• Front view/front-side view split screen
The display will switch from the Intelligent
Around View Monitor screen when:
• The shif t lever is in the D (Drive) position and the vehicle speed increases above
approximately 6 mph (10 km/h).
• A different screen is selected.
ADJUSTING THE SCREEN
1. While on the main menu screen, touch the “Settings” key.
2. Use the arrow to tab to the next screen and touch the “Camera” key.
3. Touch the “Display Settings” key.
4. Touch the “Brightness”, “Contrast”, Tint”, “Color”, or “Black Level” key.
5. Adjust the item by touching the “+” or “–” key on the touch-screen display.
LHA4770
LHA3522
4-24Monitor, climate, audio, phone and voice recognition systems
Page 230 of 500
AUTOMATIC OPERATION
Heating (A/C OFF)
The air conditioner does not activate. When
you need to heat only, use this mode.
1. Press the AUTO button.
2. Turn the temperature control dial to setthe desired temperature.
• The temperature of the passenger com- partment will be maintained automati-
cally. Air flow distribution and fan speed
are also controlled automatically.
• Do not set the temperature lower than the outside air temperature. Otherwise,
the system may not work properly.
• Not recommended if windows fog up.
Cooling and/or dehumidified
heating (AUTO)
This mode may be used all year round as
the system automatically works to keep a
constant temperature. Air flow distribution
and fan speed are also controlled auto-
matically.
1. Press the AUTO button on.
2. Turn the temperature control dial to the lef t or right to set the desired
temperature. • The temperature of the passenger com-
partment will be maintained automati-
cally. Air flow distribution and fan speed
are also controlled automatically.
• A visible mist may be seen coming from the vents in hot, humid conditions as the
air is cooled rapidly. This does not indicate
a malfunction.
Dehumidified defrosting or
defogging
1. Press thefront defroster button on.
2. Turn the temperature control dial to set the maximum temperature to aid in
defogging.
• To quickly remove ice from the outside of the windows, use the
fan speed con-
trol dial to set the fan speed to maximum.
• As soon as possible af ter the windshield is clean, press the AUTO button to return
to the automatic mode.
• When the
front defroster button is
pressed, the air conditioner will automati-
cally be turned on.
Remote Engine Start with
Intelligent Climate Control (if so
equipped)
Vehicles equipped with automatic climate
controls and Remote Engine Start function
may go into automatic heating or cooling
mode when Remote Engine Start is acti-
vated depending on outside and cabin
temperatures. During this period, the cli-
mate control display and buttons will be
inoperable until the ignition switch is
turned on. In Remote Engine Start defrost-
ing mode, the rear window defroster and
heated seats (if so equipped) may be acti-
vated automatically.
MANUAL OPERATION
Fan speed control
Turn thefan speed control dial to
manually control the fan speed.
Press the AUTO button to return to auto-
matic control of the fan speed.
Temperature control dial
The temperature control dial allows you to
adjust the temperature of the outlet air. To
lower the temperature, turn the dial to the
lef t. To increase the temperature, turn the
dial to the right.
4-42Monitor, climate, audio, phone and voice recognition systems
Page 232 of 500
• If you feel that the air flow mode you haveselected and the outlets the air is coming
out do not match, select the
mode.
• When you change the air flow mode, you may feel air flow from the foot outlets for
just a moment. This is not a malfunction. The air conditioner system in your NISSAN
vehicle is charged with a refrigerant de-
signed with the environment in mind.
This refrigerant does not harm the
earth's ozone layer.
Special charging equipment and lubricant
is required when servicing your NISSAN air
conditioner. Using improper refrigerants or
lubricants will cause severe damage to
your air conditioner system. For additional
information, refer to “Air conditioner sys-
tem refrigerant and oil recommendations”
in the “Technical and consumer informa-
tion” section of this manual.
It is recommended that you visit a NISSAN
dealer to service your “environmentally
friendly ” air conditioner system.
WARNING
The air conditioner system contains re-
frigerant under high pressure. To avoid
personal injury, any air conditioner ser-
vice should be done only by an experi-
enced technician with proper equip-
ment.
RADIO
When the ignition is placed in the ACC or ON
position, press the PUSH(power) button
to turn the radio on. If you listen to the radio
with the engine not running, the ignition
should be placed in the ACC position.
Radio reception is affected by station sig-
nal strength, distance from radio transmit-
ter, buildings, bridges, mountains and other
external influences. Intermittent changes
in reception quality normally are caused by
these external influences.
Using a cellular phone in or near the ve-
hicle may influence radio reception quality.
Radio reception
Your NISSAN radio system is equipped with
state-of-the-art electronic circuits to en-
hance radio reception. These circuits are
designed to extend reception range, and to
enhance the quality of that reception.
However, there are some general charac-
teristics of both FM and AM radio signals
that can affect radio reception quality in a
moving vehicle, even when the finest
equipment is used. These characteristics
are completely normal in a given reception
area and do not indicate any malfunction
in your NISSAN radio system.
SERVICING AIR CONDITIONER AUDIO SYSTEM
4-44Monitor, climate, audio, phone and voice recognition systems
Page 237 of 500
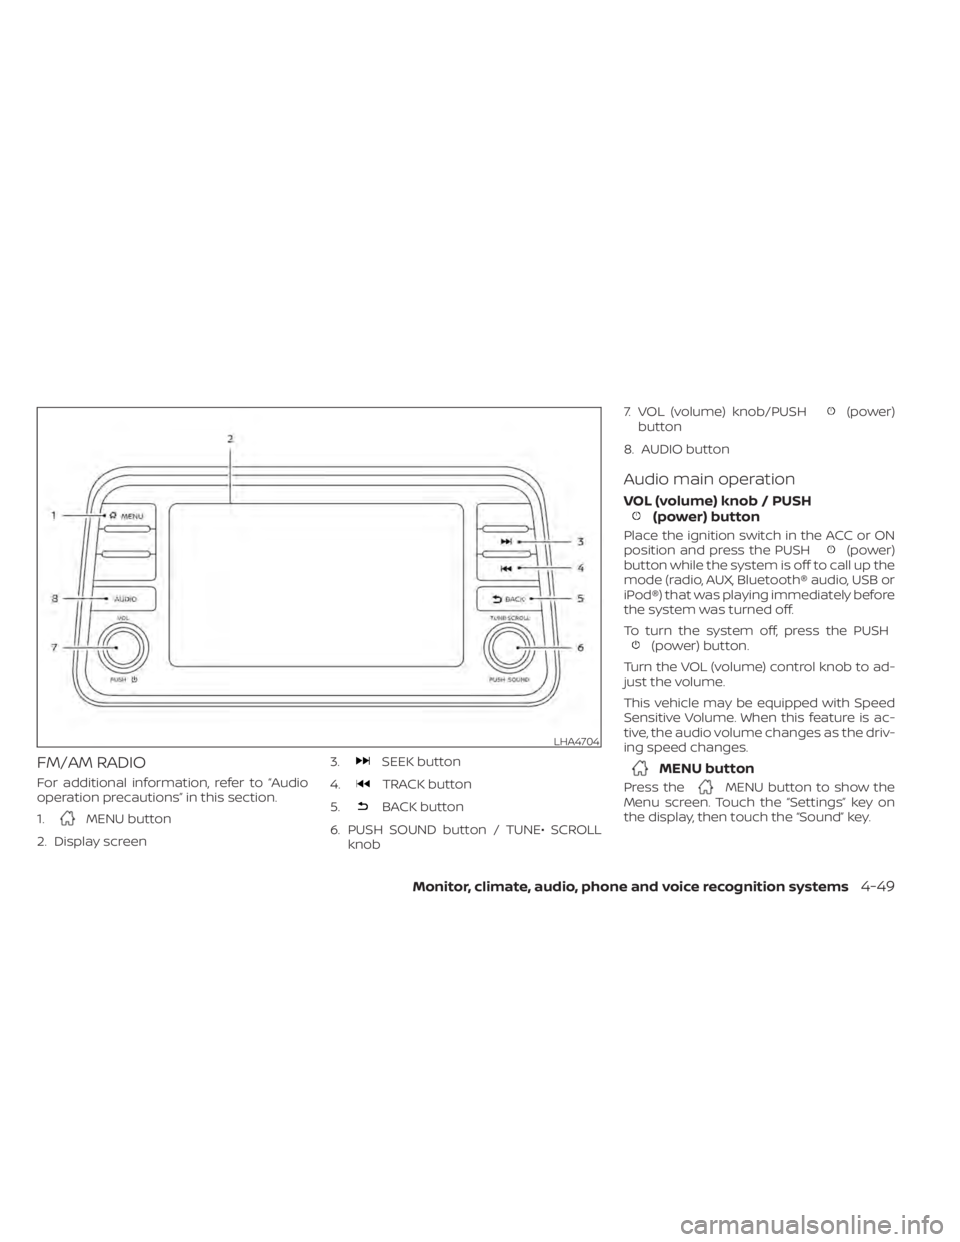
FM/AM RADIO
For additional information, refer to “Audio
operation precautions” in this section.
1.
MENU button
2. Display screen 3.
SEEK button
4.
TRACK button
5.
BACK button
6. PUSH SOUND button / TUNE• SCROLL knob 7. VOL (volume) knob/PUSH
(power)
button
8. AUDIO button
Audio main operation
VOL (volume) knob / PUSH(power) button
Place the ignition switch in the ACC or ON
position and press the PUSH(power)
button while the system is off to call up the
mode (radio, AUX, Bluetooth® audio, USB or
iPod®) that was playing immediately before
the system was turned off.
To turn the system off, press the PUSH
(power) button.
Turn the VOL (volume) control knob to ad-
just the volume.
This vehicle may be equipped with Speed
Sensitive Volume. When this feature is ac-
tive, the audio volume changes as the driv-
ing speed changes.
MENU button
Press theMENU button to show the
Menu screen. Touch the “Settings” key on
the display, then touch the “Sound” key.
LHA4704
Monitor, climate, audio, phone and voice recognition systems4-49