2020 NISSAN KICKS steering
[x] Cancel search: steeringPage 211 of 500
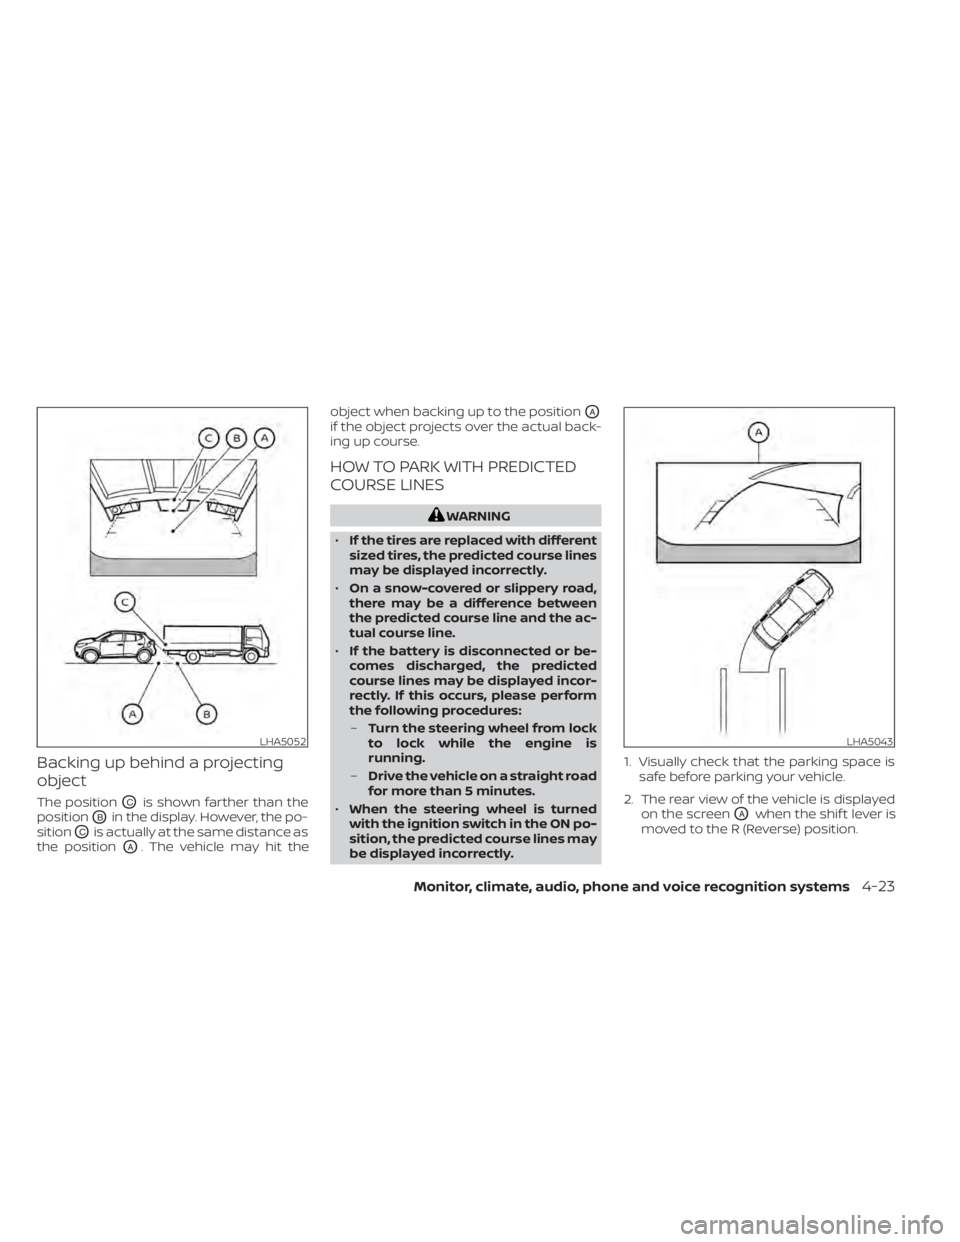
Backing up behind a projecting
object
The positionOCis shown farther than the
position
OBin the display. However, the po-
sition
OCis actually at the same distance as
the position
OA. The vehicle may hit the object when backing up to the position
OA
if the object projects over the actual back-
ing up course.
HOW TO PARK WITH PREDICTED
COURSE LINES
WARNING
• If the tires are replaced with different
sized tires, the predicted course lines
may be displayed incorrectly.
• On a snow-covered or slippery road,
there may be a difference between
the predicted course line and the ac-
tual course line.
• If the battery is disconnected or be-
comes discharged, the predicted
course lines may be displayed incor-
rectly. If this occurs, please perform
the following procedures:
– Turn the steering wheel from lock
to lock while the engine is
running.
– Drive the vehicle on a straight road
for more than 5 minutes.
• When the steering wheel is turned
with the ignition switch in the ON po-
sition, the predicted course lines may
be displayed incorrectly. 1. Visually check that the parking space is
safe before parking your vehicle.
2. The rear view of the vehicle is displayed on the screen
OAwhen the shif t lever is
moved to the R (Reverse) position.
LHA5052LHA5043
Monitor, climate, audio, phone and voice recognition systems4-23
Page 212 of 500
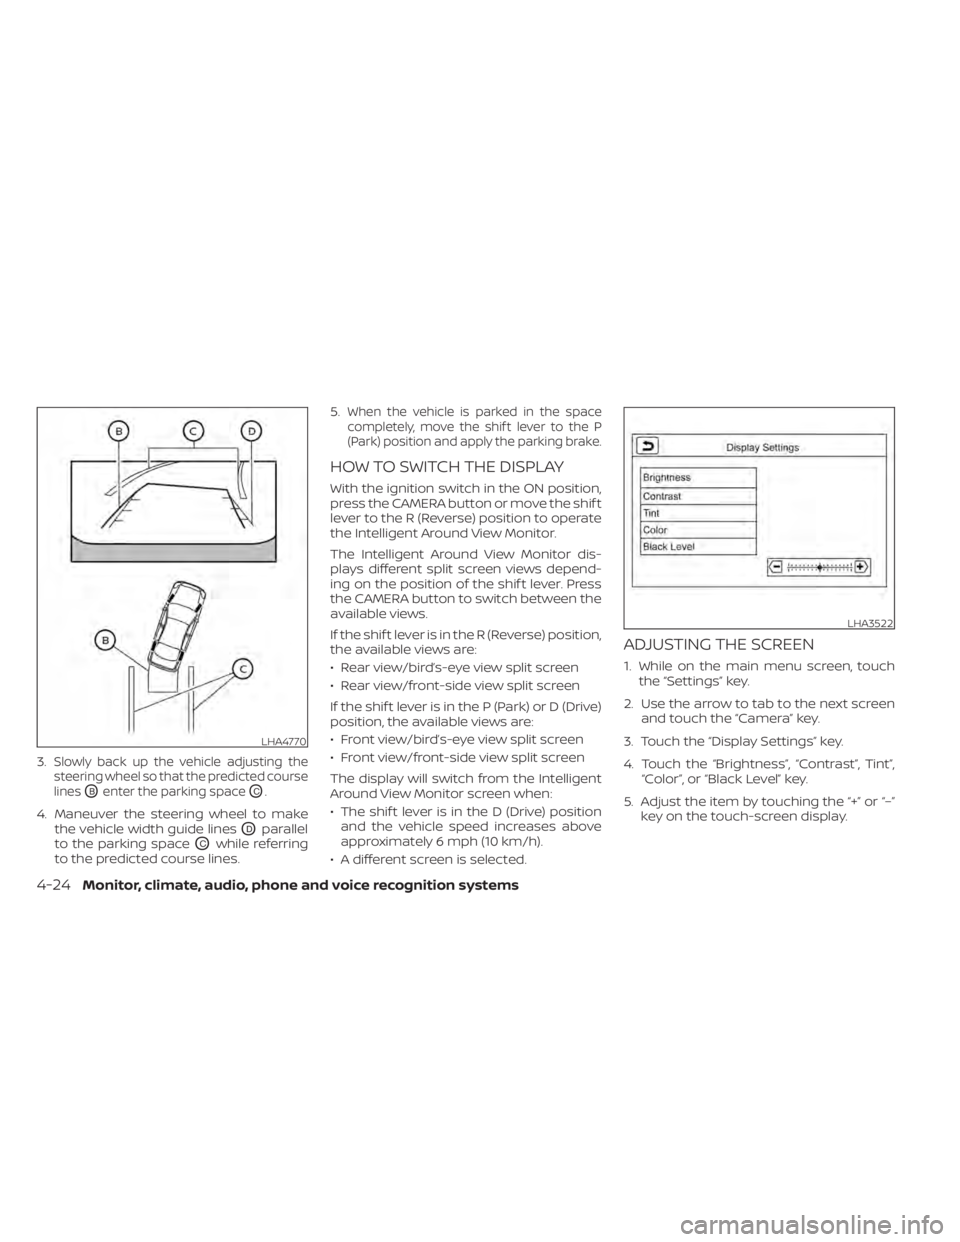
3.Slowly back up the vehicle adjusting the
steering wheel so that the predicted course
lines
OBenter the parking spaceOC.
4. Maneuver the steering wheel to make the vehicle width guide lines
ODparallel
to the parking space
OCwhile referring
to the predicted course lines. 5.
When the vehicle is parked in the space
completely, move the shif t lever to the P
(Park) position and apply the parking brake.
HOW TO SWITCH THE DISPLAY
With the ignition switch in the ON position,
press the CAMERA button or move the shif t
lever to the R (Reverse) position to operate
the Intelligent Around View Monitor.
The Intelligent Around View Monitor dis-
plays different split screen views depend-
ing on the position of the shif t lever. Press
the CAMERA button to switch between the
available views.
If the shif t lever is in the R (Reverse) position,
the available views are:
• Rear view/bird’s-eye view split screen
• Rear view/front-side view split screen
If the shif t lever is in the P (Park) or D (Drive)
position, the available views are:
• Front view/bird’s-eye view split screen
• Front view/front-side view split screen
The display will switch from the Intelligent
Around View Monitor screen when:
• The shif t lever is in the D (Drive) position and the vehicle speed increases above
approximately 6 mph (10 km/h).
• A different screen is selected.
ADJUSTING THE SCREEN
1. While on the main menu screen, touch the “Settings” key.
2. Use the arrow to tab to the next screen and touch the “Camera” key.
3. Touch the “Display Settings” key.
4. Touch the “Brightness”, “Contrast”, Tint”, “Color”, or “Black Level” key.
5. Adjust the item by touching the “+” or “–” key on the touch-screen display.
LHA4770
LHA3522
4-24Monitor, climate, audio, phone and voice recognition systems
Page 219 of 500
TURNING MOD ON AND OFF (if so
equipped)
Some vehicles include the option to allow
the MOD system to be turned on or off in
the vehicle information display.
To turn the MOD system on or off:
1. Using
buttons on the steering
wheel to select “Settings”.
2. Select “Driver Assistance” and press the OK button.
3. Select “Parking Aids”.
4. Toggle ON or OFF “Moving Object” using the OK button.
MOD SYSTEM LIMITATIONS
WARNING
Listed below are the system limitations
for MOD. Failure to operate the vehicle
in accordance with these system limi-
tations could result in serious injury or
death.
• Do not use the MOD system when
towing a trailer. The system may not
function properly. •
Excessive noise (for example, audio
system volume or open vehicle win-
dow) will interfere with the chime
sound, and it may not be heard.
• The MOD system performance will be
limited according to environmental
conditions and surrounding objects
such as:
– When there is low contrast be-
tween background and the mov-
ing objects.
– When there is a blinking source of
light.
– When strong light such as another
vehicle’s headlight or sunlight is
present.
– When camera orientation is not in
its usual position, such as when a
mirror is folded.
– When there is dirt, water drops or
snow on the camera lens.
– When the position of the moving
objects in the display is not
changed.
• The MOD system might detect flow-
ing water droplets on the camera
lens, white smoke from the muffler,
moving shadows, etc. •
The MOD system may not function
properly depending on the speed, di-
rection, distance or shape of the
moving objects.
• If your vehicle sustains damage to
the parts where the camera is in-
stalled, leaving it misaligned or bent,
the sensing zone may be altered and
the MOD system may not detect ob-
jects properly.
• When the temperature is extremely
high or low, the screen may not dis-
play objects clearly. This is not a
malfunction.
NOTE:
The blue MOD icon will change to or-
ange if one of the following has oc-
curred
• When the system is malfunctioning.
• When the component temperature reaches a high level (icon will blink).
• When the RearView camera has detected a blockage (icon will blink).
If the icon light continues to illuminate
orange, have the MOD system checked. It
is recommended that you visit a NISSAN
dealer for this service.
Monitor, climate, audio, phone and voice recognition systems4-31
Page 240 of 500
• Refresh: Touch the “Refresh” key to up-date the station list displayed on the right
side of the AM Menu screen.
(SEEK/TRACK) buttons
Press the
orbuttons to tune
from low to high or high to low frequencies
and to stop at the next broadcasting sta-
tion.
Direct Tune
Touch the “Direct Tune” key to display the
Direct Tune menu and manually enter a
station.
1 to 6 station memory operations
Up to six stations can be registered in the
preset list.
1. Select the AM radio band.
2. Tune to the station you wish to store.
3. Touch and hold one of the preset num- bers in the preset list.
The information such as frequency will be
displayed on the preset list.
To select and listen to the preset stations,
press
oron the steering wheel
briefly or touch a preferred station on the
preset list on the radio screen.
FM radio operation
Press theMENU button and touch the
“FM” key or press the AUDIO button and
select FM on the bottom of the Launch Bar
to bring up the FM display screen.
If another audio source is playing when the
“FM” key is pressed, the audio source play-
ing will automatically be turned off and the
last radio station played will begin playing.
The FM stereo indicator (STEREO) is shown
on the screen during FM stereo reception.
When the stereo broadcast signal is weak,
the radio automatically changes from ste-
reo to monaural reception.
FM Menu
Touch the “FM Menu” key to display the FM
Menu screen options:
• SCAN: To scan the stations, touch the “FM Menu” key on the radio screen and then
touch the “SCAN” key. The stations will be
tuned from low to high frequencies and
stop at each broadcasting stations for
several seconds. Touching the “SCAN” key
again during this period of several sec-
onds will stop tuning and the radio will
remain tuned to that station. • Refresh: Touch the “Refresh” key to up-
date the station list displayed on the right
side of the FM Menu screen.
• RDS Info: Radio station and song informa- tion can be displayed on the FM display
screen.
(SEEK/TRACK) buttons
Press the
orbuttons to tune
from low to high or high to low frequencies
and to stop at the next broadcasting sta-
tion.
1 to 12 station memory operations
Up to 12 stations can be registered in the
preset list.
1. Select the FM radio band.
2. Tune to the station you wish to store.
3. Touch and hold one of the preset num- bers in the preset list.
The information such as frequency will be
displayed on the preset list.
To select and listen to the preset stations,
press
oron the steering wheel
briefly or touch a preferred station on the
preset list on the radio screen.
4-52Monitor, climate, audio, phone and voice recognition systems
Page 241 of 500
Auxiliary (AUX) devices operation
Connecting auxiliary devices
Connect an AUX device into the AUX input
jack located on the center console below
the heater and air conditioner controls.
The AUX input jack accepts any standard
analog audio input such as from a portable
cassette player, CD player, MP3 player or
phone.
Insert a 1/8 in (3.5 mm) stereo mini plug in
the audio input jack. If a cable with a mono
plug is used, the audio output may not
function normally.
Activation and playing
Turn on the AUX device. Connect an AUX
cable to the AUX device and the AUX input
jack. Select AUX mode from the audio
source menu screen or by pressing the
Source button on the steering wheel.
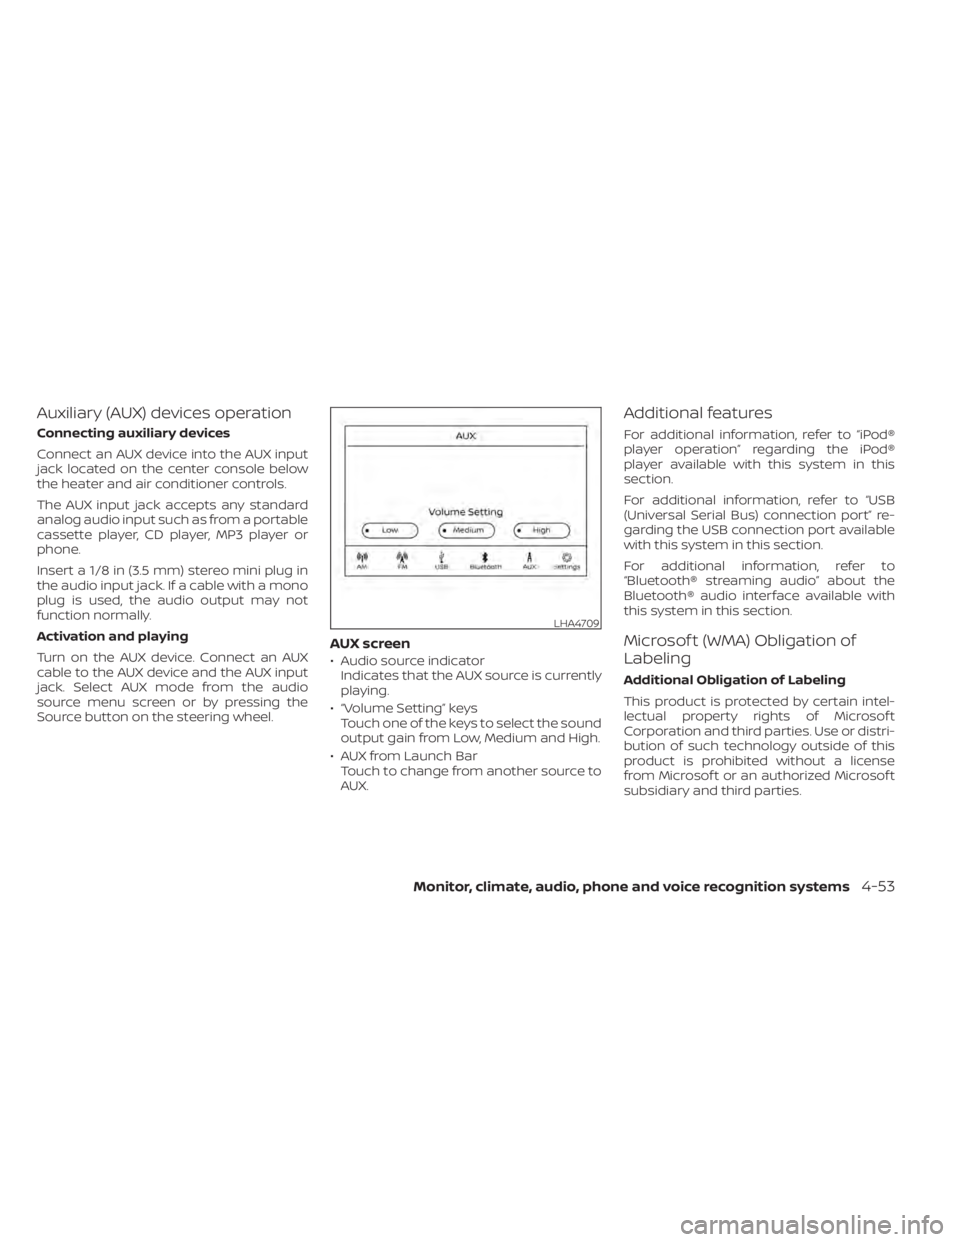
AUX screen
• Audio source indicatorIndicates that the AUX source is currently
playing.
• “Volume Setting” keys Touch one of the keys to select the sound
output gain from Low, Medium and High.
• AUX from Launch Bar Touch to change from another source to
AUX.
Additional features
For additional information, refer to “iPod®
player operation” regarding the iPod®
player available with this system in this
section.
For additional information, refer to “USB
(Universal Serial Bus) connection port” re-
garding the USB connection port available
with this system in this section.
For additional information, refer to
“Bluetooth® streaming audio” about the
Bluetooth® audio interface available with
this system in this section.
Microsof t (WMA) Obligation of
Labeling
Additional Obligation of Labeling
This product is protected by certain intel-
lectual property rights of Microsof t
Corporation and third parties. Use or distri-
bution of such technology outside of this
product is prohibited without a license
from Microsof t or an authorized Microsof t
subsidiary and third parties.
LHA4709
Monitor, climate, audio, phone and voice recognition systems4-53
Page 249 of 500
Automatic Connecting Procedure
If no phone is connected to the system,
press and hold the
button on the
steering wheel for less than 1.5 seconds.
Af ter the prompt, speak “Add Phone”, the
system will announce “transferring to the
add phone settings menu”. The system will
start the pairing procedure. When a com-
patible phone is found, a message with a
PIN appears on the screen. Operate the
Bluetooth® phone to complete the con-
nection process. For additional informa-
tion, refer to “Bluetooth® connections
screen” in this section.
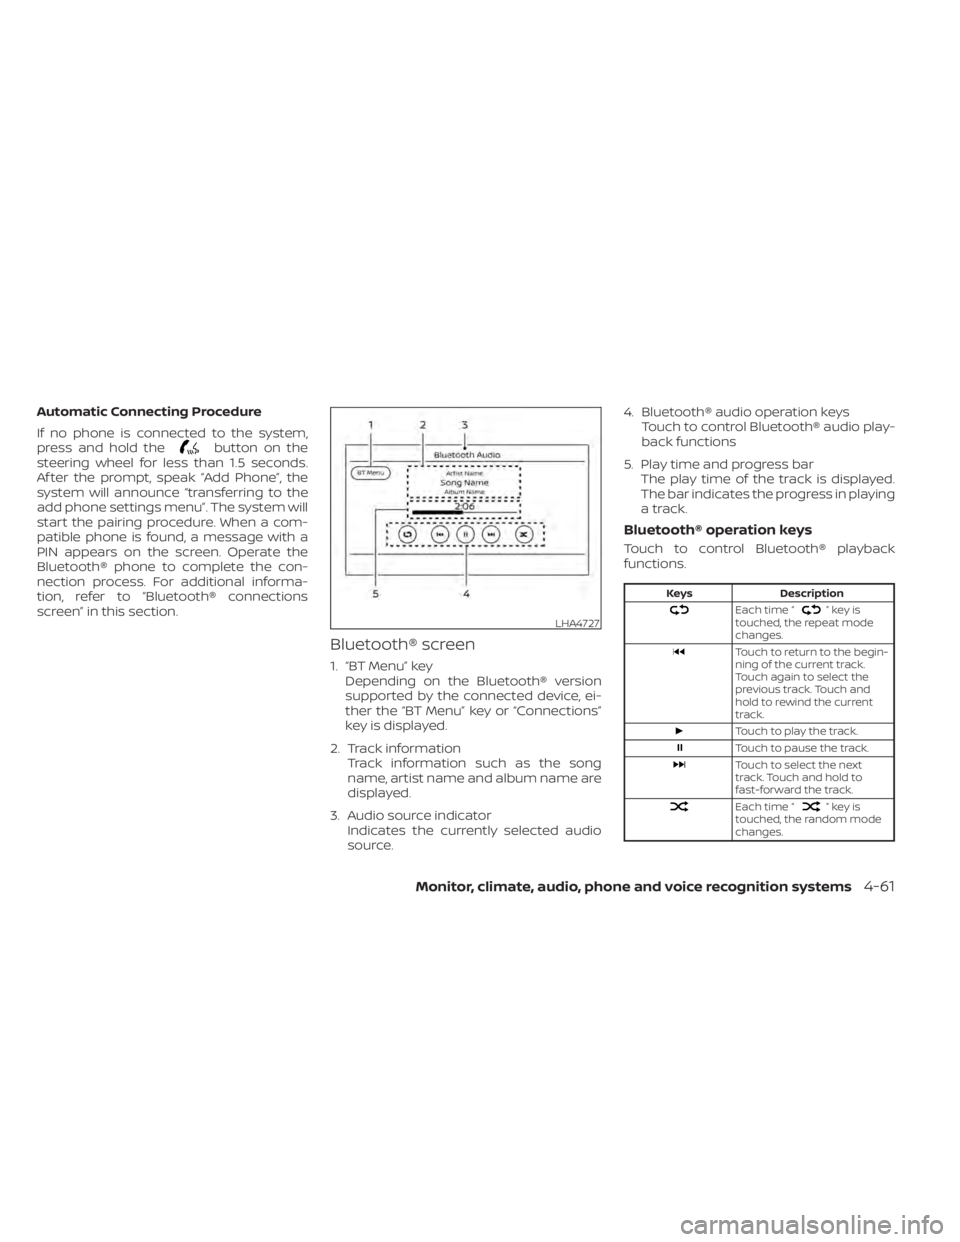
Bluetooth® screen
1. “BT Menu” key Depending on the Bluetooth® version
supported by the connected device, ei-
ther the “BT Menu” key or “Connections”
key is displayed.
2. Track information Track information such as the song
name, artist name and album name are
displayed.
3. Audio source indicator Indicates the currently selected audio
source. 4. Bluetooth® audio operation keys
Touch to control Bluetooth® audio play-
back functions
5. Play time and progress bar The play time of the track is displayed.
The bar indicates the progress in playing
a track.
Bluetooth® operation keys
Touch to control Bluetooth® playback
functions.
Keys Description
Each time “”keyis
touched, the repeat mode
changes.
Touch to return to the begin-
ning of the current track.
Touch again to select the
previous track. Touch and
hold to rewind the current
track.
Touch to play the track.
Touch to pause the track.
Touch to select the next
track. Touch and hold to
fast-forward the track.
Each time “”keyis
touched, the random mode
changes.
LHA4727
Monitor, climate, audio, phone and voice recognition systems4-61
Page 251 of 500
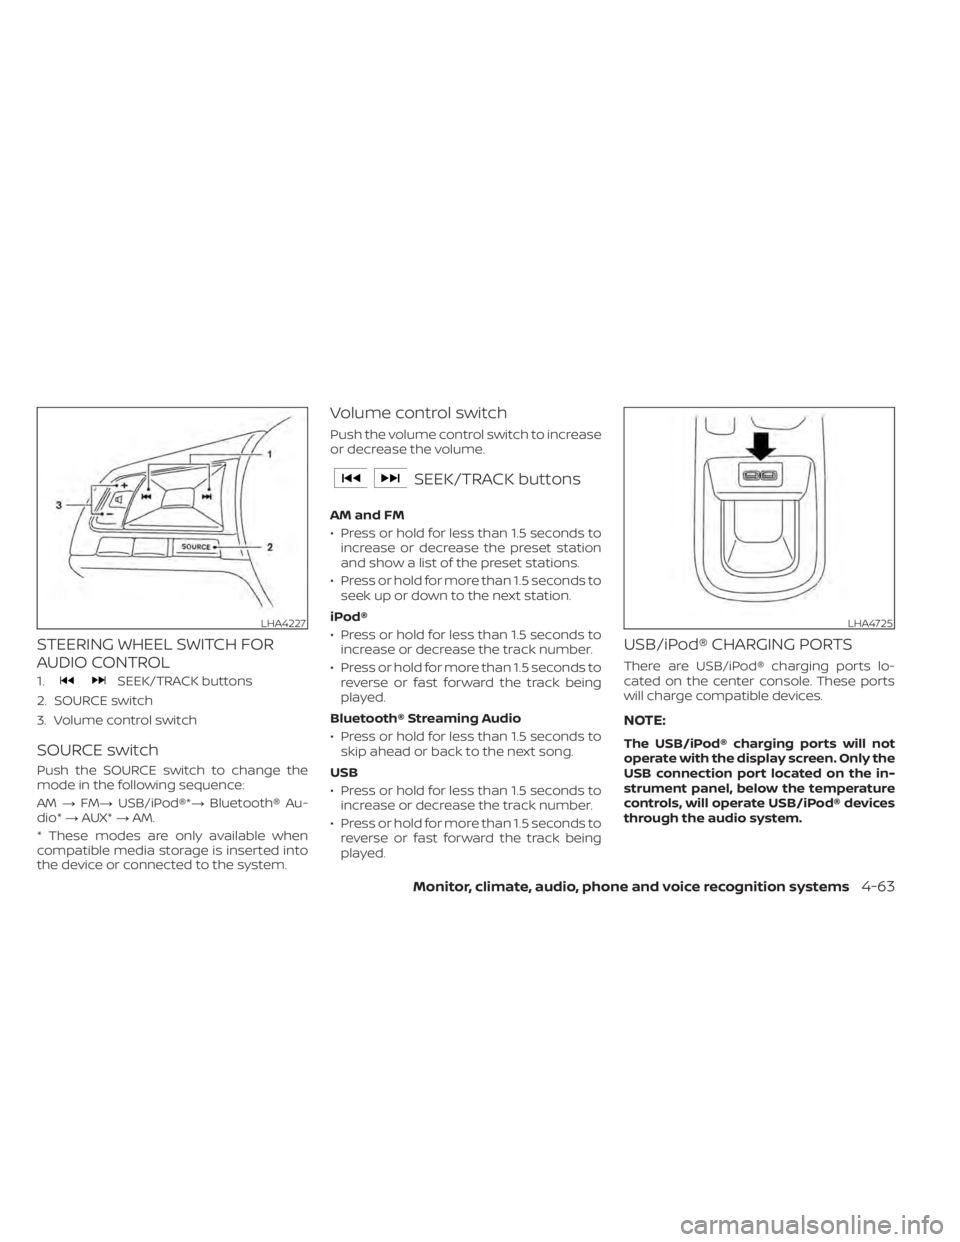
STEERING WHEEL SWITCH FOR
AUDIO CONTROL
1.SEEK/TRACK buttons
2. SOURCE switch
3. Volume control switch
SOURCE switch
Push the SOURCE switch to change the
mode in the following sequence:
AM →FM→ USB/iPod®*→ Bluetooth® Au-
dio* →AUX* →AM.
* These modes are only available when
compatible media storage is inserted into
the device or connected to the system.
Volume control switch
Push the volume control switch to increase
or decrease the volume.
SEEK/TRACK buttons
AM and FM
• Press or hold for less than 1.5 seconds to increase or decrease the preset station
and show a list of the preset stations.
• Press or hold for more than 1.5 seconds to seek up or down to the next station.
iPod®
• Press or hold for less than 1.5 seconds to increase or decrease the track number.
• Press or hold for more than 1.5 seconds to reverse or fast forward the track being
played.
Bluetooth® Streaming Audio
• Press or hold for less than 1.5 seconds to skip ahead or back to the next song.
USB
• Press or hold for less than 1.5 seconds to increase or decrease the track number.
• Press or hold for more than 1.5 seconds to reverse or fast forward the track being
played.
USB/iPod® CHARGING PORTS
There are USB/iPod® charging ports lo-
cated on the center console. These ports
will charge compatible devices.
NOTE:
The USB/iPod® charging ports will not
operate with the display screen. Only the
USB connection port located on the in-
strument panel, below the temperature
controls, will operate USB/iPod® devices
through the audio system.
LHA4227LHA4725
Monitor, climate, audio, phone and voice recognition systems4-63
Page 252 of 500
ANTENNA
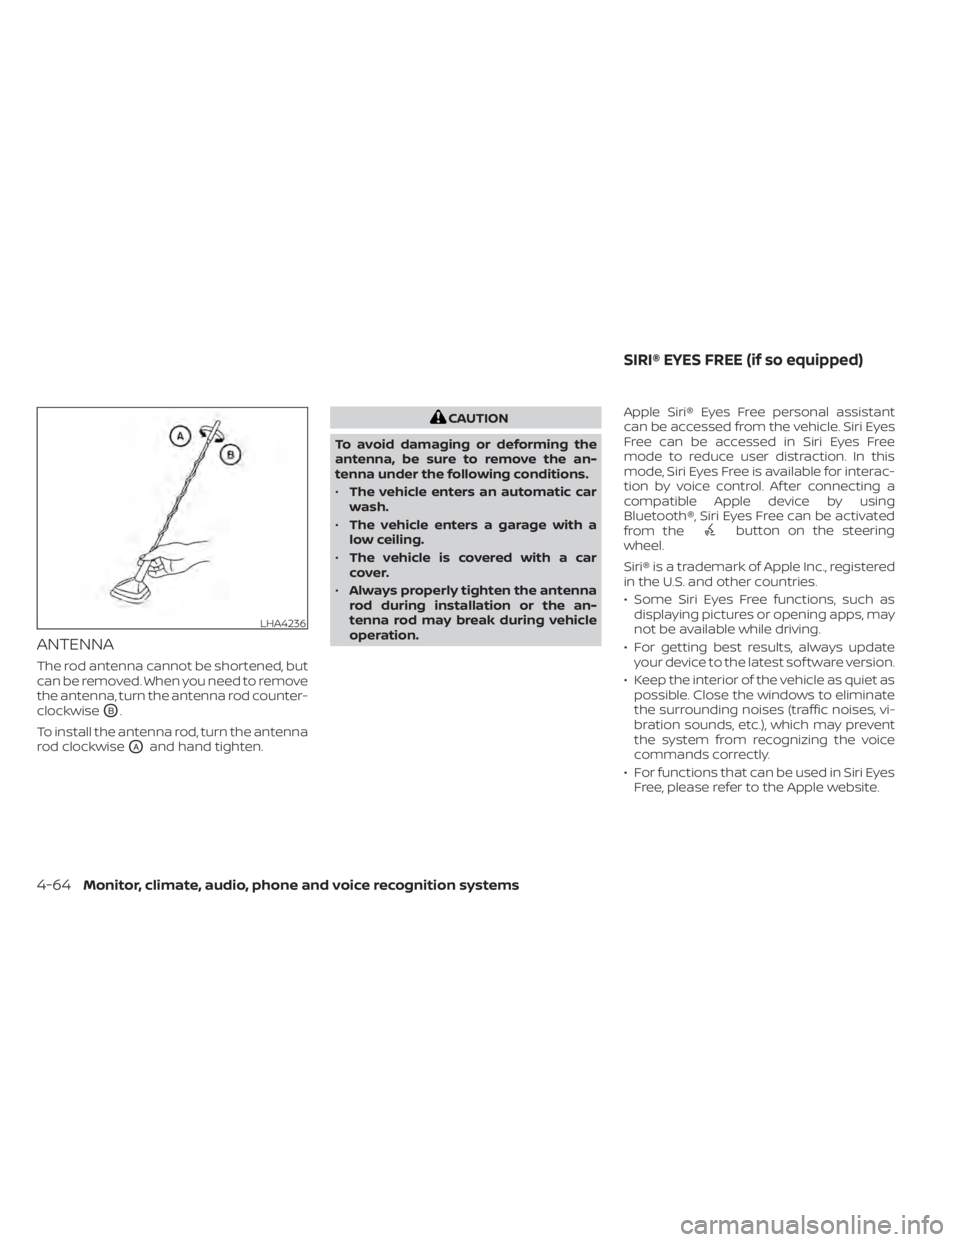
The rod antenna cannot be shortened, but
can be removed. When you need to remove
the antenna, turn the antenna rod counter-
clockwise
OB.
To install the antenna rod, turn the antenna
rod clockwise
OAand hand tighten.
CAUTION
To avoid damaging or deforming the
antenna, be sure to remove the an-
tenna under the following conditions.
• The vehicle enters an automatic car
wash.
• The vehicle enters a garage with a
low ceiling.
• The vehicle is covered with a car
cover.
• Always properly tighten the antenna
rod during installation or the an-
tenna rod may break during vehicle
operation. Apple Siri® Eyes Free personal assistant
can be accessed from the vehicle. Siri Eyes
Free can be accessed in Siri Eyes Free
mode to reduce user distraction. In this
mode, Siri Eyes Free is available for interac-
tion by voice control. Af ter connecting a
compatible Apple device by using
Bluetooth®, Siri Eyes Free can be activated
from the
button on the steering
wheel.
Siri® is a trademark of Apple Inc., registered
in the U.S. and other countries.
• Some Siri Eyes Free functions, such as displaying pictures or opening apps, may
not be available while driving.
• For getting best results, always update your device to the latest sof tware version.
• Keep the interior of the vehicle as quiet as possible. Close the windows to eliminate
the surrounding noises (traffic noises, vi-
bration sounds, etc.), which may prevent
the system from recognizing the voice
commands correctly.
• For functions that can be used in Siri Eyes Free, please refer to the Apple website.
LHA4236
SIRI® EYES FREE (if so equipped)
4-64Monitor, climate, audio, phone and voice recognition systems