2020 NISSAN KICKS tire pressure
[x] Cancel search: tire pressurePage 282 of 500
6. When it is safe to do so, gradually turnthe steering wheel until both tires return
to the road surface. When all tires are on
the road surface, steer the vehicle to
stay in the appropriate driving lane.
• If you decide that it is not safe to return the vehicle to the road surface based
on vehicle, road or traffic conditions,
gradually slow the vehicle to a stop in
a safe place off the road.
RAPID AIR PRESSURE LOSS
Rapid air pressure loss or a “blow-out” can
occur if the tire is punctured or is damaged
due to hitting a curb or pothole. Rapid air
pressure loss can also be caused by driving
on under-inflated tires.
Rapid air pressure loss can affect the han-
dling and stability of the vehicle, especially
at highway speeds.
Help prevent rapid air pressure loss by
maintaining the correct air pressure and
visually inspecting the tires for wear and
damage. For additional information, refer
to “Wheels and tires” in the “Do-it-yourself ”
section of this manual. If a tire rapidly loses
air pressure or “blows-out” while driving,
maintain control of the vehicle by following
the procedure below. Please note that this
procedure is only a general guide. The ve- hicle must be driven as appropriate based
on the conditions of the vehicle, road and
traffic.
WARNING
If there is a sudden loss of tire air pres-
sure, the vehicle will generally move or
pull in the direction of the flat tire. In
this situation, losing control of the ve-
hicle may cause a collision and result in
personal injury.
To help avoid loss of control:
• Do not rapidly apply the brakes.
• Do not rapidly release the accelerator
pedal.
• Do not rapidly turn the steering
wheel.
1. Remain calm and do not overreact.
2. Maintain a firm grip on the steering wheel with both hands and try to hold a
straight course.
3. When appropriate, slowly release the ac- celerator pedal to gradually slow the
vehicle.
4. Gradually steer the vehicle to a safe lo- cation off the road and away from traffic
if possible. 5. Lightly apply the brake pedal to gradu-
ally stop the vehicle.
6. Turn on the hazard warning flashers and contact a roadside emergency service
to change the tire. For additional infor-
mation, refer to “Changing a flat tire” in
the “In case of emergency” section of
this manual.
DRINKING ALCOHOL/DRUGS AND
DRIVING
WARNING
Never drive under the influence of alco-
hol or drugs. Alcohol in the blood-
stream reduces coordination, delays
reaction time and impairs judgement.
Driving af ter drinking alcohol increases
the likelihood of being involved in an
accident injuring yourself and others.
Additionally, if you are injured in an ac-
cident, alcohol can increase the sever-
ity of the injury.
5-10Starting and driving
Page 300 of 500
LDW SYSTEM LIMITATIONS
WARNING
Listed below are the system limitations
for the LDW system. Failure to follow
the warnings and instructions for
proper use of the LDW system could re-
sult in serious injury or death.
• The system will not operate at
speeds below approximately 37 mph
(60 km/h) or if it cannot detect lane
markers.
• Do not use the LDW system under the
following conditions as it may not
function properly:
– During bad weather (rain, fog,
snow, etc.).
– When driving on slippery roads,
such as on ice or snow.
– When driving on winding or un-
even roads.
– When there is a lane closure due to
road repairs.
– When driving in a makeshif t or
temporary lane.
– When driving on roads where the
lane width is too narrow. –
When driving without normal tire
conditions (for example, tire wear,
low tire pressure, installation of
spare tire, tire chains, nonstan-
dard wheels).
– When the vehicle is equipped with
non-original brake parts or sus-
pension parts.
– When you are towing a trailer or
other vehicle.
• The system may not function prop-
erly under the following conditions:
– On roads where there are multiple
parallel lane markers; lane mark-
ers that are faded or not painted
clearly; yellow painted lane mark-
ers; non-standard lane markers;
or lane markers covered with wa-
ter, dirt, snow, etc.
– On roads where the discontinued
lane markers are still detectable.
– On roads where there are sharp
curves. –
On roads where there are sharply
contrasting objects, such as shad-
ows, snow, water, wheel ruts,
seams or lines remaining af ter
road repairs. (The LDW system
could detect these items as lane
markers.)
– On roads where the traveling lane
merges or separates.
– When the vehicle’s traveling direc-
tion does not align with the lane
marker.
– When traveling close to the ve-
hicle in front of you, which ob-
structs the lane camera unit de-
tection range.
– When rain, snow, dirt or an object
adheres to the windshield in front
of the lane camera unit.
– When the headlights are not
bright due to dirt on the lens or if
the aiming is not adjusted
properly.
– When strong light enters the lane
camera unit. (For example, the
light directly shines on the front of
the vehicle at sunrise or sunset.)
5-28Starting and driving
Page 368 of 500
• Keep your engine tuned up.
• Follow the recommended scheduledmaintenance.
• Keep the tires inflated to the correct pres- sure. Low tire pressure increases tire
wear and lowers fuel economy.
• Keep the wheels in correct alignment. Im- proper alignment increases tire wear and
lowers fuel economy.
• Use the recommended viscosity engine oil. For additional information, refer to “En-
gine oil and oil filter recommendations” in
the “Technical and consumer informa-
tion” section of this manual.
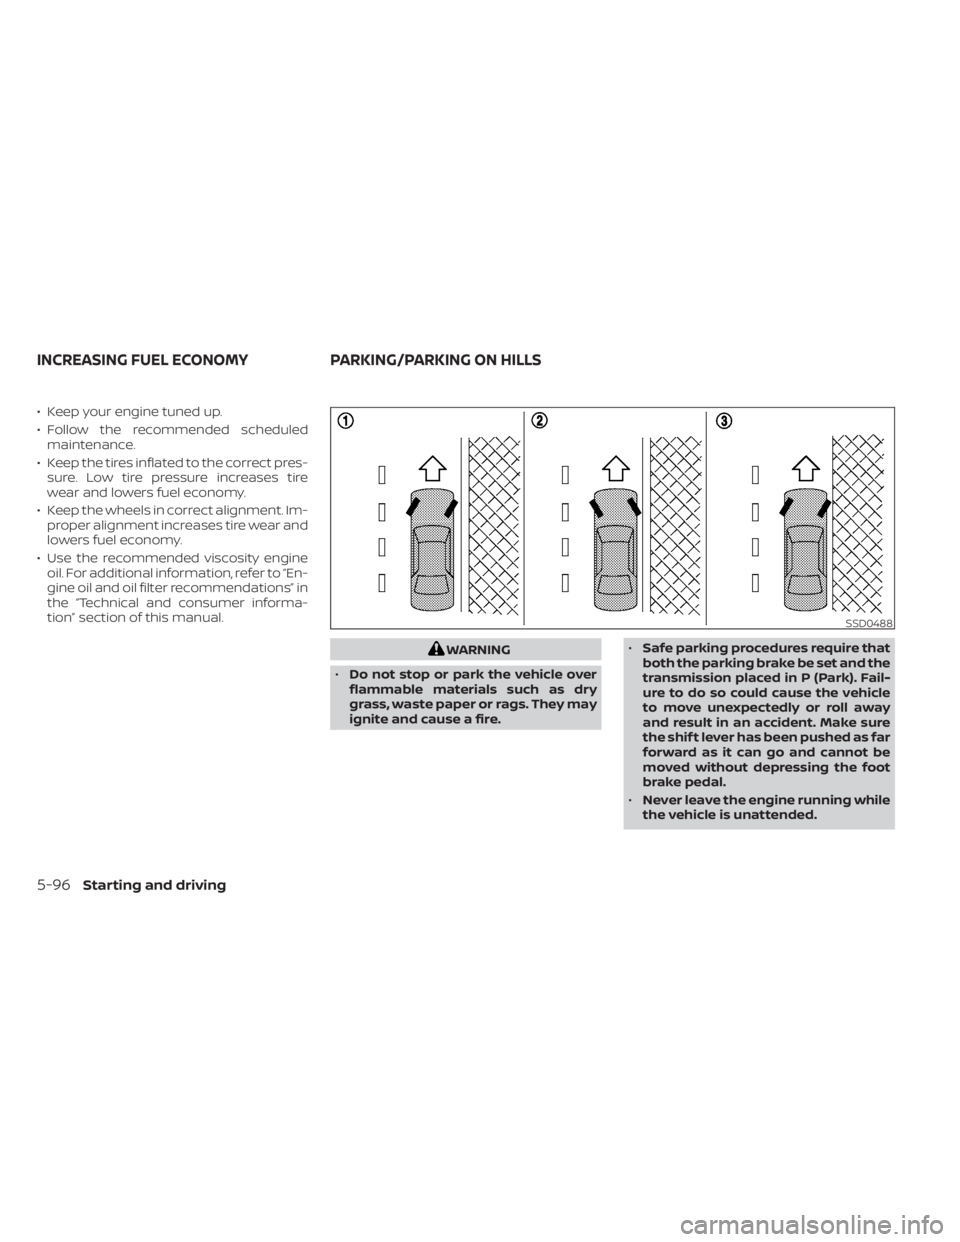
WARNING
• Do not stop or park the vehicle over
flammable materials such as dry
grass, waste paper or rags. They may
ignite and cause a fire. •
Safe parking procedures require that
both the parking brake be set and the
transmission placed in P (Park). Fail-
ure to do so could cause the vehicle
to move unexpectedly or roll away
and result in an accident. Make sure
the shif t lever has been pushed as far
forward as it can go and cannot be
moved without depressing the foot
brake pedal.
• Never leave the engine running while
the vehicle is unattended.
SSD0488
INCREASING FUEL ECONOMY PARKING/PARKING ON HILLS
5-96Starting and driving
Page 371 of 500
Parking brake break-in
Break in the parking brake shoes whenever
the stopping effect of the parking brake is
weakened or whenever the parking brake
shoes and/or drums/rotors are replaced,
in order to assure the best braking perfor-
mance.
This procedure is described in the vehicle
service manual. It is recommended that
you visit a NISSAN dealer for this service.
ANTI-LOCK BRAKING SYSTEM (ABS)
WARNING
• The ABS is a sophisticated device, but
it cannot prevent accidents resulting
from careless or dangerous driving
techniques. It can help maintain ve-
hicle control during braking on slip-
pery surfaces. Remember that stop-
ping distances on slippery surfaces
will be longer than on normal sur-
faces even with ABS. Stopping dis-
tances may also be longer on rough,
gravel or snow covered roads, or if
you are using tire chains. Always
maintain a safe distance from the ve-
hicle in front of you. Ultimately, the
driver is responsible for safety. •
Tire type and condition may also af-
fect braking effectiveness.
– When replacing tires, install the
specified size of tires on all four
wheels.
– When installing a spare tire, make
sure that it is the proper size and
type as specified on the Tire and
Loading Information label. For ad-
ditional information, refer to “Tire
and Loading Information label” in
the “Technical and consumer in-
formation” section of this manual.
– For additional information, refer
to “Wheels and tires” in the “Do-it-
yourself ” section of this manual.
The ABS controls the brakes so the wheels
do not lock during hard braking or when
braking on slippery surfaces. The system
detects the rotation speed at each wheel
and varies the brake fluid pressure to pre-
vent each wheel from locking and sliding.
By preventing each wheel from locking, the
system helps the driver maintain steering
control and helps to minimize swerving
and spinning on slippery surfaces.
Using the system
Depress the brake pedal and hold it down.
Depress the brake pedal with firm steady
pressure, but do not pump the brakes. The
Anti-lock Braking System will operate to
prevent the wheels from locking up. Steer
the vehicle to avoid obstacles.
WARNING
Do not pump the brake pedal. Doing so
may result in increased stopping dis-
tances.
Self-test feature
The Anti-lock Braking System (ABS) in-
cludes electronic sensors, electric pumps,
hydraulic solenoids and a computer. The
computer has a built-in diagnostic feature
that tests the system each time you start
the engine and move the vehicle at a low
speed in forward or reverse. When the self-
test occurs, you may hear a “clunk” noise
and/or feel a pulsation in the brake pedal.
This is normal and does not indicate a mal-
function. If the computer senses a mal-
function, it switches the ABS off and illumi-
nates the ABS warning light on the
Starting and driving5-99
Page 387 of 500
6 In case of emergency
Hazard warning flasher switch..................6-2
Emergency engine shut off ......................6-2
Flat tire ..........................................6-3
Tire Pressure Monitoring System
(TPMS) .......................................6-3
Changing a flat tire ...........................6-4
Jump starting ...................................6-9 Push starting
.................................... 6-11
If your vehicle overheats .........................6-11
Towing your vehicle ............................ 6-12
Towing recommended by NISSAN ...........6-13
Vehicle recovery (freeing a stuck
vehicle) ...................................... 6-14
Page 389 of 500
TIRE PRESSURE MONITORING
SYSTEM (TPMS)
This vehicle is equipped with the TPMS. It
monitors tire pressure of all tires except the
spare. When the low tire pressure warning
light is lit and the “Tire Pressure Low — Add
Air” warning appears in the vehicle infor-
mation display, one or more of your tires is
significantly under-inflated. If the vehicle is
being driven with low tire pressure, the
TPMS will activate and warn you of it by the
low tire pressure warning light. This system
will activate only when the vehicle is driven
at speeds above 16 mph (25 km/h). For ad-
ditional information, refer to “Warning
lights, indicator lights and audible remind-
ers” in the “Instruments and controls” sec-
tion, and “Tire Pressure Monitoring System
(TPMS)” in the “Starting and driving” section
of this manual.
WARNING
• Radio waves could adversely affect
electric medical equipment. Those
who use a pacemaker should contact
the electric medical equipment
manufacturer for the possible influ-
ences before use. •
If the low tire pressure warning light
illuminates while driving, avoid sud-
den steering maneuvers or abrupt
braking, reduce vehicle speed, pull
off the road to a safe location and
stop the vehicle as soon as possible.
Driving with underinflated tires may
permanently damage the tires and
increase the likelihood of tire failure.
Serious vehicle damage could occur
and may lead to an accident and
could result in serious personal in-
jury. Check the tire pressure for all
four tires. Adjust the tire pressure to
the recommended COLD tire pres-
sure shown on the Tire and Loading
Information label to turn the low tire
pressure warning light OFF. If the
light still illuminates while driving af-
ter adjusting the tire pressure, a tire
may be flat or the TPMS may be mal-
functioning. If you have a flat tire, re-
place it with a spare tire as soon as
possible. If no tire is flat and all tires
are properly inflated, have the ve-
hicle checked. It is recommended
that you visit a NISSAN dealer for this
service. •
When replacing a wheel without the
TPMS such as the spare tire, the TPMS
will not function and the low tire
pressure warning light will flash for
approximately 1 minute. The light will
remain on af ter 1 minute. Have your
tires replaced and/or TPMS system
reset as soon as possible. It is recom-
mended that you visit a NISSAN
dealer for these services.
• Replacing tires with those not origi-
nally specified by NISSAN could af-
fect the proper operation of the
TPMS.
• Do not inject any tire liquid or aerosol
tire sealant into the tires, as this may
cause a malfunction of the tire pres-
sure sensors.
• If the light still comes on while driving
af ter adjusting the tire pressure, a
tire may be flat or the TPMS may be
malfunctioning. If you have a flat tire,
replace it with a spare tire as soon as
possible. If no tire is flat and all tires
are properly inflated, it is recom-
mended that you visit a NISSAN
dealer for this service.
FLAT TIRE
In case of emergency6-3
Page 395 of 500

4. Lower the vehicle slowly until the tiretouches the ground. Then, with the
wheel nut wrench, tighten the wheel
nuts securely in the sequence illustrated
(
OA,OB,OC,OD). Lower the vehicle
completely.
WARNING
• Incorrect wheel nuts or improperly
tightened wheel nuts can cause the
wheel to become loose or come off.
This could cause an accident.
• Do not use oil or grease on the wheel
studs or nuts. This could cause the
nuts to become loose.
• Retighten the wheel nuts when the
vehicle has been driven for 600 miles
(1,000 km) (also in cases of a flat
tire,etc.).
As soon as possible, tighten the wheel
nuts to the specified torque with a
torque wrench.
Wheel nut tightening torque: 83 f t-lb (113 N·m)
The wheel nuts must be kept tightened
to specification at all times. It is recom-
mended that wheel nuts be tightened to
specification at each lubrication interval. Adjust tire pressure to the COLD pres-
sure.
COLD pressure: Af ter vehicle has been
parked for 3 hours or more or driven less
than 1 mile (1.6 km).
COLD tire pressures are shown on the
Tire and Loading Information label.
5. Securely store the jack and the tool kit in
its storage area.
6. Place the spare tire cover and lif tgate floor carpeting over the jack and tool kit.
7. Securely store the damaged tire in the vehicle.
8. Close the lif tgate.
WARNING
• Always make sure that the spare tire
and jacking equipment are properly
secured af ter use. Such items can be-
come dangerous projectiles in an ac-
cident or sudden stop.
• The spare tire is designed for emer-
gency use. For additional informa-
tion, refer to “Wheels and tires” in the
“Do-it-yourself ” section of this
manual. To start your engine with a booster battery,
the instructions and precautions below
must be followed.
WARNING
• If done incorrectly, jump starting can
lead to a battery explosion, resulting
in severe injury or death. It could also
damage your vehicle.
• Explosive hydrogen gas is always
present in the vicinity of the battery.
Keep all sparks and flames away
from the battery.
• Do not allow battery fluid to come
into contact with eyes, skin, clothing
or painted surfaces. Battery fluid is a
corrosive sulfuric acid solution which
can cause severe burns. If the fluid
should come into contact with any-
thing, immediately flush the con-
tacted area with water.
• Keep battery out of the reach of
children.
• The booster battery must be rated at
12 volts. Use of an improperly rated
battery can damage your vehicle.
JUMP STARTING
In case of emergency6-9
Page 409 of 500

8 Do-it-yourself
Maintenance precautions.......................8-2
Engine compartment check locations ...........8-3
Engine cooling system ..........................8-4
Checking engine coolant level ................8-5
Changing engine coolant ....................8-5
Engine oil .......................................8-5
Checking engine oil level .....................8-5
Changing engine oil and oil filter ..............8-6
Continuously Variable Transmission (CVT)
fluid .............................................8-9
Brake fluid .......................................8-9
Windshield-washer fluid ........................8-10
Windshield-washer fluid reservoir ...........8-10
Battery......................................... 8-12
Jump starting ............................... 8-13
Variable voltage control system ................8-14
Drive belt ....................................... 8-14
Spark plugs .................................... 8-15
Replacing spark plugs ....................... 8-15
Air cleaner ..................................... 8-16In-cabin microfilter
.......................... 8-16
Windshield wiper blades ........................8-17
Cleaning .................................... 8-17
Replacing ................................... 8-17
Brakes ......................................... 8-18
Fuses .......................................... 8-19
Engine compartment ....................... 8-19
Passenger compartment ...................8-21
Battery replacement ........................... 8-22
NISSAN Intelligent Key® ......................8-22
Lights .......................................... 8-24
Headlights .................................. 8-24
Fog lights (if so equipped) ...................8-24
Exterior and interior lights ...................8-26
Wheels and tires ............................... 8-28
Tire pressure ................................ 8-28
Tire labeling ................................. 8-31
Types of tires ................................ 8-34
Tire chains .................................. 8-35
Changing
wheels and tires .................. 8-36