2020 NISSAN KICKS Do it yourself
[x] Cancel search: Do it yourselfPage 133 of 500
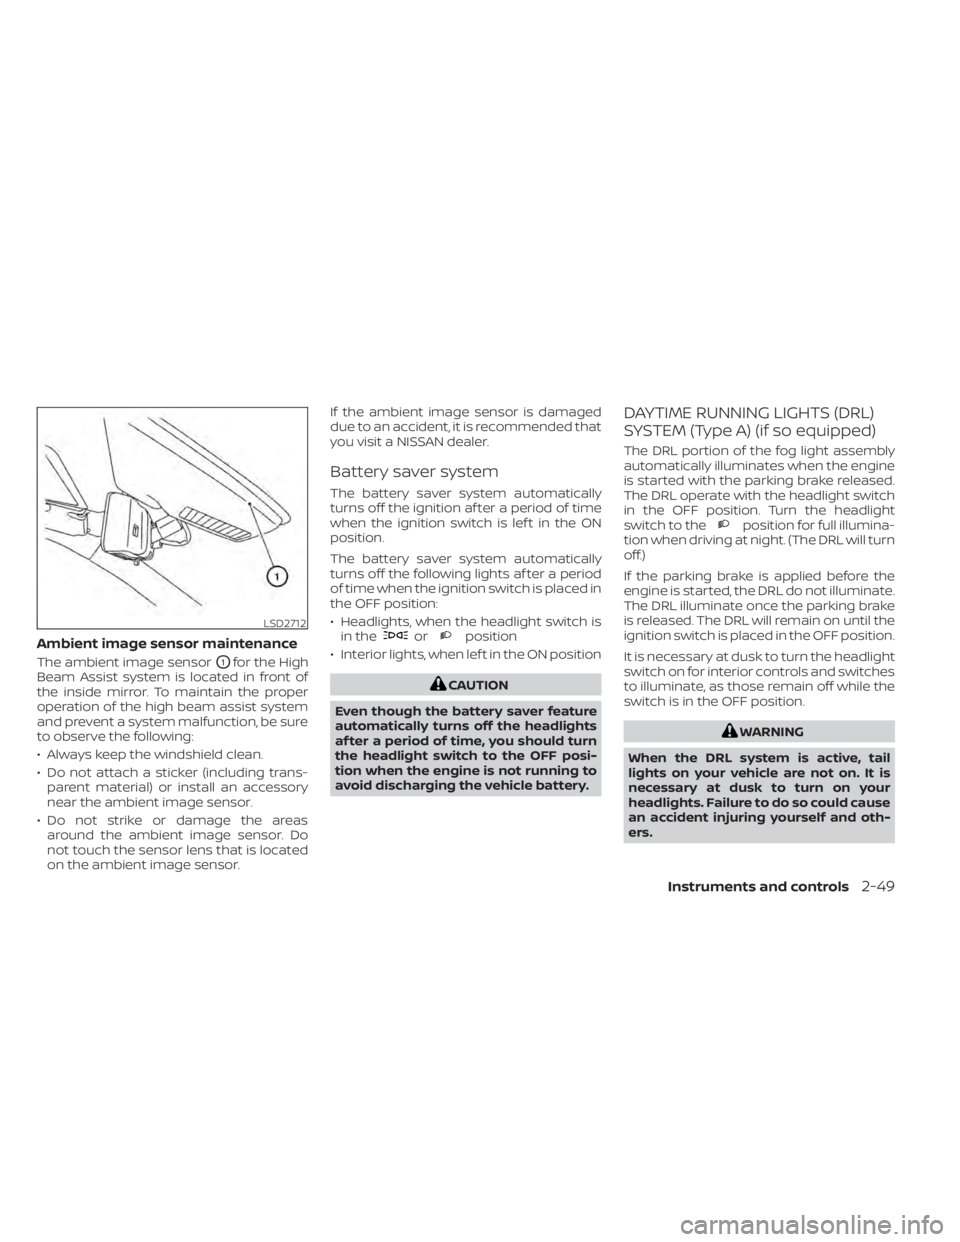
Ambient image sensor maintenance
The ambient image sensorO1for the High
Beam Assist system is located in front of
the inside mirror. To maintain the proper
operation of the high beam assist system
and prevent a system malfunction, be sure
to observe the following:
• Always keep the windshield clean.
• Do not attach a sticker (including trans- parent material) or install an accessory
near the ambient image sensor.
• Do not strike or damage the areas around the ambient image sensor. Do
not touch the sensor lens that is located
on the ambient image sensor. If the ambient image sensor is damaged
due to an accident, it is recommended that
you visit a NISSAN dealer.
Battery saver system
The battery saver system automatically
turns off the ignition af ter a period of time
when the ignition switch is lef t in the ON
position.
The battery saver system automatically
turns off the following lights af ter a period
of time when the ignition switch is placed in
the OFF position:
• Headlights, when the headlight switch is
in the
orposition
• Interior lights, when lef t in the ON position
CAUTION
Even though the battery saver feature
automatically turns off the headlights
af ter a period of time, you should turn
the headlight switch to the OFF posi-
tion when the engine is not running to
avoid discharging the vehicle battery.
DAYTIME RUNNING LIGHTS (DRL)
SYSTEM (Type A) (if so equipped)
The DRL portion of the fog light assembly
automatically illuminates when the engine
is started with the parking brake released.
The DRL operate with the headlight switch
in the OFF position. Turn the headlight
switch to the
position for full illumina-
tion when driving at night. (The DRL will turn
off.)
If the parking brake is applied before the
engine is started, the DRL do not illuminate.
The DRL illuminate once the parking brake
is released. The DRL will remain on until the
ignition switch is placed in the OFF position.
It is necessary at dusk to turn the headlight
switch on for interior controls and switches
to illuminate, as those remain off while the
switch is in the OFF position.
WARNING
When the DRL system is active, tail
lights on your vehicle are not on. It is
necessary at dusk to turn on your
headlights. Failure to do so could cause
an accident injuring yourself and oth-
ers.
LSD2712
Instruments and controls2-49
Page 134 of 500
LED Daytime Running Lights (DRL)
system (Type B) (if so equipped)
The LED DRL portion of the fog light assem-
bly automatically illuminates when the en-
gine is started with the parking brake re-
leased. The LED DRL operate with the
headlight switch in the OFF position. Turn
the headlight switch to the
position
for full illumination when driving at night.
(The LED DRL will turn off.)
If the parking brake is applied before the
engine is started, the LED DRL do not illumi-
nate. The LED DRL illuminate once the
parking brake is released. The LED DRL will
remain on until the ignition switch is placed
in the OFF position.
It is necessary at dusk to turn the headlight
switch on for interior controls and switches
to illuminate, as those remain off while the
switch is in the OFF position.
WARNING
When the LED DRL system is active, tail
lights on your vehicle are not on. It is
necessary at dusk to turn on your
headlights. Failure to do so could cause
an accident injuring yourself and oth-
ers.
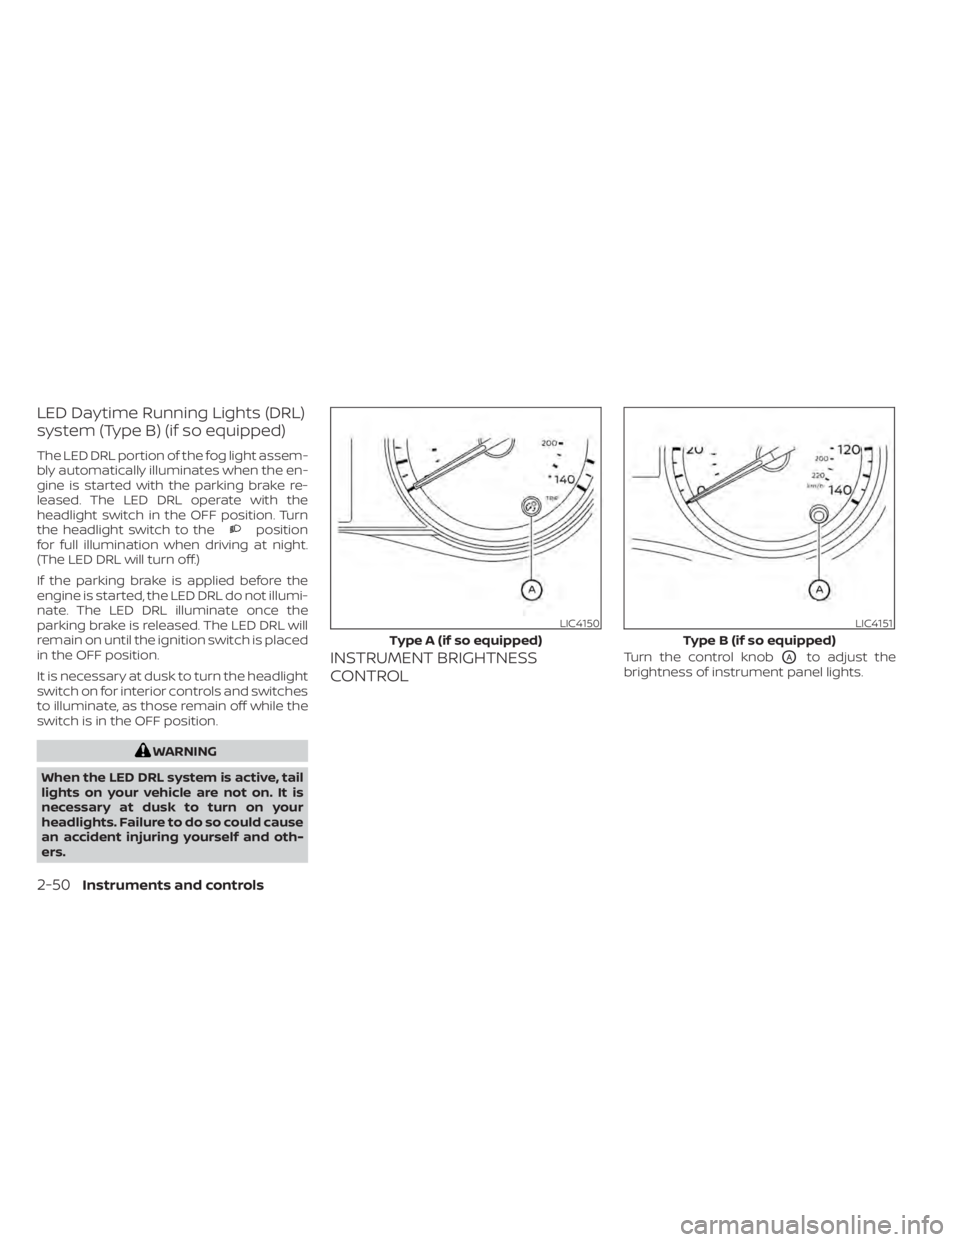
INSTRUMENT BRIGHTNESS
CONTROLTurn the control knobOAto adjust the
brightness of instrument panel lights.
LIC4150
Type A (if so equipped)
LIC4151
Type B (if so equipped)
2-50Instruments and controls
Page 157 of 500
• The doors are unlocked while the ignitionswitch is placed in the OFF position and
all doors are closed.
• The driver's door is opened and then closed while the ignition switch is placed
in the OFF position.
• The ignition switch is placed in the OFF position while all doors are closed.
The personal light will turn off while the 15
second timer is activated when:
• The driver's door is locked by the key fob, a key or the lock-unlock switch.
• The ignition switch is placed in the ON position.
When the switch is in the OFF position
O3,
the light does not illuminate, regardless of
door position.
Some vehicles are equipped with a battery
saver feature that will automatically turn
off the interior lights af ter approximately 10
minutes if:
• doors are open, or
• the interior light switch is in the ON posi- tion.
NOTE:
If the interior lights are turned off auto-
matically by the battery saver feature,
the ignition switch must be placed in the
ON position before the interior lights will
illuminate again.
For information regarding the interior light
bulb replacement, refer to “Exterior and in-
terior lights” in the “Do-it-yourself ” section
of this manual.
CAUTION
Do not use for extended periods of time
with the engine stopped. This could re-
sult in a discharged battery.
LUGGAGE COMPARTMENT LIGHT
The light illuminates when the rear hatch is
opened. When the rear hatch is closed, the
light goes off. For additional information,
refer to “Exterior and interior lights” in the
“Do-it-yourself ” section of this manual.
Instruments and controls2-73
Page 165 of 500
WARNING
• Radio waves could adversely affect
electric medical equipment. Those
who use a pacemaker should contact
the electric medical equipment
manufacturer for the possible influ-
ences before use.
• The Intelligent Key transmits radio
waves when the buttons are pressed.
The FAA advises the radio waves may
affect aircraf t navigation and com-
munication systems. Do not operate
the Intelligent Key while on an air-
plane. Make sure the buttons are not
operated unintentionally when the
unit is stored for a flight.
• Never leave the Intelligent Key in the
vehicle when you leave the vehicle.
The Intelligent Key system can operate all
the door and lif tgate locks using the re-
mote control function or pushing the re-
quest switch (if so equipped) on the vehicle
without taking the key out from a pocket or
purse. The operating environment and/or
conditions may affect the Intelligent Key
system operation.
Be sure to read the following before using
the Intelligent Key system.CAUTION
Be sure to carry the Intelligent Key with
you when operating the vehicle.
The Intelligent Key is capable of receiving
and transmitting radio waves. The Intelli-
gent Key system transmits weak radio
waves from various distances. Environ-
mental conditions may interfere with the
operation of the Intelligent Key system un-
der the following operating conditions:
• When operating near a location where strong radio waves are transmitted, such
as a TV tower, power station and broad-
casting station.
• When in possession of wireless equip- ment, such as a cellular telephone, trans-
ceiver, or a CB radio.
• When the Intelligent Key is in contact with or covered by metallic materials.
• When any type of radio wave remote con- trol is used nearby.
• When the Intelligent Key is placed near an electric appliance such as a personal
computer.
• When the vehicle is parked near a parking meter. In such cases, correct the operating condi-
tions before using the Intelligent Key func-
tion or use the mechanical key.
Although the life of the battery varies de-
pending on the operating conditions, the
battery’s life is approximately two years. If
the battery is discharged, replace it with a
new one.
When the Intelligent Key battery is low, a
yellow indicator illuminates with the mes-
sage “Key Battery Low” in the vehicle infor-
mation display. For additional information,
refer to “Vehicle information display warn-
ings and indicators” in the “Instruments
and controls” section of this manual.
Since the Intelligent Key is capable of re-
ceiving radio waves, if the key is lef t near
equipment which transmits strong radio
waves, such as signals from a TV and per-
sonal computer, the battery life may be-
come shorter.
For additional information, refer to “Battery
replacement” in the “Do-it-yourself ” section
of this manual.
As many as four Intelligent Keys can be
registered and used with one vehicle. For
information about the purchase and use of
additional Intelligent Keys, it is recom-
mended that you visit a NISSAN dealer.
NISSAN INTELLIGENT KEY®
Pre-driving checks and adjustments3-7
Page 173 of 500

If the light does not blink, your battery may
be too weak to communicate to the ve-
hicle. If this occurs, the battery may need to
be replaced. For additional information re-
garding the replacement of a battery, refer
to “Battery replacement” in the “Do-it-
yourself ” section of this manual.WARNING SIGNALS
To help prevent the vehicle from moving
unexpectedly by erroneous operation of
the Intelligent Key or to help prevent the
vehicle from being stolen, a chime or
buzzer sounds from inside and outside the
vehicle and a warning is displayed in the
instrument panel.
When a chime or beep sounds or a warning
is displayed, be sure to check the vehicle
and the Intelligent Key.
For additional information, refer to
“Troubleshooting guide” in this section and
“Vehicle information display (if so
equipped)” in the “Instruments and con-
trols” section of this manual.
Pre-driving checks and adjustments3-15
Page 175 of 500
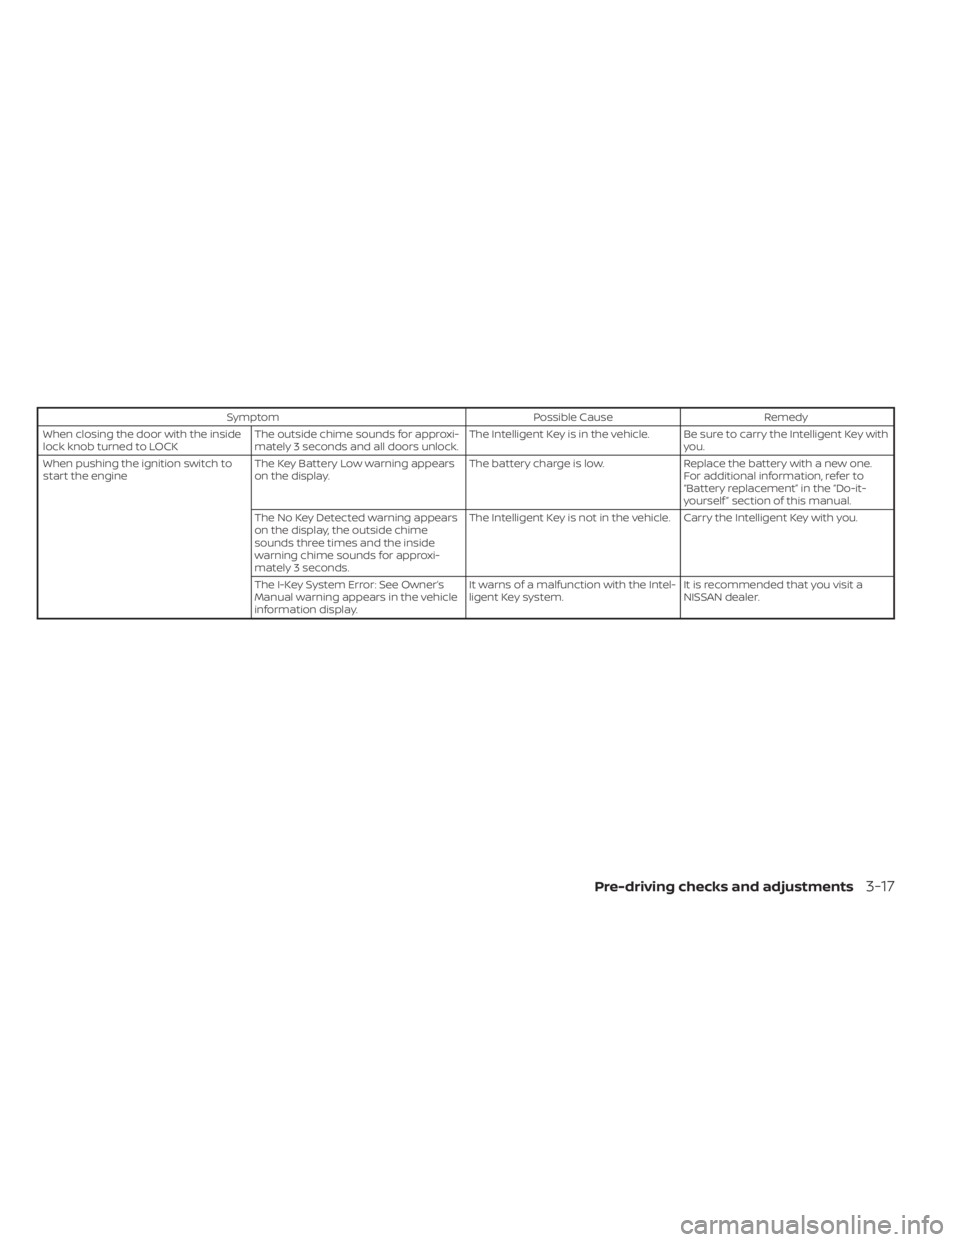
SymptomPossible CauseRemedy
When closing the door with the inside
lock knob turned to LOCK The outside chime sounds for approxi-
mately 3 seconds and all doors unlock. The Intelligent Key is in the vehicle. Be sure to carry the Intelligent Key with
you.
When pushing the ignition switch to
start the engine The Key Battery Low warning appears
on the display. The battery charge is low.
Replace the battery with a new one.
For additional information, refer to
“Battery replacement” in the “Do-it-
yourself ” section of this manual.
The No Key Detected warning appears
on the display, the outside chime
sounds three times and the inside
warning chime sounds for approxi-
mately 3 seconds. The Intelligent Key is not in the vehicle. Carry the Intelligent Key with you.
The I-Key System Error: See Owner’s
Manual warning appears in the vehicle
information display. It warns of a malfunction with the Intel-
ligent Key system.
It is recommended that you visit a
NISSAN dealer.
Pre-driving checks and adjustments3-17
Page 282 of 500
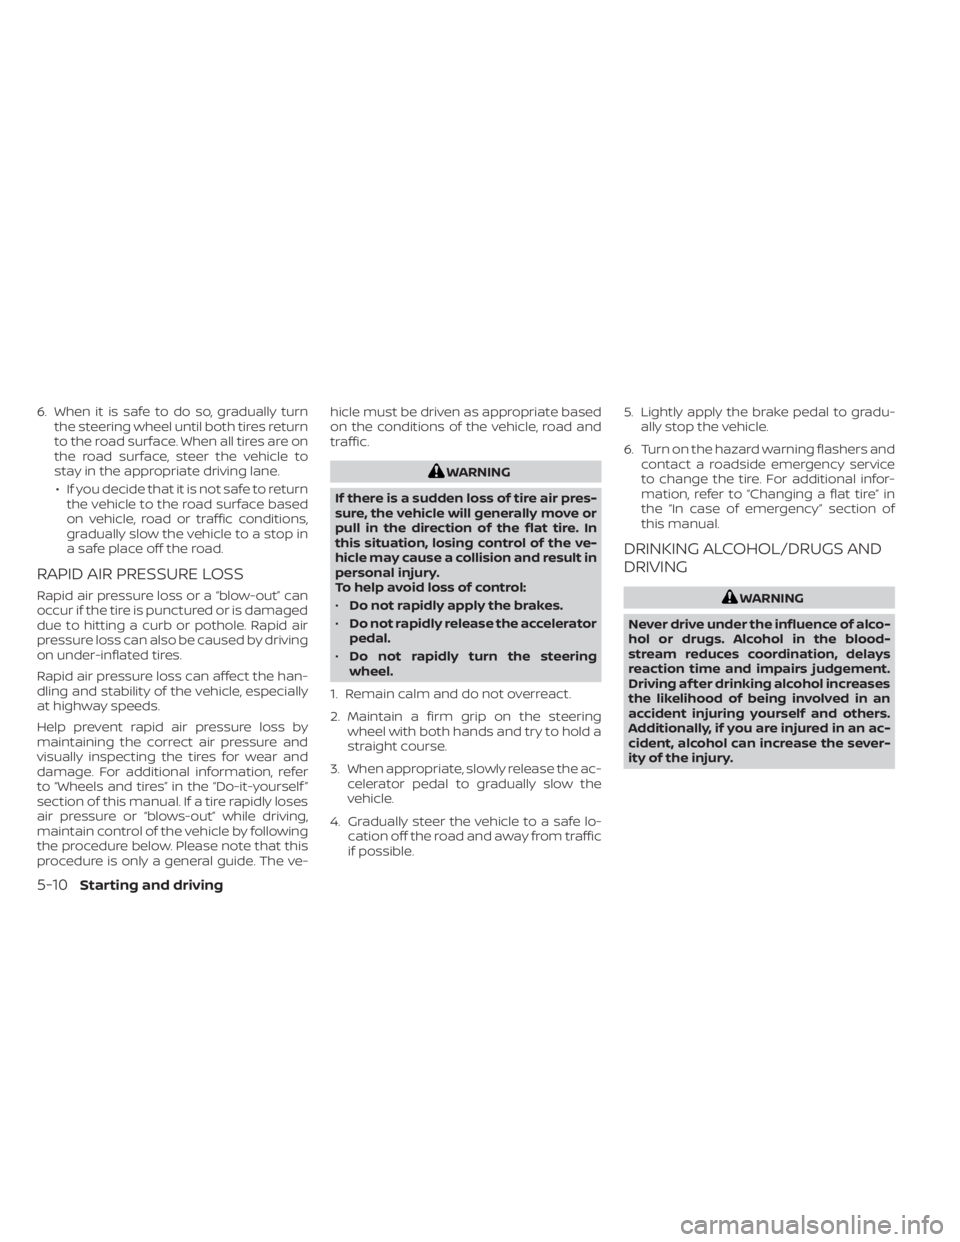
6. When it is safe to do so, gradually turnthe steering wheel until both tires return
to the road surface. When all tires are on
the road surface, steer the vehicle to
stay in the appropriate driving lane.
• If you decide that it is not safe to return the vehicle to the road surface based
on vehicle, road or traffic conditions,
gradually slow the vehicle to a stop in
a safe place off the road.
RAPID AIR PRESSURE LOSS
Rapid air pressure loss or a “blow-out” can
occur if the tire is punctured or is damaged
due to hitting a curb or pothole. Rapid air
pressure loss can also be caused by driving
on under-inflated tires.
Rapid air pressure loss can affect the han-
dling and stability of the vehicle, especially
at highway speeds.
Help prevent rapid air pressure loss by
maintaining the correct air pressure and
visually inspecting the tires for wear and
damage. For additional information, refer
to “Wheels and tires” in the “Do-it-yourself ”
section of this manual. If a tire rapidly loses
air pressure or “blows-out” while driving,
maintain control of the vehicle by following
the procedure below. Please note that this
procedure is only a general guide. The ve- hicle must be driven as appropriate based
on the conditions of the vehicle, road and
traffic.
WARNING
If there is a sudden loss of tire air pres-
sure, the vehicle will generally move or
pull in the direction of the flat tire. In
this situation, losing control of the ve-
hicle may cause a collision and result in
personal injury.
To help avoid loss of control:
• Do not rapidly apply the brakes.
• Do not rapidly release the accelerator
pedal.
• Do not rapidly turn the steering
wheel.
1. Remain calm and do not overreact.
2. Maintain a firm grip on the steering wheel with both hands and try to hold a
straight course.
3. When appropriate, slowly release the ac- celerator pedal to gradually slow the
vehicle.
4. Gradually steer the vehicle to a safe lo- cation off the road and away from traffic
if possible. 5. Lightly apply the brake pedal to gradu-
ally stop the vehicle.
6. Turn on the hazard warning flashers and contact a roadside emergency service
to change the tire. For additional infor-
mation, refer to “Changing a flat tire” in
the “In case of emergency” section of
this manual.
DRINKING ALCOHOL/DRUGS AND
DRIVING
WARNING
Never drive under the influence of alco-
hol or drugs. Alcohol in the blood-
stream reduces coordination, delays
reaction time and impairs judgement.
Driving af ter drinking alcohol increases
the likelihood of being involved in an
accident injuring yourself and others.
Additionally, if you are injured in an ac-
cident, alcohol can increase the sever-
ity of the injury.
5-10Starting and driving
Page 286 of 500
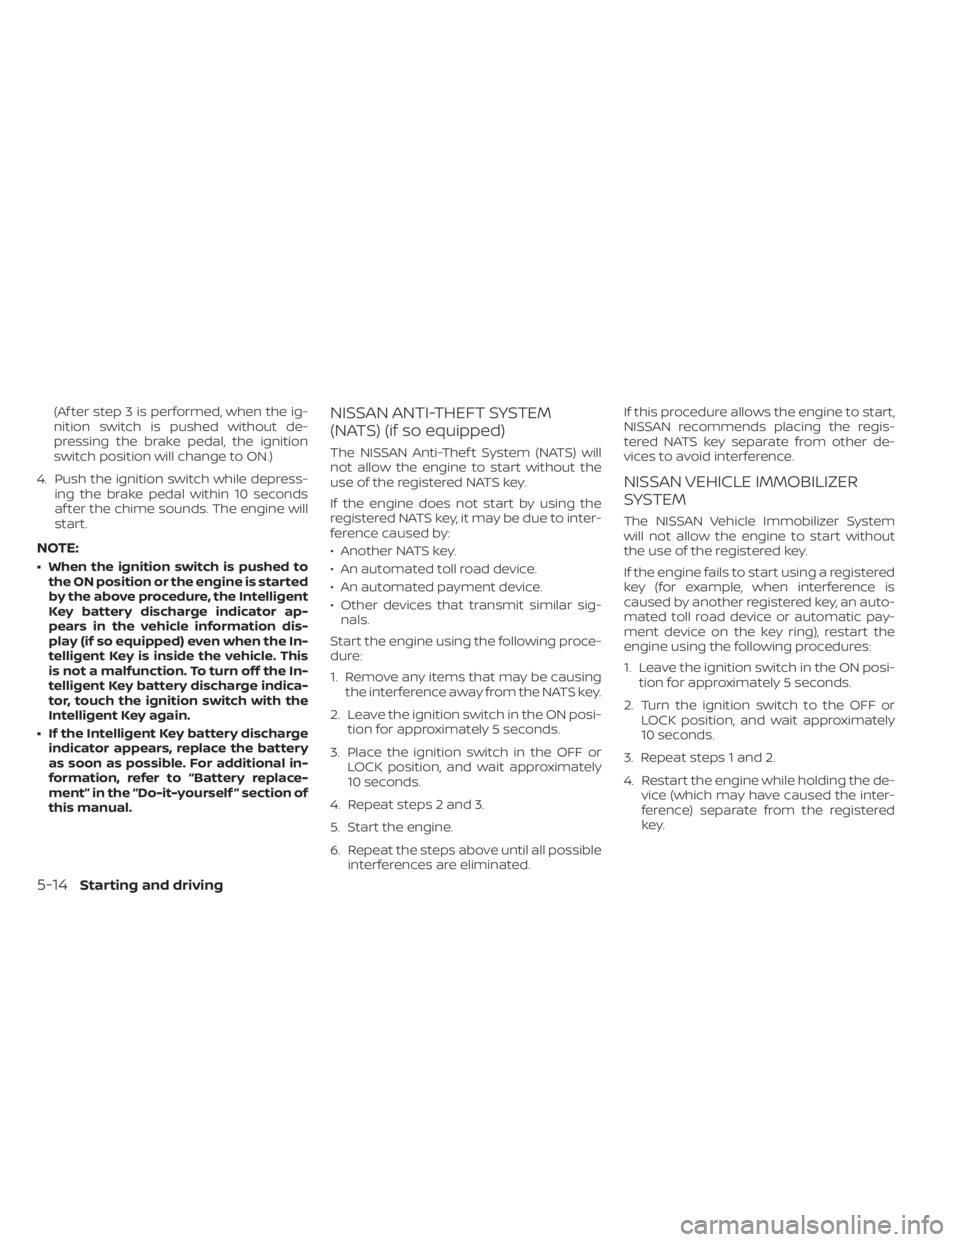
(Af ter step 3 is performed, when the ig-
nition switch is pushed without de-
pressing the brake pedal, the ignition
switch position will change to ON.)
4. Push the ignition switch while depress- ing the brake pedal within 10 seconds
af ter the chime sounds. The engine will
start.
NOTE:
• When the ignition switch is pushed tothe ON position or the engine is started
by the above procedure, the Intelligent
Key battery discharge indicator ap-
pears in the vehicle information dis-
play (if so equipped) even when the In-
telligent Key is inside the vehicle. This
is not a malfunction. To turn off the In-
telligent Key battery discharge indica-
tor, touch the ignition switch with the
Intelligent Key again.
• If the Intelligent Key battery discharge indicator appears, replace the battery
as soon as possible. For additional in-
formation, refer to “Battery replace-
ment” in the “Do-it-yourself ” section of
this manual.
NISSAN ANTI-THEFT SYSTEM
(NATS) (if so equipped)
The NISSAN Anti-Thef t System (NATS) will
not allow the engine to start without the
use of the registered NATS key.
If the engine does not start by using the
registered NATS key, it may be due to inter-
ference caused by:
• Another NATS key.
• An automated toll road device.
• An automated payment device.
• Other devices that transmit similar sig-nals.
Start the engine using the following proce-
dure:
1. Remove any items that may be causing the interference away from the NATS key.
2. Leave the ignition switch in the ON posi- tion for approximately 5 seconds.
3. Place the ignition switch in the OFF or LOCK position, and wait approximately
10 seconds.
4. Repeat steps 2 and 3.
5. Start the engine.
6. Repeat the steps above until all possible interferences are eliminated. If this procedure allows the engine to start,
NISSAN recommends placing the regis-
tered NATS key separate from other de-
vices to avoid interference.
NISSAN VEHICLE IMMOBILIZER
SYSTEM
The NISSAN Vehicle Immobilizer System
will not allow the engine to start without
the use of the registered key.
If the engine fails to start using a registered
key (for example, when interference is
caused by another registered key, an auto-
mated toll road device or automatic pay-
ment device on the key ring), restart the
engine using the following procedures:
1. Leave the ignition switch in the ON posi-
tion for approximately 5 seconds.
2. Turn the ignition switch to the OFF or LOCK position, and wait approximately
10 seconds.
3. Repeat steps 1 and 2.
4. Restart the engine while holding the de- vice (which may have caused the inter-
ference) separate from the registered
key.
5-14Starting and driving