2020 NISSAN KICKS reset
[x] Cancel search: resetPage 113 of 500
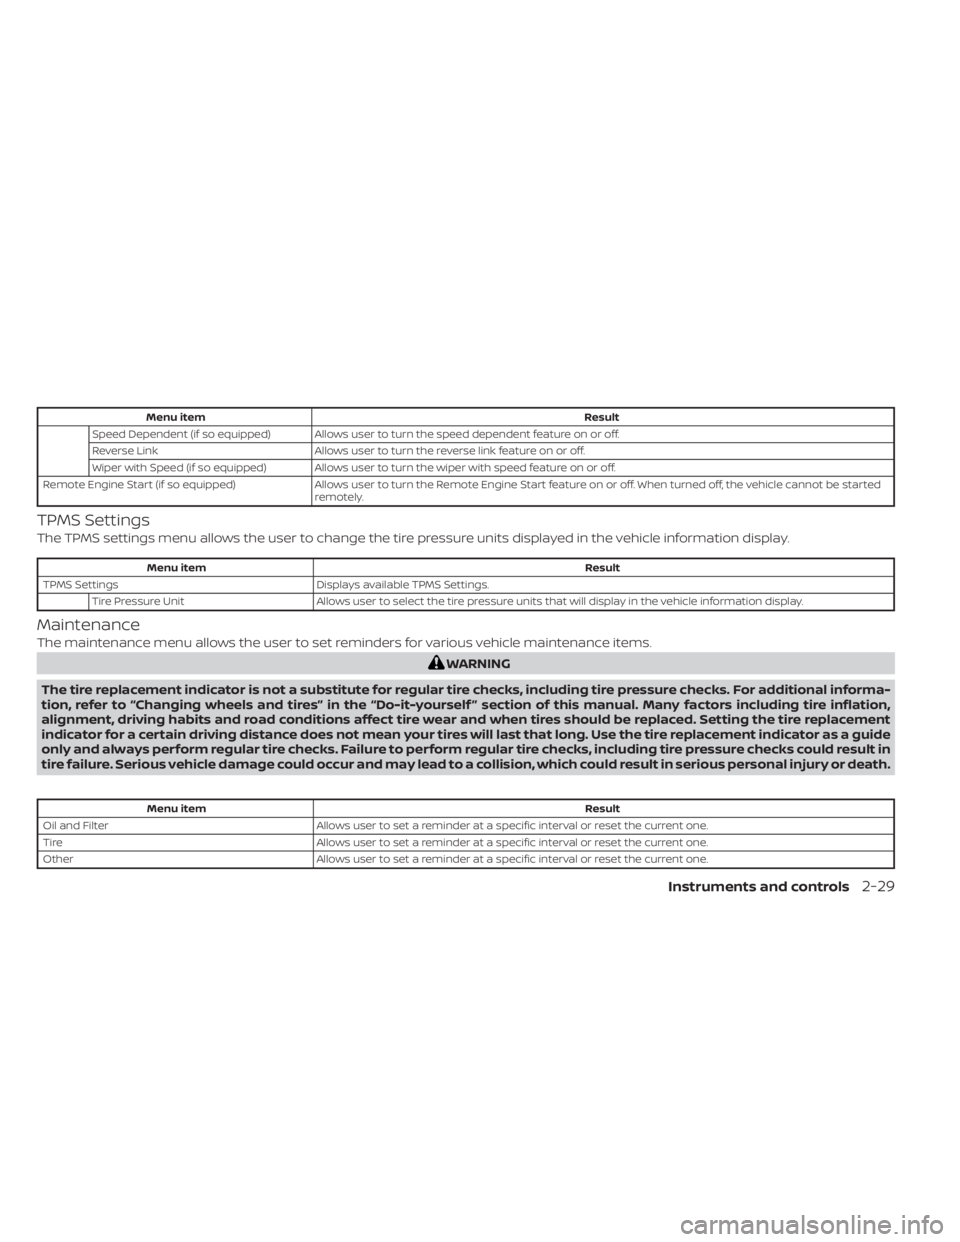
Menu itemResult
Speed Dependent (if so equipped) Allows user to turn the speed dependent feature on or off.
Reverse Link Allows user to turn the reverse link feature on or off.
Wiper with Speed (if so equipped) Allows user to turn the wiper with speed feature on or off.
Remote Engine Start (if so equipped) Allows user to turn the Remote Engine Start feature on or off. When turned off, the vehicle cannot be started
remotely.
TPMS Settings
The TPMS settings menu allows the user to change the tire pressure units displayed in the vehicle information display.
Menu item Result
TPMS Settings Displays available TPMS Settings.
Tire Pressure Unit Allows user to select the tire pressure units that will display in the vehicle information display.
Maintenance
The maintenance menu allows the user to set reminders for various vehicle maintenance items.
WARNING
The tire replacement indicator is not a substitute for regular tire checks, including tire pressure checks. For additional informa-
tion, refer to “Changing wheels and tires” in the “Do-it-yourself ” section of this manual. Many factors including tire inflation,
alignment, driving habits and road conditions affect tire wear and when tires should be replaced. Setting the tire replacement
indicator for a certain driving distance does not mean your tires will last that long. Use the tire replacement indicator as a guide
only and always perform regular tire checks. Failure to perform regular tire checks, including tire pressure checks could result in
tire failure. Serious vehicle damage could occur and may lead to a collision, which could result in serious personal injury or death.
Menu item Result
Oil and Filter Allows user to set a reminder at a specific interval or reset the current one.
Tire Allows user to set a reminder at a specific interval or reset the current one.
Other Allows user to set a reminder at a specific interval or reset the current one.
Instruments and controls2-29
Page 114 of 500

Clock
Menu itemResult
Clock Allows user to adjust the clock settings and time within the vehicle information display. Adjustments that can
be made include manually setting the time and 12H/24H format.
If these options do not appear, the clock must be set within the center display. For additional information, re-
fer to the separate NissanConnect® Owner’s Manual (if so equipped).
Unit/Language
The unit/language menu allows the user to change the units shown in the vehicle information display.
Menu item Result
Mileage/Fuel Displays the available mileage/fuel display units and allows user to select preferred unit for display.
Tire Pressures Allows user to select the tire pressure display units.
Temperature Allows user to select the temperature display units.
Language Displays the available language options and allows user to select preferred language for display.
Factory Reset
The factory reset menu allows the user to restore the vehicle information display settings to factory status.
Menu item Result
Factory Reset Allows user to reset the vehicle information display settings to the original factory settings. Once selected,
the user can confirm or cancel the reset.
2-30Instruments and controls
Page 119 of 500

• Blind Spot Warning (BSW)
• Rear Cross Traffic Alert (RCTA)
If one or more of these warning appears,
have the system checked. It is recom-
mended that you visit a NISSAN dealer for
this service.
Shipping Mode On Push Storage Fuse
This warning may appear if the extended
storage switch is not pushed in. When this
warning appears, push in the extended
storage switch to turn off the warning. For
additional information, refer to “Extended
storage switch” in this section.
CVT Error: See Owner's Manual
This warning illuminates when there is a
problem with the CVT system. If this warn-
ing comes on, have the system checked. It
is recommended that you visit a NISSAN
dealer for this service.
Steering lock release malfunction
indicator (if so equipped)
This indicator appears when the steering
lock cannot be released.
If this indicator appears, push the ignition
switch while lightly turning the steering
wheel right and lef t.
Illumination indicator
This indicator shows the illumination ad-
justment of the instrument panel. For addi-
tional information, refer to “Instrument
brightness control” in this section.
Transmission Shif t Position indicator
(if so equipped)
This indicator shows the transmission shif t
position.
High Coolant Temp: See Owner’s
Manual
This warning appears when the tempera-
ture of the engine coolant is too high. Stop
the vehicle in a safe location as soon as
possible. Avoid quick starting or abrupt ac-
celeration. When the warning turns off, the
vehicle can be driven.
If the warning appears again soon af ter it
turns off, have the vehicle checked. It is rec-
ommended that you visit a NISSAN dealer
for this service.
Outside Temperature Display
The outside temperature display appears
in the center region of the vehicle informa-
tion display.
Low Outside Temperature
This warning appears if the outside tem-
perature is below 37°F (3°C). The tempera-
ture can be changed to display in Celsius or
Fahrenheit. For additional information, re-
fer to “Settings” in this section.
Oil and Filter
This indicator appears when the customer
set distance comes for changing the en-
gine oil and filter. You can set or reset the
distance for checking or replacing these
items. For scheduled maintenance items
and intervals, refer to the “Maintenance and
schedules” section of this manual.
Tire
This indicator appears when the customer
set distance is reached for replacing tires.
You can set or reset the distance for replac-
ing tires.
Instruments and controls2-35
Page 120 of 500
WARNING
The tire replacement indicator is not a
substitute for regular tire checks, in-
cluding tire pressure checks. For addi-
tional information, refer to “Changing
wheels and tires” in the “Do-it-yourself ”
section of this manual. Many factors in-
cluding tire inflation, alignment, driving
habits and road conditions affect tire
wear and when tires should be re-
placed. Setting the tire replacement in-
dicator for a certain driving distance
does not mean your tires will last that
long. Use the tire replacement indicator
as a guide only and always perform
regular tire checks. Failure to perform
regular tire checks, including tire pres-
sure checks could result in tire failure.
Serious vehicle damage could occur
and may lead to a collision, which could
result in serious personal injury or
death.
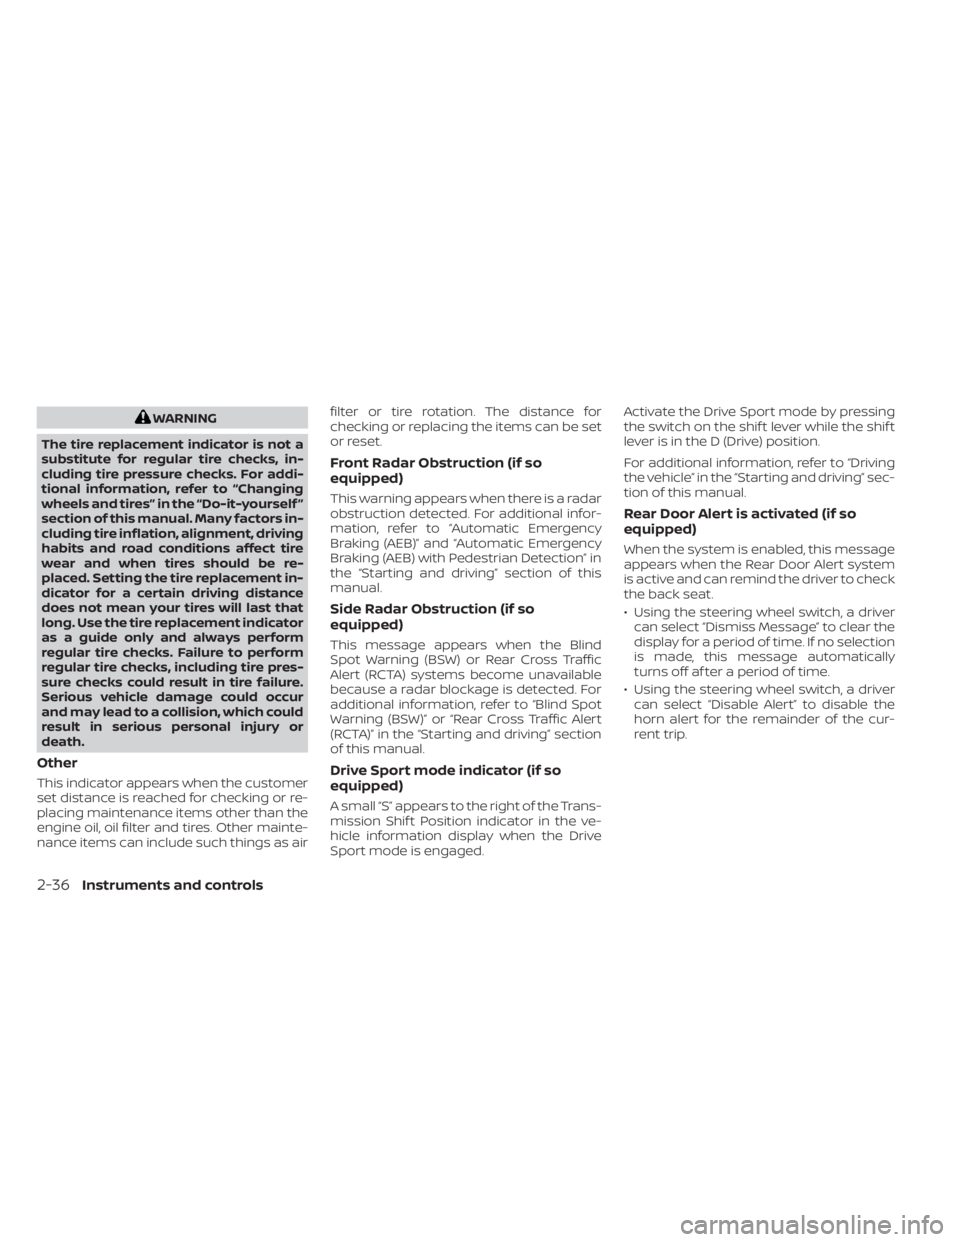
Other
This indicator appears when the customer
set distance is reached for checking or re-
placing maintenance items other than the
engine oil, oil filter and tires. Other mainte-
nance items can include such things as air filter or tire rotation. The distance for
checking or replacing the items can be set
or reset.
Front Radar Obstruction (if so
equipped)
This warning appears when there is a radar
obstruction detected. For additional infor-
mation, refer to “Automatic Emergency
Braking (AEB)” and “Automatic Emergency
Braking (AEB) with Pedestrian Detection” in
the “Starting and driving” section of this
manual.
Side Radar Obstruction (if so
equipped)
This message appears when the Blind
Spot Warning (BSW) or Rear Cross Traffic
Alert (RCTA) systems become unavailable
because a radar blockage is detected. For
additional information, refer to “Blind Spot
Warning (BSW)” or “Rear Cross Traffic Alert
(RCTA)” in the “Starting and driving” section
of this manual.
Drive Sport mode indicator (if so
equipped)
A small “S” appears to the right of the Trans-
mission Shif t Position indicator in the ve-
hicle information display when the Drive
Sport mode is engaged.Activate the Drive Sport mode by pressing
the switch on the shif t lever while the shif t
lever is in the D (Drive) position.
For additional information, refer to “Driving
the vehicle” in the “Starting and driving” sec-
tion of this manual.
Rear Door Alert is activated (if so
equipped)
When the system is enabled, this message
appears when the Rear Door Alert system
is active and can remind the driver to check
the back seat.
• Using the steering wheel switch, a driver
can select “Dismiss Message” to clear the
display for a period of time. If no selection
is made, this message automatically
turns off af ter a period of time.
• Using the steering wheel switch, a driver can select “Disable Alert” to disable the
horn alert for the remainder of the cur-
rent trip.
2-36Instruments and controls
Page 130 of 500
NOTE:
Autolight activation sensitivity and
the time delay for autolight shutoff
can be adjusted. For additional infor-
mation, refer to “Vehicle information
display ” in this section.
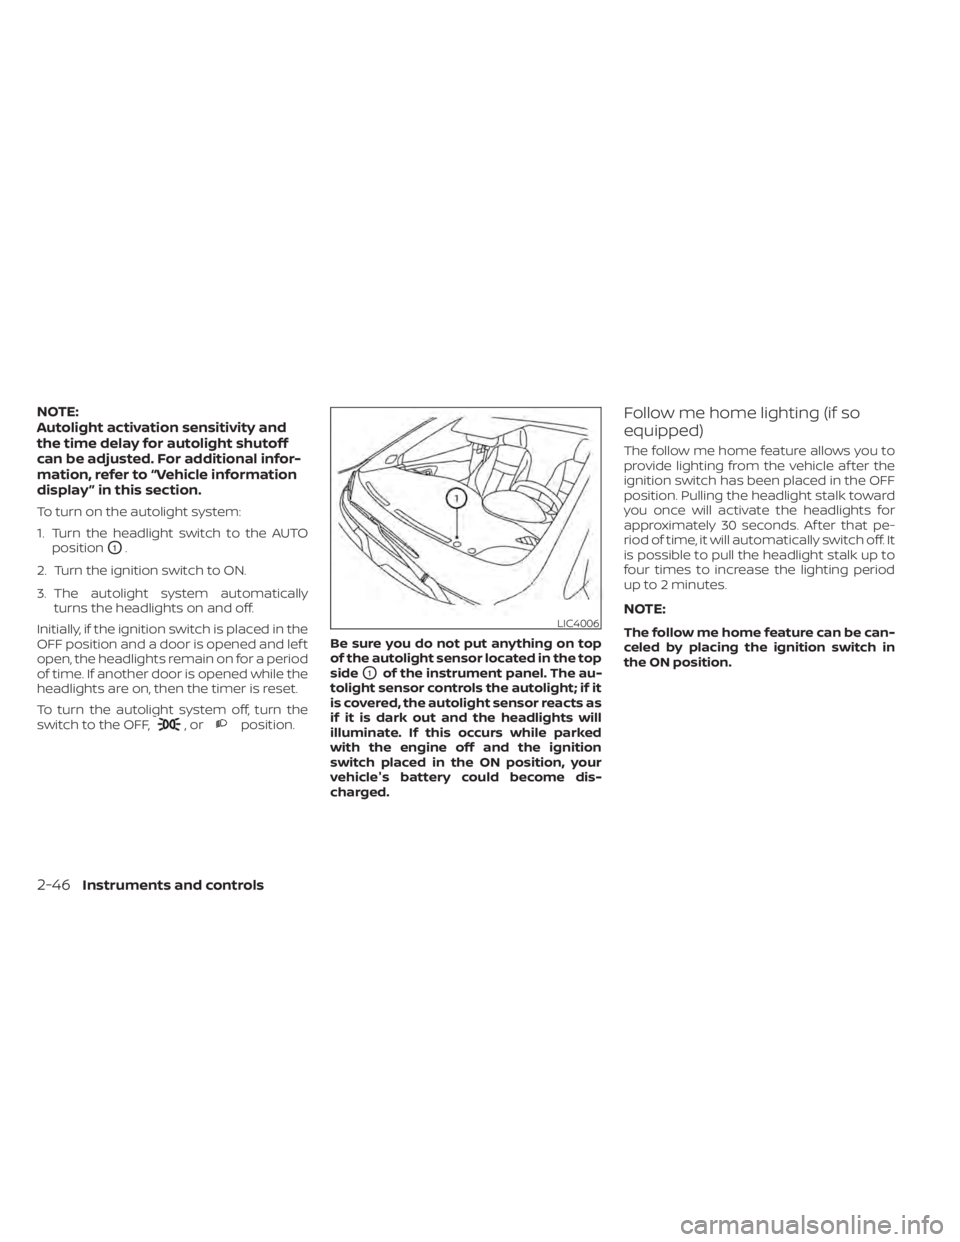
To turn on the autolight system:
1. Turn the headlight switch to the AUTOposition
O1.
2. Turn the ignition switch to ON.
3. The autolight system automatically turns the headlights on and off.
Initially, if the ignition switch is placed in the
OFF position and a door is opened and lef t
open, the headlights remain on for a period
of time. If another door is opened while the
headlights are on, then the timer is reset.
To turn the autolight system off, turn the
switch to the OFF,
,orposition. Be sure you do not put anything on top
of the autolight sensor located in the top
side
O1of the instrument panel. The au-
tolight sensor controls the autolight; if it
is covered, the autolight sensor reacts as
if it is dark out and the headlights will
illuminate. If this occurs while parked
with the engine off and the ignition
switch placed in the ON position, your
vehicle's battery could become dis-
charged.
Follow me home lighting (if so
equipped)
The follow me home feature allows you to
provide lighting from the vehicle af ter the
ignition switch has been placed in the OFF
position. Pulling the headlight stalk toward
you once will activate the headlights for
approximately 30 seconds. Af ter that pe-
riod of time, it will automatically switch off. It
is possible to pull the headlight stalk up to
four times to increase the lighting period
up to 2 minutes.
NOTE:
The follow me home feature can be can-
celed by placing the ignition switch in
the ON position.LIC4006
2-46Instruments and controls
Page 139 of 500
WARNING
The Rear Sonar System is a conve-
nience but it is not a substitute for
proper backing. Always turn and check
that it is safe to do so before backing
up. Always back up slowly.
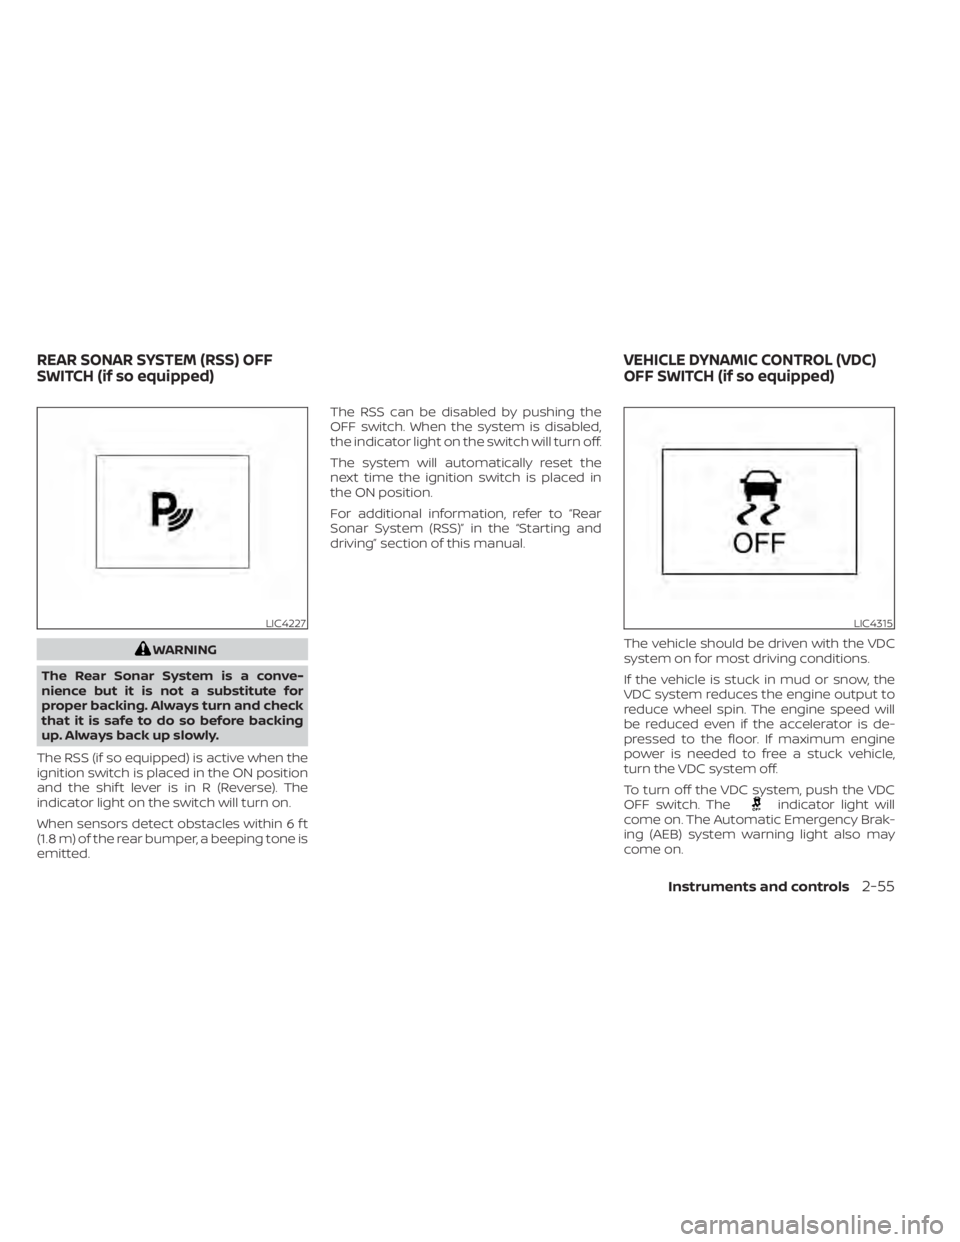
The RSS (if so equipped) is active when the
ignition switch is placed in the ON position
and the shif t lever is in R (Reverse). The
indicator light on the switch will turn on.
When sensors detect obstacles within 6 f t
(1.8 m) of the rear bumper, a beeping tone is
emitted. The RSS can be disabled by pushing the
OFF switch. When the system is disabled,
the indicator light on the switch will turn off.
The system will automatically reset the
next time the ignition switch is placed in
the ON position.
For additional information, refer to “Rear
Sonar System (RSS)” in the “Starting and
driving” section of this manual.
The vehicle should be driven with the VDC
system on for most driving conditions.
If the vehicle is stuck in mud or snow, the
VDC system reduces the engine output to
reduce wheel spin. The engine speed will
be reduced even if the accelerator is de-
pressed to the floor. If maximum engine
power is needed to free a stuck vehicle,
turn the VDC system off.
To turn off the VDC system, push the VDC
OFF switch. The
indicator light will
come on. The Automatic Emergency Brak-
ing (AEB) system warning light also may
come on.
LIC4227LIC4315
REAR SONAR SYSTEM (RSS) OFF
SWITCH (if so equipped) VEHICLE DYNAMIC CONTROL (VDC)
OFF SWITCH (if so equipped)
Instruments and controls2-55
Page 179 of 500
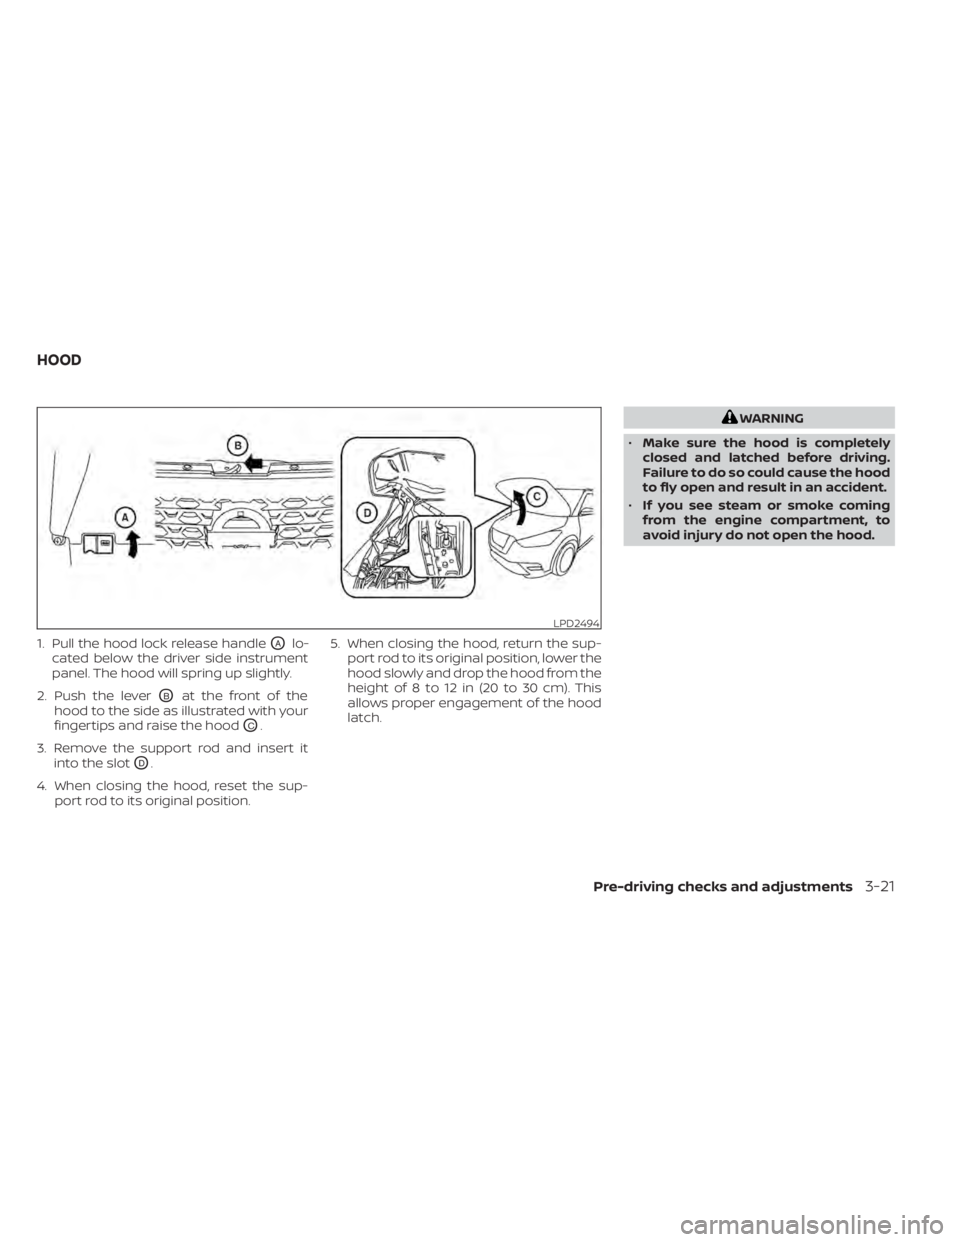
1. Pull the hood lock release handleOAlo-
cated below the driver side instrument
panel. The hood will spring up slightly.
2. Push the lever
OBat the front of the
hood to the side as illustrated with your
fingertips and raise the hood
OC.
3. Remove the support rod and insert it into the slot
OD.
4. When closing the hood, reset the sup- port rod to its original position. 5. When closing the hood, return the sup-
port rod to its original position, lower the
hood slowly and drop the hood from the
height of 8 to 12 in (20 to 30 cm). This
allows proper engagement of the hood
latch.
WARNING
• Make sure the hood is completely
closed and latched before driving.
Failure to do so could cause the hood
to fly open and result in an accident.
• If you see steam or smoke coming
from the engine compartment, to
avoid injury do not open the hood.
LPD2494
HOOD
Pre-driving checks and adjustments3-21
Page 235 of 500
General notes for USB use
• For additional information, refer to yourdevice manufacturer's owner informa-
tion regarding the proper use and care of
the device.
Notes for iPod® use
iPod® is a trademark of Apple Inc., regis-
tered in the U.S. and other countries.
• Improperly plugging in the iPod® may cause a checkmark to be displayed on
and off (flickering). Always make sure that
the iPod® is connected properly.
• An iPod® nano (1st Generation) may re- main in fast forward or rewind mode if it is
connected during a seek operation. In
this case, please manually reset the
iPod®.
• An iPod® nano (2nd Generation) will con- tinue to fast-forward or rewind if it is dis-
connected during a seek operation.
• An incorrect song title may appear when the Play Mode is changed while using an
iPod® nano (2nd Generation).
• Audiobooks may not play in the same order as they appear on an iPod®.
• Large video files cause slow responses in an iPod®. The vehicle center display may
momentarily black out, but will soon re-
cover. • If an iPod® automatically selects large
video files while in the shuffle mode, the
vehicle center display may momentarily
black out, but will soon recover.
iPod®* player
• Some characters used in other lan-guages (Chinese, Japanese, etc.) are not
displayed properly on the vehicle center
screen. We recommend using English or
Spanish language characters with an
iPod®.
• Large video podcast files cause slow re- sponses in the iPod®. The vehicle center
display may momentarily black out, but it
will soon recover.
• If the iPod® automatically selects large video podcast files while in the shuffle
mode, the vehicle center display may
momentarily black out, but it will soon
recover.
• Improperly plugging in the iPod® may cause a checkmark to be displayed on
and off (flickering). Always make sure that
the iPod® is connected properly.
• The iPod® nano (2nd Generation) will con- tinue to fast forward or rewind if it is dis-
connected during a seek operation. • An incorrect song title may appear when
the Play Mode is changed while using the
iPod® nano (2nd Generation).
• Audiobooks may not play in the same order as they appear on the iPod®.
• The iPod® nano (1st Generation) may re- main in fast forward or rewind mode if it is
connected during a seek operation. In
this case, please manually reset the
iPod®.
• If you are using an iPod® (3rd Generation with Dock connector), do not use very
long names for the song title, album
name or artist name to prevent the iPod®
from resetting itself.
• Be careful not to do the following, or the cable could be damaged and a loss of
function may occur:– Bend the cable excessively (1.6 in (40 mm) radius maximum).
– Twist the cable excessively (more than 180 degrees).
– Pull or drop the cable.
– Do not force the iPod® cable connector into the device port.
– Close the center console lid on the cable or connectors.
– Store objects with sharp edges in the storage where the cable is stored.
Monitor, climate, audio, phone and voice recognition systems4-47