2020 NISSAN KICKS towing
[x] Cancel search: towingPage 219 of 500
TURNING MOD ON AND OFF (if so
equipped)
Some vehicles include the option to allow
the MOD system to be turned on or off in
the vehicle information display.
To turn the MOD system on or off:
1. Using
buttons on the steering
wheel to select “Settings”.
2. Select “Driver Assistance” and press the OK button.
3. Select “Parking Aids”.
4. Toggle ON or OFF “Moving Object” using the OK button.
MOD SYSTEM LIMITATIONS
WARNING
Listed below are the system limitations
for MOD. Failure to operate the vehicle
in accordance with these system limi-
tations could result in serious injury or
death.
• Do not use the MOD system when
towing a trailer. The system may not
function properly. •
Excessive noise (for example, audio
system volume or open vehicle win-
dow) will interfere with the chime
sound, and it may not be heard.
• The MOD system performance will be
limited according to environmental
conditions and surrounding objects
such as:
– When there is low contrast be-
tween background and the mov-
ing objects.
– When there is a blinking source of
light.
– When strong light such as another
vehicle’s headlight or sunlight is
present.
– When camera orientation is not in
its usual position, such as when a
mirror is folded.
– When there is dirt, water drops or
snow on the camera lens.
– When the position of the moving
objects in the display is not
changed.
• The MOD system might detect flow-
ing water droplets on the camera
lens, white smoke from the muffler,
moving shadows, etc. •
The MOD system may not function
properly depending on the speed, di-
rection, distance or shape of the
moving objects.
• If your vehicle sustains damage to
the parts where the camera is in-
stalled, leaving it misaligned or bent,
the sensing zone may be altered and
the MOD system may not detect ob-
jects properly.
• When the temperature is extremely
high or low, the screen may not dis-
play objects clearly. This is not a
malfunction.
NOTE:
The blue MOD icon will change to or-
ange if one of the following has oc-
curred
• When the system is malfunctioning.
• When the component temperature reaches a high level (icon will blink).
• When the RearView camera has detected a blockage (icon will blink).
If the icon light continues to illuminate
orange, have the MOD system checked. It
is recommended that you visit a NISSAN
dealer for this service.
Monitor, climate, audio, phone and voice recognition systems4-31
Page 292 of 500
Shif t lock release
If the battery charge is low or discharged,
the shif t lever may not be moved from the
P (Park) position even with the brake pedal
depressed and the shif t lever button
pressed.
It will be necessary to jump start or have
your battery charged. For additional infor-
mation, refer to “Jump starting” in the “In
case of emergency” section of this manual.
It is recommended that you visit a NISSAN
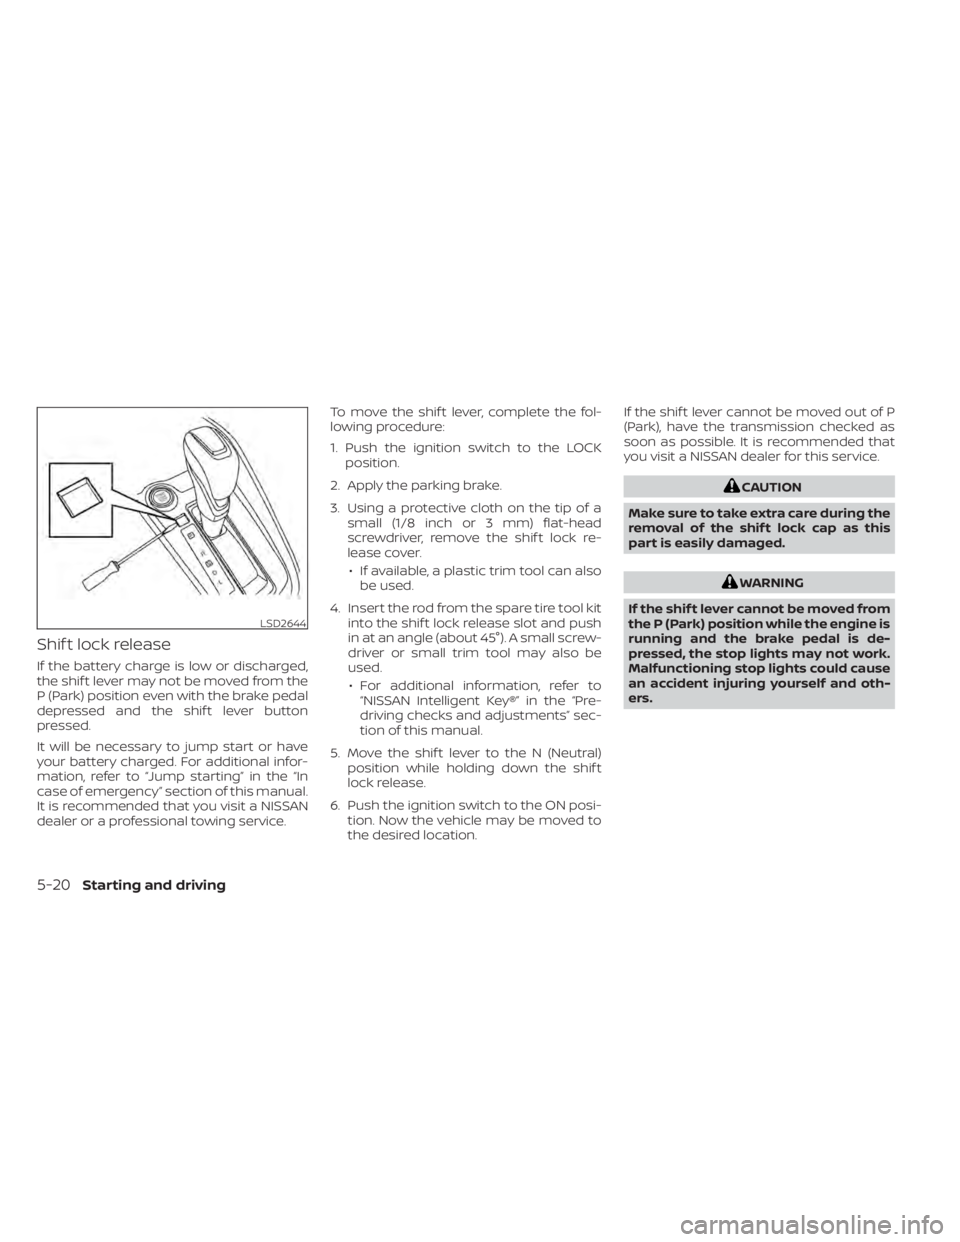
dealer or a professional towing service.To move the shif t lever, complete the fol-
lowing procedure:
1. Push the ignition switch to the LOCK
position.
2. Apply the parking brake.
3. Using a protective cloth on the tip of a small (1/8 inch or 3 mm) flat-head
screwdriver, remove the shif t lock re-
lease cover.
• If available, a plastic trim tool can also be used.
4. Insert the rod from the spare tire tool kit into the shif t lock release slot and push
in at an angle (about 45°). A small screw-
driver or small trim tool may also be
used.
• For additional information, refer to “NISSAN Intelligent Key®” in the “Pre-
driving checks and adjustments” sec-
tion of this manual.
5. Move the shif t lever to the N (Neutral) position while holding down the shif t
lock release.
6. Push the ignition switch to the ON posi- tion. Now the vehicle may be moved to
the desired location. If the shif t lever cannot be moved out of P
(Park), have the transmission checked as
soon as possible. It is recommended that
you visit a NISSAN dealer for this service.
CAUTION
Make sure to take extra care during the
removal of the shif t lock cap as this
part is easily damaged.
WARNING
If the shif t lever cannot be moved from
the P (Park) position while the engine is
running and the brake pedal is de-
pressed, the stop lights may not work.
Malfunctioning stop lights could cause
an accident injuring yourself and oth-
ers.
LSD2644
5-20Starting and driving
Page 294 of 500
OFF position:
For normal driving and fuel economy, use
the OFF position.
ON position:
For driving up or down long slopes where
engine braking is necessary, or for powerful
acceleration, use the ON position. The
transmission will automatically select a dif-
ferent gear ratio, allowing the engine to
provide high output.
Remember not to drive at high speeds for
extended periods of time with the over-
drive OFF mode in the ON position. This
reduces fuel economy.
Accelerator downshif t
— in D (Drive) position —
For passing or hill climbing, depress the
accelerator pedal to the floor. This shif ts
the transmission down into a lower gear,
depending on the vehicle speed.
High fluid temperature protection
mode
This transmission has a high fluid tem-
perature protection mode. If the fluid tem-
perature becomes too high (for example,
when climbing steep grades in high tem-peratures with heavy loads, such as when
towing a trailer), engine power and, under
some conditions, vehicle speed will be de-
creased automatically to reduce the
chance of transmission damage. Vehicle
speed can be controlled with the accelera-
tor pedal, but the engine and vehicle speed
may be limited.
Fail-safe
If the vehicle is driven under extreme
conditions, such as excessive wheel
spinning and subsequent hard braking,
the fail-safe system may be activated.
The Malfunction Indicator Light (MIL)
may come on to indicate the fail-safe
mode is activated. For additional infor-
mation, refer to “Malfunction Indicator
Light (MIL)” in the “Instruments and con-
trols” section of this manual. This will oc-
cur even if all electrical circuits are func-
tioning properly. In this case, place the
ignition switch in the OFF position and
wait for 10 seconds. Then push the
switch back to the ON position. The ve-
hicle should return to its normal operat-
ing condition. If it does not return to its
normal operating condition, have the
transmission checked and repaired, if
necessary. It is recommended that you
visit a NISSAN dealer for this service.
WARNING
When the high fluid temperature pro-
tection mode or fail-safe operation oc-
curs, vehicle speed may be gradually
reduced. The reduced speed may be
lower than other traffic, which could in-
crease the chance of a collision. Be es-
pecially careful when driving. If neces-
sary, pull to the side of the road at a safe
place and allow the transmission to re-
turn to normal operation, or have it re-
paired if necessary.
5-22Starting and driving
Page 300 of 500
LDW SYSTEM LIMITATIONS
WARNING
Listed below are the system limitations
for the LDW system. Failure to follow
the warnings and instructions for
proper use of the LDW system could re-
sult in serious injury or death.
• The system will not operate at
speeds below approximately 37 mph
(60 km/h) or if it cannot detect lane
markers.
• Do not use the LDW system under the
following conditions as it may not
function properly:
– During bad weather (rain, fog,
snow, etc.).
– When driving on slippery roads,
such as on ice or snow.
– When driving on winding or un-
even roads.
– When there is a lane closure due to
road repairs.
– When driving in a makeshif t or
temporary lane.
– When driving on roads where the
lane width is too narrow. –
When driving without normal tire
conditions (for example, tire wear,
low tire pressure, installation of
spare tire, tire chains, nonstan-
dard wheels).
– When the vehicle is equipped with
non-original brake parts or sus-
pension parts.
– When you are towing a trailer or
other vehicle.
• The system may not function prop-
erly under the following conditions:
– On roads where there are multiple
parallel lane markers; lane mark-
ers that are faded or not painted
clearly; yellow painted lane mark-
ers; non-standard lane markers;
or lane markers covered with wa-
ter, dirt, snow, etc.
– On roads where the discontinued
lane markers are still detectable.
– On roads where there are sharp
curves. –
On roads where there are sharply
contrasting objects, such as shad-
ows, snow, water, wheel ruts,
seams or lines remaining af ter
road repairs. (The LDW system
could detect these items as lane
markers.)
– On roads where the traveling lane
merges or separates.
– When the vehicle’s traveling direc-
tion does not align with the lane
marker.
– When traveling close to the ve-
hicle in front of you, which ob-
structs the lane camera unit de-
tection range.
– When rain, snow, dirt or an object
adheres to the windshield in front
of the lane camera unit.
– When the headlights are not
bright due to dirt on the lens or if
the aiming is not adjusted
properly.
– When strong light enters the lane
camera unit. (For example, the
light directly shines on the front of
the vehicle at sunrise or sunset.)
5-28Starting and driving
Page 387 of 500
6 In case of emergency
Hazard warning flasher switch..................6-2
Emergency engine shut off ......................6-2
Flat tire ..........................................6-3
Tire Pressure Monitoring System
(TPMS) .......................................6-3
Changing a flat tire ...........................6-4
Jump starting ...................................6-9 Push starting
.................................... 6-11
If your vehicle overheats .........................6-11
Towing your vehicle ............................ 6-12
Towing recommended by NISSAN ...........6-13
Vehicle recovery (freeing a stuck
vehicle) ...................................... 6-14
Page 398 of 500
3. Get out of the vehicle. Look and listen forsteam or coolant escaping from the ra-
diator before opening the hood. (If
steam or coolant is escaping, turn off
the engine.) Do not open the hood fur-
ther until no steam or coolant can be
seen.
4. Open the engine hood.
WARNING
If steam or water is coming from the
engine, stand clear to prevent getting
burned.
5. Visually check drive belts for damage or looseness. Also check if the cooling fan
is running. The radiator hoses and radia-
tor should not leak water. If coolant is
leaking, the water pump belt is missing
or loose, or the cooling fan does not run,
stop the engine.
WARNING
Be careful not to allow your hands, hair,
jewelry or clothing to come into con-
tact with, or get caught in, engine belts
or the engine cooling fan. The engine
cooling fan can start at any time. 6. Af ter the engine cools down, check the
coolant level in the engine coolant res-
ervoir with the engine running. Add cool-
ant to the engine coolant reservoir, if
necessary. Have your vehicle repaired. It
is recommended that you visit a NISSAN
dealer for this service.
When towing your vehicle, all State (Provincial
in Canada) and local regulations for towing
must be followed. Incorrect towing equip-
ment could damage your vehicle. Towing in-
structions are available from a NISSAN
dealer. Local service operators are generally
familiar with the applicable laws and proce-
dures for towing. To assure proper towing
and to prevent accidental damage to your
vehicle, NISSAN recommends having a ser-
vice operator tow your vehicle. It is advisable
to have the service operator carefully read
the following precautions:
WARNING
• Never ride in a vehicle that is being
towed.
• Never get under your vehicle af ter it
has been lif ted by a tow truck.
CAUTION
•
When towing, make sure that the trans-
mission, axles, steering system and
powertrain are in working condition. If
any of these conditions apply, dollies or
a flatbed tow truck must be used.
• Always attach safety chains before
towing.
TOWING YOUR VEHICLE
6-12In case of emergency
Page 399 of 500
For additional information, refer to “Flat
towing” in the “Technical and consumer in-
formation” section of this manual.
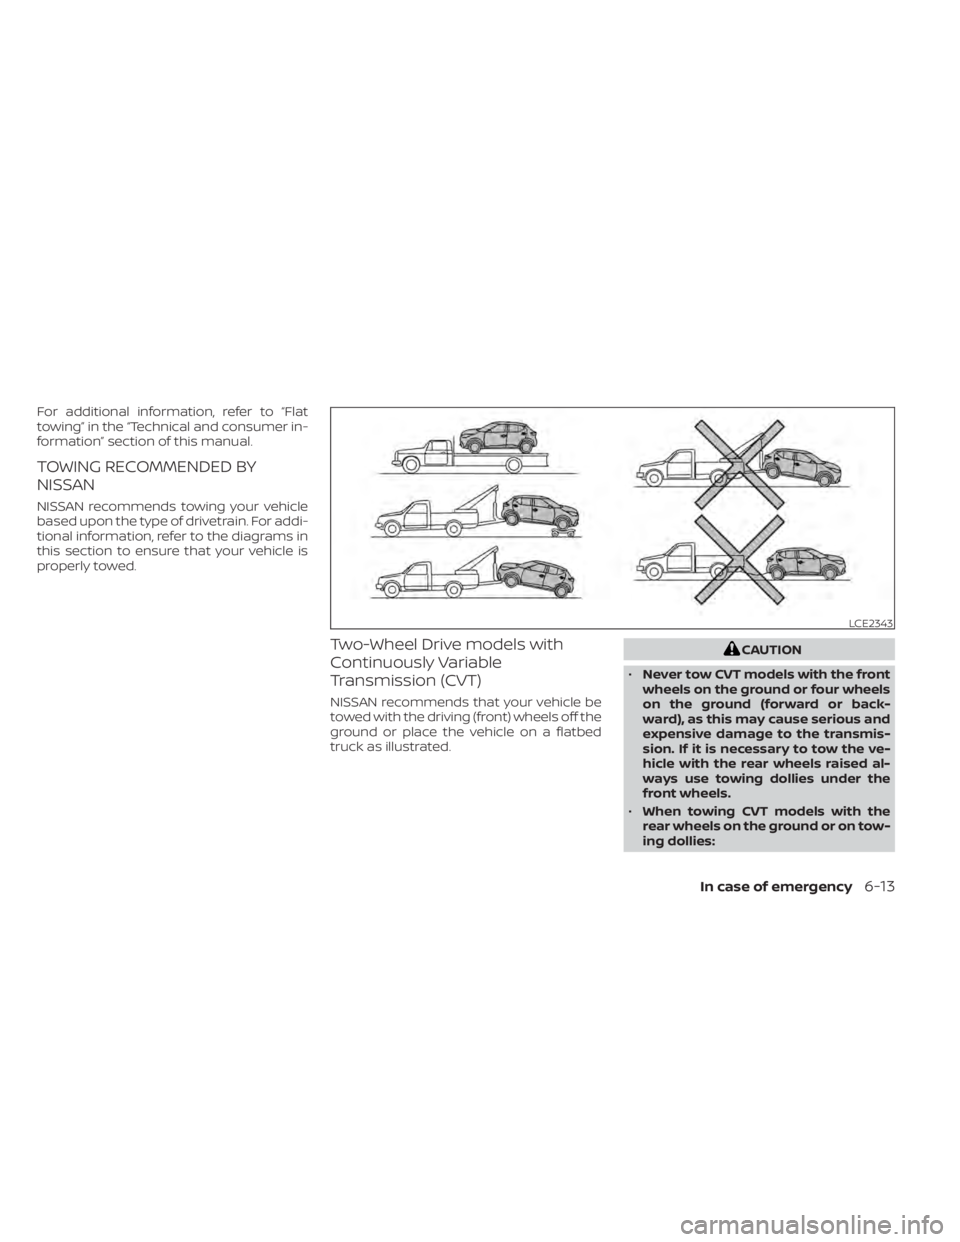
TOWING RECOMMENDED BY
NISSAN
NISSAN recommends towing your vehicle
based upon the type of drivetrain. For addi-
tional information, refer to the diagrams in
this section to ensure that your vehicle is
properly towed.
Two-Wheel Drive models with
Continuously Variable
Transmission (CVT)
NISSAN recommends that your vehicle be
towed with the driving (front) wheels off the
ground or place the vehicle on a flatbed
truck as illustrated.
CAUTION
• Never tow CVT models with the front
wheels on the ground or four wheels
on the ground (forward or back-
ward), as this may cause serious and
expensive damage to the transmis-
sion. If it is necessary to tow the ve-
hicle with the rear wheels raised al-
ways use towing dollies under the
front wheels.
• When towing CVT models with the
rear wheels on the ground or on tow-
ing dollies:
LCE2343
In case of emergency6-13
Page 400 of 500
–Place the ignition switch in the
OFF position, and secure the
steering wheel in a straight-ahead
position with a rope or similar de-
vice. Never secure the steering
wheel by placing the ignition
switch in the LOCK position. This
may damage the steering lock
mechanism (for models with a
steering lock mechanism).
VEHICLE RECOVERY (freeing a
stuck vehicle)
WARNING
To avoid vehicle damage, serious per-
sonal injury or death when recovering a
stuck vehicle:
• Contact a professional towing ser-
vice to recover the vehicle if you have
any questions regarding the recov-
ery procedure.
• Tow chains or cables must be at-
tached only to main structural mem-
bers of the vehicle.
• Do not use the vehicle tie-downs to
tow or free a stuck vehicle. •
Only use devices specifically de-
signed for vehicle recovery and fol-
low the manufacturer's instructions.
• Always pull the recovery device
straight out from the front of the ve-
hicle. Never pull at an angle.
• Route recovery devices so they do
not touch any part of the vehicle ex-
cept the attachment point.
If your vehicle is stuck in sand, snow, mud,
etc., use a tow strap or other device de-
signed specifically for vehicle recovery. Al-
ways follow the manufacturer's instruc-
tions for the recovery device.
Rocking a stuck vehicle
WARNING
• Stand clear of a stuck vehicle.
• Do not spin your tires at high speed.
This could cause them to explode
and result in serious injury. Parts of
your vehicle could also overheat and
be damaged. If your vehicle is stuck in sand, snow, mud,
etc., use the following procedure:
1. Turn off the Vehicle Dynamic Control
(VDC) system .
2. Make sure the area in front and behind the vehicle is clear of obstructions.
3. Turn the steering wheel right and lef t to clear an area around the front tires.
4. Slowly rock the vehicle forward and backward.
• Shif t back and forth between R (Re- verse) and D (Drive).
• Apply the accelerator as little as pos- sible to maintain the rocking motion.
• Release the accelerator pedal before shif ting between R (Reverse) and D
(Drive).
• Do not spin the tires above 34 mph (55 km/h).
5. If the vehicle cannot be freed af ter a few tries, contact a professional towing ser-
vice to remove the vehicle.
6-14In case of emergency