2020 NISSAN 370Z warning light
[x] Cancel search: warning lightPage 197 of 455
REARVIEW MONITOR SYSTEM LIM-
ITATIONS
WARNING
Listed below are the system limita-
tions for RearView Monitor. Failure to
operate the vehicle in accordance
with these system limitations could
result in serious injury or death.
.The system cannot completely
eliminate blind spots and may
not show every object.
. Underneath the bumper and the
corner areas of the bumper can-
not be viewed on the RearView
Monitor because of its monitoring
range limitation. The system will
not show small objects below the
bumper, and may not show ob-
jects close to the bumper or on
the ground.
. Objects viewed in the RearView
Monitor differ from actual dis-
tance because a wide-angle lens
is used.
. Objects in the RearView Monitor
will appear visually opposite
compared to when viewed in the
rear view and outside mirrors. .
Use the displayed lines as a re-
ference. The lines are highly af-
fected by the number of
occupants, fuel level, vehicle po-
sition, road conditions and road
grade.
. Make sure that the trunk lid or
rear hatch is securely closed
when backing up.
. Do not put anything on the rear
view camera. The rear view cam-
era is installed above the license
plate.
. When washing the vehicle with
high-pressure water, be sure not
to spray it around the camera.
Otherwise, water may enter the
camera unit causing water con-
densation on the lens, a malfunc-
tion, fire or an electric shock.
. Do not strike the camera. It is a
precision instrument. Otherwise,
it may malfunction or cause da-
mage resulting in a fire or an
electric shock.
The following are operating limitations
and do not represent a system malfunc-
tion:
. When the temperature is extremely
high or low, the screen may not clearly display objects.
. When strong light is directly coming
on the camera, objects may not be
displayed clearly.
. Vertical lines may be seen in objects
on the screen. This is due to strong
reflected light from the bumper.
. The screen may flicker under fluores-
cent light.
. The colors of objects on the RearView
Monitor may differ somewhat from
the actual color of objects.
. Objects on the monitor may not be
clear in a dark environment.
. If dirt, rain or snow accumulates on
the camera, the RearView Monitor
may not display objects clearly. Clean
the camera.
. Do not use wax on the camera win-
dow. Wipe off any wax with a clean
cloth dampened with mild detergent
diluted with water.
Center display, heater, air conditioner, audio, phone and voice recognition systems4-29
Page 302 of 455
5-4Starting and driving
main continuously illuminated. This se-
quence will continue upon subsequent
vehicle start-ups as long as the malfunc-
tion exists. When the malfunction indica-
tor is illuminated, the system may not be
able to detect or signal low tire pressure
as intended. TPMS malfunctions may
occur for a variety of reasons, including
the installation of replacement or alter-
nate tires or wheels on the vehicle that
prevent the TPMS from functioning prop-
erly. Always check the TPMS malfunction
telltale after replacing one or more tires
or wheels on your vehicle to ensure that
the replacement or alternate tires and
wheels allow the TPMS to continue to
function properly.
Additional information
.Since the spare tire is not equipped
with the TPMS, the TPMS does not
monitor the tire pressure of the spare
tire.
. The TPMS will activate only when the
vehicle is driven at speeds above 16
MPH (25 km/h). Also, this system may
not detect a sudden drop in tire
pressure (for example a flat tire while
driving).
. The low tire pressure warning light
does not automatically turn off when
the tire pressure is adjusted. After the
tire is inflated to the recommended pressure, the vehicle must be driven at
speeds above 16 MPH (25 km/h) to
activate the TPMS and turn off the low
tire pressure warning light. Use a tire
pressure gauge to check the tire
pressure.
. The CHECK TIRE PRESSURE warning
also appears on the vehicle informa-
tion display when the low tire pres-
sure warning light is illuminated and
low tire pressure is detected. The
CHECK TIRE PRESSURE warning turns
off when the low tire pressure warn-
ing light turns off.
The CHECK TIRE PRESSURE warning
appears each time the ignition switch
is placed in the ON position as long as
the low tire pressure warning light
remains illuminated.
The CHECK TIRE PRESSURE warning
does not appear if the low tire pres-
sure warning light illuminates to in-
dicate a TPMS malfunction.
. Tire pressure rises and falls depending
on the heat caused by the vehicle’s
operation and the outside tempera-
ture. Do not reduce the tire pressure
after driving because the tire pressure
rises after driving. Low outside tem-
perature can lower the temperature
of the air inside the tire which can
cause a lower tire inflation pressure. This may cause the low tire pressure
warning light to illuminate. If the
warning light illuminates in low ambi-
ent temperature, check the tire pres-
sure for all four tires.
For additional information, see “Low tire
pressure warning light” (P.2-13) and “Tire
Pressure Monitoring System (TPMS)” (P.6-
3).
WARNING
. If the low tire pressure warning
light illuminates while driving,
avoid sudden steering maneu-
vers or abrupt braking, reduce
vehicle speed, pull off the road
to a safe location and stop the
vehicle as soon as possible. Driv-
ing with under-inflated tires may
permanently damage the tires
and increase the likelihood of tire
failure. Serious vehicle damage
could occur and may lead to an
accident and could result in ser-
ious personal injury. Check the
tire pressure for all four tires.
Adjust the tire pressure to the
recommended COLD tire pressure
shown on the Tire and Loading
Information label to turn the low
tire pressure warning light OFF. If
Page 303 of 455

the light still illuminates while
driving after adjusting the tire
pressure, a tire may be flat or
the TPMS may be malfunctioning.
If you have a flat tire, replace it
with a spare tire (if so equipped)
or repair it with the tire puncture
repair kit (if so equipped) as soon
as possible. If no tire is flat and all
tires are properly inflated, it is
recommended you consult a
NISSAN dealer.
. Since the spare tire is not
equipped with the TPMS, when a
spare tire is mounted or a wheel
is replaced, the TPMS will not
function and the low tire pressure
warning light will flash for ap-
proximately 1 minute. The light
will remain on after 1 minute.
Have your tires replaced and/or
TPMS system reset as soon as
possible. It is recommended you
visit a NISSAN dealer for these
services.
. Replacing tires with those not
originally specified by NISSAN
could affect the proper operation
of the TPMS.
. NISSAN recommends using only
Genuine NISSAN Emergency Tire
Sealant provided with your vehi- cle. Other tire sealants may da-
mage the valve stem seal which
can cause the tire to lose air
pressure. It is recommended you
visit a NISSAN dealer as soon as
possible after using tire repair
sealant (for models equipped
with the emergency tire puncture
repair kit).
CAUTION
.
The TPMS may not function prop-
erly when the wheels are
equipped with tire chains or the
wheels are buried in snow.
. Do not place metalized film or
any metal parts (antenna, etc.) on
the windows. This may cause
poor reception of the signals
from the tire pressure sensors,
and the TPMS will not function
properly.
Some devices and transmitters may tem-
porarily interfere with the operation of
the TPMS and cause the low tire pressure
warning light to illuminate. Some exam-
ples are: .
Facilities or electric devices using
similar radio frequencies are near the
vehicle.
. If a transmitter set to similar frequen-
cies is being used in or near the
vehicle.
. If a computer (or similar equipment) or
a DC/AC converter is being used in or
near the vehicle.
Low tire pressure warning light may
illuminate in the following cases.
. If the vehicle is equipped with a wheel
and tire without TPMS.
. If the TPMS has been replaced and the
ID has not been registered.
. If the wheel is not originally specified
by NISSAN.
FCC Notice:
For USA:
This device complies with Part 15 of the
FCC Rules. Operation is subject to the
following two conditions: (1) This device
may not cause harmful interference,
and (2) this device must accept any
interference received, including inter-
ference that may cause undesired op-
eration.
NOTE:
Changes or modifications not expressly
approved by the party responsible for
compliance could void the user’s
Starting and driving5-5
Page 305 of 455
this manual.
If a tire rapidly loses air pressure or
“blows-out” while driving maintain control
of the vehicle by following the procedure
below. Please note that this procedure is
only a general guide. The vehicle must be
driven as appropriate based on the con-
ditions of the vehicle, road and traffic.
WARNING
The following actions can increase
the chance of losing control of the
vehicle if there is a sudden loss of tire
air pressure. Losing control of the
vehicle may cause a collision and
result in personal injury.
.The vehicle generally moves or
pulls in the direction of the flat
tire.
. Do not rapidly apply the brakes.
. Do not rapidly release the accel-
erator pedal.
. Do not rapidly turn the steering
wheel.
1. Remain calm and do not overreact.
2. Maintain a firm grip on the steering wheel with both hands and try to hold
a straight course. 3. When appropriate, slowly release the
accelerator pedal to gradually slow
the vehicle.
4. Gradually steer the vehicle to a safe location off the road and away from
traffic if possible.
5. Lightly apply the brake pedal to gra- dually stop the vehicle.
6. Turn on the hazard warning flashers and either contact a roadside emer-
gency service to change the tire or see
“Changing a flat tire (for models with
spare tire)” (P.6-4) of this Owner’s
Manual.
DRINKING ALCOHOL/DRUGS AND
DRIVING
WARNING
Never drive under the influence of
alcohol or drugs. Alcohol in the
bloodstream reduces coordination,
delays reaction time and impairs
judgement. Driving after drinking
alcohol increases the likelihood of
being involved in an accident injuring
yourself and others. Additionally, if
you are injured in an accident, alco-
hol can increase the severity of the
injury. NISSAN is committed to safe driving.
However, you must choose not to drive
under the influence of alcohol. Every year
thousands of people are injured or killed
in alcohol-related accidents. Although the
local laws vary on what is considered to
be legally intoxicated, the fact is that
alcohol affects all people differently and
most people underestimate the effects of
alcohol.
Remember, drinking and driving don’t
mix! And that is true for drugs, too (over-
the-counter, prescription, and illegal
drugs). Don’t drive if your ability to oper-
ate your vehicle is impaired by alcohol,
drugs, or some other physical condition.
Starting and driving5-7
Page 309 of 455

.Make sure the area around the vehicle
is clear.
. Check fluid levels such as engine oil,
coolant, brake fluid and window
washer fluid as frequently as possible,
or at least whenever you refuel.
. Check that all windows and lights are
clean.
. Visually inspect tires for their appear-
ance and condition. Also check tires
for proper inflation.
. Lock all doors.
. Position seat and adjust head re-
straints.
. Adjust inside and outside mirrors.
. Fasten seat belts and ask all passen-
gers to do likewise.
. Check the operation of warning lights
when the ignition switch is pushed to
the ON position. (See “Warning lights,
indicator lights and audible remin-
ders” (P.2-10).) 1. Apply the parking brake.
2.
Automatic Transmission (AT) model:
Move the shift lever to the P (Park) or N
(Neutral) position. (P is recommended.)
The starter is designed not to operate
unless the shift lever is in either of the
above positions.
Manual Transmission (MT) model:
Move the shift lever to the N (Neutral)
position. Depress the clutch pedal fully
to the floor.
The starter is designed not to operate
unless the clutch pedal is fully de-
pressed.
The Intelligent Key must be carried
when operating the ignition switch.
3. Push the ignition switch to the ON position. Firmly depress the brake
pedal (AT model) or the clutch pedal
(MT model) and push the ignition
switch to start the engine.
To start the engine immediately, push
and release the ignition switch while
depressing the brake pedal or the
clutch pedal with the ignition switch
in any position.
.If the engine is very hard to start inextremely cold weather or when
restarting, depress the accelerator
pedal a little (approximately 1/3 to the floor) and while holding, crank
the engine. Release the accelerator
pedal when the engine starts.
.If the engine is very hard to start
because it is flooded, depress the
accelerator pedal all the way to the
floor and hold it. Push the ignition
switch to the ON position to start
cranking the engine. After 5 or 6
seconds, stop cranking by pushing
the ignition switch to OFF. After
cranking the engine, release the
accelerator pedal. Crank the engine
with your foot off the accelerator
pedal by depressing the brake
pedal and pushing the push-button
ignition switch to start the engine.
If the engine starts, but fails to run,
repeat the above procedure.
CAUTION
Do not operate the starter for more
than 15 seconds at a time. If the
engine does not start, push the
ignition switch to OFF and wait 10
seconds before cranking again,
otherwise the starter could be da-
maged.
Starting and driving5-11
BEFORE STARTING THE ENGINE STARTING THE ENGINE
Page 315 of 455
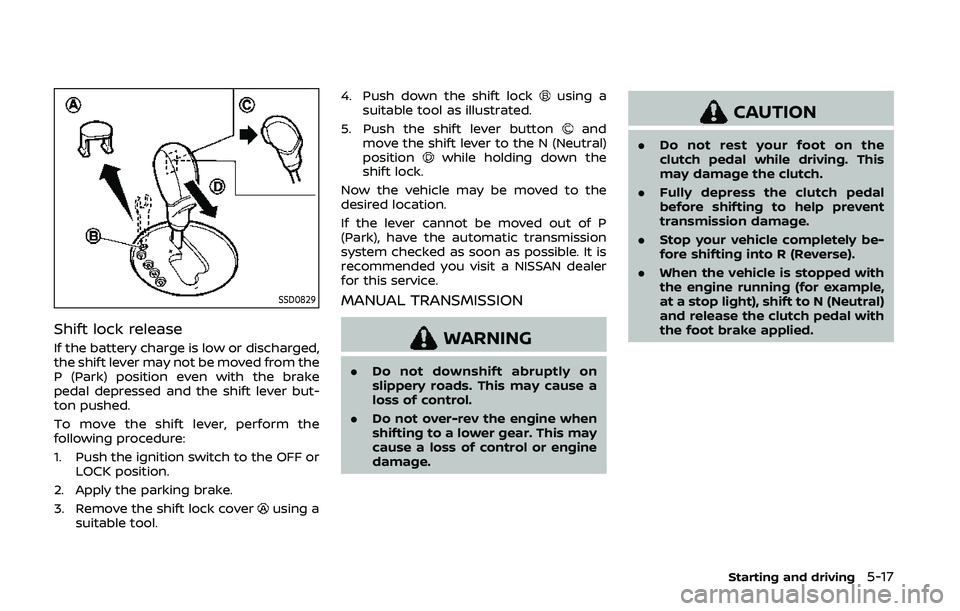
SSD0829
Shift lock release
If the battery charge is low or discharged,
the shift lever may not be moved from the
P (Park) position even with the brake
pedal depressed and the shift lever but-
ton pushed.
To move the shift lever, perform the
following procedure:
1. Push the ignition switch to the OFF orLOCK position.
2. Apply the parking brake.
3. Remove the shift lock cover
using a
suitable tool. 4. Push down the shift lock
using a
suitable tool as illustrated.
5. Push the shift lever button
and
move the shift lever to the N (Neutral)
position
while holding down the
shift lock.
Now the vehicle may be moved to the
desired location.
If the lever cannot be moved out of P
(Park), have the automatic transmission
system checked as soon as possible. It is
recommended you visit a NISSAN dealer
for this service.
MANUAL TRANSMISSION
WARNING
. Do not downshift abruptly on
slippery roads. This may cause a
loss of control.
. Do not over-rev the engine when
shifting to a lower gear. This may
cause a loss of control or engine
damage.
CAUTION
.Do not rest your foot on the
clutch pedal while driving. This
may damage the clutch.
. Fully depress the clutch pedal
before shifting to help prevent
transmission damage.
. Stop your vehicle completely be-
fore shifting into R (Reverse).
. When the vehicle is stopped with
the engine running (for example,
at a stop light), shift to N (Neutral)
and release the clutch pedal with
the foot brake applied.
Starting and driving5-17
Page 320 of 455
5-22Starting and driving
SPA2110
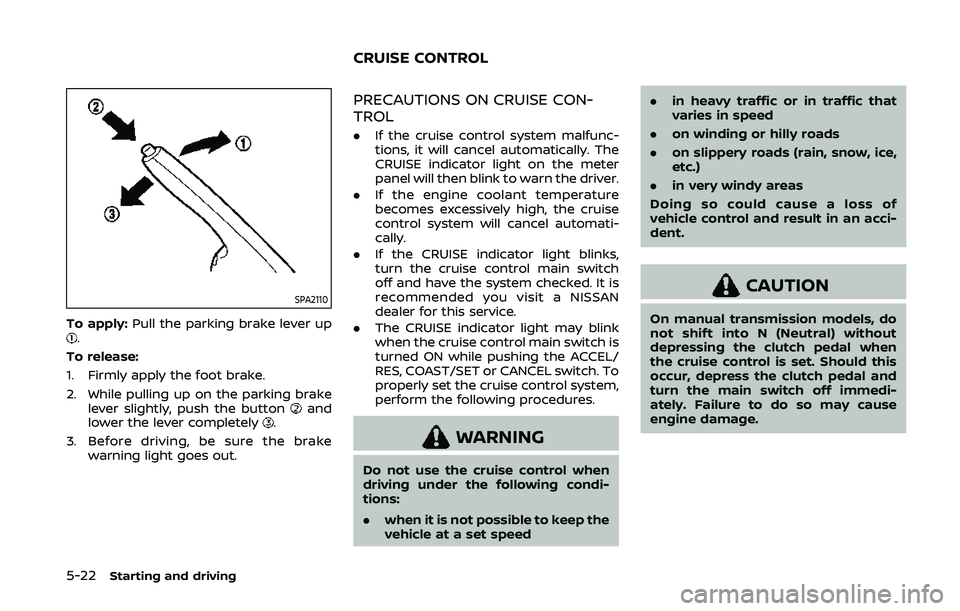
To apply:Pull the parking brake lever up.
To release:
1. Firmly apply the foot brake.
2. While pulling up on the parking brake lever slightly, push the button
and
lower the lever completely.
3. Before driving, be sure the brake warning light goes out.
PRECAUTIONS ON CRUISE CON-
TROL
.If the cruise control system malfunc-
tions, it will cancel automatically. The
CRUISE indicator light on the meter
panel will then blink to warn the driver.
. If the engine coolant temperature
becomes excessively high, the cruise
control system will cancel automati-
cally.
. If the CRUISE indicator light blinks,
turn the cruise control main switch
off and have the system checked. It is
recommended you visit a NISSAN
dealer for this service.
. The CRUISE indicator light may blink
when the cruise control main switch is
turned ON while pushing the ACCEL/
RES, COAST/SET or CANCEL switch. To
properly set the cruise control system,
perform the following procedures.
WARNING
Do not use the cruise control when
driving under the following condi-
tions:
.when it is not possible to keep the
vehicle at a set speed .
in heavy traffic or in traffic that
varies in speed
. on winding or hilly roads
. on slippery roads (rain, snow, ice,
etc.)
. in very windy areas
Doing so could cause a loss of
vehicle control and result in an acci-
dent.
CAUTION
On manual transmission models, do
not shift into N (Neutral) without
depressing the clutch pedal when
the cruise control is set. Should this
occur, depress the clutch pedal and
turn the main switch off immedi-
ately. Failure to do so may cause
engine damage.
CRUISE CONTROL
Page 325 of 455
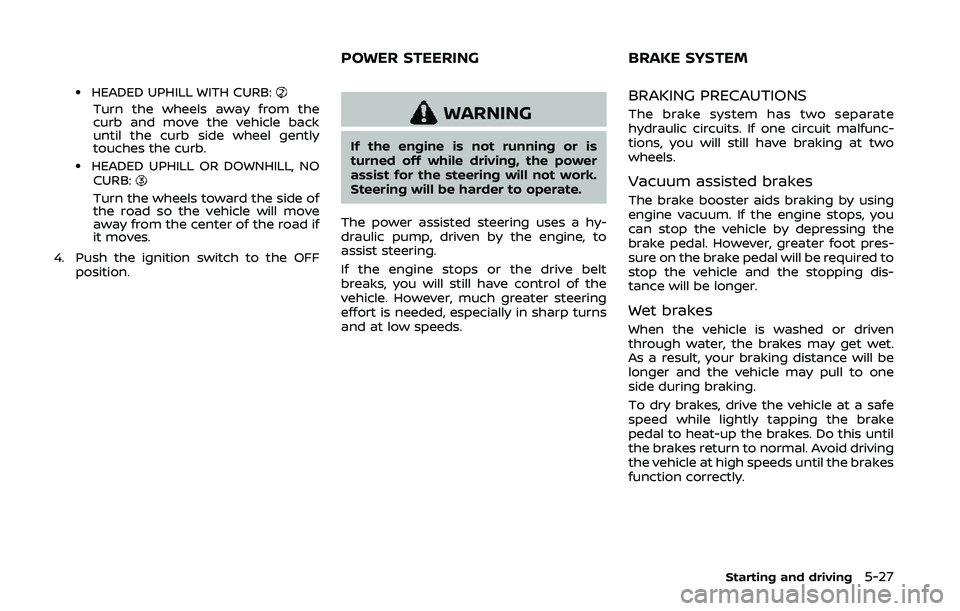
.HEADED UPHILL WITH CURB:
Turn the wheels away from the
curb and move the vehicle back
until the curb side wheel gently
touches the curb.
.HEADED UPHILL OR DOWNHILL, NOCURB:
Turn the wheels toward the side of
the road so the vehicle will move
away from the center of the road if
it moves.
4. Push the ignition switch to the OFF position.
WARNING
If the engine is not running or is
turned off while driving, the power
assist for the steering will not work.
Steering will be harder to operate.
The power assisted steering uses a hy-
draulic pump, driven by the engine, to
assist steering.
If the engine stops or the drive belt
breaks, you will still have control of the
vehicle. However, much greater steering
effort is needed, especially in sharp turns
and at low speeds.
BRAKING PRECAUTIONS
The brake system has two separate
hydraulic circuits. If one circuit malfunc-
tions, you will still have braking at two
wheels.
Vacuum assisted brakes
The brake booster aids braking by using
engine vacuum. If the engine stops, you
can stop the vehicle by depressing the
brake pedal. However, greater foot pres-
sure on the brake pedal will be required to
stop the vehicle and the stopping dis-
tance will be longer.
Wet brakes
When the vehicle is washed or driven
through water, the brakes may get wet.
As a result, your braking distance will be
longer and the vehicle may pull to one
side during braking.
To dry brakes, drive the vehicle at a safe
speed while lightly tapping the brake
pedal to heat-up the brakes. Do this until
the brakes return to normal. Avoid driving
the vehicle at high speeds until the brakes
function correctly.
Starting and driving5-27
POWER STEERING BRAKE SYSTEM