2020 NISSAN 370Z ECU
[x] Cancel search: ECUPage 348 of 455
6-14In case of emergency
9. After driving, make sure that the aircompressor switch is in the OFF posi-
tion, then screw the hose securely
onto the tire valve. Check the tire
pressure with the pressure gauge.
The temporary repair is completed if
the tire pressure does not drop.
Make sure the pressure is adjusted to
the pressure that is specified on the
tire and loading information label
before driving.
10. If the tire pressure drops, repeat the steps from 5 to 9. If the pressure drops
again or under 19 psi (130 kPa), the tire
cannot be repaired with this tire
repair kit. It is recommended you visit
a NISSAN dealer for this servicing.
The sealant bottle and hose can not
be reused to repair another punctured
tire. It is recommended you visit a
NISSAN dealer to purchase replace-
ments.After repairing tire
It is recommended you visit a NISSAN
dealer for tire repair/replacement as soon
as possible.
WARNING
. After using Emergency Tire Sea-
lant to repair a minor tire punc-
ture, do not drive the vehicle at
speeds faster than 50 MPH (80
km/h).
. Immediately after using Emer-
gency Tire Sealant to repair a
minor tire puncture, take your
vehicle to inspect, and repair or
replace the tire. It is recom-
mended you visit a NISSAN dealer
for this service. The Emergency
Tire Sealant cannot permanently
seal a punctured tire. Continuing
operation of the vehicle without a
permanent tire repair can lead to
a crash.
. NISSAN recommends using only
Genuine NISSAN Emergency Tire
Sealant provided with your vehi-
cle. Other tire sealants may da-
mage the valve stem seal which
can cause the tire to lose air
pressure. It is recommended you visit a NISSAN dealer as soon as
possible after using tire repair
sealant.
Page 354 of 455
6-20In case of emergency
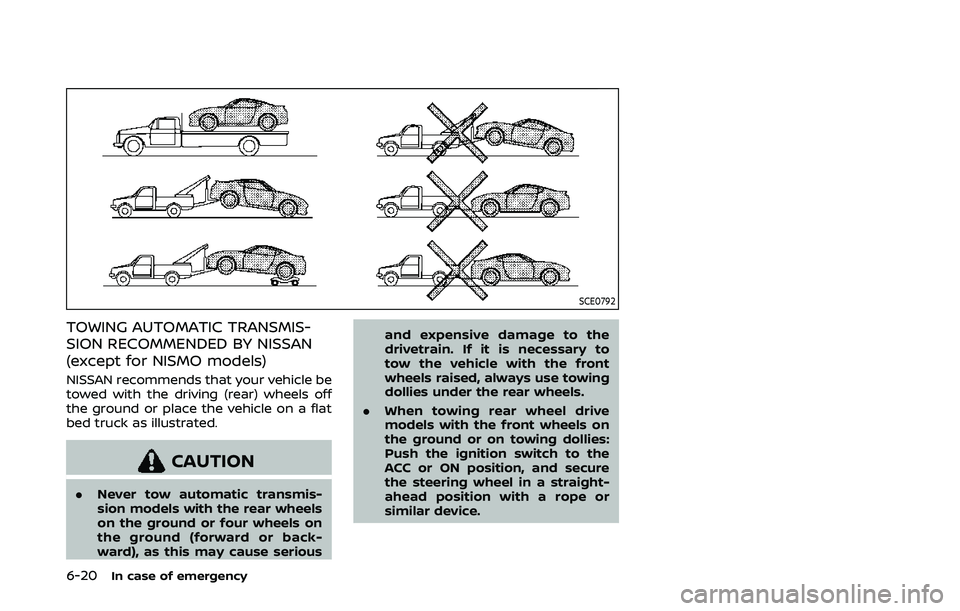
SCE0792
TOWING AUTOMATIC TRANSMIS-
SION RECOMMENDED BY NISSAN
(except for NISMO models)
NISSAN recommends that your vehicle be
towed with the driving (rear) wheels off
the ground or place the vehicle on a flat
bed truck as illustrated.
CAUTION
.Never tow automatic transmis-
sion models with the rear wheels
on the ground or four wheels on
the ground (forward or back-
ward), as this may cause serious and expensive damage to the
drivetrain. If it is necessary to
tow the vehicle with the front
wheels raised, always use towing
dollies under the rear wheels.
. When towing rear wheel drive
models with the front wheels on
the ground or on towing dollies:
Push the ignition switch to the
ACC or ON position, and secure
the steering wheel in a straight-
ahead position with a rope or
similar device.
Page 365 of 455
The use of genuine NISSAN floor mats can
extend the life of your vehicle carpet and
make it easier to clean the interior. Mats
should be maintained with regular clean-
ing and replaced if they become exces-
sively worn.
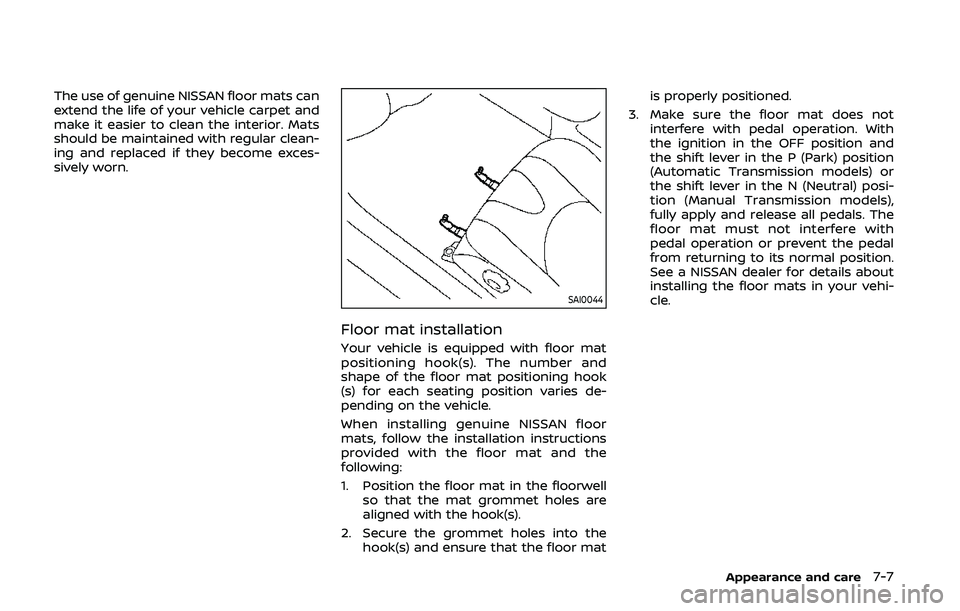
SAI0044
Floor mat installation
Your vehicle is equipped with floor mat
positioning hook(s). The number and
shape of the floor mat positioning hook
(s) for each seating position varies de-
pending on the vehicle.
When installing genuine NISSAN floor
mats, follow the installation instructions
provided with the floor mat and the
following:
1. Position the floor mat in the floorwellso that the mat grommet holes are
aligned with the hook(s).
2. Secure the grommet holes into the hook(s) and ensure that the floor mat is properly positioned.
3. Make sure the floor mat does not interfere with pedal operation. With
the ignition in the OFF position and
the shift lever in the P (Park) position
(Automatic Transmission models) or
the shift lever in the N (Neutral) posi-
tion (Manual Transmission models),
fully apply and release all pedals. The
floor mat must not interfere with
pedal operation or prevent the pedal
from returning to its normal position.
See a NISSAN dealer for details about
installing the floor mats in your vehi-
cle.
Appearance and care7-7
Page 370 of 455
8-2Do-it-yourself
When performing any inspection or main-
tenance work on your vehicle, always
take care to prevent serious accidental
injury to yourself or damage to the
vehicle. The following are general precau-
tions which should be closely observed.
WARNING
.Park the vehicle on a level sur-
face, apply the parking brake
securely and block the wheels to
prevent the vehicle from moving.
For manual transmission models,
move the shift lever to N (Neutral).
For automatic transmission mod-
els, move the shift lever to P
(Park).
. Be sure the ignition switch is in
the OFF or LOCK position when
performing any parts replace-
ment or repairs.
. Never connect or disconnect the
battery or any transistorized
component while the ignition
switch is in the ON position.
. Never leave the engine or auto-
matic transmission related com-
ponent harnesses disconnected
while the ignition switch is in the
ON position. .
If you must work with the engine
running, keep your hands, cloth-
ing, hair and tools away from
moving fans, belts and any other
moving parts.
. It is advisable to secure or re-
move any loose clothing and
remove any jewelry, such as
rings, watches, etc. before work-
ing on your vehicle.
. Always wear eye protection
whenever you work on your ve-
hicle.
. If you must run the engine in an
enclosed space such as a garage,
be sure there is proper ventilation
for exhaust gases to escape.
. Never get under the vehicle while
it is supported only by a jack. If it
is necessary to work under the
vehicle, support it with safety
stands.
. Keep smoking materials, flame
and sparks away from fuel tank
and the battery.
. Your vehicle is equipped with an
automatic engine cooling fan. It
may come on at any time without
warning, even if the ignition key is
in the OFF position and the en-
gine is not running. To avoid injury, always disconnect the ne-
gative battery cable before work-
ing near the fan.
. Because the fuel lines are under
high pressure even when the
engine is off, it is recommended
you visit a NISSAN dealer for
service of the fuel filter or fuel
lines.
CAUTION
.Do not work under the hood while
the engine is hot. Turn the engine
off and wait until it cools down.
. Avoid direct contact with used
engine oil and coolant. Impro-
perly disposed engine oil, coolant,
and/or other vehicle fluids can
damage the environment. Always
conform to local regulations for
disposal of vehicle fluid.
This “8. Do-it-yourself” section gives in-
structions regarding only those items
which are relatively easy for an owner to
perform.
A genuine NISSAN Service Manual is also
available. (See “Owner’s Manual/Service
Manual order information” (P.10-26).)
MAINTENANCE PRECAUTIONS
Page 373 of 455
JVM0087X
CHECKING ENGINE COOLANT LEVEL
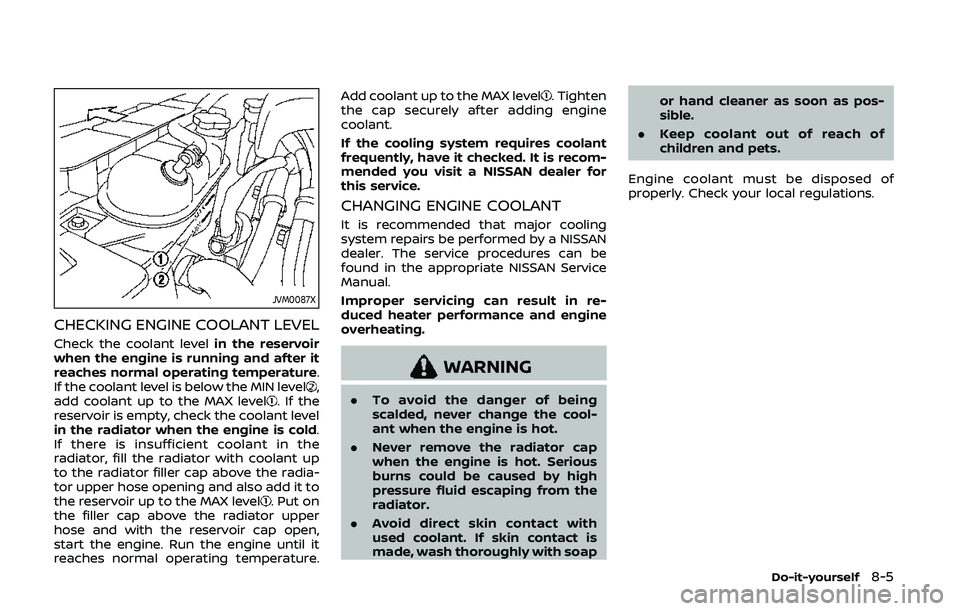
Check the coolant levelin the reservoir
when the engine is running and after it
reaches normal operating temperature.
If the coolant level is below the MIN level
,
add coolant up to the MAX level. If the
reservoir is empty, check the coolant level
in the radiator when the engine is cold.
If there is insufficient coolant in the
radiator, fill the radiator with coolant up
to the radiator filler cap above the radia-
tor upper hose opening and also add it to
the reservoir up to the MAX level
. Put on
the filler cap above the radiator upper
hose and with the reservoir cap open,
start the engine. Run the engine until it
reaches normal operating temperature. Add coolant up to the MAX level
. Tighten
the cap securely after adding engine
coolant.
If the cooling system requires coolant
frequently, have it checked. It is recom-
mended you visit a NISSAN dealer for
this service.
CHANGING ENGINE COOLANT
It is recommended that major cooling
system repairs be performed by a NISSAN
dealer. The service procedures can be
found in the appropriate NISSAN Service
Manual.
Improper servicing can result in re-
duced heater performance and engine
overheating.
WARNING
. To avoid the danger of being
scalded, never change the cool-
ant when the engine is hot.
. Never remove the radiator cap
when the engine is hot. Serious
burns could be caused by high
pressure fluid escaping from the
radiator.
. Avoid direct skin contact with
used coolant. If skin contact is
made, wash thoroughly with soap or hand cleaner as soon as pos-
sible.
. Keep coolant out of reach of
children and pets.
Engine coolant must be disposed of
properly. Check your local regulations.
Do-it-yourself8-5
Page 375 of 455

SDI2335
Engine oil and filter
1. Place a large drain pan under thedrain plug.
2. Remove the oil filler cap.
3. Remove the drain plug
with a
wrench and completely drain the oil.
CAUTION
Be careful not to burn yourself, as
the engine oil is hot.
.Waste oil must be disposed of properly.
.Check your local regulations.
(Perform steps 4 to 7 only when the
engine oil filter change is needed.)
4. Loosen the oil filter
with an oil filter
wrench. Remove the oil filter by turn-
ing it by hand.
5. Wipe the engine oil filter mounting surface with a clean rag.
CAUTION
Be sure to remove any old rubber
gasket remaining on the mounting
surface of the engine. Failure to do
so could lead to engine damage.
6. Coat the gasket on the new filter with clean engine oil.
7. Screw in the oil filter clockwise until a slight resistance is felt, then tighten
additionally more than 2/3 turn.
Oil filter tightening torque:11 to 15 ft-lb
(14.7 to 20.5 N·m)
8. Clean and re-install the drain plug with a new washer. Securely tighten
the drain plug with a wrench.
Drain plug tightening torque:22 to 29 ft-lb
(29 to 39 N·m) Do not use excessive force.
9. Refill engine with recommended oil through the oil filler opening, and
install the oil filler cap securely.
See “Capacities and recommended
fluids/lubricants” (P.10-2) for drain
and refill capacity. The drain and refill
capacity depends on the oil tempera-
ture and drain time. Use these speci-
fications for reference only. Always
use the dipstick to determine the
proper amount of oil in the engine.
10. Start the engine and check for leak- age around the drain plug and the oil
filter. Correct as required.
11. Turn the engine off and wait more than 15 minutes. Check the oil level
with the dipstick. Add engine oil if
necessary.
After the operation
1. Install the engine undercover intoposition as the following steps.
a. Pull the center of the small plastic
clip out.
b. Hold the engine undercover into position.
c. Insert the clip through the under- cover into the hole in the frame,
then push the center of the clip in
to lock the clip in place.
Do-it-yourself8-7
Page 379 of 455
Recommended fluid is Genuine NISSAN
Windshield Washer Concentrate Cleaner
& Antifreeze or equivalent.
CAUTION
.Do not substitute engine anti-
freeze coolant for window
washer solution. This may result
in damage to the paint.
. Do not fill the window washer
reservoir tank with washer fluid
concentrates at full strength.
Some methyl alcohol based
washer fluid concentrates may
permanently stain the grille if
spilled while filling the window
washer reservoir tank.
. Pre-mix washer fluid concen-
trates with water to the manu-
facturer’s recommended levels
before pouring the fluid into the
window washer reservoir tank. Do
not use the window washer re-
servoir tank to mix the washer
fluid concentrate and water. .
Keep the battery surface clean and
dry. Clean the battery with a solution
of baking soda and water.
. Make certain the terminal connec-
tions are clean and securely tightened.
. If the vehicle is not to be used for 30
days or longer, disconnect the nega-
tive (−) battery terminal cable to pre-
vent discharging it.
NOTE:
Care should be taken to avoid situations
that can lead to potential battery dis-
charge and potential no-start condi-
tions such as:
1. Installation or extended use of elec-
tronic accessories that consume
battery power when the engine is
not running (Phone chargers, GPS,
DVD players, etc.)
2. Vehicle is not driven regularly and/
or only driven short distances.
In these cases, the battery may need to
be charged to maintain battery health.
CAUTION
When the battery cable is removed
from the battery terminal, do not
close either of front doors. The auto-
matic window adjusting function will
not work, and the side roof panel may be damaged.
To disconnect the negative (−) battery
terminal, perform the procedure in the
following order. Otherwise, the window
and the side roof panel may contact and
be damaged.
1. Close the windows.
2. Open the hood.
3. Close and lock all the doors.
4. Disconnect the negative (−) battery terminal.
5. Securely close the hood.
To connect the negative (−) battery term-
inal, perform the procedure in the follow-
ing order. Otherwise, the window and the
side roof panel may contact and be
damaged.
1. Unlock and open the driver side door. Do not close the door.
2. Open the hood.
3. Connect the negative (−) battery term- inal. Then close the hood.
4. Fully open the driver side door win- dow.
5. Close the driver side door and the window.
Do-it-yourself8-11
BATTERY
Page 382 of 455

8-14Do-it-yourself
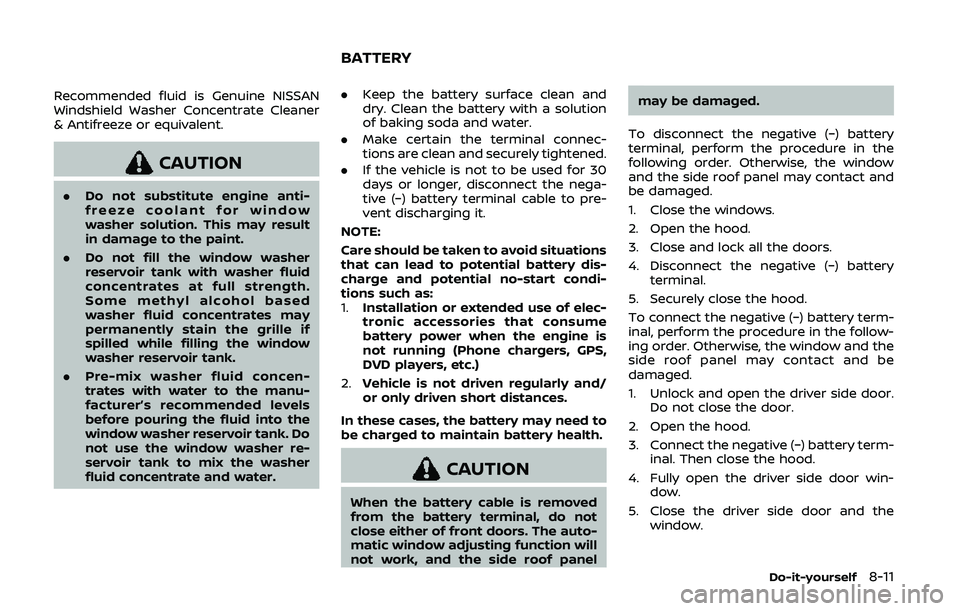
SDI2119VQ37VHR engine1. Power steering fluid pump
2. Alternator
3. Crankshaft pulley
4. Air conditioner compressor
5. Drive belt auto-tensioner
WARNING
Be sure the ignition switch is in the
OFF or LOCK position before servi-
cing drive belts. The engine could
rotate unexpectedly.
1. Visually inspect the belt for signs of unusual wear, cuts, fraying or loosen- ess. If the belt is in poor condition or
loose, have it replaced or adjusted. It is
recommended you visit a NISSAN
dealer for this service.
2. Have the belt condition checked reg- ularly for condition and tension in
accordance with the maintenance
schedule shown in the “9. Mainte-
nance and schedules” section.
WARNING
Be sure the engine and the ignition
switch are off and that the parking
brake is engaged securely.
CAUTION
Be sure to use the correct socket to
remove the spark plugs. An incorrect
socket can damage the spark plugs.
DRIVE BELTS SPARK PLUGS