2020 NISSAN 370Z transmission
[x] Cancel search: transmissionPage 154 of 455

3-28Pre-driving checks and adjustments
TROUBLESHOOTING GUIDE
If the soft top stops halfway during operation or does not operate normally, follow the procedures shown in the following table. If the
procedures in the following table do not solve the symptom, have your vehicle inspected immediately. It is recommended to visit a
NISSAN dealer for this service.
SymptomBeepPossible cause Possible solution
The OPEN side of the soft top oper-
ating switch is pushed, but the soft
top does not operate. Sounds twice
The OPEN side of the soft top operating
switch is pushed while the soft top is fully
open, or the CLOSE side of the soft top
operating switch is pushed while the soft
top is fully closed. Push the CLOSE side of the soft top operating
switch when the soft top is fully open. Push
the OPEN side of the soft top operating switch
when the soft top is fully closed.
Sounds twice The shift lever is in the R (Reverse) position. Shift the shift lever to the P (Park) or N
(Neutral) position (automatic transmission
models only), or shift the shift lever to the N
(Neutral) position (manual transmission mod-
els only), and then operate the soft top.
Sounds twice The trunk lid is opened. Fully close the trunk lid.
Does not sound The battery voltage is low.
Start the engine again and operate the soft
top.
Does not sound The operation stops to protect the system. Wait for approximately 5 minutes.
The soft top stops halfway during
operation. Sounds twice
Objects are trapped in the moving structure
of the soft top. Check that an object is not trapped inside the
rear parcel shelf, side flap and soft top. After
the check, place the ignition switch in the OFF
position, start the engine again and then
operate the soft top.
Sounds twice The battery voltage is low. Start the engine again and operate the soft
top.
When the vehicle is being driven, the
beep sounds. Sounds con-
tinuously The soft top is partially opened. Immediately park the vehicle in a safe location
and fully open or fully close the soft top.
Page 194 of 455

4-26Center display, heater, air conditioner, audio, phone and voice recognition systems
SAA1897
1. Visually check that the parking spaceis safe before parking your vehicle.
2. The rear view of the vehicle is dis- played on the screen
when the shift
lever is moved to the R (Reverse)
position.
SAA1898
3. Slowly back up the vehicle adjusting the steering wheel so that the pre-
dictive course lines
enter the park-
ing space.
4. Maneuver the steering wheel to make the vehicle width guide lines
parallel
to the parking spacewhile referring
to the predictive course lines. 5. When the vehicle is parked in the
space completely, move the shift lever
to the P (Park) position (Automatic
Transmission models) or in an appro-
priate gear (Manual Transmission
models) and apply the parking brake.
DIFFERENCE BETWEEN PREDICTIVE
AND ACTUAL DISTANCES
The displayed guide lines and their loca-
tions on the ground are for approximate
reference only. Objects on uphill or down-
hill surfaces or projecting objects will be
actually located at distances different
from those displayed in the monitor
relative to the guide lines (refer to illustra-
tions). When in doubt, turn around and
view the objects as you are backing up, or
park and exit the vehicle to view the
positioning of objects behind the vehicle.
Page 270 of 455
4-102Center display, heater, air conditioner, audio, phone and voice recognition systems
“Select Phone”
Use the Select Phone command to select
from a list of phones connected to the
vehicle. The system will list the names
assigned to each phone and then prompt
you for the phone you wish to select. Only
one phone can be active at a time.
“Delete Phone”
Use the Delete Phone command to delete
a phone that is connected to the vehicle.
The system will list the names assigned to
each phone and then prompt you for the
phone you wish to delete. Deleting a
phone from the vehicle will also delete
that phonebook for that phone.
“Bluetooth Off”
Use the Bluetooth Off command to pre-
vent a wireless connection to your phone.
“Replace phone”
This can be used to reconnect a new
phone with the vehicle you have changed
your cellular phone.
SPEAKER ADAPTATION (SA) MODE
Speaker Adaptation allows up to two out-
of dialect users to train the system to
improve recognition accuracy. By repeat-
ing a number of commands, the users
can create a voice model of their own
voice that is stored in the system. The
system is capable of storing a differentspeaker adaptation model for each con-
nected phone.
Training procedure
1. Position the vehicle in a reasonably
quiet outdoor location.
2. Sit in the driver’s seat with the engine running, the parking brake on, and the
transmission in Park.
3. Push and hold the
button for
more than 5 seconds.
4. The system announces: “Press the PHONE SEND (
) button for the
hands-free phone system to enter
the speaker adaptation mode or press
the PHONE END (
) button to select
a different language.”
5. Push the
button.
For information on selecting a differ-
ent language, see “Choosing a lan-
guage” (P.4-96).
6. If the connected phone is already in use, the system will prompt you to
overwrite. Follow the instructions pro-
vided by the system.
7. When preparation is complete and you are ready to begin, push the
button.
8. The SA mode will be explained. Follow the instructions provided by the sys-
tem. 9. When training is finished, the system
will tell you an adequate number of
phrases have been recorded.
10. The system will announce that speak- er adaptation has been completed
and the system is ready.
The SA mode will stop if:
. The
button is pressed for more
than 5 seconds in SA mode.
. The vehicle is driven during SA mode.
. The ignition switch is placed in the
OFF or LOCK position.
Training phrases
During the SA mode, the system instructs
you to say the following phrases.
(The system will prompt you for each
phrase.)
.phonebook transfer entry
. dial 3 0 4 2 9
. delete call back number
. Incoming
. Transfer entry
. 8 pause 9 3 2 pause 7
. delete all entries
. call 7 2 4 0 9
. phonebook delete entry
. next entry
Page 299 of 455
5 Starting and driving
Precautions when starting and driving ...................... 5-2Exhaust gas (carbon monoxide) ................................ 5-2
Three-way catalyst ............................................................... 5-3
Tire Pressure Monitoring System (TPMS) ........... 5-3
Avoiding collision and rollover .................................... 5-6
Off-road recovery .................................................................. 5-6
Rapid air pressure loss ...................................................... 5-6
Drinking alcohol/drugs and driving ........................ 5-7
Push-button ignition switch ................................................ 5-8 Operating range for engine start function ....... 5-8
Push-button ignition switch operation ................ 5-9
Push-button ignition switch positions ................. 5-9
Emergency engine shut off ........................................ 5-10
Intelligent Key battery discharge ........................... 5-10
Before starting the engine ................................................. 5-11
Starting the engine .................................................................. 5-11
Driving the vehicle .................................................................... 5-12 Automatic transmission ................................................ 5-12
Manual Transmission ....................................................... 5-17
Parking brake ........................................................................\
....... 5-21
Cruise control ........................................................................\
....... 5-22 Precautions on cruise control .................................. 5-22
Cruise control operations ............................................ 5-23
Break-in schedule ..................................................................... 5-24
Fuel efficient driving tips ..................................................... 5-24 Increasing fuel economy .................................................... 5-25
Parking/parking on hills ...................................................... 5-26
Power steering ........................................................................\
.... 5-27
Brake system ........................................................................\
....... 5-27
Braking precautions ....................................................... 5-27
Parking brake break-in ................................................ 5-28
Brake assist ........................................................................\
........... 5-28 Brake assist ........................................................................\
... 5-28
Anti-lock Braking System (ABS) ............................ 5-28
Vehicle Dynamic Control (VDC) system .................. 5-30
Performance dampers (NISMO models) ................. 5-32
Cold weather driving ............................................................. 5-33 Freeing a frozen door lock ....................................... 5-33
Antifreeze ........................................................................\
........ 5-33
Battery ........................................................................\
............... 5-33
Draining of coolant water ......................................... 5-33
Tire equipment ................................................................... 5-33
Special winter equipment ......................................... 5-33
Driving on snow or ice ................................................. 5-33
Engine block heater (if so equipped) ............... 5-34
Active noise cancellation/Active sound
enhancement (if so equipped) ....................................... 5-35 Active noise cancellation ........................................... 5-35
Active sound enhancement ..................................... 5-35
Page 306 of 455
5-8Starting and driving
WARNING
Do not operate the push-button
ignition switch while driving the ve-
hicle except in an emergency. (The
engine will stop when the ignition
switch is pushed 3 consecutive times
or the ignition switch is pushed and
held for more than 2 seconds.) If the
engine stops while the vehicle is
being driven, this could lead to a
crash and serious injury.
Before operating the push-button igni-
tion switch, be sure to move the shift
lever to the P (Park) position (for auto-
matic transmission model) or the shift
lever to the N (Neutral) position (for
manual transmission model).
SSD0825
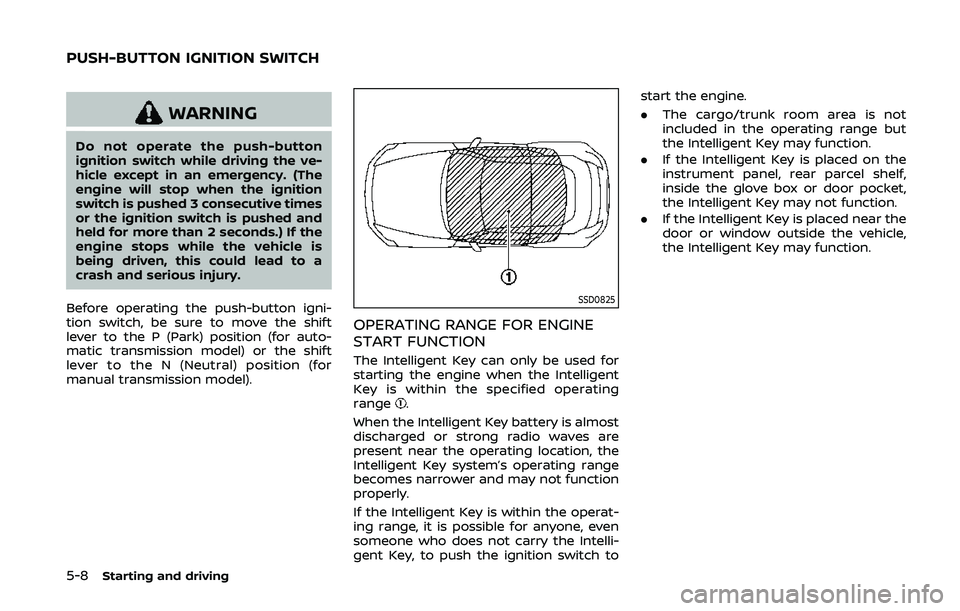
OPERATING RANGE FOR ENGINE
START FUNCTION
The Intelligent Key can only be used for
starting the engine when the Intelligent
Key is within the specified operating
range
.
When the Intelligent Key battery is almost
discharged or strong radio waves are
present near the operating location, the
Intelligent Key system’s operating range
becomes narrower and may not function
properly.
If the Intelligent Key is within the operat-
ing range, it is possible for anyone, even
someone who does not carry the Intelli-
gent Key, to push the ignition switch to start the engine.
.
The cargo/trunk room area is not
included in the operating range but
the Intelligent Key may function.
. If the Intelligent Key is placed on the
instrument panel, rear parcel shelf,
inside the glove box or door pocket,
the Intelligent Key may not function.
. If the Intelligent Key is placed near the
door or window outside the vehicle,
the Intelligent Key may function.
PUSH-BUTTON IGNITION SWITCH
Page 307 of 455
SSD1021
PUSH-BUTTON IGNITION SWITCH
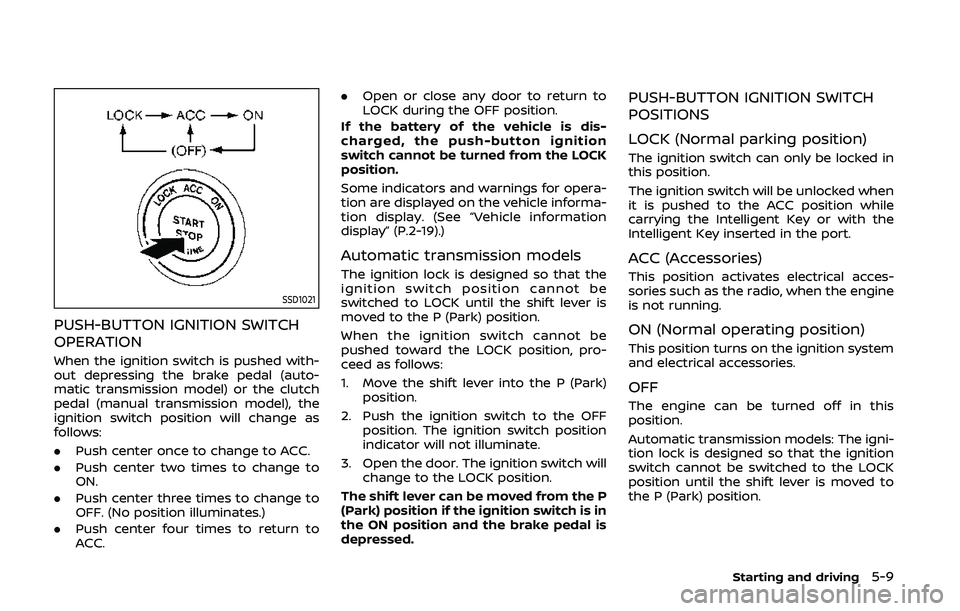
OPERATION
When the ignition switch is pushed with-
out depressing the brake pedal (auto-
matic transmission model) or the clutch
pedal (manual transmission model), the
ignition switch position will change as
follows:
.Push center once to change to ACC.
. Push center two times to change to
ON.
. Push center three times to change to
OFF. (No position illuminates.)
. Push center four times to return to
ACC. .
Open or close any door to return to
LOCK during the OFF position.
If the battery of the vehicle is dis-
charged, the push-button ignition
switch cannot be turned from the LOCK
position.
Some indicators and warnings for opera-
tion are displayed on the vehicle informa-
tion display. (See “Vehicle information
display” (P.2-19).)
Automatic transmission models
The ignition lock is designed so that the
ignition switch position cannot be
switched to LOCK until the shift lever is
moved to the P (Park) position.
When the ignition switch cannot be
pushed toward the LOCK position, pro-
ceed as follows:
1. Move the shift lever into the P (Park) position.
2. Push the ignition switch to the OFF position. The ignition switch position
indicator will not illuminate.
3. Open the door. The ignition switch will change to the LOCK position.
The shift lever can be moved from the P
(Park) position if the ignition switch is in
the ON position and the brake pedal is
depressed.
PUSH-BUTTON IGNITION SWITCH
POSITIONS
LOCK (Normal parking position)
The ignition switch can only be locked in
this position.
The ignition switch will be unlocked when
it is pushed to the ACC position while
carrying the Intelligent Key or with the
Intelligent Key inserted in the port.
ACC (Accessories)
This position activates electrical acces-
sories such as the radio, when the engine
is not running.
ON (Normal operating position)
This position turns on the ignition system
and electrical accessories.
OFF
The engine can be turned off in this
position.
Automatic transmission models: The igni-
tion lock is designed so that the ignition
switch cannot be switched to the LOCK
position until the shift lever is moved to
the P (Park) position.
Starting and driving5-9
Page 309 of 455

.Make sure the area around the vehicle
is clear.
. Check fluid levels such as engine oil,
coolant, brake fluid and window
washer fluid as frequently as possible,
or at least whenever you refuel.
. Check that all windows and lights are
clean.
. Visually inspect tires for their appear-
ance and condition. Also check tires
for proper inflation.
. Lock all doors.
. Position seat and adjust head re-
straints.
. Adjust inside and outside mirrors.
. Fasten seat belts and ask all passen-
gers to do likewise.
. Check the operation of warning lights
when the ignition switch is pushed to
the ON position. (See “Warning lights,
indicator lights and audible remin-
ders” (P.2-10).) 1. Apply the parking brake.
2.
Automatic Transmission (AT) model:
Move the shift lever to the P (Park) or N
(Neutral) position. (P is recommended.)
The starter is designed not to operate
unless the shift lever is in either of the
above positions.
Manual Transmission (MT) model:
Move the shift lever to the N (Neutral)
position. Depress the clutch pedal fully
to the floor.
The starter is designed not to operate
unless the clutch pedal is fully de-
pressed.
The Intelligent Key must be carried
when operating the ignition switch.
3. Push the ignition switch to the ON position. Firmly depress the brake
pedal (AT model) or the clutch pedal
(MT model) and push the ignition
switch to start the engine.
To start the engine immediately, push
and release the ignition switch while
depressing the brake pedal or the
clutch pedal with the ignition switch
in any position.
.If the engine is very hard to start inextremely cold weather or when
restarting, depress the accelerator
pedal a little (approximately 1/3 to the floor) and while holding, crank
the engine. Release the accelerator
pedal when the engine starts.
.If the engine is very hard to start
because it is flooded, depress the
accelerator pedal all the way to the
floor and hold it. Push the ignition
switch to the ON position to start
cranking the engine. After 5 or 6
seconds, stop cranking by pushing
the ignition switch to OFF. After
cranking the engine, release the
accelerator pedal. Crank the engine
with your foot off the accelerator
pedal by depressing the brake
pedal and pushing the push-button
ignition switch to start the engine.
If the engine starts, but fails to run,
repeat the above procedure.
CAUTION
Do not operate the starter for more
than 15 seconds at a time. If the
engine does not start, push the
ignition switch to OFF and wait 10
seconds before cranking again,
otherwise the starter could be da-
maged.
Starting and driving5-11
BEFORE STARTING THE ENGINE STARTING THE ENGINE
Page 310 of 455
5-12Starting and driving
4.Warm-up
Allow the engine to idle for at least 30
seconds after starting. Do not race the
engine while warming it up. Drive at
moderate speed for a short distance
first, especially in cold weather. In cold
weather, keep the engine running for
a minimum of 2 - 3 minutes before
shutting it off. Starting and stopping
the engine over a short period of time
may make the vehicle more difficult to
start.
When racing the engine up to 4,500
rpm or more under no load condition,
the engine will enter the fuel cut
mode.
5. To stop the engine, shift the shift lever to the P (Park) position (AT model) or
move the shift lever to the N (Neutral)
position (MT model), and push the
ignition switch to the OFF position.
NOTE:
Care should be taken to avoid situations
that can lead to potential battery dis-
charge and potential no-start condi-
tions such as:
1. Installation or extended use of elec-
tronic accessories that consume
battery power when the engine is
not running (Phone chargers, GPS,
DVD players, etc.) 2.
Vehicle is not driven regularly and/
or only driven short distances.
In these cases, the battery may need to
be charged to maintain battery health.AUTOMATIC TRANSMISSION
7 speed automatic transmission
The automatic transmission in your vehi-
cle is electronically controlled by a trans-
mission control module to produce
maximum efficiency and smooth opera-
tion.
Shown on the following pages are the
recommended operating procedures for
this transmission. Follow these proce-
dures for maximum vehicle performance
and driving enjoyment.
Starting the vehicle
After starting the engine, fully depress the
foot brake pedal and push the shift lever
button before shifting the shift lever to
the R (Reverse), N (Neutral), D (Drive) or
Manual shift mode position. Be sure the
vehicle is fully stopped before attempting
to shift the shift lever.
This automatic transmission model is
designed so that the foot brake pedal
must be depressed before shifting from
P (Park) to any drive position while the
ignition switch position is ON.
The shift lever cannot be moved out of
the P (Park) position and into any of the
other gear positions if the ignition
switch is pushed to the LOCK, OFF or
ACC position.
DRIVING THE VEHICLE