2020 NISSAN 370Z spare wheel
[x] Cancel search: spare wheelPage 341 of 455
SCE0504
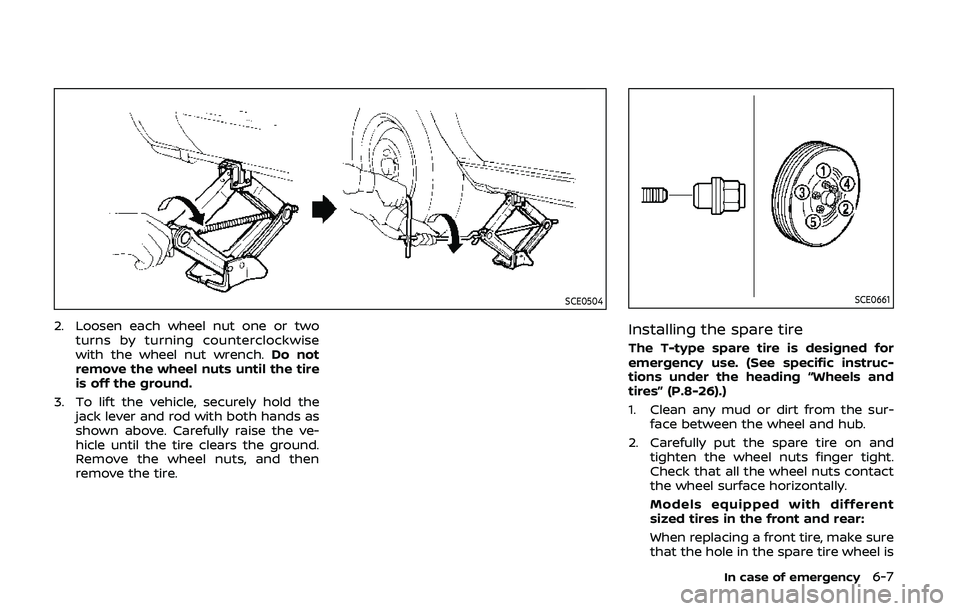
2. Loosen each wheel nut one or twoturns by turning counterclockwise
with the wheel nut wrench. Do not
remove the wheel nuts until the tire
is off the ground.
3. To lift the vehicle, securely hold the jack lever and rod with both hands as
shown above. Carefully raise the ve-
hicle until the tire clears the ground.
Remove the wheel nuts, and then
remove the tire.
SCE0661
Installing the spare tire
The T-type spare tire is designed for
emergency use. (See specific instruc-
tions under the heading “Wheels and
tires” (P.8-26).)
1. Clean any mud or dirt from the sur-face between the wheel and hub.
2. Carefully put the spare tire on and tighten the wheel nuts finger tight.
Check that all the wheel nuts contact
the wheel surface horizontally.
Models equipped with different
sized tires in the front and rear:
When replacing a front tire, make sure
that the hole in the spare tire wheel is
In case of emergency6-7
Page 342 of 455

6-8In case of emergency
aligned with the pin on the brake
rotor.
3. With the wheel nut wrench, tighten wheel nuts alternately and evenly in
the sequence illustrated (
,,,,)
until they are tight.
4. Lower the vehicle slowly until the tire touches the ground. Then, with the
wheel nut wrench, tighten the wheel
nuts securely in the sequence as
illustrated. Lower the vehicle comple-
tely.
WARNING
.Incorrect wheel nuts or impro-
perly tightened wheel nuts can
cause the wheel to become loose
or come off. This could cause an
accident.
. Do not use oil or grease on the
wheel studs or nuts. This could
cause the nuts to become loose.
. Retighten the wheel nuts when
the vehicle has been driven for
600 miles (1,000 km) (also in
cases of a flat tire, etc.).
. As soon as possible, tighten the
wheel nuts to the specified torque
with a torque wrench. Wheel nut tightening torque:
80 ft-lb (108 N·m)
The wheel nuts must be kept tigh-
tened to specification at all times. It
is recommended that wheel nuts be
tightened to specifications at each
lubrication interval.
. Adjust tire pressure to the COLD
pressure.
COLD pressure:
After the vehicle has been parked for
three hours or more or driven less
than 1 mile (1.6 km).
COLD tire pressures are shown on
the Tire and Loading Information
label affixed to the driver side center
pillar.
Stowing the damaged tire and
tools
Coupe models:
1. Securely store the damaged tire and
jacking tools in the storage area.
2. Place the spare tire cover and the cargo room carpet over the damaged
tire.
3. Close the rear hatch.
SCE0845
Roadster models:
Securely store the jacking tools in the
storage area.
Place the spare tire cover and trunk room
carpet back in the trunk, and then close
the trunk lid.
Securely store the damaged tire accord-
ing to the following procedure as illu-
strated.
1. Put the damaged tire in the plastic bag
stored in the trunk.
2. Move the passenger seat forward, and then place the damaged tire
wrapped in the plastic bag behind
the seat.
Page 343 of 455

3. Move the passenger seat backward tosecure the damaged tire.
WARNING
.Always make sure that the spare
tire and jacking equipment are
properly secured after use. Such
items can become dangerous
projectiles in an accident or sud-
den stop.
. The spare tire is designed for
emergency use. See specific in-
structions under the heading
“Wheels and tires” (P.8-26).
REPAIRING FLAT TIRE (for models
with emergency tire puncture re-
pair kit)
WARNING
.After using Emergency Tire Sea-
lant to repair a minor tire punc-
ture, do not drive the vehicle at
speeds faster than 50 MPH (80
km/h).
. Immediately after using the
Emergency Tire Sealant to repair
a minor tire puncture, take your vehicle to inspect, and repair or
replace the tire. It is recom-
mended you visit a NISSAN dealer
for this service. The Emergency
Tire Sealant cannot permanently
seal a punctured tire. Continuing
operation of the vehicle without a
permanent tire repair can lead to
a crash.
. NISSAN recommends using only
Genuine NISSAN Emergency Tire
Sealant provided with your vehi-
cle. Other tire sealants may da-
mage the valve stem seal which
can cause the tire to lose air
pressure. It is recommended you
visit a NISSAN dealer as soon as
possible after using tire repair
sealant.
This vehicle does not have a spare tire.
The emergency tire puncture repair kit
(Emergency Tire Sealant) is supplied with
the vehicle instead of a spare tire. It can
be used to temporarily repair minor tire
punctures.
If possible, have the vehicle towed to a
facility that can repair or replace the flat
tire. Using the emergency tire puncture
repair kit may cause a malfunction of the
tire pressure sensor and cause the low
tire pressure warning light to illuminate. If you have a flat tire, follow the instruc-
tions below.
CAUTION
.
To avoid the emergency tire
puncture repair kit being da-
maged during storage or use:
— Only use the emergency tire
puncture repair kit on your
vehicle. Do not use it on other
vehicles.
— Only use the kit to inflate the tires of your vehicle and to
check the vehicle’s tire pres-
sure.
— Only plug the compressor into a 12V DC car power point.
— Keep the kit free of water and dirt.
— Do not disassemble or modify the kit.
— Do not drop the kit or allow hard impacts to the kit.
. Do not use the emergency tire
puncture repair kit under the
following conditions. It is recom-
mended you visit a NISSAN dealer
or professional road assistance.
In case of emergency6-9
Page 344 of 455
6-10In case of emergency
— when the sealant has passedits expiration date (shown on
the label attached to the bot-
tle)
— when the cut or the puncture is approximately 0.25 in (6
mm) or longer
— when the tire sidewall is da- maged
— when the vehicle has been driven with extremely low tire
pressure
— when the tire has come off the inside or the outside of the
wheel.
— when the tire wheel is da- maged
— when two or more tires are flat
Stopping the vehicle
1. Safely move the vehicle off the road and away from traffic.
2. Turn on the hazard warning flashers.
3. Park on a level surface and apply the parking brake.
4. Automatic Transmission models:
Move the shift lever to the P (Park) position.
Manual Transmission models:
Move the shift lever to the R (Reverse)
position.
5. Turn off the engine.
6. Raise the hood to warn other traffic and to signal professional road assis-
tance personnel that you need assis-
tance.
7. Have all passengers get out of the vehicle and stand in a safe place, away
from traffic and clear of the vehicle.
WARNING
Make sure the parking brake is se-
curely applied and the manual trans-
mission is shifted into R (Reverse) or
the automatic transmission into P
(Park).
. Never repair tires when the vehi-
cle is on a slope, ice or slippery
areas. This is hazardous.
. Never repair tires if oncoming
traffic is close to your vehicle.
Wait for professional road assis-
tance.
JVE0122X
Getting emergency tire puncture
repair kit
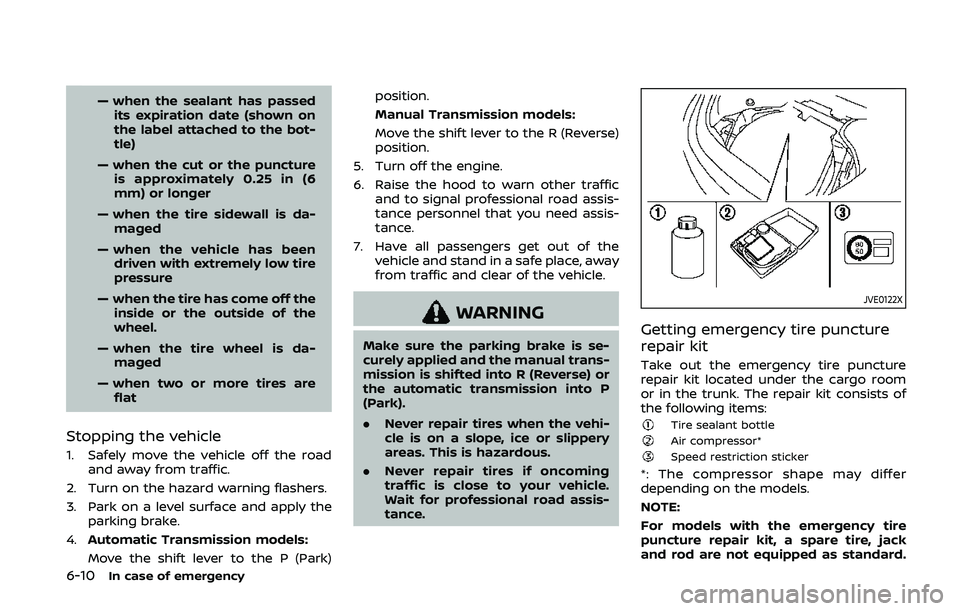
Take out the emergency tire puncture
repair kit located under the cargo room
or in the trunk. The repair kit consists of
the following items:
Tire sealant bottleAir compressor*Speed restriction sticker
*: The compressor shape may differ
depending on the models.
NOTE:
For models with the emergency tire
puncture repair kit, a spare tire, jack
and rod are not equipped as standard.
Page 345 of 455

These parts are dealer options. Contact
a NISSAN dealer about obtaining these
parts. See “Changing a flat tire (for
models with spare tire)” (P.6-4) for
usage of jacking tools and tire replace-
ment.
Before using emergency tire punc-
ture repair kit
.If any foreign object (for example, a
screw or nail) is embedded in the tire,
do not remove it.
. Check the expiration date of the
sealant (shown on the label attached
to the bottle). Never use a sealant
whose expiration date has passed.
Repairing tire
WARNING
Observe the following precautions
when using the tire repair com-
pound.
.Swallowing the compound is
dangerous. Immediately drink as
much water as possible and seek
prompt medical assistance.
. Rinse well with lots of water if the
compound comes into contact
with skin or eyes. If irritation
persists, seek prompt medical attention.
. Keep the repair compound out of
the reach of children.
. The emergency repair compound
may cause a malfunction of the
tire pressure sensors and cause
the low tire pressure warning
light to illuminate. Have the tire
pressure sensor replaced as soon
as possible.
NOTE:
Do not remove any nails or screws that
have penetrated the tire when perform-
ing repairs.
JVE0014X
1. Take out the speed restriction sticker from the air compressor*, then put it
in a location where the driver can see
it while driving.
*: The compressor shape may differ
depending on the models.
CAUTION
Do not put the speed restriction label
on the steering wheel pad, the
speedometer or the warning light
locations.
In case of emergency6-11
Page 394 of 455
8-26Do-it-yourself
If you have a flat tire, see “Flat tire” (P.6-
3).
TIRE PRESSURE
Tire Pressure Monitoring System
(TPMS)
This vehicle is equipped with the Tire
Pressure Monitoring System (TPMS). It
monitors tire pressure of all tires except
the spare. When the low tire pressure
warning light is lit and the CHECK TIRE
PRESSURE warning appears on the vehi-
cle information display, one or more of
your tires is significantly under-inflated.
The TPMS will activate only when the
vehicle is driven at speeds above 16 MPH
(25 km/h). Also, this system may not
detect a sudden drop in tire pressure
(for example a flat tire while driving).
For more details, see “Low tire pressure
warning light” (P.2-13), “Tire Pressure Mon-
itoring System (TPMS)” (P.5-3) and “Tire
Pressure Monitoring System (TPMS)” (P.6-
3).
Tire inflation pressure
Check the pressure of the tires
(including the spare) often and al-
ways prior to long distance trips.
The recommended tire pressure
specifications are shown on the
Tire and Loading Information label
under the “Cold Tire Pressure”
heading. The Tire and Loading In-
formation label is affixed to the
driver side center pillar. Tire pres-
sures should be checked regularly
because:
.Most tires naturally lose air over
time.
. Tires can lose air suddenly when
driven over potholes or other
objects or if the vehicle strikes
a curb while parking.
The tire pressures should be
checked when the tires are cold.
The tires are considered COLD after
the vehicle has been parked for 3 or
more hours, or driven less than 1
mile (1.6 km) at moderate speeds.
Incorrect tire pressure, including
under inflation, may adversely affect tire life and vehicle hand-
ling.
WARNING
.
Improperly inflated tires can
fail suddenly and cause an
accident.
. The Gross Vehicle Weight
rating (GVWR) is located on
the F.M.V.S.S./C.M.V.S.S. la-
bel. The vehicle weight ca-
pacity is indicated on the
Tire and Loading Informa-
tion label. Do not load your
vehicle beyond this capacity.
Overloading your vehicle
may result in reduced tire
life, unsafe operating condi-
tions due to premature tire
failure, or unfavorable hand-
ling characteristics and
could also lead to a serious
accident. Loading beyond
the specified capacity may
also result in failure of other
vehicle components.
WHEELS AND TIRES
Page 402 of 455
8-34Do-it-yourself
use of a winter traction device (tire chains
or cables). The minimum clearances are
determined using the factory equipped
tire size. Other types may damage your
vehicle. Use chain tensioners when re-
commended by the tire chain manufac-
turer to ensure a tight fit. Loose end links
of the tire chain must be secured or
removed to prevent the possibility of
whipping action damage to the fenders
or underbody. If possible, avoid fully load-
ing your vehicle when using tire chains. In
addition, drive at a reduced speed. Other-
wise, your vehicle may be damaged and/
or vehicle handling and performance may
be adversely affected.
Tire chains must be installed only on
the rear wheels and not on the front
wheels.
Never install tire chains on a TEMPORARY
USE ONLY spare tire.
Do not use tire chains on dry roads.
Driving with tire chains in such conditions
can cause damage to the various me-
chanisms of the vehicle due to some
overstress.CHANGING WHEELS AND TIRES
Tire rotation
Tires cannot be rotated on this
vehicle because the front tires are
a different size than the rear tires.
A pin is on the front brake rotor to
prevent the rear wheels from being
installed in place of the front
wheels. The spare tire can be
installed in place of the front and
rear wheels. When installing the
spare tire in the front wheel, the
hole in the spare tire wheel must be
aligned with the pin on the brake
rotor.
WARNING
.Retighten the wheel nuts
when the vehicle has been
driven for 600 miles (1,000
km) (also in cases of a flat
tire, etc.).
. For additional information
regarding tires, refer to “Im-
portant Tire Safety Informa- tion” (US) or “Tire Safety
Information” (Canada) in the
Warranty Information Book-
let.
Page 403 of 455
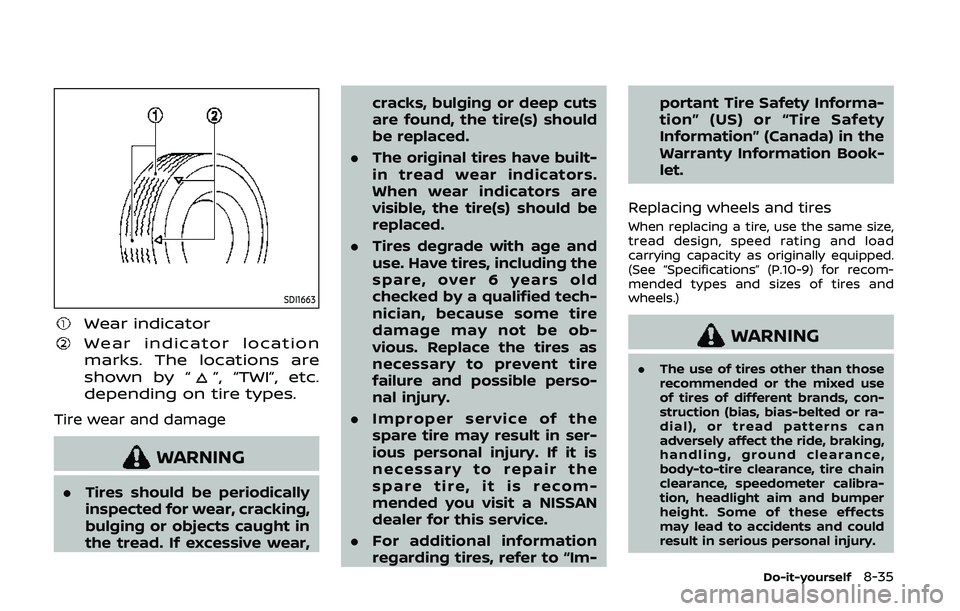
SDI1663
Wear indicator
Wear indicator location
marks. The locations are
shown by “
”, “TWI”, etc.
depending on tire types.
Tire wear and damage
WARNING
. Tires should be periodically
inspected for wear, cracking,
bulging or objects caught in
the tread. If excessive wear, cracks, bulging or deep cuts
are found, the tire(s) should
be replaced.
. The original tires have built-
in tread wear indicators.
When wear indicators are
visible, the tire(s) should be
replaced.
. Tires degrade with age and
use. Have tires, including the
spare, over 6 years old
checked by a qualified tech-
nician, because some tire
damage may not be ob-
vious. Replace the tires as
necessary to prevent tire
failure and possible perso-
nal injury.
. Improper service of the
spare tire may result in ser-
ious personal injury. If it is
necessary to repair the
spare tire, it is recom-
mended you visit a NISSAN
dealer for this service.
. For additional information
regarding tires, refer to “Im- portant Tire Safety Informa-
tion” (US) or “Tire Safety
Information” (Canada) in the
Warranty Information Book-
let.
Replacing wheels and tires
When replacing a tire, use the same size,
tread design, speed rating and load
carrying capacity as originally equipped.
(See “Specifications” (P.10-9) for recom-
mended types and sizes of tires and
wheels.)
WARNING
. The use of tires other than those
recommended or the mixed use
of tires of different brands, con-
struction (bias, bias-belted or ra-
dial), or tread patterns can
adversely affect the ride, braking,
handling, ground clearance,
body-to-tire clearance, tire chain
clearance, speedometer calibra-
tion, headlight aim and bumper
height. Some of these effects
may lead to accidents and could
result in serious personal injury.
Do-it-yourself8-35