2020 NISSAN 370Z open hood
[x] Cancel search: open hoodPage 352 of 455
6-18In case of emergency
2. Turn off the air conditioner. Open allthe windows, move the heater or air
conditioner temperature control to
maximum hot and fan control to high
speed.
3. If engine overheating is caused by climbing a long hill on a hot day, run
the engine at a fast idle (approxi-
mately 1,500 rpm) until the tempera-
ture gauge indication returns to
normal.
4. Get out of the vehicle. Look and listen for steam or coolant escaping from
the radiator before opening the hood.
(If steam or coolant is escaping, turn
off the engine.) Do not open the hood
further until no steam or coolant can
be seen.
5. Open the engine hood.
WARNING
If steam or water is coming from the
engine, stand clear to prevent get-
ting burned.
6. Visually check if the cooling fan is running. The radiator hoses and ra-
diator should not leak water. If coolant
is leaking or the cooling fan does not
run, stop the engine.
WARNING
Be careful not to allow your hands,
hair, jewelry or clothing to come into
contact with, or get caught in, engine
belts or the engine cooling fan. The
engine cooling fan can start at any
time.
7. After the engine cools down, check the coolant level in the reservoir with
the engine running. Add coolant to
the reservoir if necessary. Have your
vehicle repaired. It is recommended
you visit a NISSAN dealer for this
service.
Page 361 of 455
Rinse the vehicle thoroughly with plenty
of clean water.
Inside flanges, seams and folds on the
doors, hatches and hood are particularly
vulnerable to the effects of road salt.
Therefore, these areas must be regularly
cleaned. Make sure that the drain holes in
the lower edge of the door are open.
Spray water under the body and in the
wheel wells to loosen the dirt and wash
away road salt.
Avoid leaving water spots on the paint
surface by using a damp chamois to dry
the vehicle.
JVA0019X
NISMO models
CAUTION
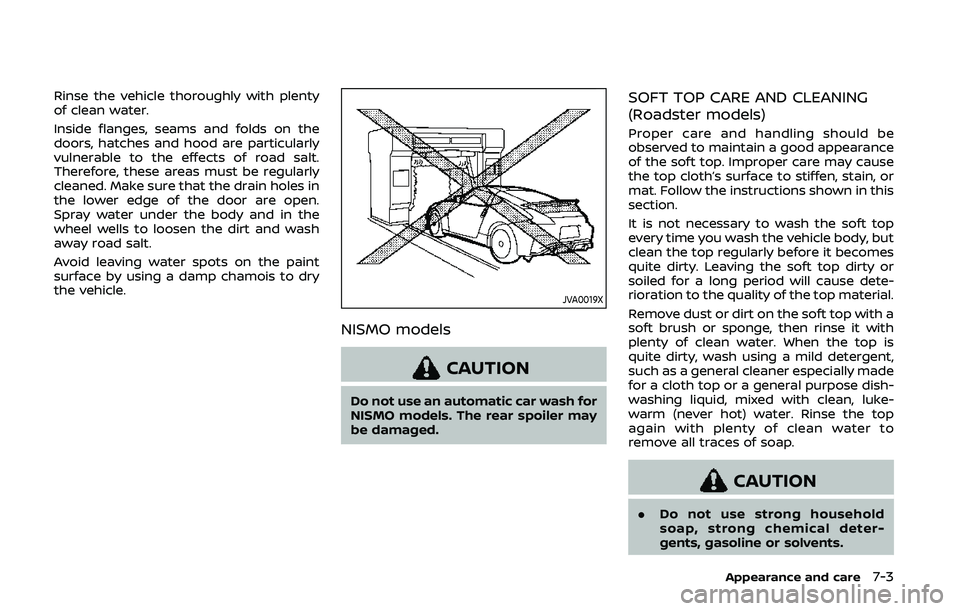
Do not use an automatic car wash for
NISMO models. The rear spoiler may
be damaged.
SOFT TOP CARE AND CLEANING
(Roadster models)
Proper care and handling should be
observed to maintain a good appearance
of the soft top. Improper care may cause
the top cloth’s surface to stiffen, stain, or
mat. Follow the instructions shown in this
section.
It is not necessary to wash the soft top
every time you wash the vehicle body, but
clean the top regularly before it becomes
quite dirty. Leaving the soft top dirty or
soiled for a long period will cause dete-
rioration to the quality of the top material.
Remove dust or dirt on the soft top with a
soft brush or sponge, then rinse it with
plenty of clean water. When the top is
quite dirty, wash using a mild detergent,
such as a general cleaner especially made
for a cloth top or a general purpose dish-
washing liquid, mixed with clean, luke-
warm (never hot) water. Rinse the top
again with plenty of clean water to
remove all traces of soap.
CAUTION
.Do not use strong household
soap, strong chemical deter-
gents, gasoline or solvents.
Appearance and care7-3
Page 379 of 455
Recommended fluid is Genuine NISSAN
Windshield Washer Concentrate Cleaner
& Antifreeze or equivalent.
CAUTION
.Do not substitute engine anti-
freeze coolant for window
washer solution. This may result
in damage to the paint.
. Do not fill the window washer
reservoir tank with washer fluid
concentrates at full strength.
Some methyl alcohol based
washer fluid concentrates may
permanently stain the grille if
spilled while filling the window
washer reservoir tank.
. Pre-mix washer fluid concen-
trates with water to the manu-
facturer’s recommended levels
before pouring the fluid into the
window washer reservoir tank. Do
not use the window washer re-
servoir tank to mix the washer
fluid concentrate and water. .
Keep the battery surface clean and
dry. Clean the battery with a solution
of baking soda and water.
. Make certain the terminal connec-
tions are clean and securely tightened.
. If the vehicle is not to be used for 30
days or longer, disconnect the nega-
tive (−) battery terminal cable to pre-
vent discharging it.
NOTE:
Care should be taken to avoid situations
that can lead to potential battery dis-
charge and potential no-start condi-
tions such as:
1. Installation or extended use of elec-
tronic accessories that consume
battery power when the engine is
not running (Phone chargers, GPS,
DVD players, etc.)
2. Vehicle is not driven regularly and/
or only driven short distances.
In these cases, the battery may need to
be charged to maintain battery health.
CAUTION
When the battery cable is removed
from the battery terminal, do not
close either of front doors. The auto-
matic window adjusting function will
not work, and the side roof panel may be damaged.
To disconnect the negative (−) battery
terminal, perform the procedure in the
following order. Otherwise, the window
and the side roof panel may contact and
be damaged.
1. Close the windows.
2. Open the hood.
3. Close and lock all the doors.
4. Disconnect the negative (−) battery terminal.
5. Securely close the hood.
To connect the negative (−) battery term-
inal, perform the procedure in the follow-
ing order. Otherwise, the window and the
side roof panel may contact and be
damaged.
1. Unlock and open the driver side door. Do not close the door.
2. Open the hood.
3. Connect the negative (−) battery term- inal. Then close the hood.
4. Fully open the driver side door win- dow.
5. Close the driver side door and the window.
Do-it-yourself8-11
BATTERY
Page 384 of 455
8-16Do-it-yourself
CLEANING
If your windshield is not clear after using
the windshield washer or if a wiper blade
chatters when running, wax or other
material may be on the blade or wind-
shield.
Clean the outside of the windshield with a
washer solution or a mild detergent. Your
windshield is clean if beads do not form
when rinsing with clear water.
Clean each blade by wiping it with a cloth
soaked in a washer solution or a mild
detergent. Then rinse the blade with clear
water. If your windshield is still not clear
after cleaning the blades and using the
wiper, replace the blades.
CAUTION
Worn windshield wiper blades can
damage the windshield and impair
driver vision.
SDI2359
REPLACING
Replace the wiper blades if they are worn.
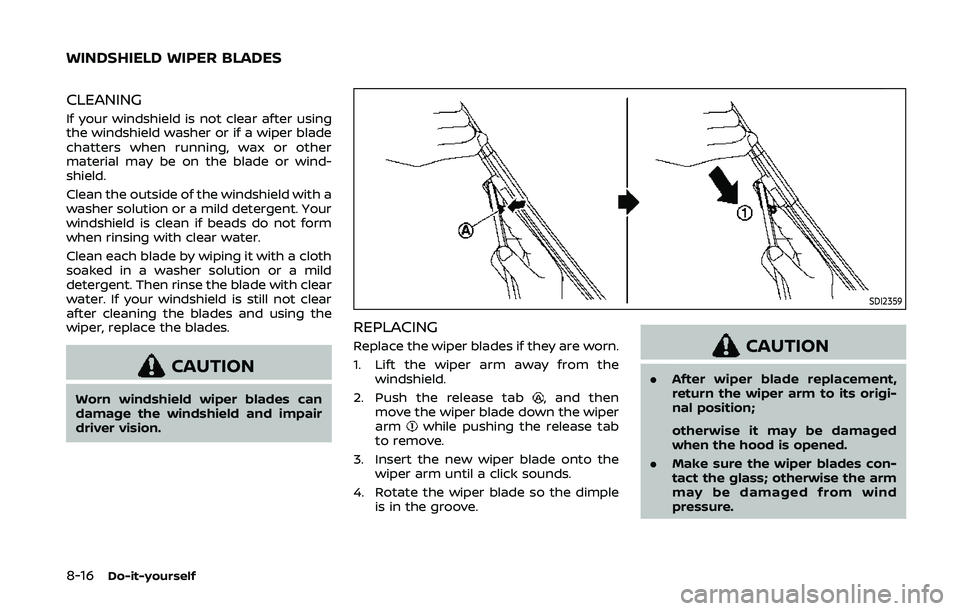
1. Lift the wiper arm away from thewindshield.
2. Push the release tab
, and then
move the wiper blade down the wiper
arm
while pushing the release tab
to remove.
3. Insert the new wiper blade onto the wiper arm until a click sounds.
4. Rotate the wiper blade so the dimple is in the groove.
CAUTION
.After wiper blade replacement,
return the wiper arm to its origi-
nal position;
otherwise it may be damaged
when the hood is opened.
. Make sure the wiper blades con-
tact the glass; otherwise the arm
may be damaged from wind
pressure.
WINDSHIELD WIPER BLADES
Page 386 of 455

8-18Do-it-yourself
SDI1479A
SDI2566
ENGINE COMPARTMENT
WARNING
Never use a fuse of a higher or lower
amperage rating than that specified
on the fuse box cover. This could
damage the electrical system or
electronic control units or cause a
fire.
If any electrical equipment does not
operate, check for an open fuse.
1. Be sure the ignition switch is pushed to the OFF or LOCK position and the
headlight switch is turned to OFF.
2. Open the engine hood.
3. Remove the fuse/fusible link holder cover.
4. Remove the fuse with the fuse puller located in the passenger compart-
ment fuse box.
SDI1754
5. If the fuse is open, replace it with a
new fuse. Spare fuses are stored in
the passenger compartment fuse box.
6. If a new fuse also opens, have the electrical system checked and re-
paired. It is recommended you visit a
NISSAN dealer for this service.
Fusible links
If any electrical equipment does not
operate and fuses are in good condition,
check the fusible links. If any of these
fusible links are melted, replace only with
genuine NISSAN parts.
FUSES
Page 408 of 455
9-2Maintenance and schedules
Some day-to-day and regular mainte-
nance is essential to maintain your vehi-
cle in good mechanical condition, as well
as its emission and engine performance.
It is the owner’s responsibility to make
sure that the scheduled maintenance, as
well as general maintenance, is per-
formed.
As the vehicle owner, you are the only one
who can ensure that your vehicle receives
the proper maintenance. You are a vital
link in the maintenance chain.
GENERAL MAINTENANCE
General maintenance includes those
items which should be checked during
normal day-to-day operation. They are
essential for proper vehicle operation. It is
your responsibility to perform these pro-
cedures regularly as prescribed.
Performing general maintenance checks
requires minimal mechanical skill and
only a few general automotive tools.
These checks or inspections can be done
by yourself, a qualified technician or, if you
prefer, a NISSAN dealer.
SCHEDULED MAINTENANCE
The maintenance items listed in this
section are required to be serviced at
regular intervals. However, under severe
driving conditions, additional or more
frequent maintenance will be required.
WHERE TO GO FOR SERVICE
If maintenance service is required or your
vehicle appears to malfunction, have the
systems checked and serviced. It is re-
commended you visit a NISSAN dealer for
this service.
NISSAN technicians are well-trained spe-
cialists and are kept up to date with the
latest service information through tech-
nical bulletins, service tips and training
programs. They are completely qualified
to work on NISSAN vehiclesbeforework
begins.
If your vehicle is involved in a collision, it is
recommended that you ask your NISSAN
dealer where the nearest NISSAN Certified
Collision Center is located, or go to http://
collision.nissanusa.com.
You can be confident that a NISSAN
dealer’s service department can perform
the service needed to meet the mainte-
nance requirements on your vehicle. During the normal day-to-day operation
of the vehicle, general maintenance
should be performed regularly as pre-
scribed in this section. If you detect any
unusual sounds, vibrations or smells, be
sure to check for the cause, or it is
recommended to have a NISSAN dealer
do it promptly. In addition, it is recom-
mended you visit a NISSAN dealer if you
think that repairs are required.
When performing any checks or mainte-
nance work, closely observe “Mainte-
nance precautions” (P.8-2) of this manual.
EXPLANATION OF GENERAL MAIN-
TENANCE ITEMS
Additional information on the following
items with “*” is found in the “8. Do-it-
yourself” section of this manual.
Outside the vehicle
The maintenance items listed here should
be performed from time to time, unless
otherwise specified.
Doors and engine hood:
Check that all
doors and the engine hood, operate
properly. Also ensure that all latches lock
securely. Lubricate hinges, latches, latch
pins, rollers and links if necessary. Make
sure that the secondary latch keeps the
hood from opening when the primary
latch is released.
MAINTENANCE REQUIREMENT GENERAL MAINTENANCE
Page 449 of 455

Front power seat adjustment ............................... 1-3
Front seat, Front seat adjustment .................... 1-3
Front-seat active head restraints ...................... 1-9
FuelCapacities and
recommended fluids/lubricants............... 10-2
Fuel consumption ................................................ 2-26
Fuel economy.......................................................... 5-25
Fuel economy information (display)......... 4-9
Fuel information.................................................... 10-4
Fuel octane rating ............................................... 10-4
Fuel-filler cap............................................................ 3-34
Fuel-filler door......................................................... 3-34
Gauge........................................................................\
........ 2-8
LOOSE FUEL CAP warning............................. 3-36
Fuel efficient driving tips ....................................... 5-24
Fuses........................................................................\
.............. 8-18
Fusible links...................................................................... 8-18
G
Garage door opener, HomeLink®
Universal Transceiver ............................................... 2-54
Gas cap........................................................................\
........ 3-34
Gauge........................................................................\
................ 2-5 Engine coolant temperature gauge......... 2-7
Fuel gauge .................................................................... 2-8
Odometer....................................................................... 2-6
Speedometer .............................................................. 2-6
Tachometer.................................................................. 2-7
Trip computer ......................................................... 2-25
General maintenance................................................... 9-2
Glove box ........................................................................\
... 2-45
H
Hands-free phone system, Bluetooth®
(models with navigation system) ................... 4-82
Hands-free phone system, Bluetooth®
(models without navigation system) ........... 4-92
Hatch, Rear hatch ....................................................... 3-17
Hazard warning flasher switch ............................ 6-2
Head restraints/headrests....................................... 1-6
Headlights Bulb replacement ................................................. 8-23
Headlight switch ................................................... 2-36
Xenon headlights.................................................. 2-35
Heated seats ................................................................... 2-40
Heater Engine block heater ........................................... 5-34
Heater and air
conditioner operation....................................... 4-31
HomeLink® Universal Transceiver .................. 2-54
Hood release ................................................................... 3-16
Horn........................................................................\
................ 2-39
I
Ignition switch (Push-button).............................................................. 5-8
Manual transmission models...................... 5-17
Immobilizer system.................................................... 2-32
In-cabin microfilter ..................................................... 4-36
Indicator lights............................................................... 2-15
INFO button ........................................................................\
. 4-8
Inside mirror .................................................................... 3-38
Inspection/maintenance (I/M) test ............ 10-25
Instrument brightness control ......................... 2-38
Instrument panel ............................................................. 2-4
Instrument pocket...................................................... 2-44
Intelligent Key..................................................................... 3-2 Intelligent Key battery
discharge indicator .................................................... 2-21
Intelligent Key removal indicator.................... 2-20
Intelligent Key system ................................................. 3-6
Battery replacement.......................................... 8-20
Intelligent Key system warning light ..... 2-12
Key operating range ............................................. 3-7
Key operation ............................................................. 3-9
Warning signals...................................................... 3-11
Interior light control switch ................................ 2-51
Interior light replacement..................................... 8-24
Interior lights................................................................... 2-51
Interior trunk lid release ........................................ 3-20
iPod® player operation............................................ 4-74
J
Jump starting ................................................................. 6-15
K
Keyless entry (See remote keyless
entry system) .................................................................. 3-13
Keys ........................................................................\
.................... 3-2 For Intelligent Key system................................ 3-6
L
Labels
Air bag warning labels ..................................... 1-45
Air conditioner specification label....... 10-14
Emission control information label .... 10-13
Engine serial number .................................... 10-13
F.M.V.S.S./C.M.V.S.S.
certification label .............................................. 10-13
Tire and Loading
information label................................ 8-28, 10-14
11-3