2020 NISSAN 370Z air condition
[x] Cancel search: air conditionPage 297 of 455
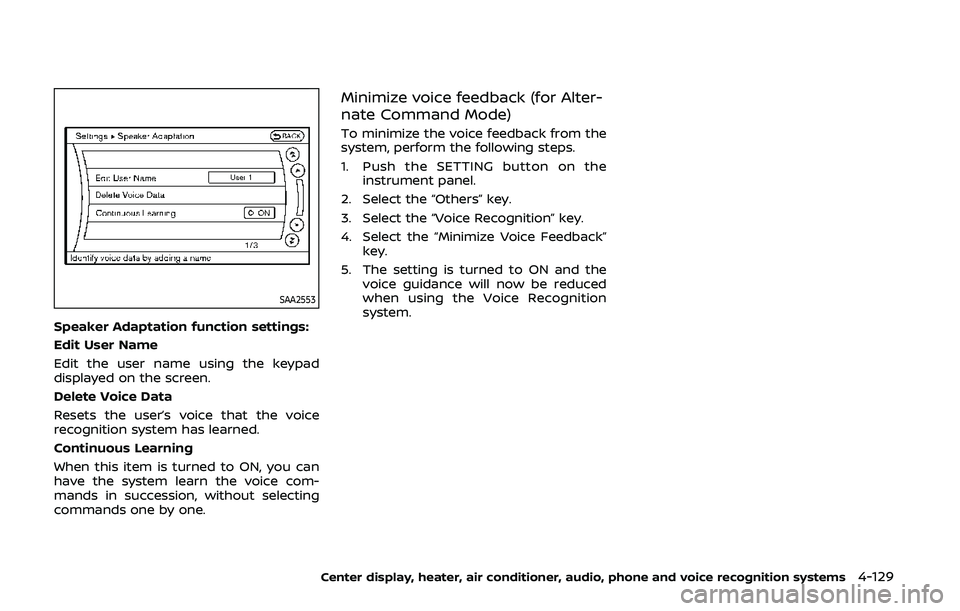
SAA2553
Speaker Adaptation function settings:
Edit User Name
Edit the user name using the keypad
displayed on the screen.
Delete Voice Data
Resets the user’s voice that the voice
recognition system has learned.
Continuous Learning
When this item is turned to ON, you can
have the system learn the voice com-
mands in succession, without selecting
commands one by one.
Minimize voice feedback (for Alter-
nate Command Mode)
To minimize the voice feedback from the
system, perform the following steps.
1. Push the SETTING button on theinstrument panel.
2. Select the “Others” key.
3. Select the “Voice Recognition” key.
4. Select the “Minimize Voice Feedback” key.
5. The setting is turned to ON and the voice guidance will now be reduced
when using the Voice Recognition
system.
Center display, heater, air conditioner, audio, phone and voice recognition systems4-129
Page 298 of 455
4-130Center display, heater, air conditioner, audio, phone and voice recognition systems
TROUBLESHOOTING GUIDE
The system should respond correctly to all voice commands without difficulty. If problems are encountered, follow the solutions
given in this guide for the appropriate error.
Where the solutions are listed by number, try each solution in turn, starting with number one, until the problem is resolved.
Symptom/error messageSolution
The system fails to interpret the command
correctly. 1. Ensure that the command format is valid, see “Command List” (P.4-111).
2. Speak clearly without pausing between words and at a level appropriate to the ambient noise
level.
3. Ensure that the ambient noise level is not excessive, for example, windows open or defrost on.
NOTE:
If it is too noisy to use the phone, it is likely that voice commands will not be recognized.
4. If optional words of the command have been omitted, then the command should be tried with
these in place.
The system consistently selects the wrong
voicetag in the phonebook. 1. Ensure that the voicetag requested matches what was originally stored. (See “Bluetooth® hands-
free phone system (models with navigation system)” (P.4-82).)
2. Replace one of the voicetags being confused with a different voicetag.
The system cannot be operated. 1. Make sure that the soft top (for Roadster models) is usable. If the soft top is not working, it is
recommended to contact a NISSAN dealer.
2. Close the soft top (for Roadster models).
3. Open and close the soft top (for Roadster models) before operating the system.
Page 303 of 455

the light still illuminates while
driving after adjusting the tire
pressure, a tire may be flat or
the TPMS may be malfunctioning.
If you have a flat tire, replace it
with a spare tire (if so equipped)
or repair it with the tire puncture
repair kit (if so equipped) as soon
as possible. If no tire is flat and all
tires are properly inflated, it is
recommended you consult a
NISSAN dealer.
. Since the spare tire is not
equipped with the TPMS, when a
spare tire is mounted or a wheel
is replaced, the TPMS will not
function and the low tire pressure
warning light will flash for ap-
proximately 1 minute. The light
will remain on after 1 minute.
Have your tires replaced and/or
TPMS system reset as soon as
possible. It is recommended you
visit a NISSAN dealer for these
services.
. Replacing tires with those not
originally specified by NISSAN
could affect the proper operation
of the TPMS.
. NISSAN recommends using only
Genuine NISSAN Emergency Tire
Sealant provided with your vehi- cle. Other tire sealants may da-
mage the valve stem seal which
can cause the tire to lose air
pressure. It is recommended you
visit a NISSAN dealer as soon as
possible after using tire repair
sealant (for models equipped
with the emergency tire puncture
repair kit).
CAUTION
.
The TPMS may not function prop-
erly when the wheels are
equipped with tire chains or the
wheels are buried in snow.
. Do not place metalized film or
any metal parts (antenna, etc.) on
the windows. This may cause
poor reception of the signals
from the tire pressure sensors,
and the TPMS will not function
properly.
Some devices and transmitters may tem-
porarily interfere with the operation of
the TPMS and cause the low tire pressure
warning light to illuminate. Some exam-
ples are: .
Facilities or electric devices using
similar radio frequencies are near the
vehicle.
. If a transmitter set to similar frequen-
cies is being used in or near the
vehicle.
. If a computer (or similar equipment) or
a DC/AC converter is being used in or
near the vehicle.
Low tire pressure warning light may
illuminate in the following cases.
. If the vehicle is equipped with a wheel
and tire without TPMS.
. If the TPMS has been replaced and the
ID has not been registered.
. If the wheel is not originally specified
by NISSAN.
FCC Notice:
For USA:
This device complies with Part 15 of the
FCC Rules. Operation is subject to the
following two conditions: (1) This device
may not cause harmful interference,
and (2) this device must accept any
interference received, including inter-
ference that may cause undesired op-
eration.
NOTE:
Changes or modifications not expressly
approved by the party responsible for
compliance could void the user’s
Starting and driving5-5
Page 304 of 455
5-6Starting and driving
authority to operate the equipment.
For Canada:
This device complies with Industry Ca-
nada licence-exempt RSS standard(s).
Operation is subject to the following
two conditions: (1) this device may not
cause interference, and (2) this device
must accept any interference, including
interference that may cause undesired
operation of the device.
AVOIDING COLLISION AND ROLL-
OVER
WARNING
Failure to operate this vehicle in a
safe and prudent manner may result
in loss of control or an accident.
Be alert and drive defensively at all times.
Obey all traffic regulations. Avoid exces-
sive speed, high speed cornering, or
sudden steering maneuvers, because
these driving practices could cause you
to lose control of your vehicle. As with
any vehicle, a loss of control could
result in a collision with other vehicles
or objects, or cause the vehicle to roll-
over, particularly if the loss of control
causes the vehicle to slide sideways. Be
attentive at all times, and avoid driving when tired. Never drive when under the
influence of alcohol or drugs (including
prescription or over-the-counter drugs
which may cause drowsiness). Always
wear your seat belt as outlined in the
“Seat belts” (P.1-10) of this manual, and
also instruct your passengers to do so.
Seat belts help reduce the risk of injury in
collisions and rollovers.
In a rollover
crash, an unbelted or improperly belted
person is significantly more likely to be
injured or killed than a person properly
wearing a seat belt.
OFF-ROAD RECOVERY
While driving, the right side or left side
wheels may unintentionally leave the
road surface. If this occurs, maintain
control of the vehicle by following the
procedure below. Please note that this
procedure is only a general guide. The
vehicle must be driven as appropriate
based on the conditions of the vehicle,
road and traffic.
1. Remain calm and do not overreact.
2. Do not apply the brakes.
3. Maintain a firm grip on the steering wheel with both hands and try to hold
a straight course.
4. When appropriate, slowly release the accelerator pedal to gradually slow
the vehicle. 5. If there is nothing in the way, steer the
vehicle to follow the road while the
vehicle speed is reduced. Do not
attempt to drive the vehicle back onto
the road surface until vehicle speed is
reduced.
6. When it is safe to do so, gradually turn the steering wheel until both tires
return to the road surface. When all
tires are on the road surface, steer the
vehicle to stay in the appropriate
driving lane.
.If you decide that it is not safe toreturn the vehicle to the road sur-
face based on vehicle, road or
traffic conditions, gradually slow
the vehicle to a stop in a safe place
off the road.
RAPID AIR PRESSURE LOSS
Rapid air pressure loss or a “blow-out” can
occur if the tire is punctured or is
damaged due to hitting a curb or pothole.
Rapid air pressure loss can also be caused
by driving on under-inflated tires.
Rapid air pressure loss can affect the
handling and stability of the vehicle,
especially at highway speeds.
Help prevent rapid air pressure loss by
maintaining the correct air pressure and
visually inspect the tires for wear and
damage. See “Wheels and tires” (P.8-26) of
Page 305 of 455
this manual.
If a tire rapidly loses air pressure or
“blows-out” while driving maintain control
of the vehicle by following the procedure
below. Please note that this procedure is
only a general guide. The vehicle must be
driven as appropriate based on the con-
ditions of the vehicle, road and traffic.
WARNING
The following actions can increase
the chance of losing control of the
vehicle if there is a sudden loss of tire
air pressure. Losing control of the
vehicle may cause a collision and
result in personal injury.
.The vehicle generally moves or
pulls in the direction of the flat
tire.
. Do not rapidly apply the brakes.
. Do not rapidly release the accel-
erator pedal.
. Do not rapidly turn the steering
wheel.
1. Remain calm and do not overreact.
2. Maintain a firm grip on the steering wheel with both hands and try to hold
a straight course. 3. When appropriate, slowly release the
accelerator pedal to gradually slow
the vehicle.
4. Gradually steer the vehicle to a safe location off the road and away from
traffic if possible.
5. Lightly apply the brake pedal to gra- dually stop the vehicle.
6. Turn on the hazard warning flashers and either contact a roadside emer-
gency service to change the tire or see
“Changing a flat tire (for models with
spare tire)” (P.6-4) of this Owner’s
Manual.
DRINKING ALCOHOL/DRUGS AND
DRIVING
WARNING
Never drive under the influence of
alcohol or drugs. Alcohol in the
bloodstream reduces coordination,
delays reaction time and impairs
judgement. Driving after drinking
alcohol increases the likelihood of
being involved in an accident injuring
yourself and others. Additionally, if
you are injured in an accident, alco-
hol can increase the severity of the
injury. NISSAN is committed to safe driving.
However, you must choose not to drive
under the influence of alcohol. Every year
thousands of people are injured or killed
in alcohol-related accidents. Although the
local laws vary on what is considered to
be legally intoxicated, the fact is that
alcohol affects all people differently and
most people underestimate the effects of
alcohol.
Remember, drinking and driving don’t
mix! And that is true for drugs, too (over-
the-counter, prescription, and illegal
drugs). Don’t drive if your ability to oper-
ate your vehicle is impaired by alcohol,
drugs, or some other physical condition.
Starting and driving5-7
Page 314 of 455
5-16Starting and driving
SSD0832
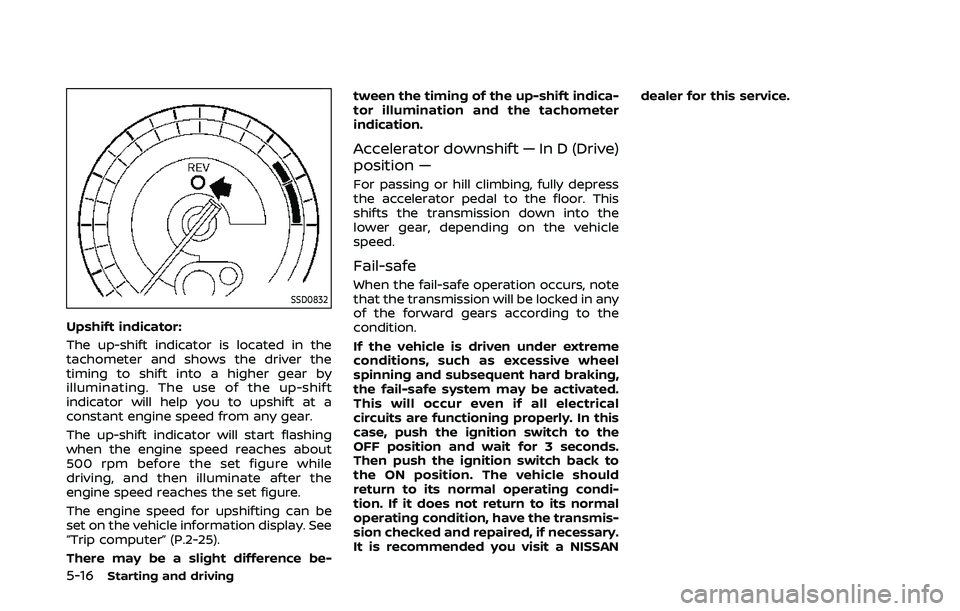
Upshift indicator:
The up-shift indicator is located in the
tachometer and shows the driver the
timing to shift into a higher gear by
illuminating. The use of the up-shift
indicator will help you to upshift at a
constant engine speed from any gear.
The up-shift indicator will start flashing
when the engine speed reaches about
500 rpm before the set figure while
driving, and then illuminate after the
engine speed reaches the set figure.
The engine speed for upshifting can be
set on the vehicle information display. See
“Trip computer” (P.2-25).
There may be a slight difference be-tween the timing of the up-shift indica-
tor illumination and the tachometer
indication.
Accelerator downshift — In D (Drive)
position —
For passing or hill climbing, fully depress
the accelerator pedal to the floor. This
shifts the transmission down into the
lower gear, depending on the vehicle
speed.
Fail-safe
When the fail-safe operation occurs, note
that the transmission will be locked in any
of the forward gears according to the
condition.
If the vehicle is driven under extreme
conditions, such as excessive wheel
spinning and subsequent hard braking,
the fail-safe system may be activated.
This will occur even if all electrical
circuits are functioning properly. In this
case, push the ignition switch to the
OFF position and wait for 3 seconds.
Then push the ignition switch back to
the ON position. The vehicle should
return to its normal operating condi-
tion. If it does not return to its normal
operating condition, have the transmis-
sion checked and repaired, if necessary.
It is recommended you visit a NISSAN
dealer for this service.
Page 322 of 455
5-24Starting and driving
one of the following methods:
.Lightly tap the brake pedal. When the
vehicle attains the desired speed,
push the COAST/SET switch and re-
lease it.
. Push and hold the COAST/SET switch.
Release the switch when the vehicle
slows down to the desired speed.
. Push, then quickly release the COAST/
SETT switch. Each time you do this,
the set speed will decrease by about 1
MPH (1.6 km/h).
To resume the preset speed, push and
release the ACCEL/RES switch. The vehi-
cle will resume the last set cruising speed
when the vehicle speed is over 25 MPH
(40 km/h).
CAUTION
During the first 1,200 miles (2,000
km), follow these recommendations
to obtain maximum engine perfor-
mance and ensure the future relia-
bility and economy of your new
vehicle.
Failure to follow these recommenda-
tions may result in shortened engine
life and reduced engine perfor-
mance.
. Avoid driving for long periods at con-
stant speed, either fast or slow. Do not
run the engine over 4,000 rpm.
. Do not accelerate at full throttle in any
gear.
. Avoid quick starts.
. Avoid hard braking as much as possi-
ble. Follow these easy-to-use Fuel Efficient
Driving Tips to help you achieve the most
fuel economy from your vehicle.
1. Use smooth accelerator and brake
pedal application.
.Avoid rapid starts and stops..Use smooth, gentle accelerator andbrake application whenever possi-
ble.
.Maintain constant speed whilecommuting and coast whenever
possible.
2. Maintain constant speed.
.Look ahead to try and anticipate and minimize stops.
.Synchronizing your speed with traf-fic lights allows you to reduce your
number of stops.
.Maintaining a steady speed canminimize red light stops and im-
prove fuel efficiency.
3. Use air conditioning (A/C) at higher vehicle speeds.
.Below 40 MPH (64 km/h), it is moreefficient to open windows to cool
the vehicle due to reduced engine
load.
.Above 40 MPH (64 km/h), it is more
efficient to use A/C to cool the
vehicle due to increased aerody-
namic drag.
BREAK-IN SCHEDULE FUEL EFFICIENT DRIVING TIPS
Page 323 of 455

.Recirculating the cool air in thecabin when the A/C is on reduces
cooling load.
4. Drive at economical speeds and dis- tances.
.Observing the speed limit and notexceeding 60 MPH (97 km/h)
(where legally allowed) can improve
fuel efficiency due to reduced aero-
dynamic drag.
.Maintaining a safe following dis-tance behind other vehicles re-
duces unnecessary braking.
.Safely monitoring traffic to antici- pate changes in speed permits
reduced braking and smooth accel-
eration changes.
.Select a gear range suitable to roadconditions.
5. Use cruise control.
.Using cruise control during highway driving helps maintain a steady
speed.
.Cruise control is particularly effec-tive in providing fuel savings when
driving on flat terrains.
6. Plan for the shortest route.
.Utilize a map or navigation system to determine the best route to save
time. 7. Avoid idling.
.Shutting off your engine when safe
for stops exceeding 30-60 seconds
saves fuel and reduces emissions.
8. Buy an automated pass for toll roads.
.Automated passes permit drivers to use special lanes to maintain cruis-
ing speed through the toll and
avoid stopping and starting.
9. Winter warm up.
.Limit idling time to minimize impact to fuel economy.
.Vehicles typically need no morethan 30 seconds of idling at start-
up to effectively circulate the en-
gine oil before driving.
.Your vehicle will reach its ideal
operating temperature more
quickly while driving versus idling.
10. Keeping your vehicle cool.
.Park your vehicle in a covered parking area or in the shade when-
ever possible.
.When entering a hot vehicle, open- ing the windows will help to reduce
the inside temperature faster, re-
sulting in reduced demand on your
A/C system. .
Keep your engine tuned up.
. Follow the recommended scheduled
maintenance.
. Keep the tires inflated to the correct
pressure. Low tire pressure increases
tire wear and lowers fuel economy.
. Keep the wheels in correct alignment.
Improper alignment increases tire
wear and lowers fuel economy.
. Use the recommended viscosity en-
gine oil. (See “Engine oil and oil filter
recommendation” (P.10-7).)
Starting and driving5-25
INCREASING FUEL ECONOMY