2020 MERCEDES-BENZ SLC ROADSTER tire pressure
[x] Cancel search: tire pressurePage 20 of 310

T
Tach ometer<0011001100110011001100110011001100110011001100110011001100110011
0011001100110011001100110011[ <0011001100110011001100110011001100110011001100110011001100110011
0011[168
Tail lamps
Dis play mes sage <0011001100110011001100110011001100110011001100110011001100110011
0011001100110011001100110011[ .....194
see Lights
Tank conte nt
Fue lgau ge <0011001100110011001100110011001100110011001100110011001100110011
0011001100110011001100110011[ ................32
Tec hnical data
Ca paciti es<0011001100110011001100110011001100110011001100110011001100110011
0011001100110011001100110011[ ...............299
Emer gency sparewh eel................. 295
Info rma tion.<0011001100110011001100110011001100110011001100110011001100110011
001100110011001100110011[ .............297
Ti res /wh eels<0011001100110011001100110011001100110011001100110011001100110011
0011001100110011001100110011[ ..........293
Veh icled ata. <0011001100110011001100110011001100110011001100110011001100110011
001100110011001100110011[ ............305
TEL EAID
Ca llpri ority<0011001100110011001100110011001100110011001100110011001100110011
0011001100110011001100110011[ .............234
Emer gency call.<0011001100110011001100110011001100110011001100110011001100110011
001100110011001100110011[ .......232
Ge nera lnotes <0011001100110011001100110011001100110011001100110011001100110011
0011001100110011001100110011[ .........231
MB info callbutton <0011001100110011001100110011001100110011001100110011001100110011
0011001100110011001100110011[ .234
Roa dside Assista ncebutton ..........233
Self-test ......................................... 231
System .......................................... 231
Vehi cleHeal thChe ck....... ............. 234
Tele phone
Accepting acall(mu ltifunction
steeri ngwhe el)....... .......................175
Authori zingamobilephone (con-
necting) ......................................... 222
Authori zingamobilephone via
the devi cemana ger(connecting) ...223
Connecting amobilephone
(de vice mana ger)........................... 223
Connecting amobilephone (gen-
eral informa tion)............................ 222
Displ aymessa ge....... ..................... 206
Menu (on-boa rdcompu ter)....... ..... 174
Numb erfrom thephone book........175
Red ialing ....... ................................. 175
Reje cting/endi ngacall....... ..........175
see also Digita lOpera tor's Man-
ua l....... ....... .............. ......................218
Temperature
Coo lant ....... ................................... 169
Coo lant (on-boa rdcompu ter,
Merced es-AMG SLC43)....... .........180
Engine oil(on-boa rdcompu ter,
Merced es-AMG SLC43)....... .........180
Outsi detempera ture......................168 Setting
(climate control) ................111
Transmi ssionoil(on-boa rdcom-
pute r,Merced es-AMG SLC43)...... 180
Timing (RACETIME R)....... .................. 181
Tire pressure
Ca lling up (on-boa rdcompu ter)..... 275
Che cking manually ....... .................274
Displ aymessa ge....... ..................... 202
Maxi mum .......................................274
Not reach ed(TIR EFIT) .................... 257
Notes .............................................273
Rea ched (TIREFIT) .......................... 257
Reco mmended ...............................271
Tire pressure lossw arni ngsys-
tem
Gene ralnotes ................................ 274
Importa ntsafe tynotes .................. 275
Res tarting ......................................275
Tire pressure monitor
Che cking thetire press ureelec-
tronical ly....... ................................. 277
Function/notes .............................275
Gene ralnotes ................................ 275
Importa ntsafe tynotes .................. 276
Ra dio type approval forthe tire
press uremonitor ........................... 279
Res tarting ......................................278
Warni nglamp ....... .......................... 217
Warni ngmessa ge....... ................... 277
Tire-c hange toolkit....... .................... 253
TIREF ITkit ....... ................................... 255
Importa ntsafe tynotes .................. 255
Storage location ............................ 253
Tire press urenot reach ed....... ....... 257
Tire press urereach ed....... ............. 257
Tires
Aspect ratio(definitio n)....... ..........288
Averag eweight ofthe vehi cle
occup ants(definitio n)....... ............. 287
Bar (definitio n)....... ........................287
Cha nging awheel....... ................... 289
Cha racteri stics..............................287
Che cking ........................................ 268
Cu rbwei ght (definitio n)....... ..........288
Definiti onofterms .........................287
Direction ofrotatio n.<0011001100110011001100110011001100110011001100110011001100110011
00110011001100110011[ 290
Disp laym essage <0011001100110011001100110011001100110011001100110011001100110011
001100110011001100110011001100110011001100110011[ 20218
In
dex
Page 25 of 310

Protecting
theenvironment General
notes H
Environmental
note
Daimler's declaredpolicyisone ofcompre-
hensive environm entalprotect ion.
The object ivesareforthe natural resources
that form thebasis ofour existen ceon this
planet tobe used sparingly andinam anner
that takes therequirements ofboth nature
and humanity intoaccount.
You toocan help toprotect theenvironm ent
by operating yourvehicle inan environm en-
tally responsible manner.
Fuel consumpt ionand therate ofengine,
transm ission,brakeandtirewear areaffec-
ted bythese factors:
R operating conditionsofyour vehicle
R your personal drivingstyle
You caninfluence bothfactors. Youshould
bear thefollowing inmind:
Operating conditions:
R avoid shorttripsasthese increase fuel
consumpt ion.
R alwa ysmake surethatthetire pressures
are correct .
R do not carry anyunnecessary weight.
R remove roofracks onceyounolonger
need them.
R ar egularly serviced vehiclewillcont ribute
to environm entalprotect ion.You should
therefore adheretothe service intervals.
R alwa yshave service workcarried outata
quali fiedspecialist workshop.
Personal drivingstyle:
R do not depress theaccelerator pedal
when startin gthe engine.
R do not warm upthe engine whenthevehi-
cle isstationary.
R drive carefully andmaintain asafe dis-
tance fromthevehicle infront .
R avoid frequent, suddenacceleration and
braking. R
change gearingood timeanduseeach
gear onlyupto00C3 ofits maximum engine
speed.
R switch offthe engine instationary traffic.
R keep aneye onthe vehicle's fuelcon-
sumption. Environmental
concerns andrecom-
mendat ions
Wherever theoperating instructionsrequire
you todispose ofmaterials, firsttrytoregen-
erate orre-use them.Observe therelevant
environm entalrulesandregulations whendis-
posing ofmaterials. Inthis way youwillhelp to
protect theenvironm ent. Genuine
Mercedes-Benz parts H
Environmental
note
Daimler AGalso supplie srecondit ioned
major assemblies andparts which areofthe
same qualityas new parts. Theyarecovered
by the same Limited Warranty entitlements
as new parts.
! Air
bags andEmergen cyTensioning Devi-
ces, aswell ascont rolunits andsensors for
these restraint systems, maybeinstalled in
the following areasofyour vehicle:
R doors
R door pillars
R door sills
R seats
R cock pit
R instrumen tcluster
R cent erconsole
Do not install accessories suchasaudio sys-
tems inthese areas. Donot carry out
repairs orwelding. Youcould impair the
operating efficiency ofthe restraint sys-
tems.
Have aftermark etaccessories installedata
quali fiedspecialist workshop.
You could jeopardize theoperating safetyof
your vehicle ifyou useparts, tiresandwheels
as well asaccessories relevanttosafety which Genuine
Mercedes-Benz parts
23Introdu ction Z
Page 141 of 310

The
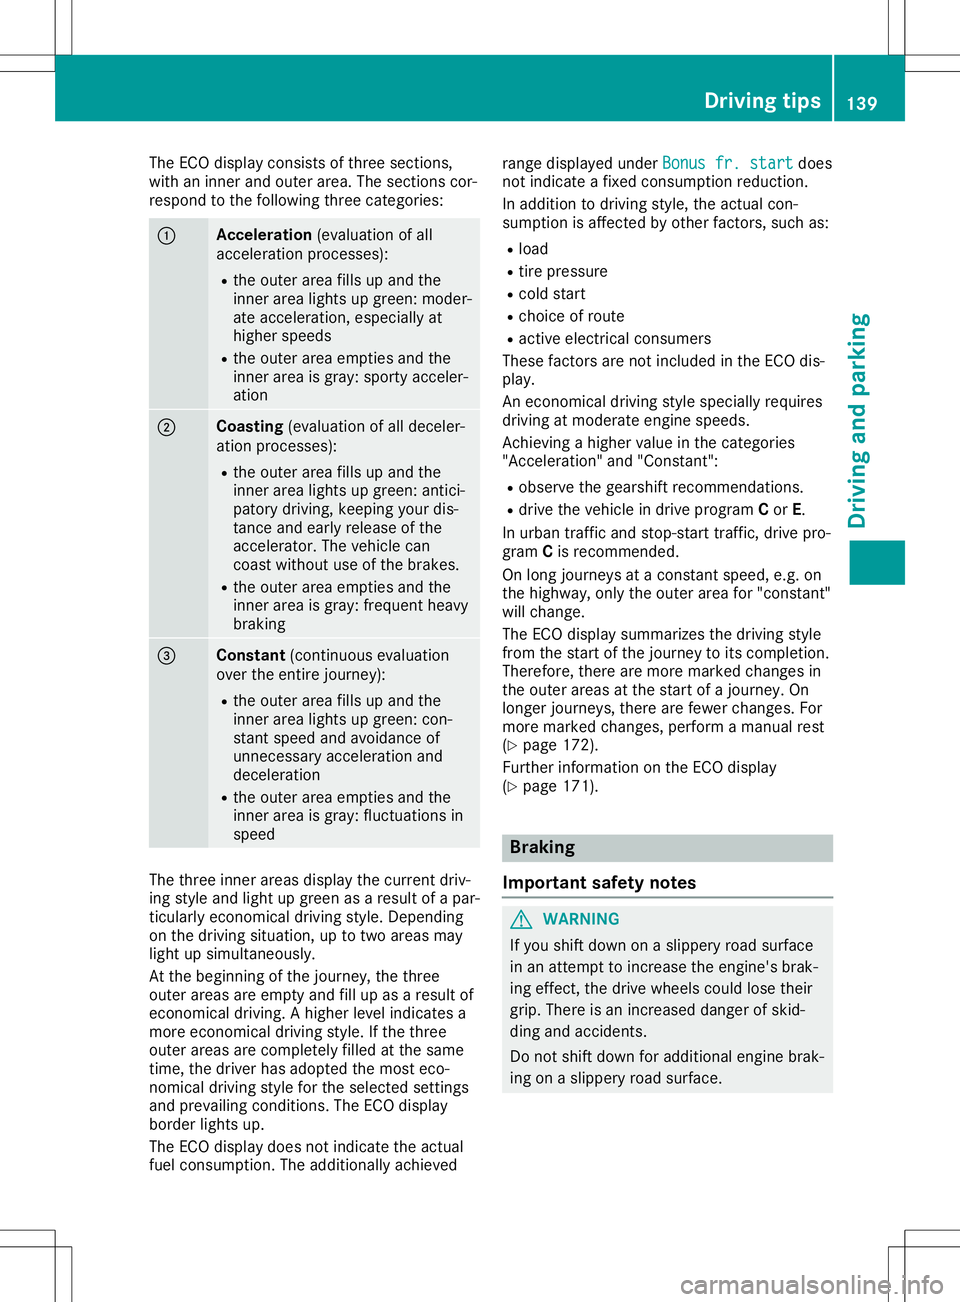
ECO display consistsofthree section s,
with aninner andouter area.Thesection scor-
respond tothe following threecategories: 0043
Acce
leration (evaluation ofall
acceleration processes):
R the outer areafillsupand the
inner arealights upgreen: moder-
ate acceleration ,especially at
higher speeds
R the outer areaempties andthe
inner areaisgray: sporty acceler-
ation 0044
Coasting
(evaluation ofall deceler-
ation processes):
R the outer areafillsupand the
inner arealights upgreen: antici-
patory driving, keeping yourdis-
tanc eand early release ofthe
accelerator. Thevehicle can
coast without useofthe brakes.
R the outer areaempties andthe
inner areaisgray: frequent heavy
braking 0087
Constant
(continuous evaluation
over theentir ejourney):
R the outer areafillsupand the
inner arealights upgreen: con-
stant speed andavoidance of
unnecessary accelerationand
deceleration
R the outer areaempties andthe
inner areaisgray: fluctuations in
speed The
three innerareas display thecurrent driv-
ing style andlight upgreen asaresult ofap ar-
ticularly economicaldriving style.Dependin g
on the driving situation, uptotwo areas may
light upsimultaneously.
At the beginning ofthe journey, thethree
outer areas areempty andfillup asaresult of
econom icaldriving. Ahigher levelindicates a
more econom icaldriving style.Ifthe three
outer areas arecompletely filledatthe same
time, thedriver hasadopted themost eco-
nomical drivingstyleforthe selected settings
and prevailing conditions.TheECO display
border lightsup.
The ECO display doesnotindicate theactual
fuel consumpt ion.Theadditionally achieved range
display edunder Bonus fr.start Bonus
fr.start does
not indicate afixed consumpt ionreduction .
In addition todriving style,theactual con-
sumption isaffect edbyother factors,such as:
R load
R tire pressure
R cold start
R choice ofroute
R active electric alconsumer s
These factorsarenot included inthe ECO dis-
play.
An econom icaldriving stylespecially requires
driving atmoderate enginespeeds.
Achievin gahigher value inthe categories
"Accelerat ion"and"Constant ":
R observe thegearshift recommendations .
R drive thevehicle indrive program Cor E.
In urban trafficand stop- start traffic,drive pro-
gram Cis recomm ended.
On long journeys atac onst antspeed, e.g.on
the highway, onlytheouter areafor"const ant"
will change.
The ECO display summarizes thedriving style
from thestart ofthe journey toits completion .
Therefore, therearemore marked changes in
the outer areas atthe start ofajourney. On
longer journeys, therearefewer changes. For
more marked changes, performamanual rest
(Y page 172).
Further informationonthe ECO display
(Y page 171). Br
aking
Import antsafety notes G
WARNIN
G
If you shift down onaslippery roadsurface
in an attempt toincrease theengine's brak-
ing effect ,the drive wheels couldlosetheir
grip. There isan increased dangerofskid-
ding andaccident s.
Do not shift down foradditional enginebrak-
ing onaslippery roadsurface. Driving
tips
139Driving andparking Z
Page 160 of 310

Use
Parking Guidance forparking spaces:
R paral leltothe direction oftravel
R on straight roads,notbends
R that areonthe same levelasthe road, i.e.
not onthe pavement, forexample. Parking
Assist PARKTRONIC maynotdetect flat
curbs
Parking tips:
R on narrow roads,driveasclosely aspossible
past theparking space
R parking spacesthatarelittered orover-
grown mightbeidentified ormeasured
incorrect ly
R parking spacesthatarepartiall yoccupied
by trailer drawba rsmight notbeidentified
as such orbe measured incorrectly
R snowfall orheavy rainmay lead toap arking
space beingmeasured inaccurately
R pay attent iontothe Parking Assist
PARKTRONIC warningmessages duringthe
parking procedure (Ypage 155)
R when transporting aload which protrudes
from yourvehicle, youshould notuse Park-
ing Guidance
R never useParking Guidance withsnow
chains oran emergency sparewheel moun-
ted
R make surethatthetire pressures arealwa ys
correct .This has adirect effect onthe steer-
ing characteristics.
R the way your vehicle ispositioned inthe
parking spaceafterparking isdependent on
various factors. Theseinclude theposition
and shape ofthe vehicles parkedinfront
and behind itand theconditions ofthe loca-
tion. Insome cases, Parking Guidance may
guide youtoofarornot farenough intoa
parking space.Insome cases, itmay also
lead youacross oronto thecurb. Ifneces-
sary, cancel theparking procedure with
Parking Guidance. Detec
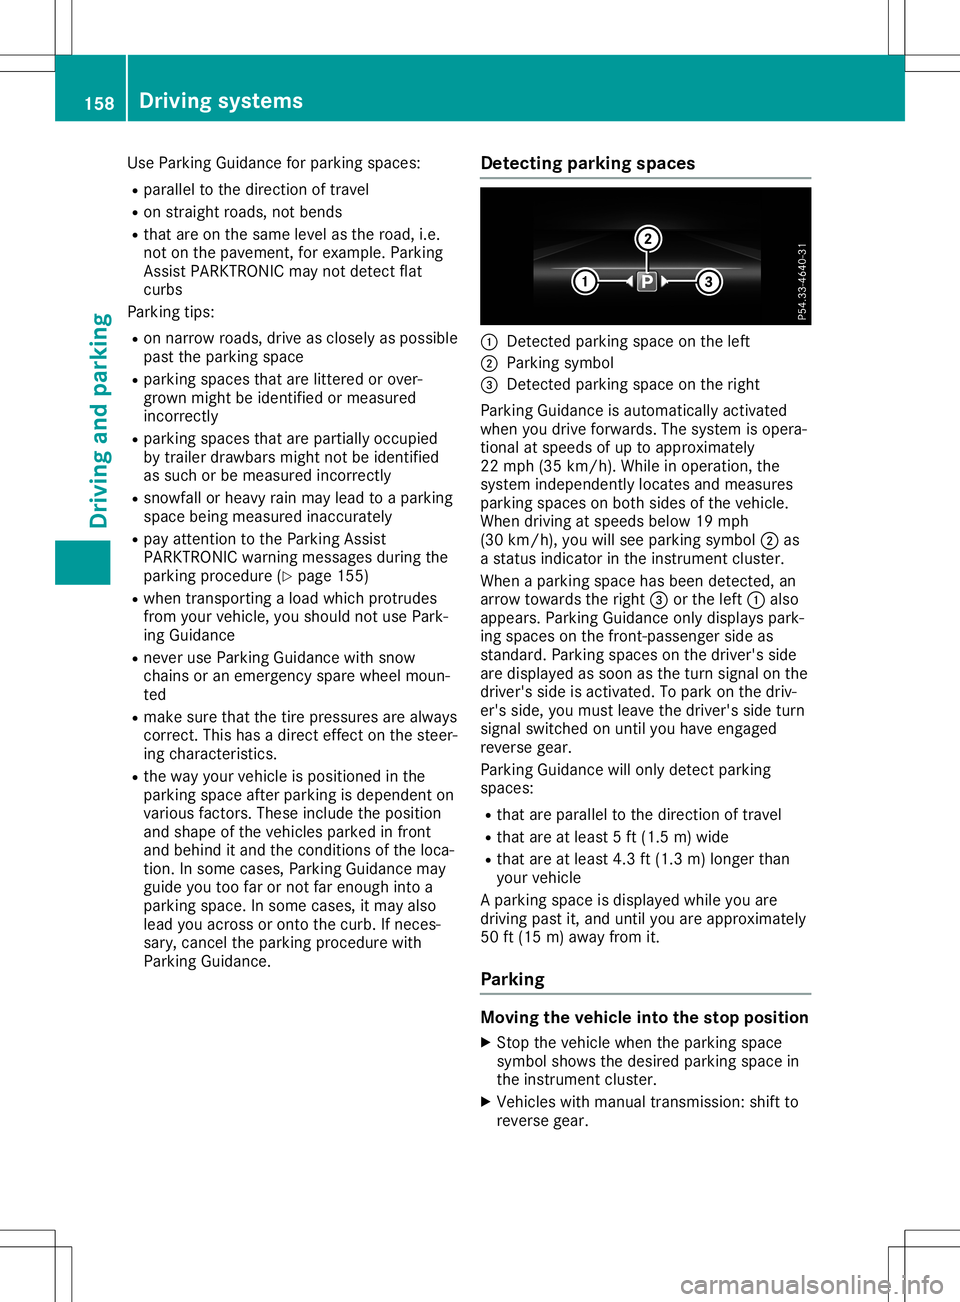
tingparking spaces 0043
Detect edparking spaceonthe left
0044 Parking symbol
0087 Detect edparking spaceonthe right
Parking Guidance isautomaticall yactivated
when youdrive forwards. Thesystem isopera-
tional atspeeds ofup toapproximately
22 mph (35km/h ).While inoperation, the
system independently locatesandmeasures
parking spacesonboth sides ofthe vehicle.
When driving atspeeds below19mph
(30 km/h), youwillsee parking symbol0044as
as tatus indicator inthe instrument cluster.
When aparking spacehasbeen detected, an
arrow towards theright 0087orthe left 0043also
appea rs.Parking Guidance onlydispla yspark-
ing spaces onthe front -passenger sideas
standard. Parkingspacesonthe driver's side
are displa yedassoon asthe turn signal onthe
driver's sideisactivated. Topark onthe driv-
er's side, youmust leave thedriver's sideturn
signal switched onuntil youhave engaged
reverse gear.
Parking Guidance willonly detect parking
spaces:
R that areparal leltothe direction oftravel
R that areatleast 5ft(1.5 m)wide
R that areatleast 4.3ft(1.3 m)longer than
your vehicle
Ap arking spaceisdispla yedwhile youare
driving pastit,and until youareapproximately
50 ft(15 m)awa yfrom it.
Parking Moving
thevehicl einto thestop position
X Stop thevehicle whentheparking space
symbol showsthedesired parking spacein
the instrument cluster.
X Vehicles withmanual transmission: shiftto
reverse gear. 158
Driving
systemsDriving andparking
Page 179 of 310

X
Press 0064or0063 toset Off Off,
Standard Standard
or
Adaptive Adaptive.
X Press the0076 button tosave thesetting.
When LaneKeeping Assistisactivat ed,the
multifunc tiondisplay showsthelane mark-
ings asbright linesinthe assistanc e
graphic.
Further informationonLane Keeping Assist
(Y page 166). Service
menu
Dependin gonthe equipment installedinthe
vehicle, youhave thefollowing optionsinthe
Serv. Serv.
menu:
R Calli ngup display messages (Ypage 183)
R Restartin gthe tire pressure losswarning
system (Ypage 275)
R Checking thetire pressure electronically
(Y page 275)
R Calli ngup the service duedate
(Y page 246) Settings
menu
Introdu ction Dependin
gonthe equipment installedinthe
vehicle, inthe Sett. Sett.
menuyouhave thefol-
lowing options:
R Changing theinstr ument cluster settings
(Y page 177)
R Changing thelight settings (Ypage 177)
R Changing thevehicle settings (Ypage 179)
R Changing theconv enienc esettings
(Y page 179)
R Restoring thefactor ysettings (Ypage 180)
Instru mentcluster Selecting
thedista nceunit
The Display UnitSpeed-/Odo meter: Display
UnitSpeed-/Odo meter:func-
tion allows youtochoose whether certaindis-
plays appear inkilometer sorm iles inthe mul-
tifunc tiondisplay.
X Press the0059 or0065 button onthe steer-
ing wheel toselect theSett. Sett.
menu.
X Press the0064 or0063 button toselect the
Instrument Cluster Instrument
Clustersubmenu. X
Press 0076toconf irm.
X Press the0064 or0063 button toselect the
Display UnitSpeed-/Odo meter: Display
UnitSpeed-/Odo meter:func-
tion.
The curren tsett ing km km
ormiles miles
appears.
X Press the0076 button tosave thesetting.
The selected unitofmeasurement fordistanc e
applies to:
R the digital speedometer inthe Trip Trip
menu
R the odometer andtripodometer
R the trip computer
R the curren tcons umption andtherange
R navigation instruction sint he Navi Navi
menu
R cruise control
R DIS TRONIC
R ASS YST PLUS
Selecting permanent display
The Permanent Display: Permanent
Display:functionallows you
to choose whether themultifunc tiondisplay
alway sshows theoutside temperat ureorthe
speed.
The speed display isinverse tothe speedome-
ter.
X Press the0059 or0065 button onthe steer-
ing wheel toselect theSett. Sett.
menu.
X Press the0064 or0063 button toselect the
Instrument Cluster Instrument
Clustersubmenu.
X Press 0076toconf irm.
X Press the0064 or0063 button toselect the
Permanent Display: Permanent
Display:function.
The curren tsett ing, Outside Temperatur e Outside
Temperatur e
or Speedomete r[km/h] Speedomete
r[km/h] orSpeedomete r Speedomete
r
[mph] [mph],a
ppears.
X To change thesetting: press0076again.
Lights Setting
thedayt imerunning lamps
This funct ionisnot availabl einC anada.
X Press the0059 or0065 button onthe steer-
ing wheel toselect theSett. Sett.
menu.
X Press the0064 or0063 button toselect the
Light Light
submenu.
X Press 0076toconf irm.
X Press the0064 or0063 button toselect the
Daytime RunningLights Daytime
RunningLightsfunction.
If the Daytime RunningLights Daytime
RunningLightsfunction
has been switched on,the cone oflight and Menus
andsubmenus
177On-boardcomputerand display s Z
Page 258 of 310

Using
theTIREFIT kit X
Do not remov eanyforeign objectswhich
have penet rated thetire, e.g.screws or
nails.
X Remove thetire sealant bottle,the accom -
panying TIREFITstic ker and thetire inflat ion
compr essorfromthestowage wellunder-
neat hthe trun kfloor (Ypage 253).
X Aff ixpart 0043ofthe TIREF ITstic ker tothe
inst rumen tclust erwithin thedriver' sfield of
vision .
X Aff ixpart 0044ofthe TIREF ITstic ker near the
valve onthe wheel withthedefect ivetire. X
Remove fillerhose 0084and plug 0087from the
bott omsect ionofthe tire inflat ioncompr es-
sor housing.
X Slide theyellow fillerhose connectorinto
the mount ingonyellow cap0083oftire seal-
ant bott le0043 until theplug engages.
X With thesealing ringsinfron t,slide yellow
cap 0083oftire sealant bottle0043 intot he
mount ingoftire inflat ioncompr essor0044.
The capmust engage inboth hooks . X
Remove thecap from valve 006Bonthe faulty
tire.
X Sc rew filler hose 006Contothe valve.
X Ins ert plug 0087intot he cigaret telighter
sock et(Y page 230)orintoa1 2Vp ower
sock etinyour vehicle (Ypage 230).
X Turn theSmart Keytoposition 0047
(Y page 118)inthe ignit ionlock .
X Press onand offswitc h0085 onthe tire infla-
tion compr essortoON.
The tireinflat ioncompr essorisswitc hedon.
The tireisinflat ed.
First ,tire sealant ispumped intot he tire.
The pressure maybriefly risetoapprox-
imately 500kPa(5.0 bar/7 3psi).
Do not switch offthe tirei nflat ioncom-
pr essor during this phase.
X Let the tire inflat ioncompr essorrunfora
maximum often minut es.The tireshould
then have attained apressure ofat least
200 kPa(2.0 bar/29 psi).
If at ire pressure of200 kPa(2.0 bar/2 9psi)is
achieved afteramaximum often minut es,see
(Y page 257).
If at ire pressure of200 kPa(2.0 bar/29 psi)is
not achieved afteramaximum often minut es,
see (Ypage 257).
If tire sealant hasescaped, cleanitoff affec ted
areas asquickly aspossible. Itis prefer ableto
use clean water.
If your clothes aresoiled withtiresealant ,
have them cleaned withperch loroet hylene ata
dry cleaner assoon aspossible. 256
Flat
tireBr eakd ownassist ance
Page 273 of 310

Snow
chains G
WARNING
If snow chains areinstalled tothe front
wheels, theymaydrag against thevehicle
body orchassis componen ts.This could
cause damage tothe vehicle orthe tires.
There isar isk ofan accident.
To avoid hazardous situations:
R never install snowchains tothe front
wheels
R alwa ysinstall snowchains inpairs tothe
rear wheels.
For safety reasons, Mercedes-B enzrecom-
mends thatyouonly usesnow chains that
have been specially approved foryour vehicle
by Mercedes-B enz,orare ofac orrespondin g
standard ofquali ty.For more information ,
please contactaquali fied specialist workshop.
If you inten dtom ount snow chains, please
bear thefollowing pointsinmind:
R Snow chains maynotbemounted onall
wheel/tire combinations .Permissible
wheel-tire combinations (Ypage 293).
R Only usesnow chains whendriving onroads
completely coveredbysnow. Remove the
snow chains assoon aspossible whenyou
come toaroad that isnot snow-cov ered.
R Local regulations mayrestrict theuse of
snow chains. Observe theappropriate regu-
lations ifyou wish tomount snowchains.
R Do not exceed themaximum permissible
speed of30 mph (50km/h).
You may wish todeactivate ESP®
when pulling
away withsnow chains installed (Ypage 61).
You canthereby allowthewheels tospin ina
cont rolled manner, achieving anincreased
driving force(cuttin gaction).
Inform ationabout driving withanemergency
spare wheel (Ypage 294). Tire
pressur e Tire
pressur especifications
Import antsafety notes G
WARNING
Underinflated oroverinflated tirespose the
following risks:
R the tires mayburst, especially asthe load
and vehicle speedincrease.
R the tires maywear excessively and/or
unevenly, whichmaygreatly impairtire
tract ion.
R the driving characterist ics,aswell as
steering andbraking, maybegreatly
impaired.
There isar isk ofan accident.
Follow recommen dedtireinflation pressures
and check thepressure ofall the tires
including thespare wheel:
R mont hly,atleast
R ifthe load changes
R before beginning along journey
R under different operating conditions,e.g.
off-r oad driving
If necessary, correctthetire pressure.
The data onthe Tire andLoading Information
placard andtirepressure tableshown hereare
examples. Tirepressure specifications are
vehicle-specific andmay deviate fromthedata
shown here.Thetirepressure specifications
that arevalid foryour vehicle canbefound on
the Tire andLoading Informationplacard and
tire pressure tableonthe vehicle.
General notes The
recommen dedtirepressures forthe tires
mounted atthe factory canbefound onthe
labels described here.
Operat ionwith anemergency sparewheel:
information onoperation withanemergency
spare wheel canbefound inthe general notes
in the "Emergenc yspare wheel" section
(Y page 295).
Further information ontire pressures canbe
obtained ataq uali fied specialist workshop. Tire
pressure
271Wheelsandtires Z
Page 277 of 310

pressure
losswarning system" section
(Y page 275).
Impor tantsafet ynotes The
tirepressure warningsystemdoesnot
warn youofan inco rrectlyset tire pressure.
Observe thenoteson the recom mended tire
pressure (Ypage 271).
The tirepressure losswarning doesnot
replace theneed toregularly checkthe tire
pressure. Aneven lossofpressure onseveral
tires atthe same timecannotbe detec tedby
the tire pressure losswarning system.
The tirepressure monitorisnot able towarn
you ofas udden lossofpressure, e.g.ifthe
tire ispenet rated byaforeign object.In the
event ofas udden lossofpressure, bringthe
vehicle toah alt bybrakin gcarefully. Avoid
abrupt steeringmoveme nts.
The func tion ofthe tire pressure losswarning
system islimited ordelayed if:
R snow chains aremount edon your vehicle's
tires.
R road condition sarewintr y.
R you aredriving onsand orgravel.
R you adopt avery sport ydriving style(corner-
ing athigh speeds ordriving withhigh rates
of accelerat ion).
R you drive withaheavy load.
Resta rting the tirep ressure losswarn-
ing system Restart
thetire pressure losswarning system
if you have:
R chang edthe tire pressure
R chang edthe wheels ortires
R mount ednew wheels ortires
X Befor erest artin g,make surethatthetire
pressures aresetproperly onallfour tires
for the respect iveoperatin gcondition s.
The recom mended tirepressure canbe
found onthe Tire andLoading Informat ion
placard onthe B-pillar .Addit ionally, atire
pressure tableisattac hedtothe fuel filler
flap. Thetirepressure losswarning system
can only givereliable warningsify ou have
set the corr ecttire pressure. Ifan incorrec ttire
pressure isset, these incorrectvalues
will bemonit ored.
X Also observe thenotesinthe sect ionontire
pressures (Ypage 271).
X Make surethattheSmart Keyisin position
0048 inthe ignit ionlock (Ypage 118).
X Press the0059 or0065 buttononthe steer -
ing wheel toselect theServ. Serv.
menu.
X Press the0063 or0064 buttontos elect
Tire Pressu re Tire
Pressu re.
X Press the0076 button.
The Run Flat Indica torActive Press Run
Flat Indica torActive Press
'OK' toRestar t 'OK'
toRestar tmessage appearsinthe
multifun ction display.
If you wish toconfirm therest art:
X Press the0076 button.
The Tire Pressu reNow OK? Tire
Pressu reNow OK?message
appears inthe multifun ction display.
X Press the0063 or0064 buttontos elect
Yes Yes.
X Press the0076 button.
The Run Flat Indica torRestar ted Run
Flat Indica torRestar tedmes-
sage appears inthe multifun ction display.
Aft erateach -inperiod, thetire pressure
loss warning systemwillmonit orthe settire
pressures ofall four tires.
If you wish tocancel therest art:
X Press the0038 button.
or X Ifthe Tire Pressu reNow OK? Tire
Pressu reNow OK?message
appears, usethe0063 or0064 buttonto
select Cancel Cancel
.
X Press the0076 button.
The tirepressure valuesstoredatthe last
rest artwill continue tobe monit ored. Tir
ep ressure monitor
General notes If
at ire pressure monitorisinst alled, thevehi-
cle's wheels havesensor sthat monit orthe tire
pressures inall four tires. Thetirepressure
monit orwarns youifthe pressure dropsinone
or more ofthe tires. Thetirepressure monitor
only functionsifthe corr espondin gsensor s
are installed inall wheels.
Inf ormat ionontire pressures isdisplayed in
the multifun ction display. Afterafew minut es
of driving ,the curren ttire pressure ofeach tire Tir
ep ressure
275Wheels andtires Z