2020 MERCEDES-BENZ SLC change wheel
[x] Cancel search: change wheelPage 161 of 310
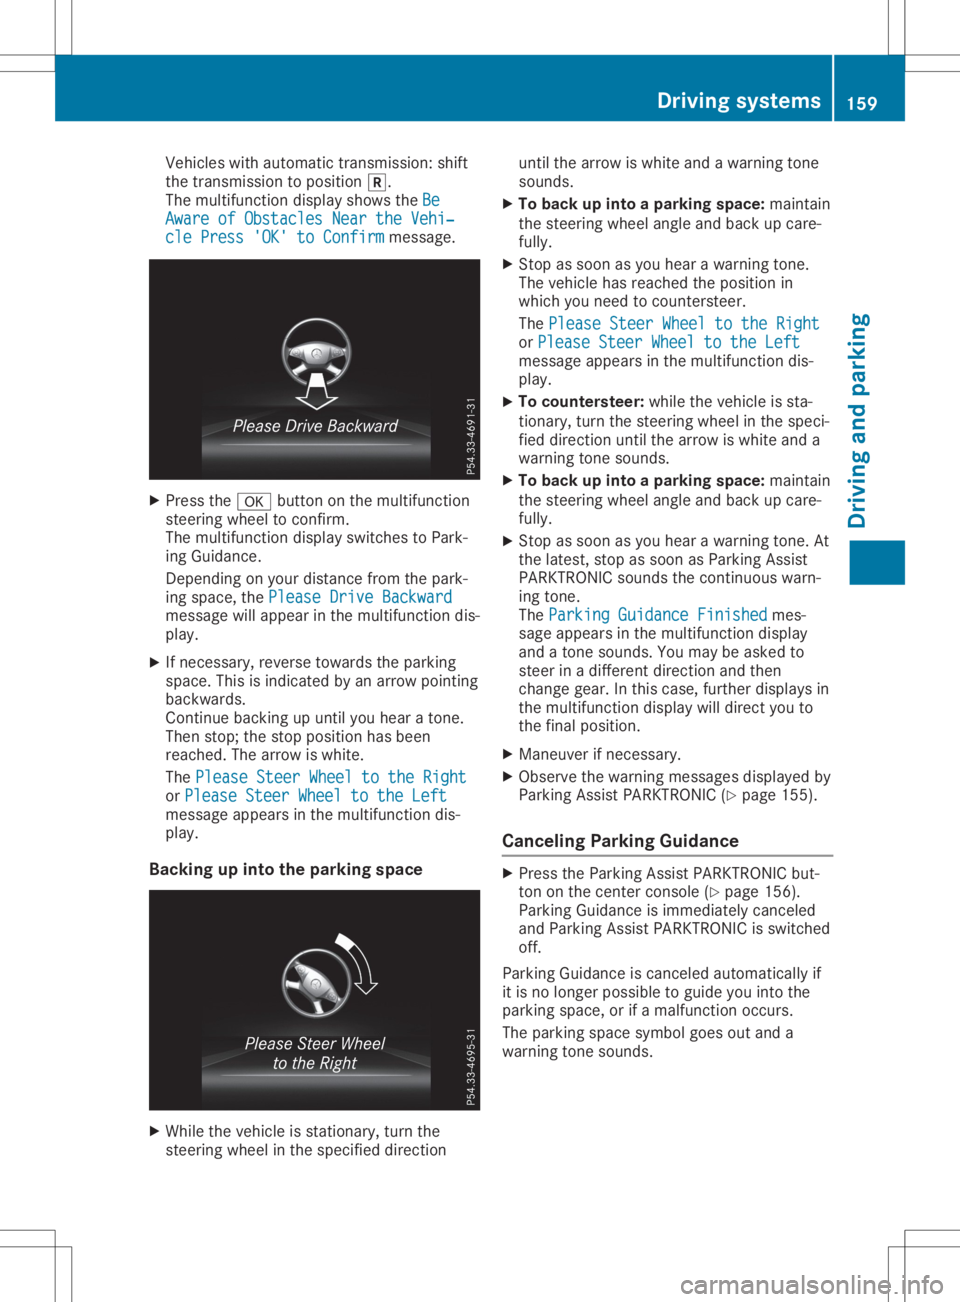
Vehicles
withautomatic transmission: shift
the transmission toposition 005E.
The multifunction displayshows theBe Be
Aware ofObstacles NeartheVehi‐ Aware
ofObstacles NeartheVehi‐
cle Press 'OK'toConfirm cle
Press 'OK'toConfirm message. X
Press the0076 button onthe multifunction
steering wheeltoconfirm.
The multifunction displayswitches toPark-
ing Guidance.
Depending onyou rdistance fromthepark-
ing space, thePlease DriveBackward Please
DriveBackward
message willappea rint he multifunction dis-
play .
X Ifnecessary, reversetowards theparking
space. Thisisindicated byan arrow pointing
backwards.
Continue backingupuntil youhear atone.
Then stop; thestop position hasbeen
reached. Thearrow iswhite.
The Please SteerWheeltothe Right Please
SteerWheeltothe Right
or Please SteerWheel tothe Left Please
SteerWheel tothe Left
message appearsinthe multifunction dis-
play .
Backing upinto theparking space X
While thevehicle isstationary, turnthe
steering wheelinthe specified direction until
thearrow iswhite andawarning tone
sounds.
X To back upinto aparking space: maintain
the steering wheelangleandback upcare-
fully .
X Stop assoon asyou hear awarning tone.
The vehicle hasreached theposition in
which youneed tocountersteer.
The Please SteerWheeltothe Right Please
SteerWheeltothe Right
or Please SteerWheeltothe Left Please
SteerWheeltothe Left
message appearsinthe multifunction dis-
play .
X To countersteer: whilethe vehicle issta-
tionary, turnthesteering wheelinthe speci-
fied direction untilthearrow iswhite anda
warning tonesounds.
X To back upinto aparking space: maintain
the steering wheelangleandback upcare-
fully .
X Stop assoon asyou hear awarning tone.At
the latest, stopassoon asParking Assist
PARKTRONIC soundsthecontinuous warn-
ing tone.
The Parking Guidance Finished Parking
Guidance Finishedmes-
sage appea rsinthe multifunction display
and atone sounds. Youmay beasked to
steer inad ifferent direction andthen
change gear.Inthis case, further displaysin
the multifunction displaywill direct youto
the final position.
X Maneuver ifnecessary.
X Observe thewarning messages displayedby
Parking AssistPARKTRONIC (Ypage 155).
Cance lingParking Guidance X
Press theParking AssistPARKTRONIC but-
ton onthe center console (Ypage 156).
Parking Guidance isimmedia telycanceled
and Parking AssistPARKTRONIC isswitched
off.
Parking Guidance iscanceled automatical lyif
it is no longer possibl etog uideyou into the
parking space,orifam alfunction occurs.
The parking spacesymbol goesoutand a
warning tonesounds. Drivin
gsystems
159Drivingand par king Z
Page 179 of 310

X
Press 0064or0063 toset Off Off,
Standard Standard
or
Adaptive Adaptive.
X Press the0076 button tosave thesetting.
When LaneKeeping Assistisactivat ed,the
multifunc tiondisplay showsthelane mark-
ings asbright linesinthe assistanc e
graphic.
Further informationonLane Keeping Assist
(Y page 166). Service
menu
Dependin gonthe equipment installedinthe
vehicle, youhave thefollowing optionsinthe
Serv. Serv.
menu:
R Calli ngup display messages (Ypage 183)
R Restartin gthe tire pressure losswarning
system (Ypage 275)
R Checking thetire pressure electronically
(Y page 275)
R Calli ngup the service duedate
(Y page 246) Settings
menu
Introdu ction Dependin
gonthe equipment installedinthe
vehicle, inthe Sett. Sett.
menuyouhave thefol-
lowing options:
R Changing theinstr ument cluster settings
(Y page 177)
R Changing thelight settings (Ypage 177)
R Changing thevehicle settings (Ypage 179)
R Changing theconv enienc esettings
(Y page 179)
R Restoring thefactor ysettings (Ypage 180)
Instru mentcluster Selecting
thedista nceunit
The Display UnitSpeed-/Odo meter: Display
UnitSpeed-/Odo meter:func-
tion allows youtochoose whether certaindis-
plays appear inkilometer sorm iles inthe mul-
tifunc tiondisplay.
X Press the0059 or0065 button onthe steer-
ing wheel toselect theSett. Sett.
menu.
X Press the0064 or0063 button toselect the
Instrument Cluster Instrument
Clustersubmenu. X
Press 0076toconf irm.
X Press the0064 or0063 button toselect the
Display UnitSpeed-/Odo meter: Display
UnitSpeed-/Odo meter:func-
tion.
The curren tsett ing km km
ormiles miles
appears.
X Press the0076 button tosave thesetting.
The selected unitofmeasurement fordistanc e
applies to:
R the digital speedometer inthe Trip Trip
menu
R the odometer andtripodometer
R the trip computer
R the curren tcons umption andtherange
R navigation instruction sint he Navi Navi
menu
R cruise control
R DIS TRONIC
R ASS YST PLUS
Selecting permanent display
The Permanent Display: Permanent
Display:functionallows you
to choose whether themultifunc tiondisplay
alway sshows theoutside temperat ureorthe
speed.
The speed display isinverse tothe speedome-
ter.
X Press the0059 or0065 button onthe steer-
ing wheel toselect theSett. Sett.
menu.
X Press the0064 or0063 button toselect the
Instrument Cluster Instrument
Clustersubmenu.
X Press 0076toconf irm.
X Press the0064 or0063 button toselect the
Permanent Display: Permanent
Display:function.
The curren tsett ing, Outside Temperatur e Outside
Temperatur e
or Speedomete r[km/h] Speedomete
r[km/h] orSpeedomete r Speedomete
r
[mph] [mph],a
ppears.
X To change thesetting: press0076again.
Lights Setting
thedayt imerunning lamps
This funct ionisnot availabl einC anada.
X Press the0059 or0065 button onthe steer-
ing wheel toselect theSett. Sett.
menu.
X Press the0064 or0063 button toselect the
Light Light
submenu.
X Press 0076toconf irm.
X Press the0064 or0063 button toselect the
Daytime RunningLights Daytime
RunningLightsfunction.
If the Daytime RunningLights Daytime
RunningLightsfunction
has been switched on,the cone oflight and Menus
andsubmenus
177On-boardcomputerand display s Z
Page 248 of 310
Maintaining
thetime-dependent servicesched-
ule:
X Note down theservice duedate display edin
the multifunction displaybeforedisconnec t-
ing the battery.
or X Aft erreconn ectingthebattery, subtract the
battery disconnec tionperiods fromtheser-
vice date shown onthe display . Hiding
service displays
X Press the0076 or0038 button onthe steer-
ing wheel. Showing
servicedisplays
X Switch onthe ignition.
X Press 0059or0065 onthe steering wheel
to select theServ. Serv.
menu.
X Press 0063or0064 toselect theASSYST ASSYST
PLUS PLUS
submenu andconfirm bypressing the
0076 button.
The service duedate appears inthe multi-
funct iondisplay . Informat
ionabout Service
Resetting theASSYST PLUSservice
interval display !
If
the ASS YST PLUS service interval dis-
play hasbeen inadvertent lyreset, thisset-
ting canbecorrect edataq ualified special-
ist workshop.
Have service workcarried outasdescribed
in the Maintenanc eBooklet. Thismay other-
wise leadtoincreased wearanddamage to
the major assemblies orthe vehicle.
Aq ualified specialist workshop, e.g.anauthor-
ized Mercedes-Ben zCenter, willreset the
ASS YST PLUS service interval displayafterthe
service workhasbeen carried out.Youcan
also obtain further information onmainte-
nance work,forexample. Special
servicerequirements The
specified maintenanc einterval takesonly
the normal operation ofthe vehicle into
account. Serviceworkwillneed tobe per-
formed moreoften ifthe vehicle isoperated
under arduou scondition sorincreased loads.
The ASSYST PLUS service interval displayis
only anaid. Thedriver ofthe vehicle isrespon-
sible forwhether serviceworkwillneed tobe
performed morefrequently thanrequired asa
result ofthe actual operating conditions
and/or loads.
Examples ofarduou soperating condition s:
R regular citydriving withfrequent intermedi-
ate stops
R the vehicle isprimarily usedtotravel short
distances
R frequent useinmountainous terrainoron
poor roadsurfaces
R the engine isoften leftidling forlong peri-
ods
R particularly dustycondition s,or ifair-recir-
culation modeisfrequently used
In these orsimilar operating conditions,have
the interior filter,airfilter, engine oiland oilfil-
ter, forexample, changedmorefrequently.
Under arduou soperating condition s,the tires
must becheck edmore often. Further informa-
tion canbeobtained ataq ualified specialist
workshop.
Driving abroad An
exten siveMercedes-Ben zService network
is also availa bleinother countr ies.You can
obtain further information fromanyauthorized
Mercedes-Ben zService Center. Care
Notes
oncare H
Environmental
note
Dispose ofempty packaging andcleaning
cloths inan environm entallyresponsible
manner.
! When
cleaning yourcar,donot use:
R dry, coarse orhard cloths
R abrasive cleaningagents 246
CareMaintenance
andcare
Page 255 of 310
so,
cont actyour local waste disposa lcom-
pany. Vehicle
toolkit
General notes The
vehicle toolkitcan befound inthe trunk
or inthe stowage wellunder thetrunk floor.
Apart fromcertain country-specific variations,
the vehicles arenot equip pedwith atire-
change toolkit.Some toolsforchanging a
wheel arespecific tothe vehicle. Formore
information onwhich toolsarerequired toper-
form awheel change onyour vehicle, consulta
qual ified speciali stworkshop.
Necessary tire-changing toolscaninclude, for
example:
R jack
R wheel chock
R lug wrench
R ratchet wrench
R alignment bolt
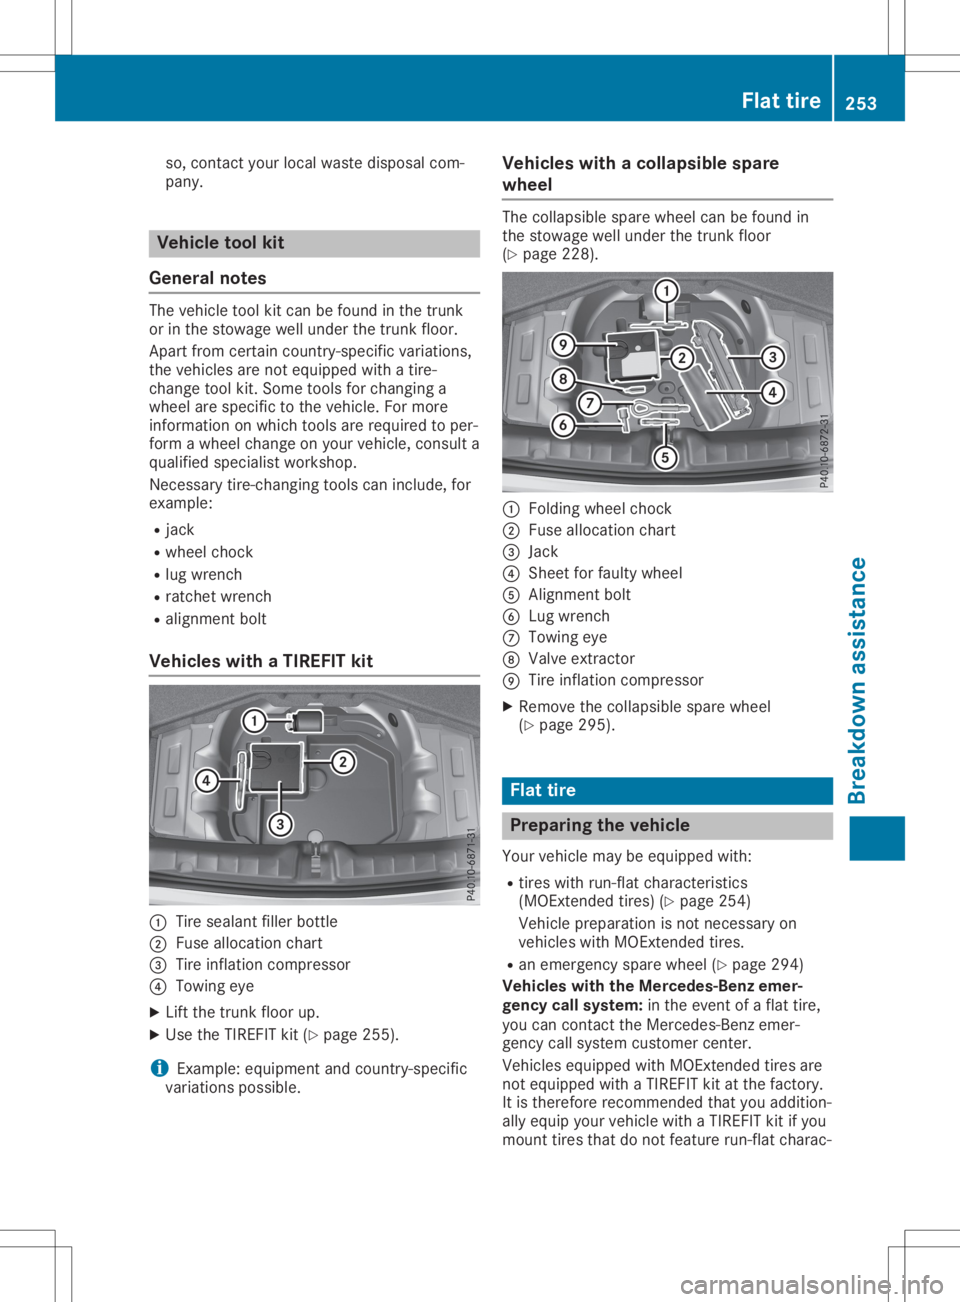
Vehicle swithaTIREFIT kit 0043
Tire seala ntfiller bottle
0044 Fuse alloca tionchart
0087 Tire inflation compressor
0085 Towing eye
X Lift the trunk floorup.
X Use theTIREFIT kit(Ypage 255).
i Example:
equipment andcountry-specific
variations possible. Vehicle
swithacollapsible spare
wheel The
collapsi blespare wheel canbefound in
the stowage wellunder thetrunk floor
(Y page 228). 0043
Folding wheelchock
0044 Fuse allocation chart
0087 Jack
0085 Sheet forfaulty wheel
0083 Alignment bolt
0084 Lug wrench
006B Towing eye
006C Valve extract or
006D Tire inflation compressor
X Remove thecollapsi blespare wheel
(Y page 295). Flat
tire Prepar
ingthe vehicl e
Your vehicle maybeequip pedwith:
R tires withrun-flat characteristics
(MOExt endedtires)(Ypage 254)
Vehicle preparation isnot necessary on
vehicles withMOExt ended tires.
R an emergency sparewheel (Ypage 294)
Vehicles withtheMercedes-Benz emer-
gency callsystem: inthe event ofaflat tire,
you can cont actthe Mercedes-Benz emer-
gency callsystem customer center.
Vehicles equippedwith MOExt ended tiresare
not equip pedwith aTIREFIT kitatthe factory.
It is therefore recommended thatyouaddition-
ally equip yourvehicle withaTIREFIT kitifyou
mount tiresthatdonot feature run-flat charac- Flat
tire
253Breakdown assistance
Page 267 of 310
The
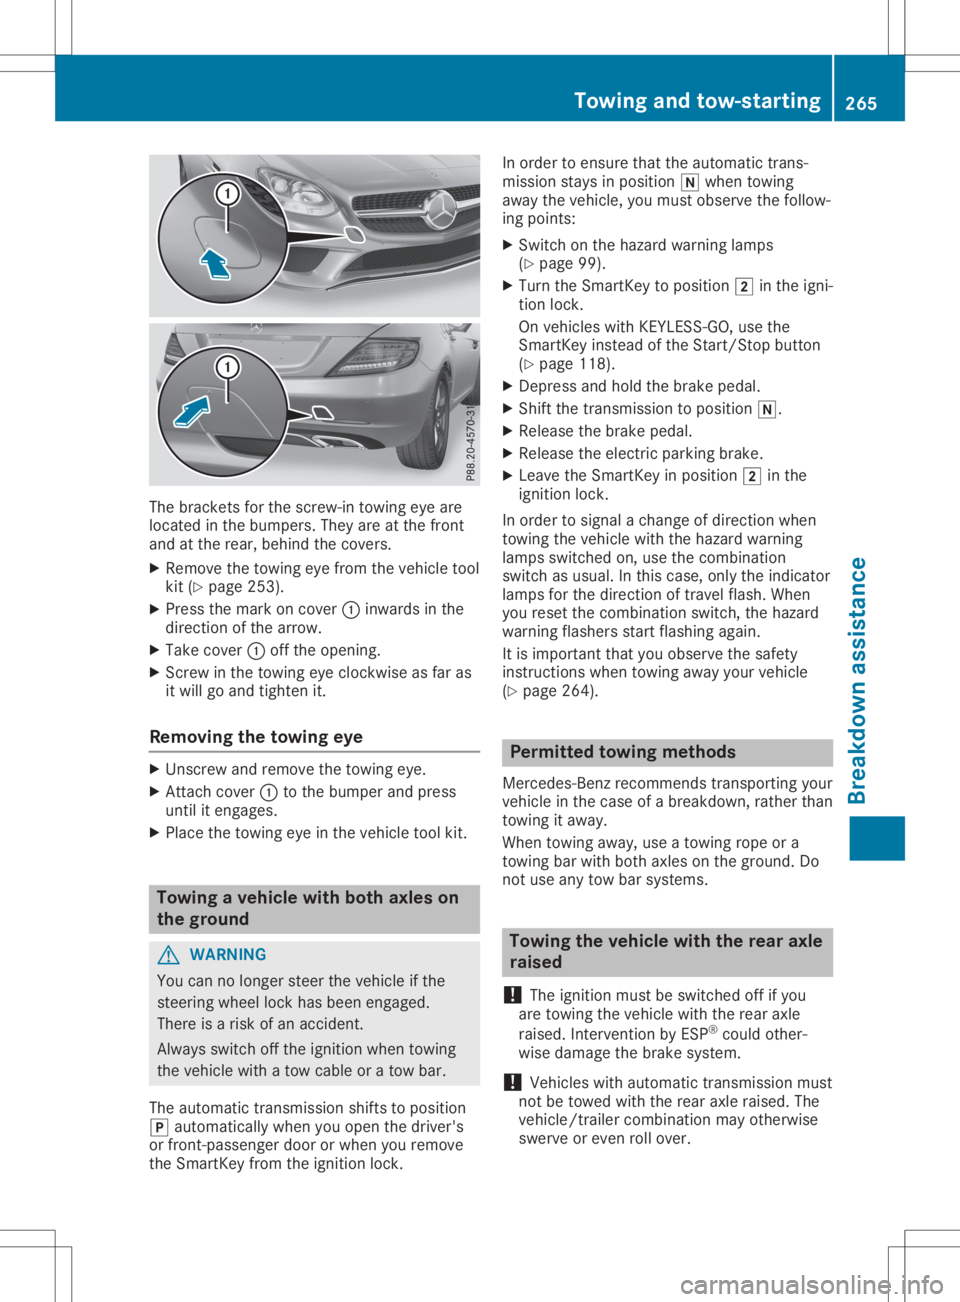
bracket sfor the screw-in towingeyeare
located inthe bumpers. Theyareatthe front
and atthe rear, behind thecovers.
X Remove thetowing eyefrom thevehicle tool
kit (Ypage 253).
X Press themark oncover 0043inwards inthe
direction ofthe arrow.
X Take cover 0043offthe opening.
X Scr ew inthe towing eyeclock wiseasfar as
it will goand tighten it.
Removing thetowing eye X
Unsc rewand remove thetowing eye.
X Attach cover 0043tothe bumper andpress
until itengages.
X Place thetowing eyeinthe vehicle toolkit. Towing
avehicle withboth axles on
the ground G
WARNIN
G
You cannolonger steerthevehicle ifthe
steerin gwheel lockhasbeen engaged.
There isar isk ofan accident .
Always switchoffthe ignition whentowing
the vehicle withatow cable oratow bar.
The automatic transmission shiftstoposition
005D automatically whenyouopen thedriver's
or front -passenger doororwhen youremove
the Smart Keyfrom theignition lock. In
order toensure thattheautomatic trans-
mission staysinposition 005Cwhen towing
away thevehicle, youmust observe thefollow-
ing points:
X Switch onthe hazard warning lamps
(Y page 99).
X Turn theSmart Keytoposition 0048inthe igni-
tion lock.
On vehicles withKEYLE SS-GO, usethe
Smart Keyinstead ofthe Start /Stopbutton
(Y page 118).
X Depress andhold thebrake pedal.
X Shift thetrans mission toposition 005C.
X Release thebrake pedal.
X Release theelectric parking brake.
X Leave theSmart Keyinposition 0048inthe
ignition lock.
In order tosignal achange ofdirection when
towing thevehicle withthehazard warning
lamps switched on,use thecombinat ion
switch asusual. Inthis case, onlytheindicator
lamps forthe direction oftravel flash.When
you reset thecombinat ionswitch, thehazard
warning flashersstartflashing again.
It is important thatyouobserve thesafety
instr uctions whentowing awayyourvehicle
(Y page 264). Permit
tedtowing methods
Mercedes- Benzrecomm endstransportin gyour
vehicle inthe case ofab reakdown, ratherthan
towing itaway .
When towing away,use atowing ropeora
towing barwith both axles onthe ground. Do
not use anytow barsystems. Towing
thevehicle withtherear axle
raised
! The
ignition mustbeswitched offifyou
are towing thevehicle withtherear axle
raised. Intervent ionbyESP ®
could other-
wise damage thebrake system.
! Vehicles
withautomatic transmission must
not betowed withtherear axle raised. The
vehicle/t railercombinat ionmay otherwise
swerve oreven rollover. Towing
andtow-sta rting
265Breakdown assistance Z
Page 273 of 310
Snow
chains G
WARNING
If snow chains areinstalled tothe front
wheels, theymaydrag against thevehicle
body orchassis componen ts.This could
cause damage tothe vehicle orthe tires.
There isar isk ofan accident.
To avoid hazardous situations:
R never install snowchains tothe front
wheels
R alwa ysinstall snowchains inpairs tothe
rear wheels.
For safety reasons, Mercedes-B enzrecom-
mends thatyouonly usesnow chains that
have been specially approved foryour vehicle
by Mercedes-B enz,orare ofac orrespondin g
standard ofquali ty.For more information ,
please contactaquali fied specialist workshop.
If you inten dtom ount snow chains, please
bear thefollowing pointsinmind:
R Snow chains maynotbemounted onall
wheel/tire combinations .Permissible
wheel-tire combinations (Ypage 293).
R Only usesnow chains whendriving onroads
completely coveredbysnow. Remove the
snow chains assoon aspossible whenyou
come toaroad that isnot snow-cov ered.
R Local regulations mayrestrict theuse of
snow chains. Observe theappropriate regu-
lations ifyou wish tomount snowchains.
R Do not exceed themaximum permissible
speed of30 mph (50km/h).
You may wish todeactivate ESP®
when pulling
away withsnow chains installed (Ypage 61).
You canthereby allowthewheels tospin ina
cont rolled manner, achieving anincreased
driving force(cuttin gaction).
Inform ationabout driving withanemergency
spare wheel (Ypage 294). Tire
pressur e Tire
pressur especifications
Import antsafety notes G
WARNING
Underinflated oroverinflated tirespose the
following risks:
R the tires mayburst, especially asthe load
and vehicle speedincrease.
R the tires maywear excessively and/or
unevenly, whichmaygreatly impairtire
tract ion.
R the driving characterist ics,aswell as
steering andbraking, maybegreatly
impaired.
There isar isk ofan accident.
Follow recommen dedtireinflation pressures
and check thepressure ofall the tires
including thespare wheel:
R mont hly,atleast
R ifthe load changes
R before beginning along journey
R under different operating conditions,e.g.
off-r oad driving
If necessary, correctthetire pressure.
The data onthe Tire andLoading Information
placard andtirepressure tableshown hereare
examples. Tirepressure specifications are
vehicle-specific andmay deviate fromthedata
shown here.Thetirepressure specifications
that arevalid foryour vehicle canbefound on
the Tire andLoading Informationplacard and
tire pressure tableonthe vehicle.
General notes The
recommen dedtirepressures forthe tires
mounted atthe factory canbefound onthe
labels described here.
Operat ionwith anemergency sparewheel:
information onoperation withanemergency
spare wheel canbefound inthe general notes
in the "Emergenc yspare wheel" section
(Y page 295).
Further information ontire pressures canbe
obtained ataq uali fied specialist workshop. Tire
pressure
271Wheelsandtires Z
Page 280 of 310
If
the wheel positio nson the vehicle arerota-
ted, thetire pressu resmay bedispl ayedfor
the wrong positionsfor ashort time. Thisis
rectified afterafew minutes ofdriving, andthe
tire pressu resare displ ayedfor the correct
positio ns.
Restarting thetire pressure monitor When
yourestart thetire pressu remonitor, all
existing warning messagesare dele tedand the
warning lampsgoo ut. The monitor usesthe
currently settire pressu resasthe reference
valu esfor monitoring. Inmost cases, thetire
pressu remonitor willautoma tically detect the
new reference valuesafter youhave changed
the tire pressu re.However, youcan also set
reference valuesmanua llyas describe dhere.
The tirepressu remonitor thenmonitors the
new tirepressu revalu es.
X Set thetire pressu reto the valu erecom-
mended forthe corresponding drivingsitua-
tion onthe Tire andLoadi ngInformation
pla card onthe driver's sideB-pilla r
(Y page 271).
Additional tirepressu revalu esfor different
load scan also befound onthe tire pressu re
table onthe inside ofthe fuel fillerflap
(Y page 271).
X Make surethatthetire pressu reiscorrect
on allfour wheel s.
X Ensure thattheSmartKey isin positio n0048
in the ignition lock.
X Press the0059 or0065 button onthe steer-
ing wheel toselect theServ. Serv.
menu.
X Press the0063 or0064 button toselect
Tire Pressure Tire
Pressure.
X Press 0076.
The multifu nctiondisplayshows thecurrent
tire pressu refor the individ ualtires orthe
Tire pressure willbedisplayed Tire
pressure willbedisplayed
after driving afew minutes after
driving afew minutes message.
X Press the0064 button.
The Use Current Pressures asNew Use
Current Pressures asNew
Reference Values Reference
Valuesmessage appearsinthe
multifu nctiondisplay.
If you wishtoc onfirm therestart:
X Press 0076.
The Tire Press. Monitor Restarted Tire
Press. Monitor Restarted
message appearsinthe multifu nctiondis-
pla y. After
driving forafew minutes, thesystem
checks whether thecurrent tirepressu res
are within thespecifie drange. Thenew tire
pressu resare then accepted asreference
valu esand monitored.
If you wishtoc anc elthe restart:
X Press 0038.
The tirepressu revalu esstored atthe last
restart willcontinue tobe monitored. 278
Tire
pressureWheel sand tires
Page 291 of 310
Tread
The partof the tire thatcome sinto conta ct
wi th the road.
Bead The tirebead ensu resthatthe tire sits
sec urelyo nthe wheel.The reares evera lstee l
wi res inthe bead topre vent thetire from com-
ing loose from thewheelrim .
Si dew all
The partof the tire betwe enthe trea dand the
be ad.
Wei ght ofopti onalextras
The comb inedw eigh to fthos eoptional extra s
tha tweigh mor ethant he rep laced standa rd
pa rts and morethan2 .3kg (5lbs).T he se
op tio nal extra s,su ch ashigh-p erform ance
bra kes, level contro l,ar oofrac ko ra high-p er-
form ance battery ,are not included inthe curb
we ight and theweight ofthe acce ssories.
TIN (Tire Ide ntificatio nNumbe r)
Thi sisa uniqueide nti fierw hich can beused
by atire manuf actu rertoidenti fytire s,for
exa mpl efor ap rodu ct reca ll,a nd thu side nti fy
the purcha sers.The TINisma de up ofthe
ma nuf actu rer'sidenti tycod e,tire size, tire
typ ecodea nd the manuf actu ring date.
Lo ad bearin gind ex
The load bearing index(alsol oa dind ex) isa
cod ethatc onta insthe maximu mloadb earing
cap acityof at ire.
Tracti on
Tra ctio nist he res ulto ffrictio nbetwe en the
tire sand the roadsurface.
Treadw earindic ators
Na rro wb ars( tre ad wearbars) thatare distri b-
ute doverthe tire trea d.Ifthe tire trea dislev el
wi th the bars, the wearlimit of00CD in(1.6 mm)
ha sb eenr eache d.
Oc cupant distrib utio n
The distri butio no foccu pants inav ehiclea t
thei rdesigna ted seating positio ns.
Total load limit
Nom inalloa da nd lugga geload plus 68 kg
(15 0lbs)m ultipl iedb ythe num bero fseats in
the vehicle. Ch
ang ingaw heel Fl
at tire
The "Breakdo wnassista nce" section
(Y page 253 )conta insinfo rma tiona nd note s
on how todealwith aflatt ire .Info rma tiono n
dri ving with MOExte ndedtiresint he eve ntofa
fla ttire can befou ndund er"M OExtend edtire s
(ti res with run-fla tcharacteri stics"
(Y page 254 ). Rotati
ngthe wheels G
WA
RNING
Ro tati ngthe fron tand rea rwheelsi fthe
wh eelsor tire shaved iffe rent dimens ions
ma ysevere lyimp airt he driving characteri s-
tics .The ser viceb rake orwh eelsus pe nsi on
comp onents mayalsob edamaged .The re is
ar isko fana ccident.
Ro tate frontand rea rwheelso nlyi fthe
wh eelsand tiresareofthe same dimen-
si ons.
! On
veh icles equipp ed with atire pre ssu re
moni tor,electro niccomp onents arel oc ate d
in the wheel.
Ti re-m ounting toolsshouldn otbe used nea r
the valve .Thisc ouldda ma gethe electro nic
comp onents.
Onl yhavet iresc hange dataq ualifi ed spe -
cia list wo rksh op.
Alw aysp ayatte ntiontot he instructio nsand
sa fety note swhenc hangi ng aw heel
( Y pa ge 290 ).
The wearpatterns onthe fron tand rea rtire s
di ffe r,de pendi ng on the opera ting cond itions.
Ro tate thewheelsbe fore aclear we arpattern
ha sform edon the tires.Front tirestypica lly
we armor eonthe sho ulde ra nd rea rtire sin
the cente r.
On veh icles tha thavet he same size front and
rea rwheels, yo uc an rota tethe wheelsacco rd-
ing tothe intervalsin the tire manuf actu rer's
wa rranty book inyour veh icled ocum ents. Ifno
wa rranty book isavaila bl e, the tiresshouldb e
rota tedevery3,0 00 to6,0 00 miles(5,000 to
10, 000 km).Dep endingontire wear,thism ay
be req uired earlier. Do not change thedirec-
tio no fwheelrota tion. Ch
ang ingaw heel
289Whe elsa nd tire s Z