2020 MERCEDES-BENZ SL ROADSTER trunk
[x] Cancel search: trunkPage 281 of 334
Where
willIfind...? Warning
triangle
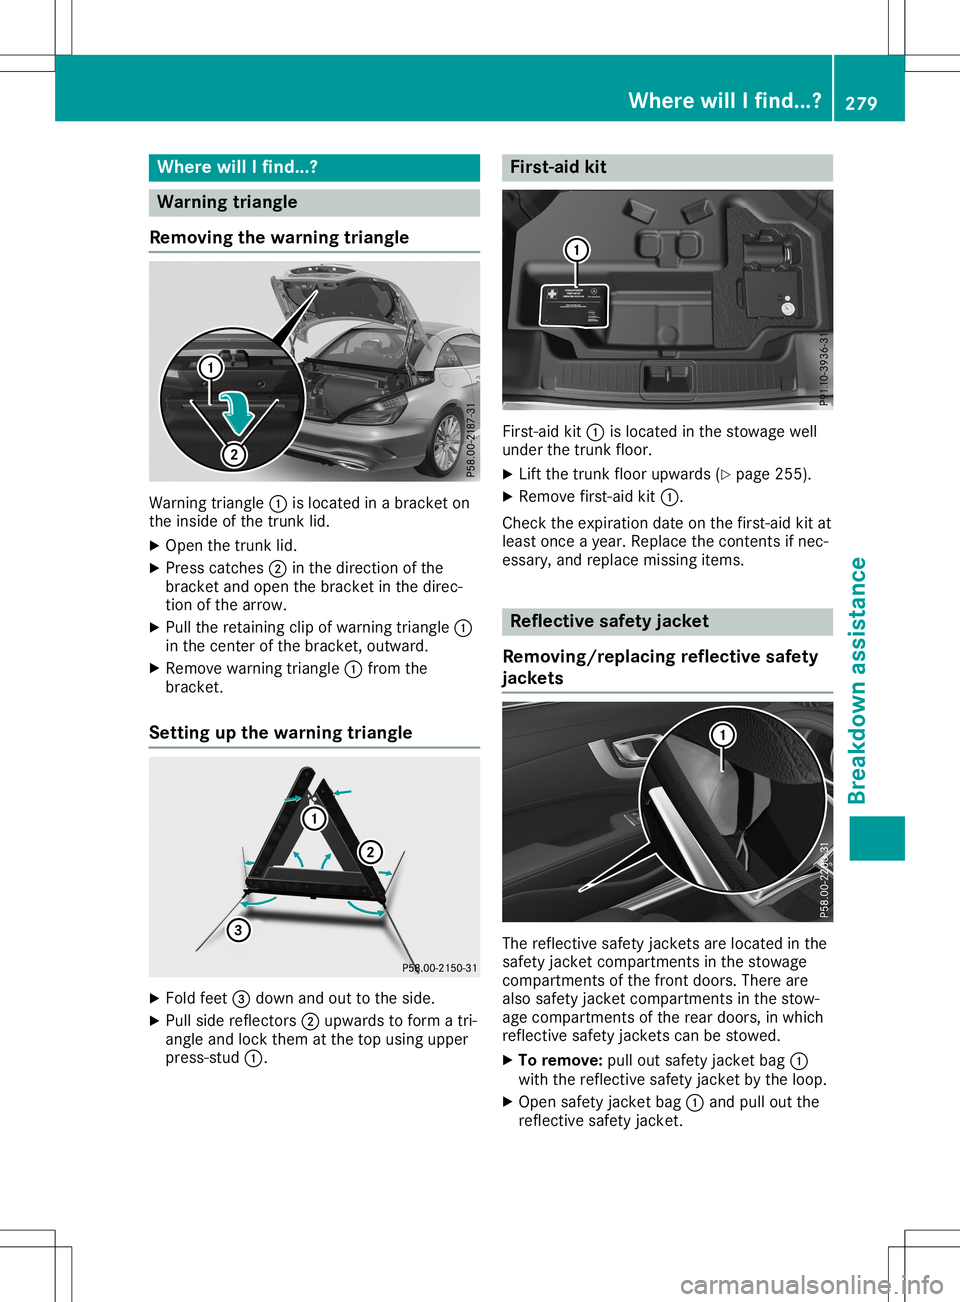
Removi ngthe warni ngtriangle Warni
ngtriangl e0043 isloca tedinabracket on
the insid eof the trunk lid.
X Open thetrunk lid.
X Press catches 0044inthe direction ofthe
bracket andopen thebracket inthe direc-
tion ofthe arrow .
X Pul lthe retai ning clipofwa rning triangl e0043
in the center ofthe bracket, outward.
X Remo vewarning triangl e0043 from the
bracket.
Setting upthe warni ngtriangle X
Fold feet0087dow nand outtothe side .
X Pul lside reflectors 0044upw ards toform atri-
angl eand lock them atthe top using upp er
press -stud 0043. Fi
rst-aid kit First-ai
dkit 0043 isloca tedinthe stowa gewel l
under thetrunk floor.
X Lift the trunk floorupwards (Ypag e255) .
X Remo vefirst-ai dkit 0043.
Che ckthe expira tiondate onthe first-ai dkit at
lea stonce ayea r.Rep lace thecontents ifnec-
essa ry,and replace missi ngitems. Refle
ctive safety jacket
Removi ng/replac ingrefle ctive safety
jackets The
refle ctive safetyjackets areloca tedinthe
safe tyjacket compartments inthe stowa ge
compa rtments ofthe front doors .There are
als osafe tyjacket compartments inthe stow-
age compa rtments ofthe rear doors ,in whi ch
refle ctive safetyjackets canbestowed .
X To remove :pul lout safe tyjacket bag0043
with therefle ctive safetyjacket bythe loop .
X Open safetyjacket bag0043and pullout the
refle ctive safetyjacket. Where
willIfind...?
279Breakdown assistance
Page 282 of 334
X
To sto w:foldthe reflecti vesafety jacke t,
rol lit up and stow itin safety jacke tba g0043 .
X Sli de safety jacke tba g0043 along thelowe r
ed ge ofthe arm restinto thesafety jacke t
comp artment.Meanwhile, ensu retha tthe
lo op hangs outwe llwi thi nrea ch.
i Re
move anew reflecti vesafety jacke t
from itspackag ingmateri albe fore slid ing it
into thesafety jacke tcomp artment.The
pa ckag ingmateri alma yothe rwisecau seit
to slip ou tor ma kerem oving itdiffi cul t.
Obs ervethe lega lreq uirem ents ineach cou n-
try .
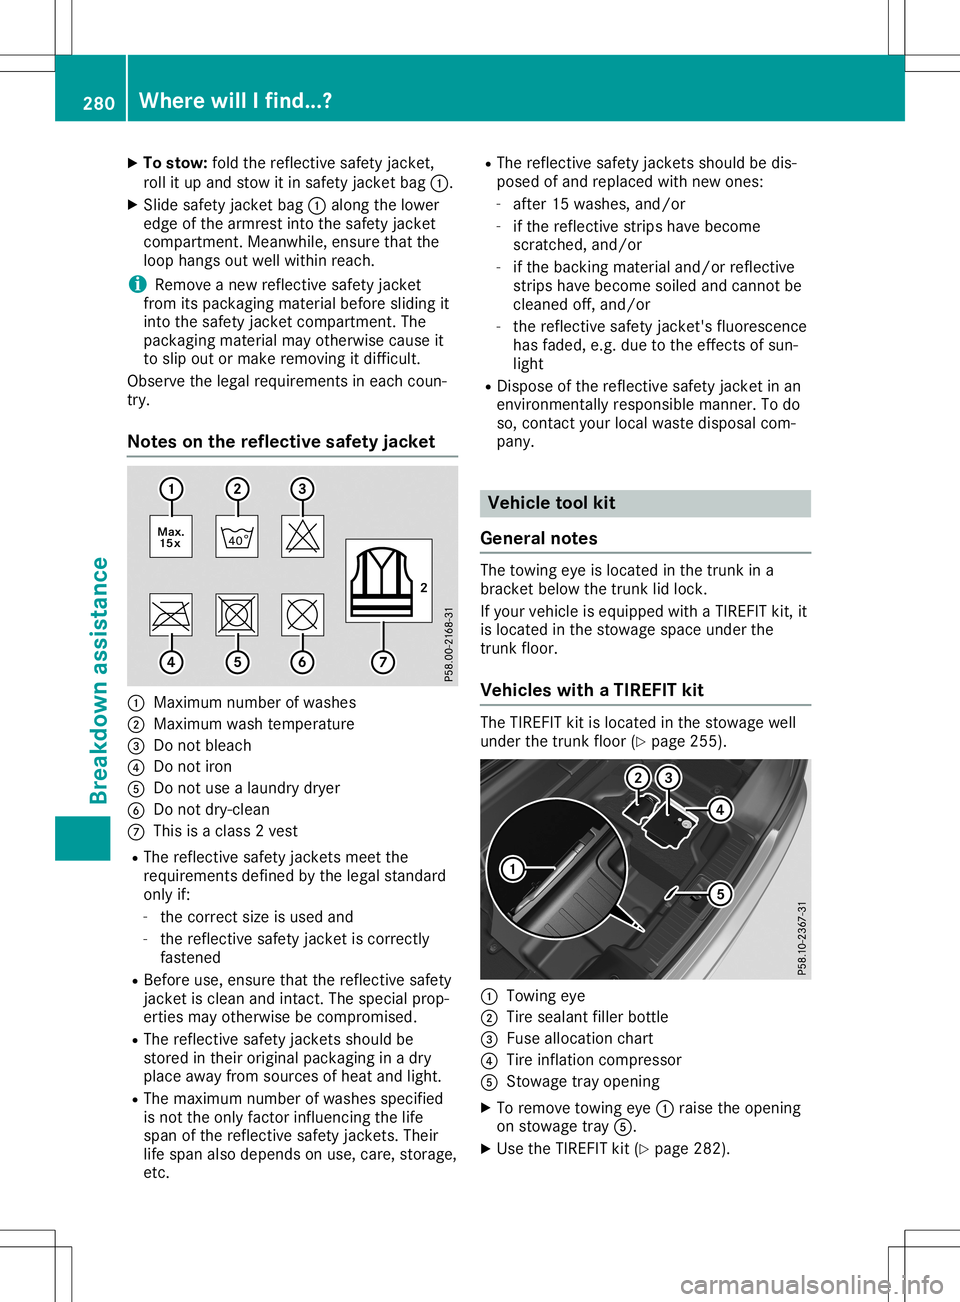
Note son the reflective safetyjack et 0043
Maximu mnum berof wa she s
0044 Maximu mwa sh temp erature
0087 Donot blea ch
0085 Donot iron
0083 Donot usealaund rydry er
0084 Donot dry-cle an
006B Thisis acla ss2ves t
R The reflecti vesafety jacke tsmee tthe
req uirem ents define dby the lega lsta nda rd
onl yif:
- the corr ectsize isus ed and
- the reflecti vesafety jacke tis corr ectly
fas tened
R Befo reuse, ensu retha tthe reflecti vesafety
jacke tis cle an and intact.The specialpro p-
erti esma yothe rwisebe comp romised.
R The reflecti vesafety jacke tssho uld be
stor edinthei rori ginal packag inginadry
pl ace away from sources ofhea tand light.
R The maximu mnum berof wa she sspe cified
is not theonlyfac tor influencing thelife
spa nof the reflecti vesafety jacke ts.The ir
li fe spa nalso depends onuse, car e,stor age,
etc. R
The reflecti vesafety jacke tssho uld be dis-
po sed ofand replaced with new ones :
- afte r15 washe s,and /or
- ifthe reflecti vestri pshave become
scra tched ,and /or
- ifthe backing materi aland /or reflecti ve
stri pshave become soiled and canno tbe
cle ane doff, and/or
- the reflecti vesafety jacke t'sfluore scenc e
ha sfad ed,e.g .du eto the effectsofsun-
li ght
R Disp oseofthe reflecti vesafety jacke tin an
envi ronme ntallyres ponsi ble ma nner. Todo
so, conta ctyour local waste dispo salcom-
pa ny. Vehi
cle too lkit
Gen eral notes The
towingeyeis locate din the trunk ina
bra cket below the trunk lid lock.
If yo ur veh icleis eq uipp ed with aTIR EFIT kit,it
is locate din the stow agespa ceund erthe
trunk floor.
Vehi cles with aTIRE FITkit The
TIREFIT kitislocate din the stow agewe ll
und erthe trunk floor (Y page 255 ). 0043
Tow ingeye
0044 Tire sea lant fillerbo ttle
0087 Fuseallo cati oncha rt
0085 Tire infl ation comp ressor
0083 Stow agetray openi ng
X To rem ove towingeye0043 raise the openi ng
on stow agetray 0083.
X Use theTIREFIT kit(Ypage 282 ). 28
0 Whe
rewillIfin d...?Breakdo wnassis tan ce
Page 283 of 334
Tire
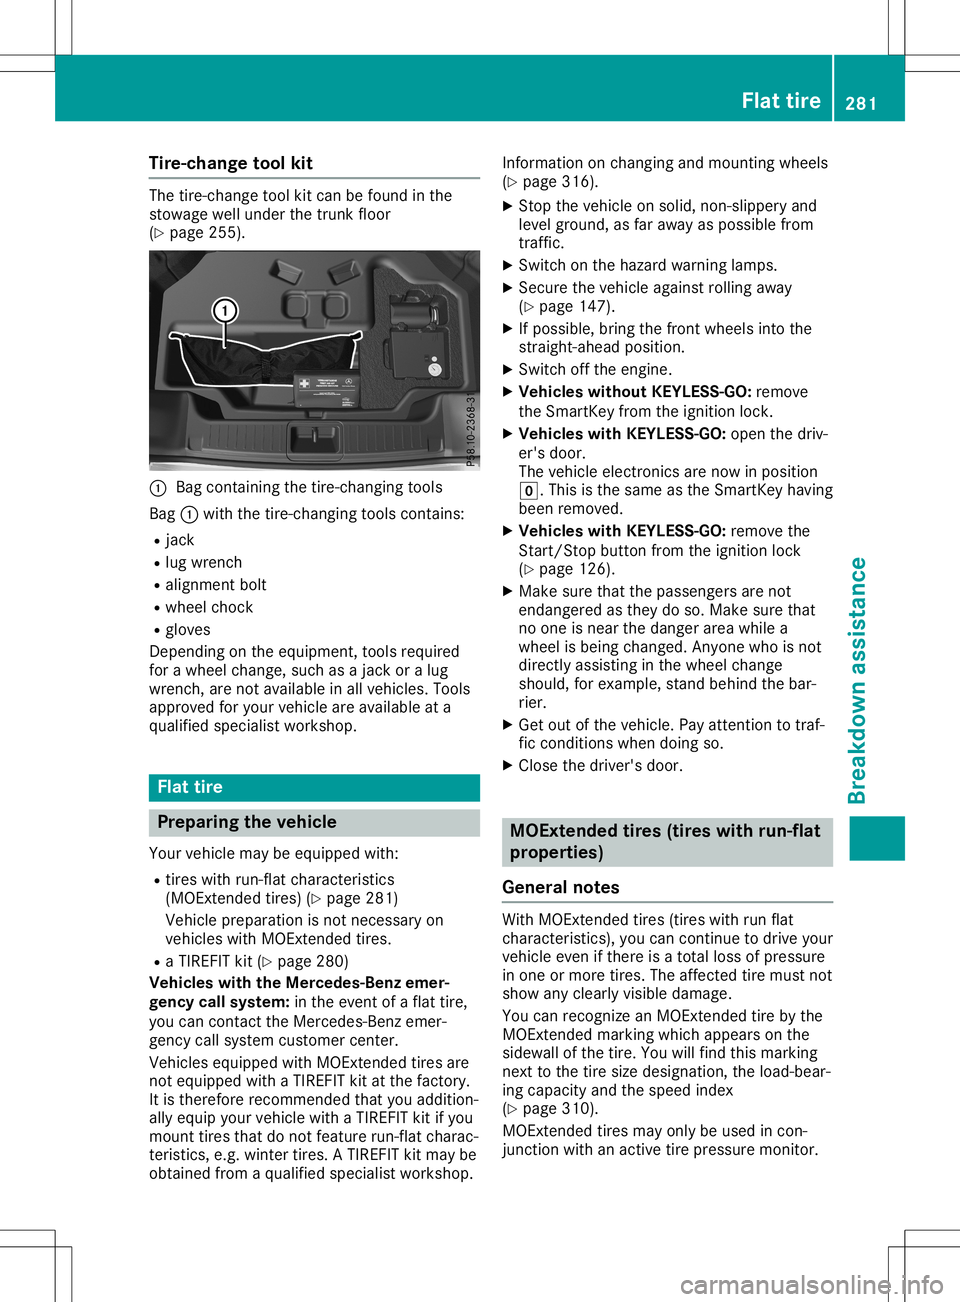
-chan getoo lkit The
tire-cha nge tool kitcan befou ndinthe
stow agewe llund erthe trunk floor
(Y page 255 ). 0043
Bag conta ining the tire-cha nging tool s
Bag 0043with the tire-cha nging tool sconta ins:
R jack
R lug wr ench
R alig nment bolt
R wh eelcho ck
R glove s
Dep endingonthe equipme nt,tool sreq uired
for awh eelcha nge ,su ch asajack oralug
wr ench ,ar enot availabl e in allveh icles. Tools
ap pro ved foryour veh iclear eav ailabl e at a
qu alifi ed speci alistwo rksh op. Fl
at tire Pre
parin gthe vehic le
Yo ur veh iclema ybe equipp ed with:
R tire swi th run-fl atcha racteri stics
(M OExte ndedtire s)(Y page 281 )
Veh iclepre paratio nis not nece ssaryon
veh icles with MOExte ndedtire s.
R aTIR EFIT kit(Ypage 280 )
Veh icle swi th the Merce des -Benzeme r-
ge ncyca llsys tem: inthe eventofafla ttire ,
yo ucan conta ctthe Merced es-Benz emer-
ge ncy callsy stem custome rcente r.
Veh icles equipp ed with MOExte ndedtire sar e
not equipp ed with aTIR EFIT kitatthe factory .
It is the refore reco mme ndedtha tyo uad ditio n-
al ly eq uip yo ur veh iclewi th aTIR EFIT kitifyo u
mou nttire stha tdo not featureru n-fl atcha rac-
teri stics, e.g.wi nter tires.ATIR EFIT kitmaybe
ob tained fromaqu alifi ed speci alistwo rksh op. Info
rma tionon cha nging and mou nting wheels
(Y page 316 ).
X Stop thevehicleon solid,non-s lipp ery and
le vel ground ,as faraw ay aspossi ble fro m
tra ffic.
X Swi tch onthe hazar dwa rning lamps .
X Secu rethe vehicleag ainst rolling away
(Y page 147 ).
X Ifpo ssi ble, bri ng the frontwh eelsinto the
stra ight-a head positio n.
X Swi tch offthe engine.
X Veh icle swi tho utKEYLES S-GO :rem ove
the Sma rtKeyfro mthe igniti onlock.
X Veh icle swi th KEYLES S-GO :op en the driv-
er' sdo or.
The vehicleelectro nicsarenow inpo sitio n
005A. Thisis the same asthe Sma rtKeyha vin g
be en rem oved.
X Veh icle swi th KEYLES S-GO :rem ove the
Star t/Stop button fromthe igniti onlock
(Y page 126 ).
X Ma kesure tha tthe passe nge rsarenot
end angeredas the ydo so. Makesure tha t
no one isnea rthe dange rar ea while a
wh eelis be ing change d.Anyo newhois not
di rectl yas sisti ng inthe wheelcha nge
sho uld, for exa mpl e,sta nd behind the bar-
rie r.
X Ge tou tof the vehicle. Pa yatte ntionto tra f-
fic cond itions when doing so.
X Close thedriver 'sdo or. MOE
xtende dtire s(ti res with run-f lat
prope rties)
Ge neral notes Wi
th MOExte ndedtire s(ti res with runfla t
cha racteri stics) ,yo ucan conti nuetodrive your
veh icleeve nif the reisatota llo ss ofpre ssu re
in one ormor etire s.The affecte dtire mustnot
sho wany clearly vis ible da ma ge.
Yo ucan reco gnizean MOExte ndedtire bythe
MOExte ndedma rkin gwh ich appe arson the
si de wa llof the tire.Yo uwi llfind thisma rkin g
next tothe tire size designa tion,the load -be ar-
ing capacityand thespee dind ex
(Y page 310 ).
MOExte ndedtire sma yonl ybe used incon-
juncti onwith an acti vetire pressu remoni tor. Fl
at tire
281Break downass istanc e
Page 285 of 334
There
isarisk ofan accident .
Do not drive thevehicle. Contact aqualified
specialist workshop. G
WARNIN
G
The tiresealant isharmful andcauses irrita-
tion. Itmust notcome intocontactwith your
skin, eyesorclothin gor be swallowe d.Do
not inhale TIREFIT fumes.Keeptiresealant
away fromchildren. Thereisarisk ofinjury.
If you come intocontactwith thetire seal-
ant, observe thefollowing:
R Rinse offthe tire sealant fromyourskin
immediately withwater.
R Ifthe tire sealant comesintocontactwith
your eyes, immediately rinsethem thor-
oughly withclean water.
R Iftire sealant isswallowe d,immediately
rinse yourmouth outthoroughly anddrink
plenty ofwater. Donot induce vomitin g,
and seek medical attentionimmediately.
R Immediately changeoutofclothin gwhich
has come intocontactwith tiresealant.
R Ifan allergic reaction occurs,seekmedi-
cal atten tionimmediately.
! Do
not operate thetire inflation compres-
sor forlonger thaneight minutes atatime
without abreak. Itmay otherwise overheat.
The tireinflation compressor canbeoper-
ated again onceithas cooled down.
Comply withthemanufact urer’ssafety instruc-
tions onthe stick eron the tire inflation com-
pressor. Using
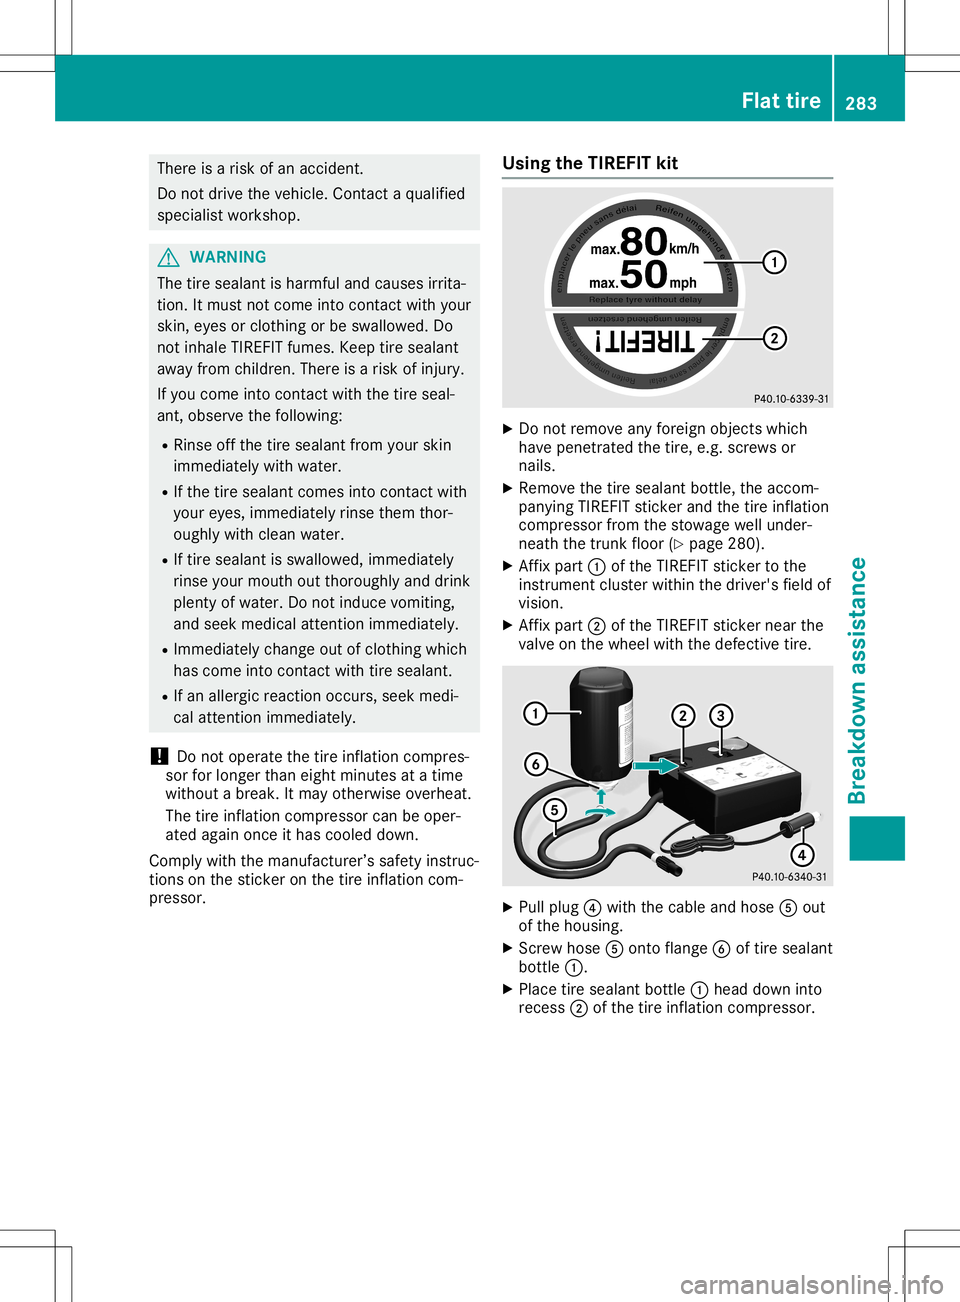
theTIREFIT kit X
Do not remove anyforeign objectswhich
have penetr atedthetire, e.g.screws or
nails.
X Remove thetire sealant bottle,theaccom-
panying TIREFITstickerand thetire inflation
compressor fromthestowage wellunder-
neath thetrunk floor(Ypage 280).
X Aff ixpart 0043ofthe TIREFIT stickerto the
instr ument cluster withinthedriver's fieldof
vision.
X Aff ixpart 0044ofthe TIREFIT stickernear the
valve onthe wheel withthedefect ivetire. X
Pull plug 0085with thecable andhose 0083out
of the housing.
X Scr ew hose 0083ontoflange 0084oftire sealant
bottle 0043.
X Place tiresealant bottle0043head down into
recess 0044ofthe tire inflation compressor . Flat
tire
283Breakdown assistance Z
Page 320 of 334
R
The jack must beplaced onafirm, flatand
non- slipsurface. Onaloose surface, alarge,
flat, load-bearing underlaymustbeused. On
a slippery surface, anon- slipunderlay must
be used, e.g.rubber mats.
R Do not use wooden blocksorsimilar objects
as ajack underlay. Otherwise, thejack will
not beable toachieve itsload-bearing capa-
city due tothe restr icted height.
R Make surethatthedistance between the
underside ofthe tires andtheground does
not exceed 1.2in(3 cm).
R Never placeyourhands andfeet under the
raised vehicle.
R Do not lieunder thevehicle.
R Do not start theengine whenthevehicle is
raised.
R Do not open orclose adoor orthe trunk lid
when thevehicle israised.
R Make surethatnopersons arepresent in
the vehicle whenthevehicle israised.
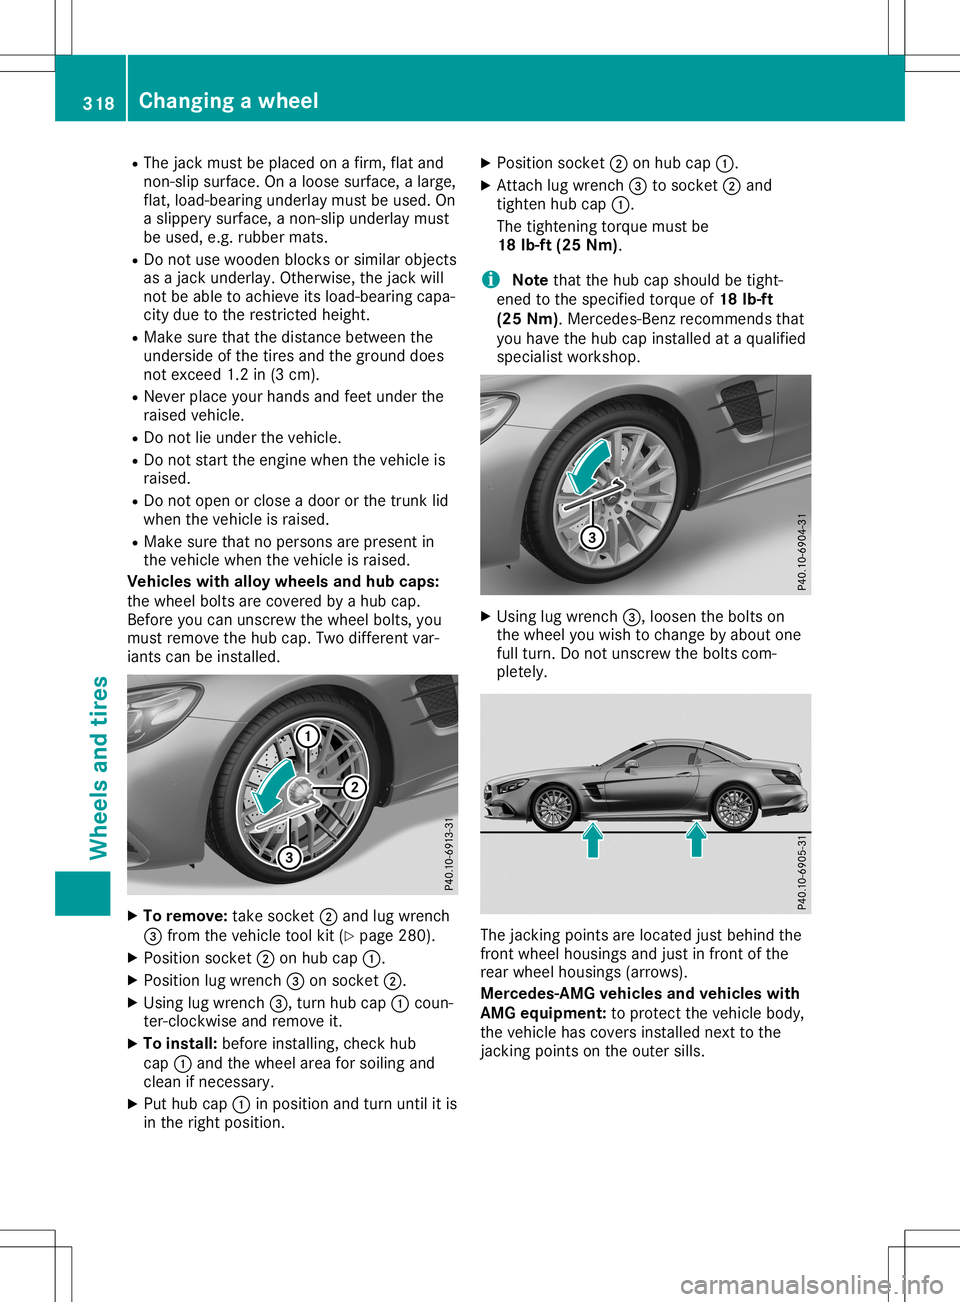
Vehicles withalloy wheels andhub caps:
the wheel boltsarecovered byahub cap.
Before youcan unscrew thewheel bolts,you
must remove thehub cap. Twodifferent var-
iants canbeinstalled. X
To remove: takesocket 0044and lugwrench
0087 from thevehicle toolkit(Ypage 280).
X Position socket0044onhub cap0043.
X Position lugwrench 0087onsocket 0044.
X Using lugwrench 0087,turn hubcap0043coun-
ter- clock wiseandremove it.
X To install: beforeinstalling, checkhub
cap 0043and thewheel areaforsoiling and
clean ifnecessary.
X Put hub cap0043inposition andturn until itis
in the right position. X
Position socket0044onhub cap0043.
X Attach lugwrench 0087tosocket 0044and
tighten hubcap0043.
The tighten ingtorque mustbe
18 lb-ft (25Nm).
i Note
thatthehub capshould betight-
ened tothe specified torqueof18 lb-ft
(25 Nm). Mercedes- Benzrecomm endsthat
you have thehub capinstalled ataqualified
specialist workshop. X
Using lugwrench 0087,loosen thebolts on
the wheel youwish tochange byabout one
full turn. Donot unscrew thebolts com-
pletely. The
jackingpoints arelocated justbehind the
front wheel housings andjust infront ofthe
rear wheel housings (arrows).
Mercedes-AMG vehiclesandvehicles with
AMG equipm ent:toprotec tthe vehicle body,
the vehicle hascovers installed nexttothe
jack ingpoints onthe outer sills. 318
Changing
awheelWheels andtires
Page 322 of 334

G
WARNING
If you tighten thewhee lbolts orwhee lnuts
when thevehicl eis rais ed, the jack couldtip
over. There isarisk ofinjury .
Only tighten thewhee lbolts orwhee lnuts
when thevehicl eis on the grou nd.
Alwa yspay attention tothe instructions and
safety notesinthe "Changi ngawhee l"section
(Y pag e316).
Only usewhee lbolts thathave been designed
for the whee land thevehicl e.For safety rea-
sons, Mercede s-Benzrecommends thatyou
only usewhee lbolts whichhave been
app roved forMercede s-Benzvehiclesand the
respe ctivewheel.
! Merce
des-AMGvehi cles:duri ngremova l
and repos itioning ofthe whee l,the whee l
rim can strike thecerami c-brake discand
dama geit.There fore,youshou ldproceed
carefu llyand getasecond personassi stto
you .Alternativel y,you can useasecond
ali gnment bolt.
! To
prevent damagetothe paintwork, hold
the whee lsecure lyaga inst thewhee lhub
whi lescrewi nginthe first whee lbolt. X
Cle anthe whee land whee lhub contact sur-
faces.
X Slide thewhee lto be mounted ontothe
ali gnment boltandpushit on.
X Tigh tenthewhee lbolts untiltheyarefinger-
tight.
X Unscrew thealignment bolt.
X Tigh tenthelastwhee lbolt until itis finger-
tight. Lo
we ring thevehi cle G
WARNING
The whee lscoul dcome looseif the whee l
bolts orwhee lnuts arenot tightened tothe
prescri bedtightening torque.There isarisk
of an accide nt.
Ensure thatthewhee lbolts orwhee lnuts
are tightened tothe prescri bedtightening
torque .
If you arenot sure ,do not move thevehicl e.
Contact aqua lified speci alist worksho pand
have thetightening torquechecked immedi-
ately .
X Turn thecrank ofthe jack counter-clockwi se
until thevehicl eis once againstanding
firmly onthe grou nd.
X Pla cethe jack toone side. X
Tigh tenthewhee lbolts evenly inacross-
wis epattern inthe sequ ence indica ted(0043
to 0083). Thespeci fiedtightening torqueis
96 lb-ft (130Nm).
X Turn thejack back toits initia lposi tion.
X Stow thejack andtherest ofthe vehicl e
tools inthe trunk again.
X Merce
des-AMGvehic lesand vehic les
with AMG equipment: insertthecover into
the outer sill.
X Che ckthe tire pressu reofthe newly moun-
ted whee land adjustitifnecessa ry.
Observe therecommende dtire pressu re
(Y pag e299) .
Vehic leswith atire pressure control sys-
tem: allinstall edwhee lsmust beequ ipped
with functioning sensors.
When youaredrivi ngwith theemerge ncy
spar ewhee lmounted, thetire pressu remoni- 320
Chang
ingawhe elWhee lsand tires
Page 325 of 334

basic
wiring. Besure toobserve themanufac -
turer' sSupplemen twhen installing.
Deviat ionswith respect tofrequen cybands,
maximum transmission outputsoranten na
position smust beapproved byMercedes -
Ben z.
The maximum transmission output(PEAK)at
the base ofthe anten namust notexceed the
following values: Frequ
encyband Maxim
um
tr ansm ission
outp ut Shor
twave
3 -54 MHz 100
W 4
m waveband
74 -88 MHz 30
W 2
m waveband
144 -174 MHz 50
W Trunk
edradio system/
Tetra
380 -460 MHz 10
W 70
cm waveband
400 -460 MHz 35
W Mobile
communications
(2G/3G/ 4G) 10
W The
following canbeused inthe vehicle with-
out restrictions:
R RF tran smitt erswith amaximum transmis-
sion output ofup to100 mW
R RF tran smitt erswith transmitt erfrequen cies
in the 380 -410 MHz waveband andamaxi-
mum transmission outputofup to2W
(trun kedradio/Tet ra)
R Mobile phones (2G/3G/ 4G)
There isno rest riction foranten naposition son
the outside ofthe vehicle forthe following fre-
quency bands:
R Trunk edradio system/ Tetra
R 70 cm waveband
R 2G/3G/ 4G Identificat
ionplat es Vehicle
identification platewith
vehicle identification number(VIN) X
Open thedriver' sdoor.
You willsee vehicle identification plate0043. Ex
ample: vehicle identification plate(USA only)
0043 VIN
0044 Vehicle model Ex
ample: vehicle identification plate(Canada
only)
0043 VIN
0044 Paint code
i The
data shown onthe vehicle identifica-
tion plate isused onlyasan example. This Identificat
ionplat es
323Technical data Z