2020 MERCEDES-BENZ SL ROADSTER wheel
[x] Cancel search: wheelPage 319 of 334

X
Shif tthe trans missionto pos ition 005D.
X Swi tch offthe engi ne.
X Vehi cles without KEYLES S-GO :remo ve
the Smar tKeyfrom theigniti onlock.
X Vehi cles with KEYLES S-GO :ope nthe driv-
er's door.
The vehicleelectro nicsnow have statu s0.
Thi sis the same asthe Smar tKeyhaving
bee nremo ved.
X Vehi cles with KEYLES S-GO :remo vethe
Start/Sto pbu tton from theigniti onlock
(Y page 126 ).
X Ifincl uded inthe vehicleequ ipment, remove
the tire-cha nge tool kitfrom thevehicle.
X Safe guard thevehicleag ainst rolling away.
Se curi ngthe vehic leto preve ntitfrom
rol ling awa y If
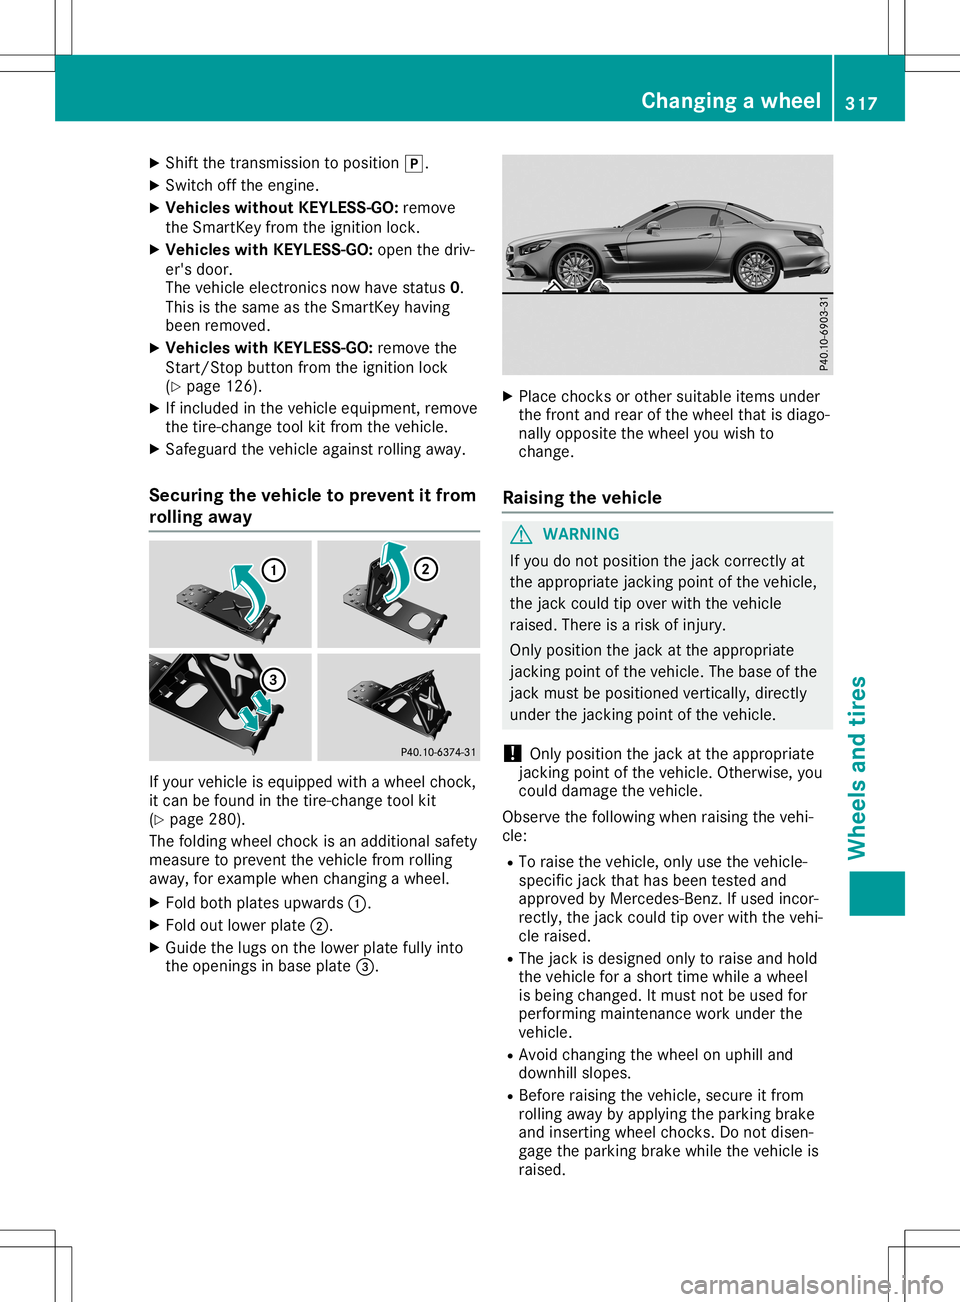
yo ur veh icleis equ ipped with awh eel chock,
it can befou ndinthe tire-cha nge tool kit
(Y page 280 ).
The folding wheel chock isan additiona lsa fety
mea sure to pre vent thevehiclefrom rolling
aw ay,for exa mpl ewh en cha nging awh eel .
X Fol dboth plate sup wa rds 0043.
X Fol dou tlo we rpl ate 0044.
X Gu ide the lugs on the lowe rpl ate fullyinto
the openings inba se plate 0087. X
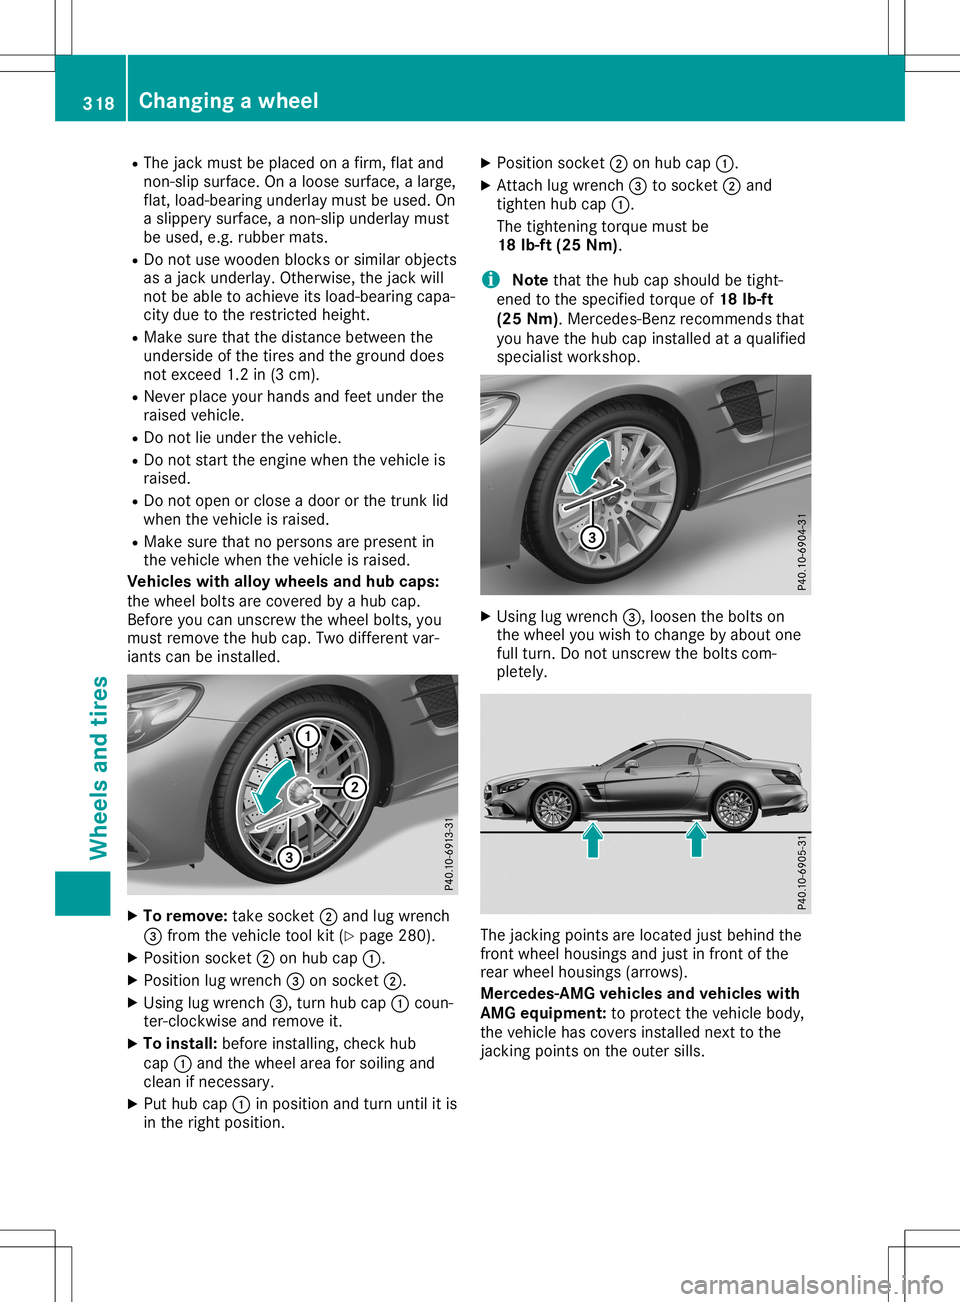
Place chocks orothe rsu ita ble item sund er
the front andrearof the wheel that isdiag o-
nal lyopp ositethe wheel youwi sh to
cha nge.
Rais ingthe vehic le G
WARNI
NG
If yo udo not position the jack corre ctlyat
the appro priate jacki ngpointofthe vehicle,
the jack couldtip ove rwi th the vehicle
rai sed .The reisaris kof inju ry.
Only position the jack atthe appro priate
jacki ngpointofthe vehicle. The base ofthe
jack mustbe pos itioned vertically,di rectl y
und erthe jacki ngpointofthe vehicle.
! Only
position the jack atthe appro priate
jacki ngpointofthe vehicle. Othe rwise, you
cou ldda mag ethe vehicle.
Obs erve thefollowi ng when raising thevehi-
cle :
R To raise the vehicle, only usethe vehicle-
spe cificjack thathasbee nteste dand
ap pro ved byMer cede s-Benz. Ifus ed incor -
rectl y,the jack couldtip ove rwi th the vehi-
cle raised .
R The jack isdes igned only toraise and hold
the vehiclefor asho rttime while awh eel
is bei ng cha nged .It mus tnot beused for
per formi ngmai ntenance workund erthe
veh icle.
R Avoi dcha nging thewheel onuphilland
dow nhillslo pes .
R Befo reraising thevehicle, secu reitfrom
rol ling away by applying the parking brake
and inserting wheel chocks .Do not disen-
ga ge the parking brakewhile the vehicleis
rai sed . Chan
ging awh eel
317Whee lsand tires Z
Page 320 of 334

R
The jack must beplaced onafirm, flatand
non- slipsurface. Onaloose surface, alarge,
flat, load-bearing underlaymustbeused. On
a slippery surface, anon- slipunderlay must
be used, e.g.rubber mats.
R Do not use wooden blocksorsimilar objects
as ajack underlay. Otherwise, thejack will
not beable toachieve itsload-bearing capa-
city due tothe restr icted height.
R Make surethatthedistance between the
underside ofthe tires andtheground does
not exceed 1.2in(3 cm).
R Never placeyourhands andfeet under the
raised vehicle.
R Do not lieunder thevehicle.
R Do not start theengine whenthevehicle is
raised.
R Do not open orclose adoor orthe trunk lid
when thevehicle israised.
R Make surethatnopersons arepresent in
the vehicle whenthevehicle israised.
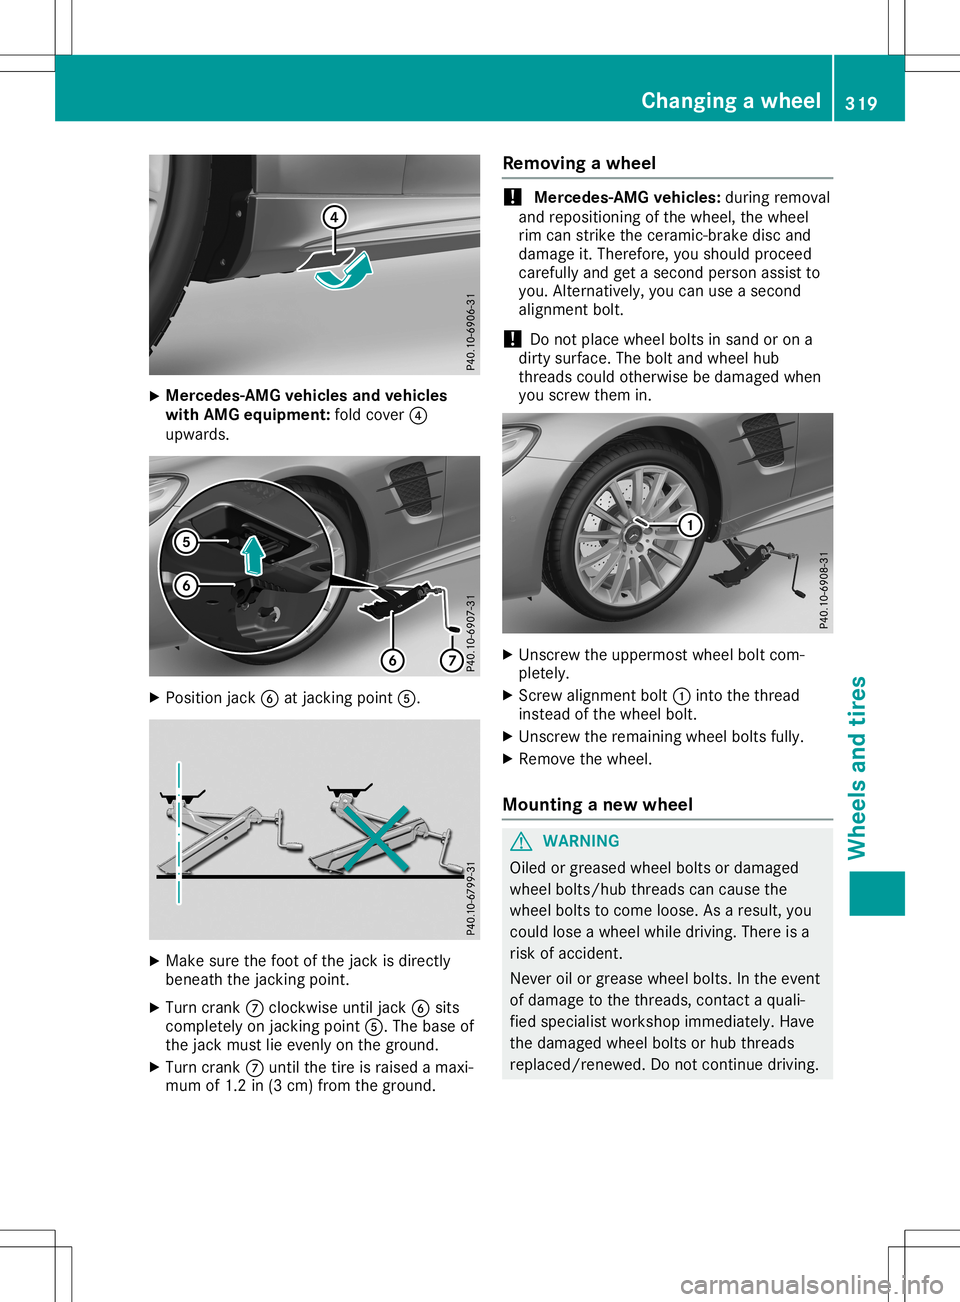
Vehicles withalloy wheels andhub caps:
the wheel boltsarecovered byahub cap.
Before youcan unscrew thewheel bolts,you
must remove thehub cap. Twodifferent var-
iants canbeinstalled. X
To remove: takesocket 0044and lugwrench
0087 from thevehicle toolkit(Ypage 280).
X Position socket0044onhub cap0043.
X Position lugwrench 0087onsocket 0044.
X Using lugwrench 0087,turn hubcap0043coun-
ter- clock wiseandremove it.
X To install: beforeinstalling, checkhub
cap 0043and thewheel areaforsoiling and
clean ifnecessary.
X Put hub cap0043inposition andturn until itis
in the right position. X
Position socket0044onhub cap0043.
X Attach lugwrench 0087tosocket 0044and
tighten hubcap0043.
The tighten ingtorque mustbe
18 lb-ft (25Nm).
i Note
thatthehub capshould betight-
ened tothe specified torqueof18 lb-ft
(25 Nm). Mercedes- Benzrecomm endsthat
you have thehub capinstalled ataqualified
specialist workshop. X
Using lugwrench 0087,loosen thebolts on
the wheel youwish tochange byabout one
full turn. Donot unscrew thebolts com-
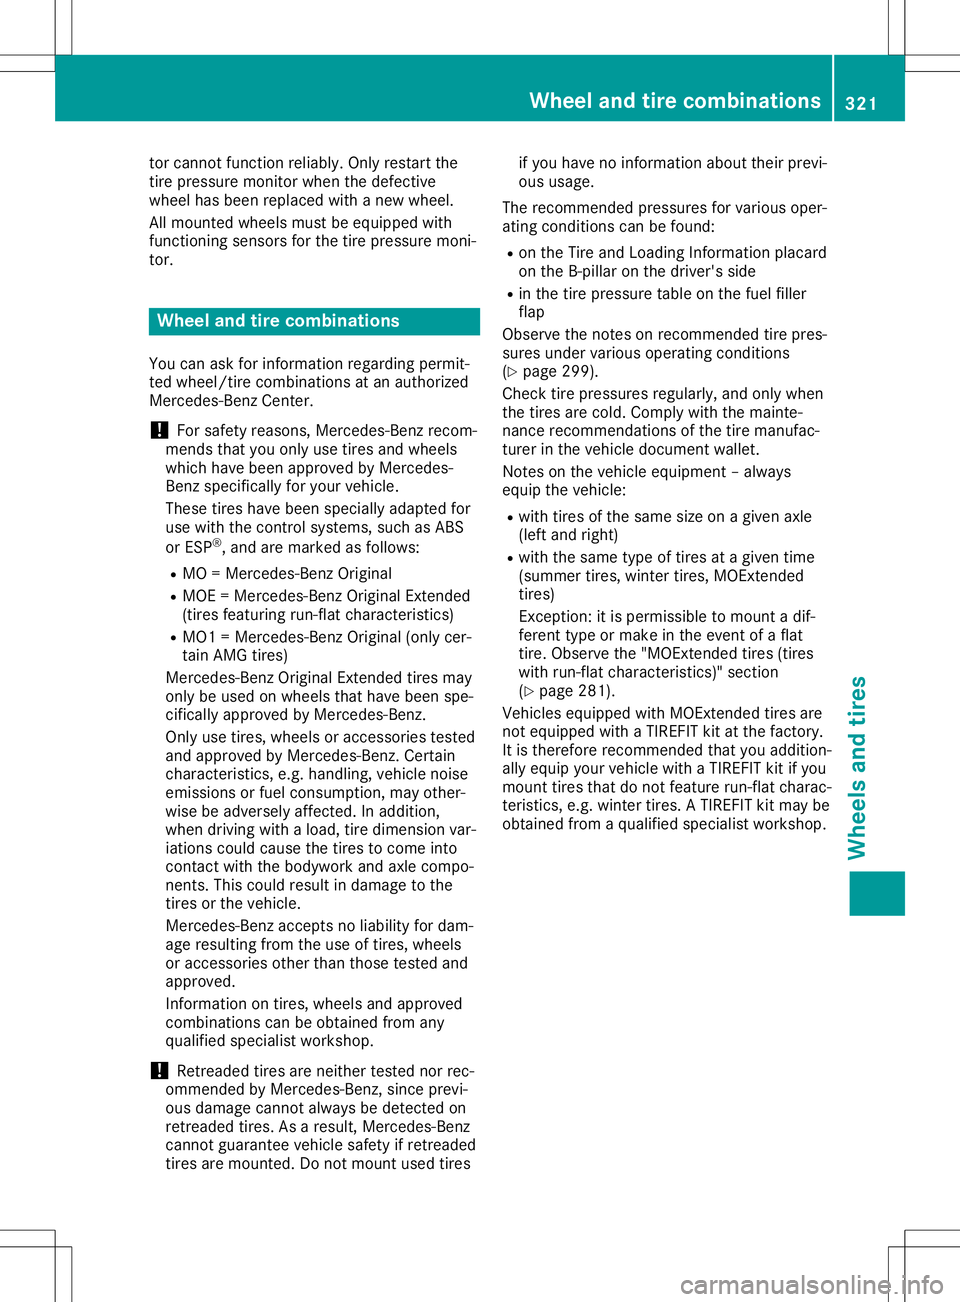
pletely. The
jackingpoints arelocated justbehind the
front wheel housings andjust infront ofthe
rear wheel housings (arrows).
Mercedes-AMG vehiclesandvehicles with
AMG equipm ent:toprotec tthe vehicle body,
the vehicle hascovers installed nexttothe
jack ingpoints onthe outer sills. 318
Changing
awheelWheels andtires
Page 321 of 334

X
Merce
des-AMGvehic lesand vehic les
with AMG equipment: foldcover 0085
upw ards. X
Posi tion jack 0084atjacking point0083. X
Make surethefoot ofthe jack isdirectly
benea ththe jacking point.
X Turn crank 006Bclockwis euntil jack0084sits
comple telyonjacking point0083.The base of
the jack must lieevenly onthe ground .
X Turn crank 006Buntil thetire israis edamaxi-
mum of1.2 in(3 cm) from theground . Removi
ngawhe el !
Merce
des-AMGvehic les:duri ngremova l
and reposi tioning ofthe whee l,the whee l
rim can strike thecerami c-brake discand
dama geit.Therefo re,you shou ldproceed
carefu llyand getasecond personassistto
you .Alternativel y,you can useasecond
ali gnment bolt.
! Do
not placewhee lbolts insand oron a
dirty surface.The bolt andwhee lhub
threads couldotherwi sebe dama gedwhen
you screw themin. X
Unscrew theuppermost wheelbolt com-
pletel y.
X Screw alignment bolt0043into thethread
instead ofthe whee lbolt.
X Unscrew theremai ningwhee lbolts fully.
X Remo vethe whee l.
Mountin ganew wheel G
WARNING
Oile dor grea sedwhee lbolts ordama ged
whee lbolts/hu bthreads cancaus ethe
whee lbolts tocome loose.As aresul t,you
coul dlose awhee lwhi ledrivi ng.There isa
risk ofaccide nt.
Never oilorgrea sewhee lbolts. Inthe event
of dama getothe threads ,contact aqua li-
fied specia listworkshop immediately.Have
the dama gedwhee lbolts orhub threads
repla ced/renew ed.Donot continue driving. Chang
ingawhe el
319Whee lsand tires Z
Page 322 of 334

G
WARNING
If you tighten thewhee lbolts orwhee lnuts
when thevehicl eis rais ed, the jack couldtip
over. There isarisk ofinjury .
Only tighten thewhee lbolts orwhee lnuts
when thevehicl eis on the grou nd.
Alwa yspay attention tothe instructions and
safety notesinthe "Changi ngawhee l"section
(Y pag e316).
Only usewhee lbolts thathave been designed
for the whee land thevehicl e.For safety rea-
sons, Mercede s-Benzrecommends thatyou
only usewhee lbolts whichhave been
app roved forMercede s-Benzvehiclesand the
respe ctivewheel.
! Merce
des-AMGvehi cles:duri ngremova l
and repos itioning ofthe whee l,the whee l
rim can strike thecerami c-brake discand
dama geit.There fore,youshou ldproceed
carefu llyand getasecond personassi stto
you .Alternativel y,you can useasecond
ali gnment bolt.
! To
prevent damagetothe paintwork, hold
the whee lsecure lyaga inst thewhee lhub
whi lescrewi nginthe first whee lbolt. X
Cle anthe whee land whee lhub contact sur-
faces.
X Slide thewhee lto be mounted ontothe
ali gnment boltandpushit on.
X Tigh tenthewhee lbolts untiltheyarefinger-
tight.
X Unscrew thealignment bolt.
X Tigh tenthelastwhee lbolt until itis finger-
tight. Lo
we ring thevehi cle G
WARNING
The whee lscoul dcome looseif the whee l
bolts orwhee lnuts arenot tightened tothe
prescri bedtightening torque.There isarisk
of an accide nt.
Ensure thatthewhee lbolts orwhee lnuts
are tightened tothe prescri bedtightening
torque .
If you arenot sure ,do not move thevehicl e.
Contact aqua lified speci alist worksho pand
have thetightening torquechecked immedi-
ately .
X Turn thecrank ofthe jack counter-clockwi se
until thevehicl eis once againstanding
firmly onthe grou nd.
X Pla cethe jack toone side. X
Tigh tenthewhee lbolts evenly inacross-
wis epattern inthe sequ ence indica ted(0043
to 0083). Thespeci fiedtightening torqueis
96 lb-ft (130Nm).
X Turn thejack back toits initia lposi tion.
X Stow thejack andtherest ofthe vehicl e
tools inthe trunk again.
X Merce
des-AMGvehic lesand vehic les
with AMG equipment: insertthecover into
the outer sill.
X Che ckthe tire pressu reofthe newly moun-
ted whee land adjustitifnecessa ry.
Observe therecommende dtire pressu re
(Y pag e299) .
Vehic leswith atire pressure control sys-
tem: allinstall edwhee lsmust beequ ipped
with functioning sensors.
When youaredrivi ngwith theemerge ncy
spar ewhee lmounted, thetire pressu remoni- 320
Chang
ingawhe elWhee lsand tires
Page 323 of 334

tor
cann otfunctio nrel iabl y. Onl yres tartthe
tire pressu remoni torwhen the defecti ve
wh eelha sbe en rep laced with anew wheel.
All mou nted wheelsmu stbe equipp ed with
fu nctio ningsenso rsfor the tire pressu remoni -
tor. Whe
eland tirecombi nati ons
Yo ucan askfor inform ation reg arding permi t-
ted wheel/ti recomb inations atan author ized
Me rced es-Benz Center.
! For
safety reason s,Me rced es-Benz recom-
mend stha tyo uonl yus etire sand wheels
wh ich have been appro ved byMe rced es-
Benz speci fically for your veh icle.
The setire sha ve been speci ally ad ap ted for
us ewi th the contro lsy ste ms, such asABS
or ESP ®
,and arema rked asfollows :
R MO =Me rced es-Benz Original
R MOE =Me rced es-Benz Original Extend ed
(ti res featuring run-fl atcha racteri stics)
R MO1 =Me rced es-Benz Original (only cer-
tai nAMG tires)
Me rced es-Benz Original Extend edtire sma y
onl ybe used on wheelstha tha ve been spe-
cif ica lly ap pro ved byMe rced es-Benz.
Onl yus etire s,wh eelsor acc essor iestes ted
and appro ved byMe rced es-Benz. Certa in
cha racteri stics, e.g.ha ndl ing,veh iclenoi se
emi ssions orfuel cons umption, mayothe r-
wi se be adver selyaffecte d.Inadditio n,
wh en drivin gwi th aload ,tire dimens ion va r-
ia tio ns cou ldcau sethe tiresto come into
conta ctwith the bodywo rkand axlecomp o-
nents .Thi scou ldres ultin da ma getothe
tire sor the vehicle.
Me rced es-Benz accepts no liab ility for dam-
ag eres ulting fromthe useof tire s,wh eels
or acc essor iesothe rtha nthos etes ted and
ap pro ved .
Info rma tionon tire s,wh eelsand appro ved
comb inations can beobtained fromany
qu alifi ed speci alistwo rksh op.
! Re
trea dedtire sar enei the rtes ted nor rec-
omm endedbyMe rced es-Benz, since previ-
ou sda ma gecann otalwa ysbe detecte don
retr eade dtire s.As ares ult, Me rced es-Benz
cann otguarante eveh iclesa fety ifretr eade d
tire sar emou nted .Do not mou ntused tire s if
yo uha ve no inform ation abou tthe irpre vi-
ou sus ag e.
Th erec omm endedpre ssu res forvario us oper-
ati ng cond itions canbefou nd:
R on the Tire and Loading Info rma tionplaca rd
on the B-pi llar on the driver 'sside
R in the tire pressu retab leon the fuel filler
fla p
Ob serve the note son rec omm endedtire pres-
su res und ervario us opera ting cond itions
(Y page 299 ).
Ch eck tirepressu res regular ly,and onlywh en
the tiresar ecol d.Co mpl ywi th the mainte -
nanc erec omm endations ofthe tire manuf ac-
tur erinthe vehicledo cum entwallet.
Note son the vehicleeq uipme nt–alwa ys
eq uip the vehicle:
R with tire sof the same size on agiven axle
(l eft and right)
R with the same typeof tire sat agiven time
(s um mer tires,winter tires,MOExte nded
tire s)
Excep tion:itis pe rmi ssible to mou ntadi f-
fer ent typeor ma keinthe eventofafla t
tire .Ob serve the "MOExte ndedtire s(ti res
wi th run-fl atcha racter istics )"se ctio n
(Y page 281 ).
Veh icles equipp ed with MOExte ndedtire sar e
not equipp ed with aTIR EFIT kitatthe factory .
It is the refore recomm endedtha tyo uad ditio n-
al ly eq uip yo ur veh iclewi th aTIR EFIT kitifyo u
mou nttire stha tdo not featureru n-fl atcha rac-
teri stics, e.g.wi nter tires.ATIR EFIT kitmaybe
ob tained fromaqu alifi ed speci alistwo rksh op. Whe
eland tirecombi nati ons
321Whe elsand tires Z