2020 MERCEDES-BENZ GLS SUV oil
[x] Cancel search: oilPage 198 of 549
#
Alw ays drive on inclines in the line of
fa ll (straight up or down) and do not
turn. &
WARNING Risk offire due toflammable
materials on hot parts of theex haust
sy stem
Flammable material such as lea ves, grass or
twigs may ignite if they come into contact
wi th hot parts of theex haust sy stem. #
When driving on unpa vedro ads or off-
ro ad, regular lych eck theve hicle under‐
side. #
Remo vetrapped plants or other flam‐
mable material, in particular. #
Ifth ere is damage, consult a qualified
specialist workshop immediately. When driving off-road, sand, mud and
water or
wate r mixed with oil may getinto the brakes.
This may lead toare duction in braking ef fect or
tot al brake failure as a result of increased wear.
The braking characteristics will vary depending
on the material that has entered the sy stem. Clean
the brakes af ter driving off-road. If you
th en notice reduced braking ef fect or hear
scraping noises, ha vethe brake sy stem checked
at a qualified specialist workshop. Adapt your
driving style to thech anged braking characteris‐
tics.
* NO
TEDama gecaused bydriving over
obs tacles The
vehicle can be damaged by:
R driving up onto high kerbs or unpa ved
ro ads.
R quickly driving over obs tacles su chas
ke rbs, speed bumps or po tholes.
R heavy objects hitting the underbody or
ch assis components. #
Do not drive over obs tacles that could
damage theve hicle. #
Check theve hicle regular lyfor dama ge
during off-road driving. #
Adjust theve hicle speed tosuit the
ro ad sur face conditions. #
Ifth ere is damage, consult a qualified
specialist workshop immediately. +
ENVIRONMENTAL
NOTEEnvironmental
dama gedue tonon-obser vance of pro‐
hibition signs Environmental pr
otection has priority. Treat
nature with respect. #
Be sure toobser veprohibition signs. Checklist before driving off-road
Check
thefo llowing points before driving off-
ro ad:
R Fuel le vel
R Vehicles with a diesel engine: AdBlue ®
le vel
R Engine oil le vel:fill engine oil tothe maxi‐
mum le velto ensure full gradeability
(/ page 360).
R Tyre-change tool kit and spare wheel
R Tyres and wheels Driving and parking
19 5
Page 216 of 549
Ne
verre fuel using any of thefo llowing fuels:
R petrol
R marine diesel
R heating oil
R pure bio-diesel fuel or vege table oil
R paraf fin or kerosene
If yo u accidentally refuel with the wrong fuel: #
Do not switch the ignition on. #
Consult a qualified specialist workshop. *
NO
TEDo not use diesel torefuel vehi‐
cles with a petrol engine If
yo u ha veacciden tally refuelled with the
wrong fuel:
R do not swit chthe ignition on. Otherwise
fuel can enter the engine.
Even small amounts of the wrong fuel
could result in damage tothe fuel sy stem
and the engine. The repair costs are high. #
Consult a qualified specialist workshop. #
Have the fuel tank and fuel lines
drained compl etely. *
NO
TEDo not use petrol torefuel vehi‐
cles with a diesel engine If
yo u ha veacciden tally refuelled with the
wrong fuel:
R do not swit chthe ignition on. Otherwise,
fuel can enter the fuel sy stem.
Even small amounts of the wrong fuel
could result in damage tothe fuel sy stem
and the engine. The repair costs are high. #
Consult a qualified specialist workshop. #
Have the fuel tank and fuel lines
drained compl etely. *
NO
TEDama getothe fuel sy stem caused
by ove rfilled fuel tanks #
Only fill th e fuel tank until the pump
nozzle switches off. If
yo u ha veadded too much fuel because of a
defective filling pump, for ins tance: #
Do not switch the ignition on. #
Consult a qualified specialist workshop. *
NO
TEFuel may spr ayout when you
re mo vethe fuel pump nozzle #
Only fill th e fuel tank until the pump
nozzle switches off. Re
quirements:
R The vehicle is unloc ked.
% Do not get into theve hicle again during the
re fuelling process. Otherwise, electros tatic
ch arge could build up again.
Obser vethe no tes on operating fluids and fuel.
The recommended octane number foryo ur vehi‐
cle can be found on the information label in the
fuel filler flap. Driving and parking
213
Page 228 of 549

%
The radar sensors are integ rated behind the
bumpers and/or behind the Mercedes star.
1 Cameras in the outside mir rors
2 Multifunction camera
3 Front camera
4 Ultrasonic sensors
5 Reversing camera &
WARNING Risk of accident due to
re stricted de tection per form ance of vehi‐
cle sensors and cameras
If th e area around vehicle sensors or cam‐
eras is co vered, damaged or dirty, cer tain
driving and saf ety sy stems cann otfunction
cor rectly. The reis a risk of an accident. #
Keep the area around vehicle sensors
or cameras clear of any obstructions
and clean. #
Have damage tothe bumper, radiator
grille or stone chipping in the area of
th e front and rear wind owsrepaired at
a qu alified specialist workshop. Pa
rticular ly,ke ep the areas around the sensors
and cameras free of dirt, ice or slush
(/ page 369). The sensors and cameras may
not be co vered and the de tection ranges around
th em must be kept free. Do not attach additional
license pla tebrac kets, ad vertisements, sticke rs,
fo ils or foils toprotect against stone chippings in
th e de tection range of the sensors and cameras. Make sure
that there are no overhanging loads
pr otru ding into the de tection range.
If th ere is damage toa bumper or thera diator
grille, or af ter an impact, ha vethe function of
th e sensors checked at a qualified specialist
wo rkshop. Ha vedamage or stone chipping in the
area of the cameras on the front and rear win‐
do ws repaired at a qualified specialist workshop. Overview of driving sy
stems and driving
saf ety sy stems R
ABS (Anti-lo ckBra king System)
(/ page 226)
R Off-road ABS (/ page 226)
R BAS (Bra keAssist System) (/ page 227)
R ESP ®
(Electronic Stability Program)
(/ page 227)
R ESP ®
Crosswind Assist (/ page 228)
R ESP ®
trailer stabilisation (/ page 228)
R EBD (Electronic Brakeforc eDistribution)
(/ page 230)
R STEER CONTROL (/ page 230) Driving and parking
225
Page 361 of 549
fi
ed based on the actual operating conditions
and/or loads.
Examples of arduous operating conditions:
R regular city driving with frequent intermedi‐
ate stops
R mainly short-dis tance driving
R frequent operation in mountainous terrain or
on poor road sur faces
R when the engine is of ten le ftidling for long
periods
R operation in particula rly dusty conditions
and/or if air-recirculation mode is frequently
used
In these or similar operating conditions, ha vethe
interior air filter, engine air cleaner, engine oil
and oil filter etc. changed more frequent ly. The
ty re s must be checked more frequently if the
ve hicle is operated under increased loads. Fur‐
th er information can be obtained at a qualified
specialist workshop. Battery disconnection periods
The ASS
YST PLUS se rvice inter val display
can only calculate the service due da tewhen
th e bat tery is connected. #
Notedown the service due date displa yed on
th e instrument display before disconnecting
th e battery (/ page 357). Engine compartment
Opening and closing
the bonnet &
WARNING Risk of accident due todriv‐
ing with the bonn etunlo cked
The bonn etmay open and block your vie w. #
Neverre lease the bonn etwhen driving. #
Before every trip, ensure that the
engine bonn etis loc ked. &
WARNING Risk of accident and inju ry
when opening and closing the bonn et
The bonnet may suddenly drop into the end
position.
There is a risk of injury for an yone in the bon‐
net's range of mo vement. #
Open or close the bonn etonly when
th ere is nobody in the bonn et's range of
mo vement. &
WARNING Danger of bu rns when open‐
ing the bonn et
If yo u open the engine bonn etwhen the
engine has overheated or during a fire inthe
engine compartment, you could come into
contact with hot gases or other escaping
operating fluids. #
Before opening the bonn et, allow the
engine tocool down. #
Intheeve nt of a fire inthe engine com‐
partment, keep the engine bonn et
closed and call thefire service. 358
Maintenance and care
Page 363 of 549
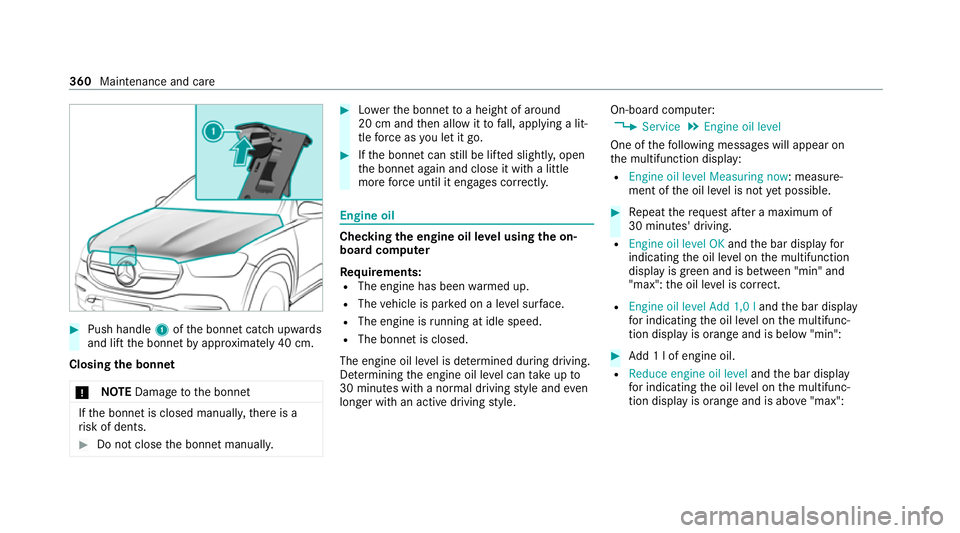
#
Push handle 1ofthe bonn etcatch up wards
and lift the bonn etby appr oximately 40 cm.
Closing the bonnet
* NO
TEDama getothe bonn et If
th e bonn etis closed manuall y,there is a
ri sk of dents. #
Do not close the bonn etmanually. #
Lowe rth e bonn etto a height of around
20 cm and then allow it tofall, applying a lit‐
tle forc e as you let it go. #
Ifth e bonn etcan still be lif ted slightl y,open
th e bonn etagain and close it with a little
more forc e until it engages cor rectly. Engine oil
Che
cking the engine oil le vel using the on-
board compu ter
Re quirements:
R The engine has been warmed up.
R The vehicle is par ked on a le vel sur face.
R The engine is running at idle speed.
R The bonnet is closed.
The engine oil le vel is de term ined during driving.
De term ining the engine oil le vel can take up to
30 minutes with a normal driving style and even
longer with an active driving style. On-board computer:
4 Service 5
Engine oil level
One of thefo llowing messages will appear on
th e multifunction display:
R Engine oil level Measuring now : measure‐
ment of the oil le vel is not yet possible. #
Repeat there qu est af ter a maximum of
30 minutes' driving.
R Engine oil level OK andthe bar display for
indicating the oil le vel on the multifunction
display is green and is between "min" and
"max": the oil le vel is cor rect.
R Engine oil level Add 1,0 l andthe bar display
fo r indicating the oil le vel on the multifunc‐
tion display is orange and is below "min": #
Add 1 l of engine oil.
R Reduce engine oil level andthe bar display
fo r indicating the oil le vel on the multifunc‐
tion display is orange and is abo ve"max": 360
Maintenance and care
Page 364 of 549
#
Drain off any excess engine oil that has been
added. Todo so, consult a qualified specialist
wo rkshop.
R For engine oil level turn on ignition #
Switch on the ignition tocheck the engine oil
le ve l.
R Engine oil level System inoperative : The oil
le ve l sensor is defective or not connec ted. #
Consult a qualified specialist workshop.
R Engine oil level System currently unavail. #
Close the bonn et.
To pping up engine oil &
WARNING Risk of bu rns from hot com‐
ponent parts in the engine compartment
Cer tain component parts in the engine com‐
partment can be very hot, e.g. the engine,
th e cooler and parts of theex haust sy stem. #
Allow the engine tocool down and only
to uch co mponent parts described in
th efo llowing. &
WARNING Risk offire and injury from
engine oil
If engine oil comes into con tact wi thhot
component parts in the engine compart‐
ment, it may ignite. #
Make sure that no engine oil is spilled
next tothefiller opening. #
Allow the engine tocool off and thor‐
oughly clean the engine oil from compo‐
nent parts before starting theve hicle. *
NO
TEEngine dama gecaused byan
incor rect oil filter, incor rect oil or addi‐
tives #
Do not use engine oils or oil filters
which do not cor respond tothe specifi‐
cations explicitly prescribed forthe
service inter vals. #
Follow the instructions on the service
inter val display forch anging the engine
oil and obser vethe prescribed change
inter vals. #
Do not use additives. *
NO
TEDama gecaused bytopping up too
much engine oil To
o much engine oil can damage the engine
or the catalytic con verter. #
Have excess engine oil remo ved at a
qu alified specialist workshop. %
Depending on driving style, theve hicle con‐
sumes up to0.8 lof oil per 1000 km. The oil
consum ption may be higher than this when
th eve hicle is new or if you frequently drive
at high engine speeds.
% Depending on the engine, the cap may be
ins talled in the engine compartment in dif‐
fe re nt locations. Maintenance and care
361
Page 365 of 549
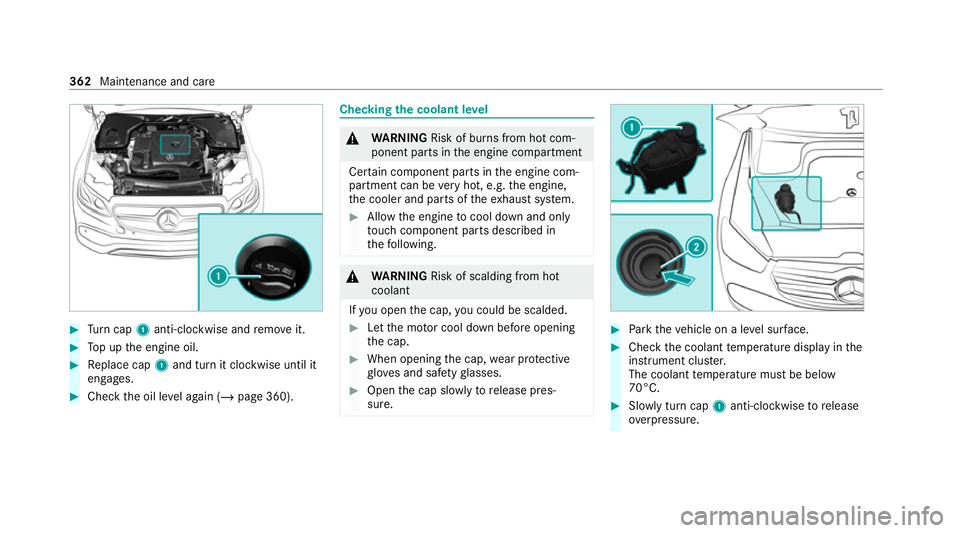
#
Turn cap 1anti-clockwise and remo veit. #
Top up the engine oil. #
Replace cap 1and turn it clockwise until it
engages. #
Check the oil le vel again (/ page 360). Checking
the coolant le vel &
WARNING Risk of bu rns from hot com‐
ponent parts in the engine compartment
Cer tain component parts in the engine com‐
partment can be very hot, e.g. the engine,
th e cooler and parts of theex haust sy stem. #
Allow the engine tocool down and only
to uch co mponent parts described in
th efo llowing. &
WARNING Risk of scalding from hot
coolant
If yo u open the cap, you could be scalded. #
Let the mo tor cool down before opening
th e cap. #
When opening the cap, wear pr otective
gl ove s and saf etygl asses. #
Open the cap slowly torelease pres‐
sure. #
Park theve hicle on a le vel sur face. #
Check the coolant temp erature display in the
instrument clus ter.
The coolant temp erature must be below
70°C. #
Slowly turn cap 1anti-clockwise torelease
ove rpressure. 362
Maintenance and care
Page 369 of 549
R
the air conditioning sy stem is set tofresh air
mode.
R Parking Assist PARKTRONIC is reset tothe
pr ev iously selec ted setting.
R the windo wsand the sliding sunroof remain
closed.
R Mercedes-Maybach vehicles: theru nning
boards remain retracted.
R vehicles with 360° Camera: the front
image is deactivated at speeds abo ve
18 km/h.
R vehicles with AIRMATIC: theve hicle is low‐
ered tothe pr eviously set chassis le vel.
R vehicles with E- ACTIVE BODY CONT ROL:
th eve hicle is lo weredto the pr eviously set
ch assis le vel. Ac
tivating/deactivating automatic car wash
mode Requ
irements:
R theve hicle is stationar y.
R the engine is running. Multimedia sy
stem:
4 © 5
Settings 5
Quick access
Ac tivating automatic car wash mode #
Select Car wash mode . #
Select Start.
If one of the settings cann otbe selected, this is
displa yedby a% behind there spective set‐
ting.
% For an overview of the settings made when
activating automatic car wash mode
(/ page 364).
Deactivating automatic car wash mode #
Select Stop.
The automatic car wash settings are reset.
% The automatic car wash mode is automati‐
cally deactivated as soon as a speed of
20 km/h is exceeded. Information on using a high-p
ressure cleaner &
WARNING Risk of an accident when
using high-pressure cleane rswith round-
spray nozzles
The wate r jet can cause extern ally invisible
damage.
Components damaged in this wa y may unex‐
pec tedly fail. #
Do not use a high-pressure cleaner with
round-spr aynozzles. #
Have damaged tyres or chassis parts
re placed immediatel y. To
avo id damage to yourvehicle, obser vethefo l‐
lowing when using a high-pressure cleaner:
R theke y is at a minimum dis tance of 3 m
aw ay from theve hicle. Otherwise theta ilgate
could open unin tentional ly.
R maintain a dis tance of at least 30 cm tothe
ve hicle.
R vehicles with deco rative foil: parts of your
ve hicle are co vered with a decorative foil. 366
Maintenance and care