2020 MERCEDES-BENZ GLE COUPE warning light
[x] Cancel search: warning lightPage 288 of 757
%
Ve
hicles with a standard Instrument Dis‐
pla y:a+ symbol next toa traf fic sign in the
Instrument Display indicates that additional
traf fic signs ha vebeen de tected. These can
also be displ ayed in the media display and
optionally in the head-up displa y.
If Traf fic Sign Assi stcannot de term ine the cur‐
re nt maximum pe rmissible speed (e.g. due to
missing signs), thefo llowing display appears in
th e Instrument Display: This is displa
yed continuously if theve hicle is in
a country where Traf fic Sign Assi stis not sup‐
por ted. Traf fic Sign Assi stis not available in all
countries.
% Also obse rveth e information on display mes‐
sages in Traf fic Sign Assi st (/ page 632). Wa
rning when app roaching pedestrian cross‐
ings (vehicles with Driving AssistancePack‐
age)
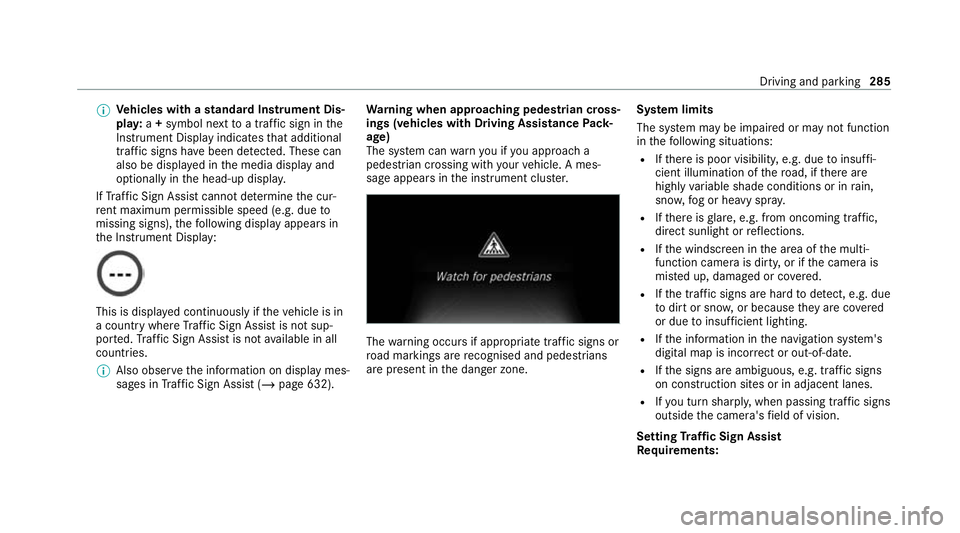
The sy stem can warnyou if you approach a
pedestrian crossing with your vehicle. A mes‐
sage appears inthe instrument clus ter. The
warning occurs if appropriate traf fic signs or
ro ad markings are recognised and pedestrians
are present in the danger zone. Sy
stem limits
The sy stem may be impaired or may not function
in thefo llowing situations:
R Ifth ere is poor visibility, e.g. due toinsuf fi‐
cient illumination of thero ad, if there are
highly variable shade conditions or in rain,
sno w,fog or heavy spr ay.
R Ifth ere is glare, e.g. from oncoming traf fic,
di re ct sunlight or reflections.
R Ifth e windscreen in the area of the multi‐
function camera is dirty, or if the camera is
mis ted up, damaged or co vered.
R Ifth e tra ffic signs are hard todetect, e.g. due
to dirt or sno w,or because they are co vered
or due toinsuf ficient lighting.
R Ifth e information in the navigation sy stem's
digital map is incor rect or out-of-da te.
R Ifth e signs are ambiguous, e.g. tra ffic signs
on con stru ction sites or in adjacent lanes.
R Ifyo u turn sharpl y,when passing traf fic signs
outside the camera's field of vision.
Setting Traf fic Sign Assist
Requ irements: Driving and parking
285
Page 289 of 757
R
Only vehicles with Driving Assistance
Pa ckage:
Ac tive Dis tance Assi stDISTRONIC mu stbe
activated forth e automatic adoption of
speed limits.
Multimedia sy stem:
4 © 5
Settings 5
Assistance
5 Traffic Sign Assist
Ac tivating/deactivating automatic adoption
of speed limits (only vehicles with Driving
Assistance Package) #
Select Adopt limit. #
Activate or deacti vate the function.
The speed limits de tected byTraf fic Sign
Assi stare automatically adop tedby Active
Dis tance Assi stDISTRONIC.
% If one of thefo llowing sy stems is activated,
th e speed de tected can be manually adop ted
as the speed limit:
R Active Dis tance Assi stDISTRONIC
R Cruise control
R Variable limiter Fu
rther information (/ page 234).
Displaying de tected traf fic signs in the
medi a display #
Select Display in head unit. #
Activate or deacti vate the function.
Ad justing the type of warning #
Select Visual & audible ,Visual orOff .
Ad justing the warning threshold
This value de term ines the speed at which a
wa rning is issued when exceeded. #
Select Warning threshold. #
Set the desired speed. Blind Spot Assist and
Active Blind Spot
Assi stwith exitwa rning Fu
nction of Blind Spot Assist and Active
Blind Spot Assi stwith exitwa rning
Blind Spot Assist and Active Blind Spot Assi st
use two lateral, rear-facing radar sensors to
monitor the area up to40 m behind and 3 m
next toyour vehicle. If a
vehicle is de tected at speeds ab ove appr ox‐
imately 12km/h and this vehicle subsequently
enters the monitoring range di rectly next to your
ve hicle, thewa rning lamp in the outside mir ror
lights up red.
If a vehicle is de tected close tothe side of your
ve hicle, there dwa rning lamp in the outside mir‐
ro rflashes. If you swit chon the turn signal indi‐
cator in the cor responding direction, a warning
to ne sounds once. If the turn signal indicator
re mains switched on, all other de tected vehicles
are indicated only bytheflashing of thered
wa rning lamp.
If yo uove rtake a vehicle quickl y,no warning is
given. &
WARNING Risk of accident despi teBlind
Spot Assi st
Blind Spot Assi stdoes not react tovehicles
approaching and overtaking you at a greatly
di fferent speed.
As a result, Blind Spot Assist cannot warn
drivers in this situation. 286
Driving and parking
Page 295 of 757
Setting
Active Lane Keeping Assist
Multimedia sy stem:
4 © 5
Settings 5
Assistance
5 Active Lane Keeping Assist
Setting the sensitivity
% The availability of this function is dependent
on the count ry. #
Select Standard ,Sensitive orOff.
Ac tivating/deactivating the haptic warning #
Select Warning.
Ac tivate or deacti vate the function. Tr
ailer hitch Note
s on trailer operation Mercedes‑AMG
vehicles: be sure toobser ve
th e no tes in the Supplement. You could other‐
wise failto recognise dangers.
Plug-in hybrid: obser vethe no tes in the Supple‐
ment. You could otherwise failto recognise dan‐
ge rs. Obser
vethefo llowing no tes on theto ngue
we ight:
R Do not use a tongue weight that exceeds or
fa lls below the permissible tongue weight
R Use a tongue weight as close as possible to
th e maximum tongue weight
Do not exceed thefo llowing values:
R Perm issible towing capacity
R Perm issible rear axle load of theto wing vehi‐
cle
R Perm issible gross weight of theto wing vehi‐
cle
R Perm issible grossweight of the trailer
R Maximum permissible speed of the trailer
Ensure thefo llowing before starting a journey:
R The tyre pressure on there ar axle of theto w‐
ing vehicle is set for a maximum load
R The lighting of the connected trailer is opera‐
tional
In theeve nt of increased rear axle load, the car/
trailer combination may not exceed a maximum speed of
100 km/h forre asons concerning the
operating permit. This also applies in countri es
in which the permissible maximum speed for
car/trailer combinations is ab ove100 km/h.
Ve hicles with AIRMATIC or E- ACTIVE BODY
CONT ROL:ifth e soc ket of the trailer hitch is
occupied, e.g. bya trailer or rear bicycle rack,
th eve hicle is set tothe normal le velre ga rdless
of the drive prog ram at speeds greater than
30 km/h.
% When you are reve rsing with a trailer,
re member touse theTr ailer Manoeuvring
Assist function (/ page 265). Extends/r
etra cts the ball neck fully electri‐
cally &
WARNING Risk of accident due tothe
ball neck not being engaged
If th e ball neck is not engaged, the trailer
may come loose. #
Make sure that the ball neck securely
engages and loc ksinto place. 292
Driving and parking
Page 299 of 757
#
Secu rethe cable tothe trailer with cable ties
(only if you are using an adap ter cable). #
Make sure that the cable is alw ays slack for
ease of mo vement during cornering.
Under thefo llowing conditions, a message may
appear on the multifunction display even if the
trailer has been connected cor rectly:
R LEDs ha vebeen ins talled in the trailer light‐
ing sy stem
R The cur rent has fallen below the trailer light‐
ing sy stem's minimum cur rent (50 mA)
% Accessories can be connected tothe perma‐
nent po wer supp lyup to180 W and tothe
po we r supp lythat is swit ched on via the igni‐
tion loc k.
Un coupling a trailer &
WARNING Risk of being crushed and
becoming trapped when uncoupling a
trailer
When uncoupling a trailer wi than engaged
ine rtia-activated brake, your hand may become trapped between
theve hicle and the
trailer dr awbar. #
Do not uncouple trailers with an
engaged overrun brake. *
NO
TEDama gewhen uncoupling in a
st ate of overrun Uncou
pling in a state of overru n can dama ge
th eve hicle. #
Do not uncouple trailers with an
engaged overrun brake. &
WARNING Risk of becoming trapped
when disconnecting the trailer cable
Ve hicles with le vel control sy stem: The
ve hicle may lo wer when the trailer cable is
disconnected.
This could result in you or other people
becoming trapped if your or their limbs are
between theve hicle body and the tyres or
underneath theve hicle. #
Make sure that nobody is unde rneath
th eve hicle or in the immediate vicinity
of the wheel ar ches when you discon‐
nect the trailer cable. *
NO
TEDama getothere ar bumper from
ins talling adap ter cables or adapte r plugs The
following parts could be damaged when
swiveling the ball neck fully electrically:
R Bumper
R Adapter cable
R Adapter plug #
Alw aysre mo vethe adap ter cable or
adapte r plug before swive lingthe ball
neck fully electrically. #
Secure the trailer against rolling away. #
Disconnect the electrical connection
between theve hicle and the trailer. #
Uncouple the trailer. #
Place the co ver cap on the ball head. 296
Driving and parking
Page 309 of 757
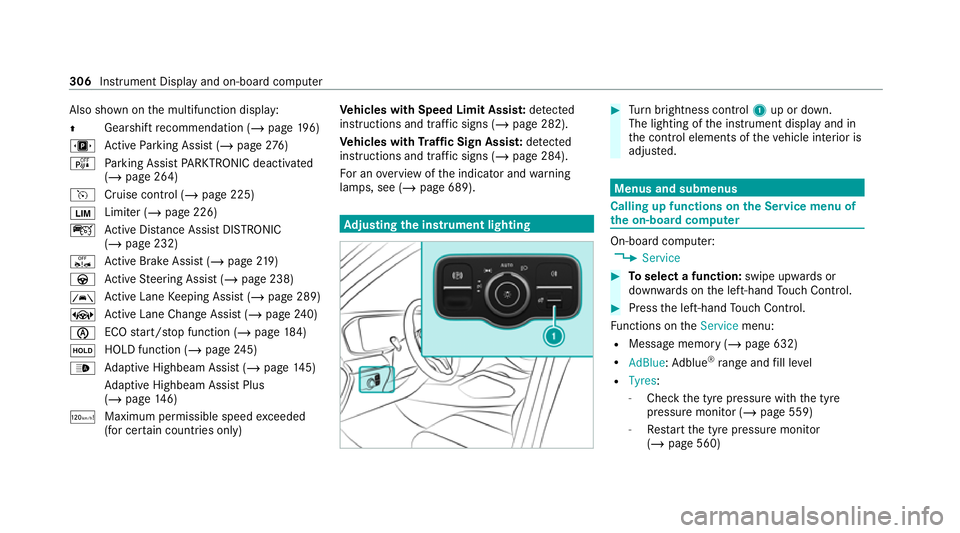
Also shown on
the multifunction display:
0097 Gearshift
recommendation (/ page 196)
u Active Parking Assist (/ page276)
é Parking Assist PARKTRONIC deacti vated
( / page 264)
h Cruise control (/ page 225)
00CB Limiter (/
page 226)
ç Active Dis tance Assi stDISTRONIC
(/ page 232)
ê Active Brake Assi st (/ page 219)
à Active Steering Assist (/ page 238)
00B0 Ac
tive Lane Keeping Assist (/ page 289)
± Active Lane Change Assi st (/ page 240)
00D6 ECO
start/ stop function (/ page184)
00D9 HOLD function (/
page245)
00CE Ad
aptive Highbeam Assist (/ page145)
Ad aptive Highbeam Assist Plus
(/ page 146)
ð Maximum permissible speed exceeded
(for cer tain countries only) Ve
hicles with Speed Limit Assis t:de tected
instructions and traf fic signs (/ page 282).
Ve hicles with Traf fic Sign Assis t:de tected
instructions and traf fic signs (/ page 284).
Fo r an overview of the indicator and warning
lamps, see (/ page 689). Ad
justing the in stru ment lighting #
Turn brightness control 1up or down.
The lighting of the instrument display and in
th e control elements of theve hicle interior is
adjus ted. Menus and submenus
Calling up functions on
the Service menu of
th e on-boa rdcompu ter On-board computer:
4 Service #
Toselect a function: swipe upwards or
down wards on the left-hand Touch Control. #
Press the left-hand Touch Control.
Fu nctions on theService menu:
R Message memory (/ page 632)
R AdBlue: Adblue ®
ra nge and fill le vel
R Tyres:
- Check the tyre pressure with the tyre
pressure monitor (/ page 559)
- Restart the tyre pressure monitor
(/ page 560) 306
Instrument Display and on-board computer
Page 316 of 757
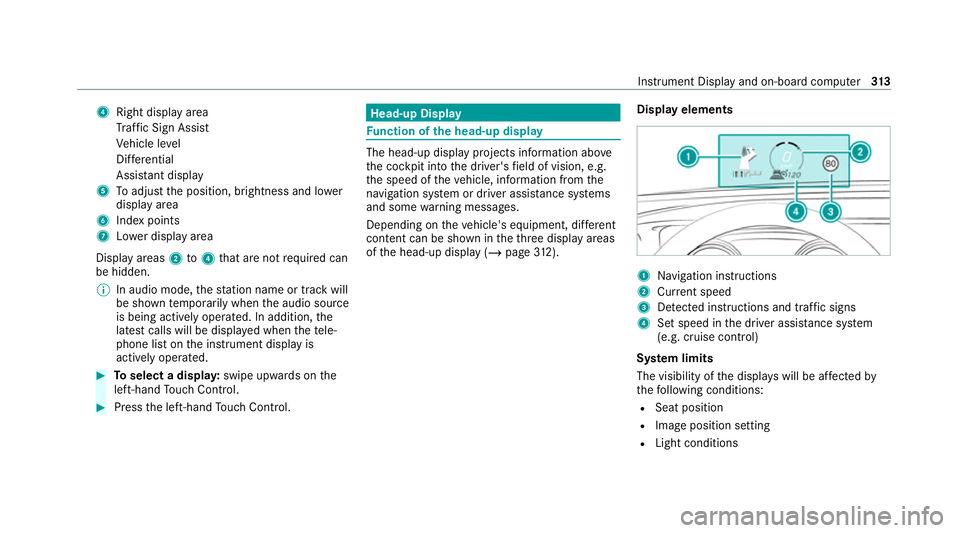
4
Right display area
Tr af fic Sign Assi st
Ve hicle le vel
Dif fere ntial
Assi stant display
5 Toadjust the position, brightness and lo wer
display area
6 Index points
7 Lowe r display area
Display areas 2to4 that are not requ ired can
be hidden.
% In audio mode, thest ation name or track will
be shown temp orarily when the audio source
is being actively operated. In addition, the
latest calls will be displa yed when thete le‐
phone list on the instrument display is
actively operated. #
Toselect a displa y:swipe upwards on the
left-hand Touch Control. #
Press the left-hand Touch Control. Head-up Display
Fu
nction of the head-up display The head-up display projects information abo
ve
th e cockpit into the driver's field of vision, e.g.
th e speed of theve hicle, information from the
navigation sy stem or driver assis tance sy stems
and some warning messages.
Depending on theve hicle's equipment, dif fere nt
content can be shown in theth re e display areas
of the head-up display (/ page312). Display elements 1
Navigation instructions
2 Curr ent speed
3 Detected instructions and traf fic signs
4 Set speed in the driver assis tance sy stem
(e.g. cruise control)
Sy stem limits
The visibility of the displa yswill be af fected by
th efo llowing conditions:
R Seat position
R Image position setting
R Light conditions Instrument Display and on-board computer
313
Page 346 of 757
beams can escape in an uncontrolled man‐
ner.
Laser radiation can damage your retina. #
Do not open the housing. #
Alw ays ha vemaintenance workand
re pairs car ried out byaqu alified spe‐
cialist workshop. This device is a class 1 laser product in accord‐
ance with DIN EN 60825-1:20
14&
WARNING Risk of di stra ction from infor‐
mation sy stems and communications
equipment
If yo u operate information and communica‐
tion equipment integ rated in theve hicle
when driving, you will be distracted from the
traf fic situation. This could also cause youto
lose control of theve hicle. #
Only operate this equipment when the
traf fic situation permits. #
Ifyo u cannot be sure of this, stop the
ve hicle whilst paying attention toroad and traf
fic conditions and ope rate the
equipment with theve hicle stationar y. Yo
u must obse rveth e legal requirements forthe
country in whi chyou are cur rently driving when
operating the multimedia sy stem.
Overview of the MBUX Interior Assistant
If th eve hicle is fitted wi th the MBUX Interior
Assis tant, selected functions of the multimedia
sy stem can be operated conta ct-free. In addi‐
tion, there ading light or sear chlight can be
switched on or off con tact-free.
The MBUX Interior Assi stant can dif fere ntia te
between driver and front passenger interactions.
The MBUX Interior Assis tant recognises cer tain
hand positions (poses).
Sy stem limits, display messages and no tes
fo rre ctification
The er ror messa ges are shown in the media dis‐
pla y. The sy
stem may be impaired or may not function
in thefo llowing situations:
R The camera is co vered or dirty, mis ted up or
scratched.
The The Interior Assistant is temporarily not
available see Owner's Manual message
appears.
Clean the outside of the camera lens with a
dry or damp cotton clo th. Do not use microfi‐
bre clo ths. Do notremo vethe co ver when
cleaning.
R Recognition can be impaired byreflective
clo thing, an adverse colour of clo thing or by
accesso ries, forex ample.
R Clothing being worn(hat, shawl, scarf) may
be limiting the de tection area of the camera.
Ke ep the camera's field of vision clear.
R The camera is too hot or is temp orarily
switched off.
The Interior Assistant is temporarily not avail-
able. You will be informed as soon as the
function is available again. MBUX multimedia sy
stem 343
Page 353 of 757
Yo
u can select the profile:
R When entering (/ page 352)
R Using the home screen (/ page 337)
The profile settings are activated as soon as a
profile is selected.
% When you call up your profile, the driver's
seat, steering wheel and outside mir rors can
be set.
If yo u call up your profile when driving then
th e driver's seat position will not be adjus‐
te d.
Yo u can cancel the setting process with the
fo llowing actions:
R Tap on thePositioning seat and steering
wheel. Please tap to cancel. warning on
th e media displa y.
R Press one of the seat operating buttons
in the driver's door. Profile content
Depending on theve hicle equipment, thefo llow‐
ing settings can be stored in your profile, for
ex ample:
R Driver's seat, steering wheel and mir ror set‐
tings
R Driver's seat memory
R Radio (including station list)
R Last destinations
R Climate control
R Ambient lighting
R DYNA MIC SELECT I (individual)
R Instrument Displa y,Head-up Display and
st yle (display style of the multimedia sy stem)
R Themes, suggestions and favo urites
% Settings for driver assi stance sy stems can‐
not be sa ved in the profile. Mercedes me connect profile
If
yo u use a profile from Mercedes me connect,
th efo llowing online functions are available, for
ex ample:
R You can configure the settings in theve hicle
using the Mercedes me app and the
Mercedes me por tal.
R You can syn chronise your profile on
Mercedes me connect with the profile in the
ve hicle (/ page 352).
R You can add a personal profile pho tothat is
shown in theve hicle.
R You can take your profile and some of your
settings with you in new vehicles.
Requ irements for using Me rcedes me con‐
nect profiles
Fo rth eve hicle owner:
R You ha vea Mercedes me user account.
R The vehicle has been connected with the
user account.
R The personalisation service is activated. 350
MBUX multimedia sy stem