2020 MERCEDES-BENZ GLE COUPE change wheel
[x] Cancel search: change wheelPage 572 of 757
The maximum load capacity of
the jack can
be found on thest icke r af fixe dto the jac k.
The jack is maintenance-free. If there is a
malfunction, please conta ct aqualified spe‐
cialist workshop.
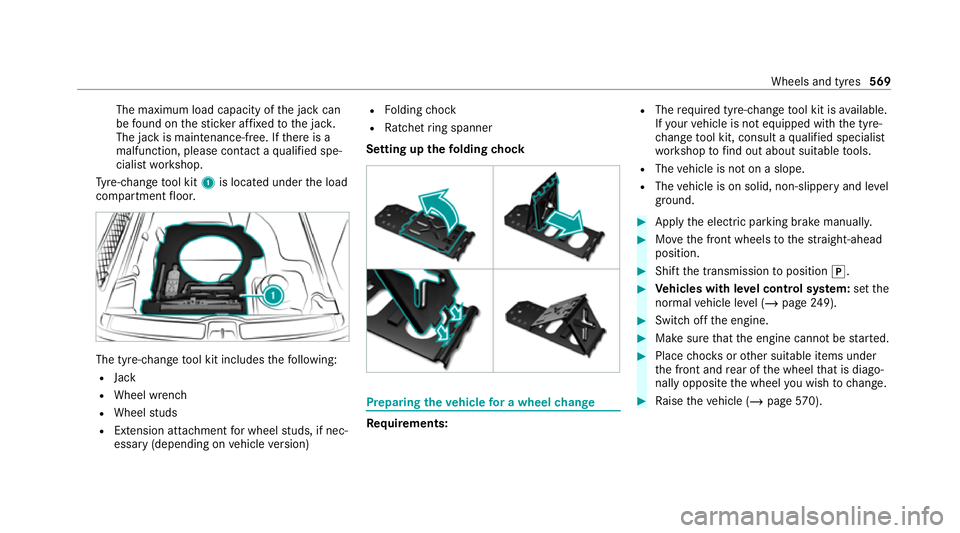
Ty re-change tool kit 1is located under the load
compartment floor. The tyre-change
tool kit includes thefo llowing:
R Jack
R Wheel wrench
R Wheel studs
R Extension attachment for wheel studs, if nec‐
essary (depending on vehicle version) R
Folding chock
R Ratchet ring spanner
Setting up the folding chock Prepa
ring theve hicle for a wheel change Re
quirements: R
The requ ired tyre-change tool kit is available.
If yo ur vehicle is not equipped with the tyre-
ch ange tool kit, consult a qualified specialist
wo rkshop tofind out about suitable tools.
R The vehicle is not on a slope.
R The vehicle is on solid, non-slippery and le vel
ground. #
Apply the electric parking brake manually. #
Movethe front wheels tothest ra ight-ahead
position. #
Shift the transmission toposition 005D. #
Vehicles with le vel control sy stem: setthe
normal vehicle le vel (/ page 249). #
Switch off the engine. #
Make sure that the engine cann otbe star ted. #
Place choc ks orother suitable items under
th e front and rear of the wheel that is diago‐
nally opposite the wheel you wish tochange. #
Raise theve hicle (/ page570). Wheels and
tyres569
Page 573 of 757
Re
moving and fitting hub caps Re
quirements:
R The vehicle is prepared for a wheel change
(/ page 569).
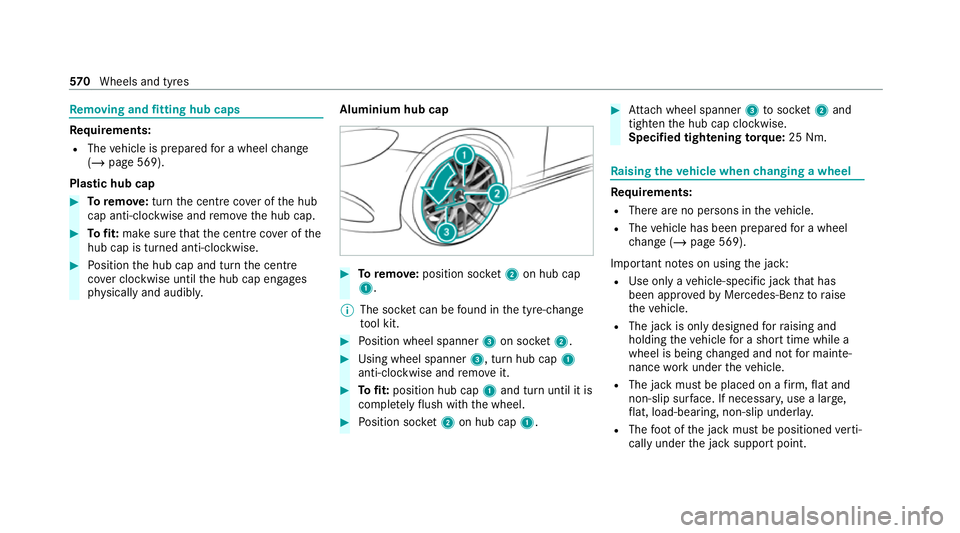
Pla stic hub cap #
Toremo ve:turn the cent recover of the hub
cap anti-clockwise and remo vethe hub cap. #
Tofit: make sure that the cent recover of the
hub cap is turned anti-clockwise. #
Position the hub cap and turn the cent re
co ver clockwise until the hub cap engages
ph ysically and audibly. Aluminium hub cap #
Toremo ve:position soc ket2 on hub cap
1.
% The soc ket can be found in the tyre-change
to ol kit. #
Position wheel spanner 3on soc ket2. #
Using wheel spanner 3, turn hub cap1
anti-clo ckwise and remo veit. #
Tofit: position hub cap 1and turn until it is
comple tely flush with the wheel. #
Position soc ket2 on hub cap 1. #
Attach wheel spanner 3tosoc ket2 and
tighten the hub cap clockwise.
Specified tightening torq ue: 25 Nm. Ra
ising theve hicle when changing a wheel Re
quirements:
R There are no persons in theve hicle.
R The vehicle has been prepared for a wheel
ch ange (/ page 569).
Important no tes on using the jack:
R Use only a vehicle-specific jack that has
been appr ovedby Mercedes-Benz toraise
th eve hicle.
R The jack is only designed forra ising and
holding theve hicle for a short time while a
wheel is being changed and not for mainte‐
nance workunder theve hicle.
R The jack must be placed on a firm ,fl at and
non-slip sur face. If necessar y,use a lar ge,
fl at, load-bearing, non-slip unde rlay.
R The foot ofthe jack must be positioned verti‐
cally under the jack support point. 57 0
Wheels and tyres
Page 574 of 757
Ru
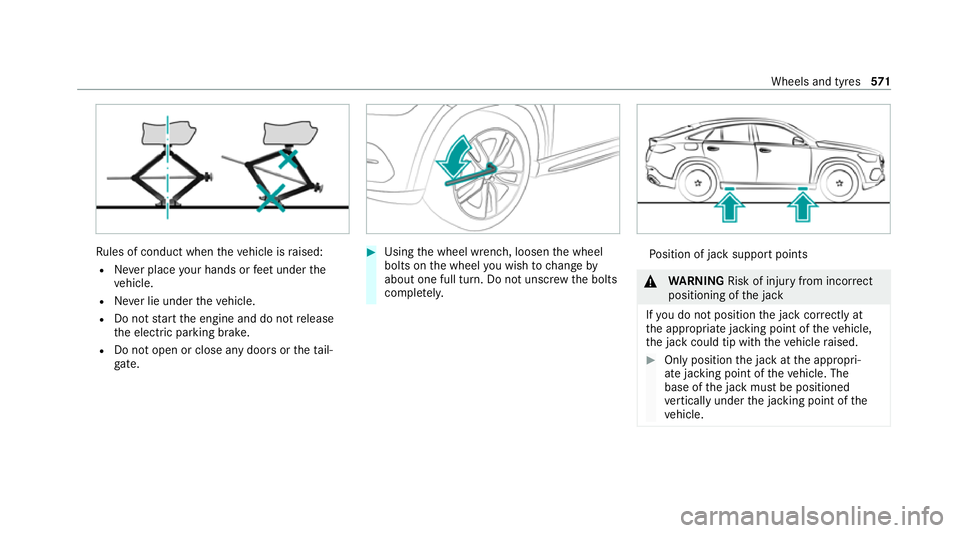
les of conduct when theve hicle is raised:
R Never place your hands or feet under the
ve hicle.
R Never lie under theve hicle.
R Do not start the engine and do not release
th e electric parking brake.
R Do not open or close any doors or theta il‐
gate. #
Using the wheel wrench, loosen the wheel
bolts on the wheel you wish tochange by
about one full turn. Do not unscr ewthe bolts
comple tely. Po
sition of jack support points &
WARNING Risk of inju ryfrom incor rect
positioning of the jack
If yo u do not position the jack cor rectly at
th e appropriate jacking point of theve hicle,
th e jack could tip with theve hicle raised. #
Only position the jack at the appropri‐
ate jacking point of theve hicle. The
base of the jack must be positioned
ve rtically under the jacking point of the
ve hicle. Wheels and tyres
571
Page 576 of 757
R
The wheel is remo ved (/ page572).
Me rcedes-AMG vehicles: observeth e no tes in
th e Supplement. Otherwise, you may failto rec‐
ognise dangers. &
WARNING Risk of accident from losing a
wheel
Oiled, greased or damaged wheel bolt/wheel
nut thre ads or wheel hub/wheel mounting
bolt thre ads can cause the wheel bolts/
wheel nuts tocome loose.
As a result, you could lose a wheel while driv‐
ing. #
Never oil or grease theth re ads. #
Intheeve nt of damage totheth re ads,
con tact a qualified specialist workshop
immediatel y. #
Have the damaged wheel bolts or dam‐
aged hub thre ads replaced. #
Do not continue driving. #
Obser vethe information on thech oice of
tyres (/ page 564). Fo
r tyres with a specified direction of rotation,
an ar row on the side wall of the tyre indicates
th e cor rect di rection of rotation. Obse rvethe
direction of rotation when fitting. &
WARNING Risk of inju ryfrom tightening
wheel bolts and nuts
If yo u tighten the wheel bolts or wheel nuts
when theve hicle is raised, the jack could tip. #
Only tighten wheel bolts or wheel nuts
when theve hicle is on the ground. #
Be sure toobser vethe instructions and
saf ety no tes on "Changing a wheel"
(/ page 564). #
For saf etyre asons, on lyuse wheel bolts
which ha vebeen appr ovedby Mercedes-
Benz and forth e wheel in question. #
Tighten the wheel bolts evenly in a diagonal
pattern in the order indicated until they are
fi nger-tight. #
Ifth e collapsible emer gency spa rewheel has
been fitted, infla tethe collapsible emer gency
spa rewheel (/ page578). #
Lowe rth eve hicle (/ page573). Lo
weri ngtheve hicle af ter a wheel change Re
quirements:
R The new wheel has been fitted
(/ page 572 ).
Obse rveth e information on tyre pressure
(/ page 557). #
Place thera tchet ring spanner onto the he xa‐
gon nut of the jack so that the lettering "AB"
is visible. #
Tolowe r the vehicle: turnthera tchet ring
spanner of the jack anti-clockwise. Wheels and tyres
573
Page 708 of 757
1,
2, 3 ...
4MATIC ..................................................... 197
Fu nction .............................................. 197
12 V battery
see Battery (vehicle)
12 V so cket
see Soc ket (12 V)
48 V on-board electrical sy stem
Operating saf ety .................................... 24
230 V soc ket
see Soc ket (230 V)
360° Camera ............................................ 271
Care .................................................... .531
Fu nction .............................................. 271
Opening the camera co ver (r eve rsing
camera) .............................................. .274
Selecting a view ................................... 274
Switching au tomatic operation
on/off (r eversing camera) .................. .274 A
A/C function Activating/deactivating (MBUX mul‐
timedia sy stem) ................................... 161
Switching on/off (control panel) .......... 161
ABS (Anti-lock Braking Sy stem) ............ .213
Ac celeration
see Kickdown
Ac cess data
Setting (Blue tooth®
) .............................4 75
Setting (car telephony) ........................ .476
Ac cident and breakdown manage‐
ment
Mercedes me connect ........................ .465
Ac oustic locking verification signal
Ac tivating/deactivating ......................... 80
Ac tivating/deactivating automatic
vo lume adjustment
Burmes ter®
sur round sound sy stem ... 505
Ac tive Blind Spot Assi st......................... 286
Ac tivating/deactivating ...................... .289
Brake application ................................. 288
Fu nction .............................................. 286 Sy
stem limitations ...............................2 86
Tr ailer operation .................................. 288
Ac tive Brake Assi st
Fu nction/no tes .................................... 219
Setting ................................................. 225
Ac tive Di stance Assist DISTRO NIC........ 232
Ac tive Emergency Stop Assist .............2 42
Ac tive Lane Change Assi st.................. 24 0
Calling up a speed .............................. .234
Displ ays in the instrument display .......2 43
Fu nction .............................................. 232
Increasing/decreasing speed .............. 234
Re quirements: .................................... .234
Ro ute-based speed adap tation ........... .237
Selecting ............................................. 234
St eering wheel buttons ....................... 234
St oring a speed ................................... 234
Switching off/deactivating .................. 234
Switching on/activating ......................2 34
Sy stem limitations ...............................2 32
Ac tive Eme rgency Stop Assist ...............242
Ac tive headlamps .................................... 14 3
Ac tive Lane Change Assi st..................... 24 0
Ac tivating/deactivating ...................... .242 Index
705
Page 713 of 757
Belt
see Seat belt
Bic ycle rack
Tr ailer operation .................................. 297
Blind Spot Assist .................................... .286
Ac tivating/deactivating ...................... .289
Fu nction .............................................. 286
Sy stem limitations ...............................2 86
Blo wer
see Climate control
BlueTEC see AdBlue ®
Blue tooth ®
................................................ 373
Information .......................................... 373
Setting up an Internet connection ....... 475
Switching on/off ................................. 373
Boot lid see Tailgate
Brake Assist Sy stem
see BAS (Brake Assi stSystem)
Brake fluid Notes ................................................... 624 Brake
forc e distribution
EBD (Elect ronic Brake forc e Distribu‐
tion) ..................................................... 219
Brakes ABS (Anti-lock Braking Sy stem) ........... 213
Ac tive Brake Assi st.............................. 219
Ad aptive brake lights .......................... .225
BA S (Brake Assi stSystem) ...................2 14
Driving tips .......................................... 17 9
EBD (Electronic Brake forc e Distribu‐
tion) ..................................................... 219
HOLD function .................................... .245
Limi ted braking ef fect (salt-trea ted
ro ads) .................................................. 17 9
New/replaced brakepads/brake
discs .................................................... 17 7
Po st-collision brake ................................ 51
Ru nning-in no tes ..................................1 77
Braking assistance see BAS (Brake Assi stSystem)
Breakdown Overview of the help functions .............. 18
To w- starting ........................................ 553
To wing away ........................................ 549
Tr ansporting theve hicle ......................5 51Wheel
change ...................................... 569
Breakdown see Flat tyre
Bu rm ester ®
high-end 3D sur round
sound sy stem .......................................... 506
Ad justing the balance/fader ............... 507
Ad justing the sound optimisation ........ 507
Ad justing treble, mid-range and bass
settings ............................................... 506
Au tomatic volume adjustment ............ .507
Calling up the sound menu .................. 506
Information .......................................... 506
Selecting the sound profile .................. 507
Burmes ter®
sur round sound sy stem .....5 05
Ad justing the balance/fader ............... 505
Ad justing the sound focus ................... 506
Ad justing treble, mid-range and bass
settings ............................................... 505
Au tomatic volume adjustment ............ .505
Calling up the sound menu .................. 505
Information .......................................... 505
Selecting the sound profile .................. 506
Butto ns
St eering wheel .....................................3 01710
Index
Page 722 of 757
Limiter passive
..................................... 671
Mercedes me connect Services limi‐
te d See Owner's Manual ......................677
Mo tor can be star ted again .................6 80
N permanently active Risk of vehicle
ro lling .................................................. 652
Only select Park (P) when vehicle is
st ationary ............................................ 651
Place theke y in the mar ked space
See Owner's Manual ...........................638
PRE-SAFE impulse side inope rative
See Owner's Manual ........................... 636
PRE-SAFE inope rative See Owner's
Manual ................................................ 636
Re duce speed ...................................... 683
Re versing not poss. Consult work‐
shop ....................................................6 52
Risk of vehicle rolling Driver door
open and transmission not in P ...........651
Speed limit (winter tyres) XXX km/h ...672 Speed Limit Assi
stcur rently una vail‐
able See Owner's Manual .................... 666
Speed Limit Assist inope rative ........... .666
St op vehicle Lea veengine running
Wa itTransmission cooling ...................653
To shift out of P or N,depress brake
and start engine .................................. 651
To switch off the engine, press the
St art/ Stop button for at least 3 sec‐
onds or 3 times. .................................. 648
Tr af fic Sign Assi stcur rently una vaila‐
ble See Owner's Manual ...................... 666
Tr af fic Sign Assi stinope rative ............. 666
Tr ansmission Malfunction Stop ........... 652
Ty re press. monitor cur rently una vail‐
able .................................................... .680
Ty re press. monitor inoperative ...........680
Ty re press. monitor inoperative No
wheel sensors ...................................... 681
Ty re(s) ove rheated ...............................6 83Up
date failed ...................................... .643
Up date failed Software remains
unchanged ........................................... 643
Up date successfully comple ted ...........6 43
Wi thout changing gear, consult work‐
shop ....................................................6 52
Display on the windscreen
see Head-up display
Distance control see Active Dis tance Assi stDISTRONIC
Di stance recorder
see Trip dis tance
DI STRO NIC
see Active Dis tance Assi stDISTRONIC
Door Additional door lock .............................. 82
Child saf ety lock (rear door) .................. .76
Locking (emergency key) ...................... .86
Opening (from the inside) ......................82
Po we r closing function ......................... .86
Un locking (emer gency key) .................. .86
Un locking (from the inside) ...................82 Index
719
Page 726 of 757
Exterior lighting
see Lights
Exterior lighting (Care) ............................ 531F
Fa tigue de tection
see ATTENTION ASSIST
Fa ult message
see Displ aymessa ge
Favo urites
Ad ding .................................................3 57
Ad ding a destination ...........................3 96
Calling up ............................................ 357
Deleting ............................................... 358
Home add ress .....................................3 96
Moving ................................................ 358
Overview ............................................. 357
Re naming ............................................ 358
Wo rkaddress ...................................... 396
Fi ll le vel
Ad Blue ®
............................................... 306
Fi lling station sear ch
St arting automatic sear ch................... 403
Switching au tomatic sear chon/off ..... 403 Fire
extinguisher ..................................... 536
Fi rs t-aid kit (soft sided) .......................... 536
Flacon Inse rting/ removing ............................. 16 4
Flat towing
see Tow- bar sy stem
Flat tyre ....................................................5 37
MOExtended tyres ...............................5 38
No tes ................................................... 537
TIREFIT kit ...........................................5 39
Wheel change ...................................... 569
Floor mats ................................................ 13 8
Fo g light (extended range) ..................... 14 4
Fo il co vering
Ra dar and ultrasonic sensors ...............2 12
Fr ag rance
see Frag rance sy stem
Fr ag rance sy stem .................................... 16 4
Inserting/removing theflacon ............ .164
Setting ................................................. 16 4
Fr ee driving mode
St arting .............................................. .259 Fr
ee software ............................................ 35
Fr equencies
Mobile phone ...................................... .581
Tw o-w ayradio ...................................... 581
Fr equency band
Dialling (on-board computer) .............. .310
Fr ont airbag (driver, front passenger) .....42
Fr ont passenger seat ..............................104
Ad justing from the driver's seat ..........1 04
Fr ont passenger seat
see Seat
Fu el .......................................................... .620
Ad ditives .............................................6 20
Diesel ................................................. .620
E10 ...................................................... 61 9
Fu elreser ve ......................................... 621
Low outside temp eratures ...................6 20
Pe trol ................................................... 61 9
Quality (diesel) .................................... 620
Quality (petrol) ..................................... 61 9
Re fuelling ............................................. 197
Sulphur content ................................... 61 9
Ta nk content ........................................ 621 Index
723