2020 MERCEDES-BENZ GLA door lock
[x] Cancel search: door lockPage 253 of 346
Load
ingguid elines G
WAR
NING
If obj ect s,luggage orloads arenot secured
or not secured sufficiently, they could slip,
tip over orbe flun garoun dand thereb yhit
veh icle occupant s.Ther eis arisk ofinjury,
part icular lyin theeven tof sudden braking
or asudden changeindirec tion.
Always store object sso that they can not be
flun garoun d.Sec ure object s,luggage or
loads againstslippin gor tipping beforethe
jo urn ey. G
DANG
ER
Combus tioneng inesemit poiso nous
exh aust gases suchascar bon mon oxide.
Ex haust gases canentertheveh icle interio r
if th etailg ateisopen while theeng ineis
run ning,espec iallyifth eveh icle isin
mot ion.Ther eis arisk ofpoiso ning.
Always switchoff theeng inebefo reopen ing
th etailg ate. Neverdriv ewith thetailg ate
open . G
WAR
NING
The exhaust tailpipe andtailpipe trim can
bec ome veryhot .If you com eint ocon tact
with these partsof theveh icle,you could
burn yourse lf.Ther eis arisk ofburn s.
Always bepart icular lycar eful andsuper vise
chi ldren closely aroun dth eexh aust pipeand
th eexh aust pipetrims. Allowthese com po-
nen tsto coo ldown beforetouchin gth em.
The handlingchar acteris ticsof aladen vehicle
are depen denton thedist ribut ionoftheload
with intheveh icle.
Obse rvethefollo wing noteswhen loadin gand
tr ans port ingaload:
R Nev erexc eed themax imum permissible
gro ssveh icle mass orthegro ssaxle weight
rat ing fortheveh icle (includin gocc upant s).
The values arespec ified ontheveh icle iden - tif
icat ion plat eon theB- pillar ofthedriv er's
door .
R The cargocom partmen tis thepref erred
place tocar ryobj ect s.
R Posit ionheavy loadsasfar forward asposs i-
ble and aslow down inthecar gocom part-
men tas poss ible.
R The load must notprot rude above theupper
edge oftheseat backrests.
R Always placetheload again sttherear or
fro ntseat backrests.Mak esure that the
seat backrestsare securely lockedinto
place .
R Always placetheload behin dunoc cupie d
seat sif poss ible.
R Use thecar gotie-do wn rings and theparc el
net sto trans port loads andluggage .
R Use cargotie-do wn rings and fastening
mat erials appropriatefor theweight and
siz eof theload.
R The maximum loadcapac ityofthest owage
well unde rth ecar gocom partmen tfloo ris
55 lbs (25 kg).
R Se cure the load with sufficiently stron gand
wear- resistant tie-do wns .Pad sharpedges
for prot ection.
! Do
notposit iontheload ononepart ofthe
fold ingcargocom partmen tfloo ron ly. The
max imum loadcapac ityofthefold ingcargo
com partmen tfloo ris 22 0lbs (100kg ).Di s-
tri bu te the weight evenlyto avoid damagin g
th ecar gocom partmen tfloo r.Place asolid
board undertheload ifnec essar y.Please
not eth at theload onthecar gocom part-
men tfloo rwill beincrease dwhen theload
is lashed down. St
owage areas St
owage spaces
Imp ortant safety notes G
WAR
NING
If you transp ortobject sin thevehic leint e-
rior and these arenot adequat elysecured,
th ey could sliporbe flun garoun dand
th ereby strik evehic leocc upant s.In addi-
tio n,cup holder s,open stowage spacesand
mobile phonebrac ketsmay notalways be St
owage areas
251Stowage andfeatures
Z
Page 269 of 346
USA
only: alternatively, thevehicle canbe
opened via:
R the Intern et,under the"Owners Online"sec-
tion
R telephone applications (e.g.foriPhone ®
,
Android ®
)
To do this, youwillneed youridentification
number andpassword .
i Vehicle
remoteopening isonly possible if
the corresponding mobilephonenetwork is
accessible.
Vehicle remoteclosing The
vehicle valetlocking featurecanbeused
when youhave forgotten tolock thevehicle
and youarenolonger nearby.
The vehicle canthen belocked bythe
Mercedes-Benz CustomerAssistance Center.
The vehicle canbeimmediately locked
remotely uptofour days after theignition was
last switched off.After thistime, valetlocking
may bedelay edby15 to60 minutes. After
30 days thevehicle cannolonger belocked
remotely.
X Contact thefollowi ngservice hotlines:
R USA: Mercedes-Benz CustomerAssis-
tance Center at1-800 -FOR-MERCedes
(1-800- 367-6372)or1-866 -990-9007
R Canada: Customer Serviceat
1-888 -923-8367
You willbeasked foryour password .
The next time youareinside thevehicle and
you switch onthe ignition, theDoors Locked Doors
Locked
Remotely Remotely
messagewillappea ron the multi-
function display.
USA only: alternatively, thevehicle canbe
locked via:
R the Intern et,under the"Owners Online"sec-
tion
R telephone applications (e.g.foriPhone ®
,
Android ®
)
To do this, youwillneed youridentification
number andpassword .
i The
vehicle valetlocking featureisavail a-
ble when therelevant mobilephonenetwork
is avail able anddata connec tionispossible .Stolen
vehiclerecove ryservice If
your vehicle hasbeen stolen:
X Notify thepolice.
The police willissue anumbered incident
report.
X This number willbeforwarded tothe
Mercedes-Benz CustomerAssistance Center
together withyour PIN.
The Mercedes-Benz CustomerAssistance
Center thentriestolocate thesystem. The
Mercedes-Benz CustomerAssistance Center
cont acts youand thelocal lawenforcement
agency ifthe vehicle islocated.
However, onlythelaw enforcement agency
is informed ofthe location ofthe vehicle.
i If
the anti-theft alarm system isactivated
for longer than30seconds, Mercedes me
connec tautomaticall ynotifies the
Mercedes-Benz CustomerAssistance Cen-
ter.
Vehicle HealthCheck With
theVehicle HealthCheck, theCustomer
Assistance Centercanprovide improved sup-
port forproblems withyour vehicle. Duringan
existing call,vehicle dataistransferred tothe
Customer Assistance Center.Thecustomer
service representative canusethereceived
data todecide whatkindofassistance is
required .You arethen, forexample, guidedto
the nearest Mercedes-Benz ServiceCenteror
a recovery vehicleiscalled.
If vehicle dataneeds tobe transferred during
an MB Info calloraRoad sideAssistance call,
this isinitiated bythe Customer Assistance
Center. Youwillsee theRoadside Assis‐ Roadside
Assis‐
tance Connected tance
Connected messageonthe multimedia
system display.Ifthe vehicle remote malfunc-
tion diagnosis canbestarted, theRequest Request
for vehicle diagnosis received. for
vehicle diagnosis received.
Start vehicle diagnosis? Start
vehicle diagnosis? message
appea rsinthe displa y.
X Confirm themessage withYes Yes.
X When theVehicle diagnosis: Please Vehicle
diagnosis: Please
start ignition start
ignition messageappears,turn
the SmartKey toposition 2in the ignition
lock (Ypage 125).
X When thePlease followtheinstruc‐ Please
followtheinstruc‐
tions received byphone andmove tions
received byphone andmove
your vehicle toasafe position your
vehicle toasafe position mes- Features
267Stowageandfeatur es Z
Page 273 of 346
The
signal isnot detect edduring program-
ming. Comparable withCanadian law,some
U.S. garage dooropeners alsofeature a
"break".
Proceed asfollows:
R ifyou liveinCanada
R ifyou have difficulties programming the
garage dooropener (regardless ofwhere
you live) asyou follow theprogramming
steps.
X Press andhold oneofbutton s0044 to0085 on
the integr atedgarage dooropener.
Aft erashort time,indicator lamp0043lights
up yellow.
X Release thebutton .
Indicat orlamp 0043flashes yellow.
X Press button 0084ofgarage doorremote con-
trol 0083for two seconds, thenrelease itfor
two seconds.
X Press button 0084again fortwo seconds.
X Repeat thissequence onbutton 0084of
remote control0083 until indicator lamp0043
lights upgreen.
When indicator lamp0043lights upgreen:
programming isfinished.
When indicator lamp0043flashes green:pro-
gramming wassuccessful. Thenext step is
to synchron izethe rolling code.
X Release button0084ofremote control0083 of
the garage doordrive.
If indicator lamp0043lights upred: repeat the
programming processforthe correspon ding
button onthe rear-view mirror.Whendoing
so, vary thedistance between remotecon-
trol 0083and therear-view mirror.
The required distance between remotecon-
trol 0083and theintegr atedgarage door
opener depends onthe garage doordrive
system. Severalattemptsmight beneces-
sary. Youshould testevery position forat
least 25seconds beforetryinganother posi-
tion.
Problems whenprogramming
If you areexperienc ingproblems programming
the integr atedgarage dooropener onthe rear-
view mirror, takenoteof the following instruc-
tions:
R Check thetrans mitterfrequency usedby
garage doordrive remote control0083 and
whether itis supported. Thetrans mitterfre- quency
canusuall ybe found onthe back of
remote control0083 for the garage doordrive.
The integr atedgarage dooropener iscom-
patible withdevices thathave units which
operate inthe frequency rangeof280 to
433 MHz.
R Replace thebatteries ingarage doorremote
cont rol0083. This increases thelikelihood that
garage doorremote control0083 will trans mit
a stron gand precise signaltothe integr ated
garage dooropener.
R When programming, holdremote control0083
at varying distances andangles frombut-
ton s0044 to0085 which youareprogramming.
Try various anglesatadistance between
2and 8inches (5to20cm) oratthe same
angle butatvarying distances .
R Ifanother remotecontrol0083 isavailab lefor
the same garage doordrive, repeat the
same programming stepswiththisremote
cont rol0083. Before performin gthese steps,
make surethatnew batteries havebeen
installed ingarage doordrive remote control
0083.
R Note thatsome remote controlsonly trans -
mit foralimited amount oftime (theindica-
tor lamp onthe remote controlgoes out).
Press button 0084onremote control0083 again
before transmission ends.
R Align theanten nacable ofthe garage door
opener unit.Thiscanimprove signalrecep-
tion/ transmission.
Opening/clo singthegara gedoor Aft
erithas been programmed, theintegr ated
garage dooropener performs thefunct ionof
the garage doorsystem remote control.Please
also read theoperating instructions forthe
garage doorsystem.
X Turn theSmart Keytoposition 2in the igni-
tion lock (Ypage 125).
X Press button 0044,0087or0085 which youhave
programmed tooperate thegarage door.
Garage doorsystem withafixed code: indi-
cator lamp0043lights upgreen.
Garage doorsystem witharolling code:indi-
cator lamp0043flashes green.
The trans mitterwill trans mitasignal aslong
as the button ispressed. Thetrans mission Featur
es
271Stowage andfeatu res Z
Page 274 of 346
is
halted afteramaxim umoften seco nds
and indic atorlamp 0043light sup yellow.
X Press button0044, 0087or0085 again ifnec es-
sary.
Clear ingthemem ory Make
surethatyouclear thememo ryof the
int egrat edgarage dooropenerbefor esellin g
the vehic le.
X Turn theSmar tKey toposit ion2in the igni-
tion lock (Ypage 125).
X Press andhold buttons 0044and 0085.
The indic atorlamp initially lightsup yellow
and thengreen .
X Release buttons 0044and 0085.
The memo ryof the integrat edgarage door
open erinthe rear- view mirroriscleare d. Comp
ass
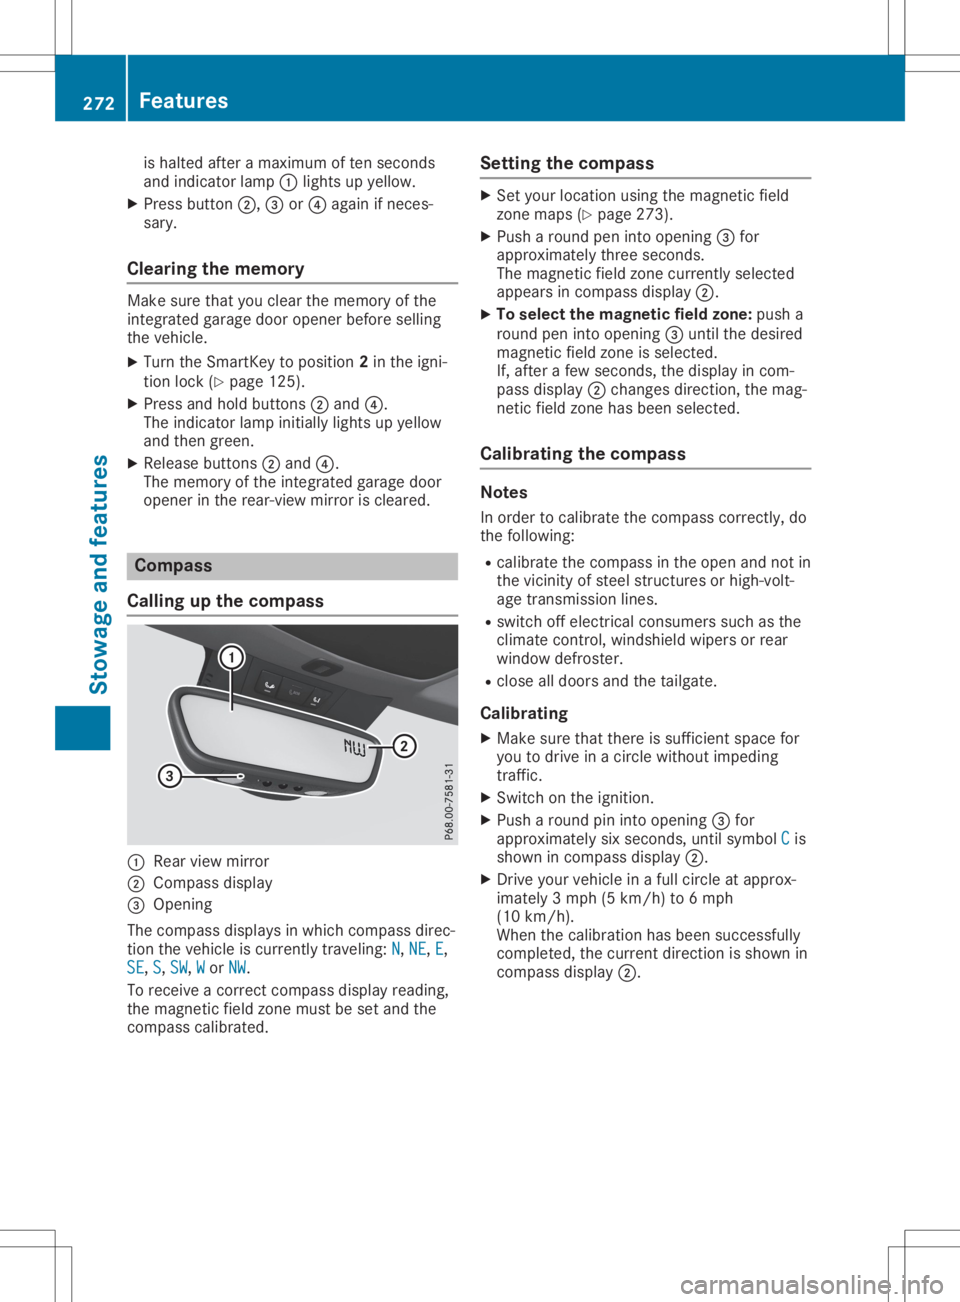
Calling upthecomp ass 0043
Rear viewmirror
0044 Compass display
0087 Open ing
The com pass displays inwhich compass direc-
tion thevehic leiscurr entlytravelin g:N N,
NE NE,
E E,
SE SE,
S S,
SW SW,
W W
or NW NW.
To rec eive acor rectcom pass display reading,
the magn eticfield zonemust beset and the
com pass calibrat ed. Sett
ingthecomp ass X
Set your locationusing themagn eticfield
zon emaps (Ypage 273).
X Push aroun dpen intoopen ing0087for
approx imatelythr ee seco nds.
The magn eticfield zonecurr entlyselec ted
appears incom pass display 0044.
X To select thema gnetic fieldzone: pusha
roun dpen intoopen ing0087untilthe desire d
magn eticfield zoneis selec ted.
If, aft erafew seco nds,the display incom -
pass display 0044chan gesdirec tion,the mag-
net icfield zonehas been selected.
Calibr ating thecomp ass Not
es
In order tocalibrat ethe com pass correctly, do
the followin g:
R calibrat ethe com pass inthe open andnotin
the vicin ityofste elstr uct ures orhigh- volt-
age transm ission lines.
R switc hoff elect ricalconsumer ssuch asthe
climat econ trol, windsh ieldwipers orrear
window defroster.
R clos eall doors andthetailgat e.
Calibr ating
X Make surethatthereissuffic ientspace for
you todrive inacirc lewitho utimpedin g
tr affic .
X Swit chon the ignit ion.
X Push aroun dpin intoopen ing0087for
approx imatelysix seco nds,unt ilsymbol C C
is
shown incom pass display 0044.
X Dr ive your vehic lein afull circ leat approx -
imate ly3mph (5km /h) to6mph
(10 km/h).
When thecalibrat ionhas been successfully
com plete d,the curr entdirec tionisshown in
com pass display 0044. 272
Featu
resStowage andfeatures
Page 303 of 346
X
When thevehicle isstation ary,depress the
brake pedalandkeep itdepressed.
X Shift theautomatic transmission toposition
005D.
X Release thebrake pedal.
X Release theelectr icparking brake.
X Switc hoff the automatic locking
(Y page 199).
X Switc hon the hazard warning lamps
(Y page 104).
X Turn theSmart Keyinthe ignition lockto
position 005Aand leave theSmart Keyinthe
ignition lock. Towing
avehicle withboth axles on
the ground
It is importan tthat youobserve thesafety
inst ruction swhen towing awayyourvehicle
(Y page 299).
X On
vehicles withKEYLE SS-GO orthe
KEYLE SS-GO startfunction: youmust use
the Smart Keyinstead ofthe Start/S topbut-
ton (Ypage 126).
The automatic transmission automatically
shifts toposition 005Dwhen youopen thedriv-
er's orfron t-passenger doororwhen you
remove theSmart Keyfrom theignition lock.In
order toensure thattheautomatic transmis-
sion stays inposition 005Cwhen towing away
the vehicle, youmust observe thefollowing
points :
X Make surethatthevehicle isstation ary.
X Turn theSmart Keytoposition 0048inthe igni-
tion lock.
X Depress andhold thebrake pedal.
X Shift theautomatic transmission toposition
005C.
X Leave theSmart Keyinposition 0048inthe
ignition lock.
X Release thebrake pedal.
X Release theelectr icparking brake.
X Switc hon the hazard warning lamps
(Y page 104).
i In
order tosignal achange ofdirect ion
when towing thevehicle withthehazard
warning lampsswitched on,use thecombi-
nation switch asusual. Inthis case, onlythe
indicator lampsforthe direct ionoftravel flash.
Afterresett ingthe combin ation
switch, thehazard warning lampstarts
flashing again. Perm
ittedtowing methods
Mercedes- Benzrecomm endstransportin gyour
vehicle inthe case ofabreakdown, ratherthan
towing itaway.
When towing away,useatowing ropeora
towing barwith both axles onthe ground. Do
not use anytow barsystems. Tr
anspor tingthevehicle
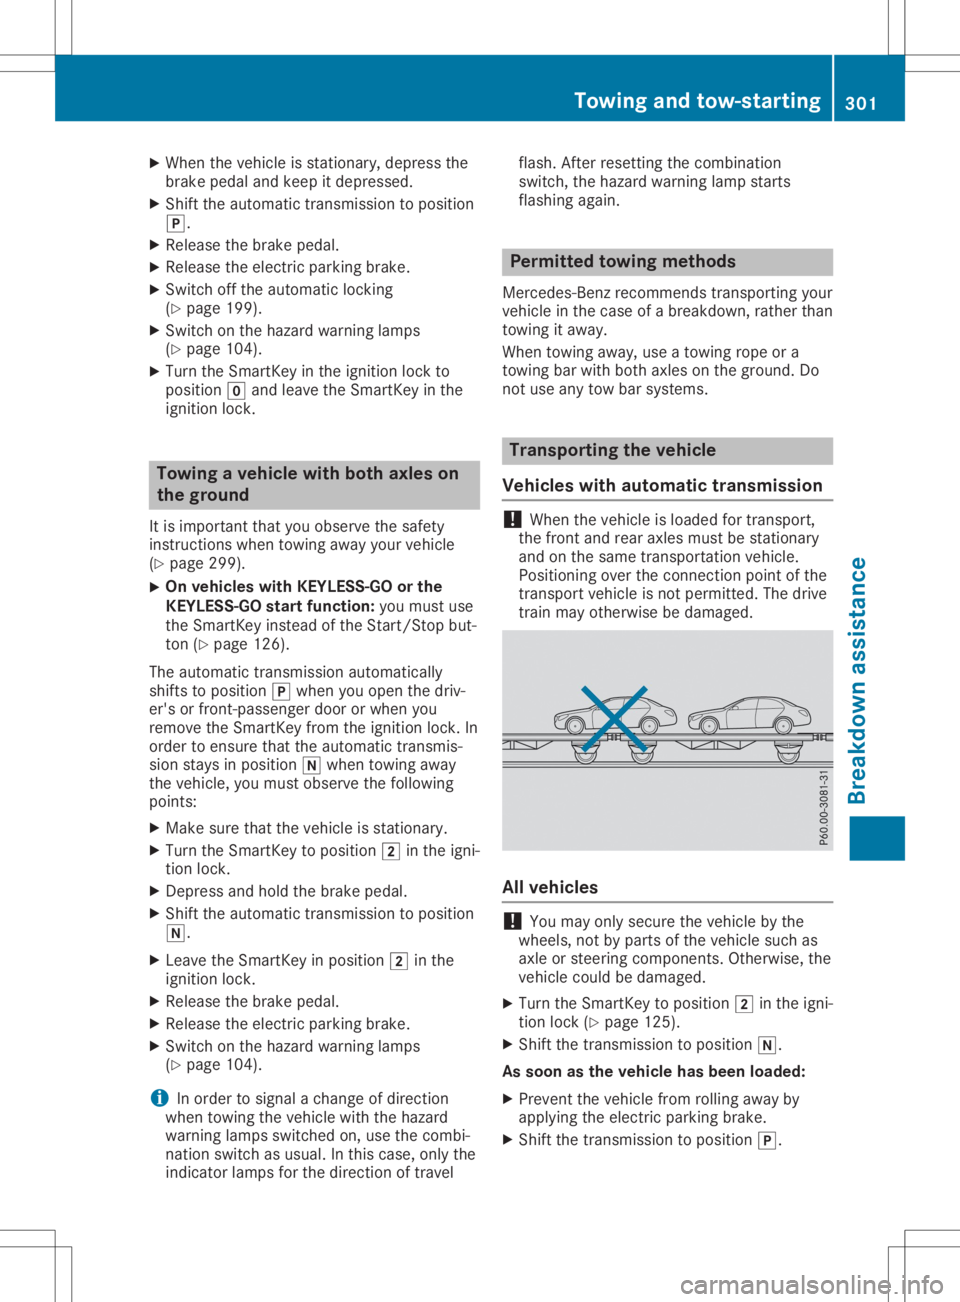
Vehicles withautomat ictransmission !
When
thevehicle isloaded fortran sport,
the fron tand rear axles mustbestation ary
and onthe same transportat ionvehicle.
Position ingover theconn ection pointofthe
tran sport vehicle isnot permitt ed.The drive
train mayotherwise bedamaged. All
vehicles !
You
may onlysecure thevehicle bythe
wheels, notbyparts ofthe vehicle suchas
axle orsteerin gcompon ents.Other wise, the
vehicle couldbedamaged.
X Turn theSmart Keytoposition 0048inthe igni-
tion lock (Ypage 125).
X Shift thetran smission toposition 005C.
As soon asthe vehicle hasbeen loaded:
X Preven tthe vehicle fromrolling awayby
applying theelectr icparking brake.
X Shift thetran smission toposition 005D. Towing
andtow-sta rting
301Breakdown assistance Z
Page 304 of 346

X
Turn theSmart Keytoposition 005Ainthe igni-
tion lock andremove it.
X Secure thevehicle.
The towing eyecan beused topull thevehicle
ont oatrailer ortrans porter fortrans portin g
purposes. Notes
on4MATIC vehicles
! Vehicles
with4MATI Cmust notbetowed
with either thefront orthe rear axle raised,
as doing sowill damage thetrans mission.
Vehicles with4MATI Cmay onlyeither be
towed awaywithboth axles onthe ground or
be loaded upand trans ported.
If the vehicle's transmission, front,or rear axle
is damaged, havethevehicle transported ona
truck ortrailer.
In the event ofdam agetothe electrical
system:
If the battery isdefect ive,theautomatic trans-
mission willbelocked inposition 005D.Toshift
the automatic transmission toposition 005C,you
must provide powertothe vehicle's on-board
electric alsystem inthe same wayaswhen
jump-st arting(Ypage 296).
Have thevehicle transported onatrans porter
or trailer. Tow-star
ting(emergency engine
star ting)
! Vehicles
withautomatic transmission must
not betow-st arted. Youcould otherwise
damage theautomatic transmission.
i You
canfind inform ationon"Jump-start-
ing" under (Ypage 296). Fuses
Import
antsafety notes G
WARNIN
G
If you manipulate orbridge afaulty fuseorif
you replace itwith afuse withahigher
amperage, theelectric cablescouldbeover-
loaded. Thiscould result inafire. There isa
risk ofan accident andinjury. Always
replace faultyfuseswiththespeci-
fied new fuses having thecorrec tamperage.
! Only
usefuses thathave been approved
for Mercedes- Benzvehicles andwhich have
the correc tfuse rating forthe system con-
cern ed.Only usefuses marked withan"S".
Otherwise, componentsorsystems couldbe
damaged.
! Make
surethatnomoisture canenter the
fuse boxwhen thecover isopen.
! When
closing thecover, makesurethatit
is lying correc tlyon the fuse box. Moisture
seeping inor dirt could otherwise impairthe
operation ofthe fuses.
The fuses inyour vehicle servetoclose down
faulty circuits. Ifafuse blows, allthe compo-
nent son the circuit andtheir functionsstop
operating.
Blown fusesmustbereplaced withfuses of
the same rating, whichyoucan recogn izeby
the color andvalue. Thefuse ratings, and
other items ofinform ationtobe complied with
are, listed inthe fuse allocation chart.
The fuse allocation chartisin the fuse boxin
the front -passenger footwell(Ypage 303).
If anewly insertedfuse alsoblows, havethe
cause traced andrectified ataqualified spe-
cialist workshop, e.g.anauthorized Mercedes-
Benz Center. Before
changing afuse
X Secure thevehicle against rollingaway
(Y page 145).
X Switch offallelectric alconsumer s.
X Vehicles withoutKEYLESS-GO: remove
the Smart Keyfrom theignition lock.
X Vehicles
withKEYL ESS-GO start-func-
tion orKEYL ESS-GO: openthedriver's
door.
The vehicle electron icsare now inposition
005A. This isthe same asthe Smart Keybeing
removed fromtheignition.
The fuses arelocated invarious fuseboxes:
R Fuse boxinthe engine compart mentonthe
left- hand sideofthe vehicle, whenviewed in
the direction oftravel
R Fuse boxinthe front -passenger footwell 302
FusesBr
eakdown assistance
Page 329 of 346
The
wear pattern son the front andrear tires
differ, depending onthe operating conditions.
Rotate thewheels beforeaclear wearpattern
has formed onthe tires. Fronttires typically
wear more onthe shoulders andtherear tires
in the cent er.
On vehicles thathave thesame sizefront and
rear wheels, youcan rotat ethe wheels accord-
ing tothe inter valsinthe tire manufact urer's
warranty bookinyour vehicle document s.Ifno
warranty bookisavailabl e,the tires should be
rotat edevery 3,000 to6,000 miles(5,000 to
10,00 0km). Dependin gon tire wear, thismay
be required earlier.Donot change thedirec-
tion ofwheel rotation.
Clean thecont actsurfaces ofthe wheel and
the brake discthoroughly everytimeawheel
is rotat ed.Check thetire pressure and,ifnec-
essary, restartthetire pressure losswarning
system (Canada only)orthe tire pressure
monit or(USA only). Direction
ofrota tion
Tires withaspecified directionofrotat ionhave
additional benefits,e.g. ifthere isarisk of
hydroplaning. Theseadvantages canonly be
gained ifthe tires areinstalled correspon ding
to the direction ofrotat ion.
An arrow onthe sidewall ofthe tire indicates
its correc tdirection ofrotat ion. Storing
wheels
Stor ewheels thatarenot being usedinacool,
dry and preferably darkplace. Protectthe tires
from oil,grease, gasoline anddiesel. Mounting
awheel
Prepa ringthevehicle X
Stop thevehicle onsolid, non-slippery and
level ground.
X Apply theelectric parking brakemanually.
X Bring thefront wheels intothestraight-
ahead position.
X Shift thetrans mission toposition 005D.
X Switch offthe engine. X
Vehicles withoutKEYLESS-GO: remove
the Smart Keyfrom theignition lock.
X Vehicles
withKEYL ESS-GO start-func-
tion orKEYL ESS-GO: openthedriver's
door.
The vehicle electron icsare now inposition
0092. This isthe same as“key removed”.
X Vehicles
withKEYL ESS-GO start-func-
tion orKEYL ESS-GO: removetheStart /
Stop button fromtheignition lock
(Y page 125).
X Make surethattheengine cannotbe start ed
via your smartphon e(Y page 84).
X Ifincluded inthe vehicle equipment, remove
the tire- change toolkitfrom thevehicle.
X Safeguard thevehicle against rollingaway
(Y page 145).
i Apart
fromcertaincount ry-specific varia-
tions, thevehicles arenot equipped witha
tire- change toolkit.Some toolsforchanging
a wheel arespecific tothe vehicle. Formore
inform ationonwhich toolsarerequired to
perform awheel change onyour vehicle,
consult aqualified specialist workshop.
Necessary tire-changing toolscaninclude,
for example:
R Jack
R Wheel chock
R Lug wrench
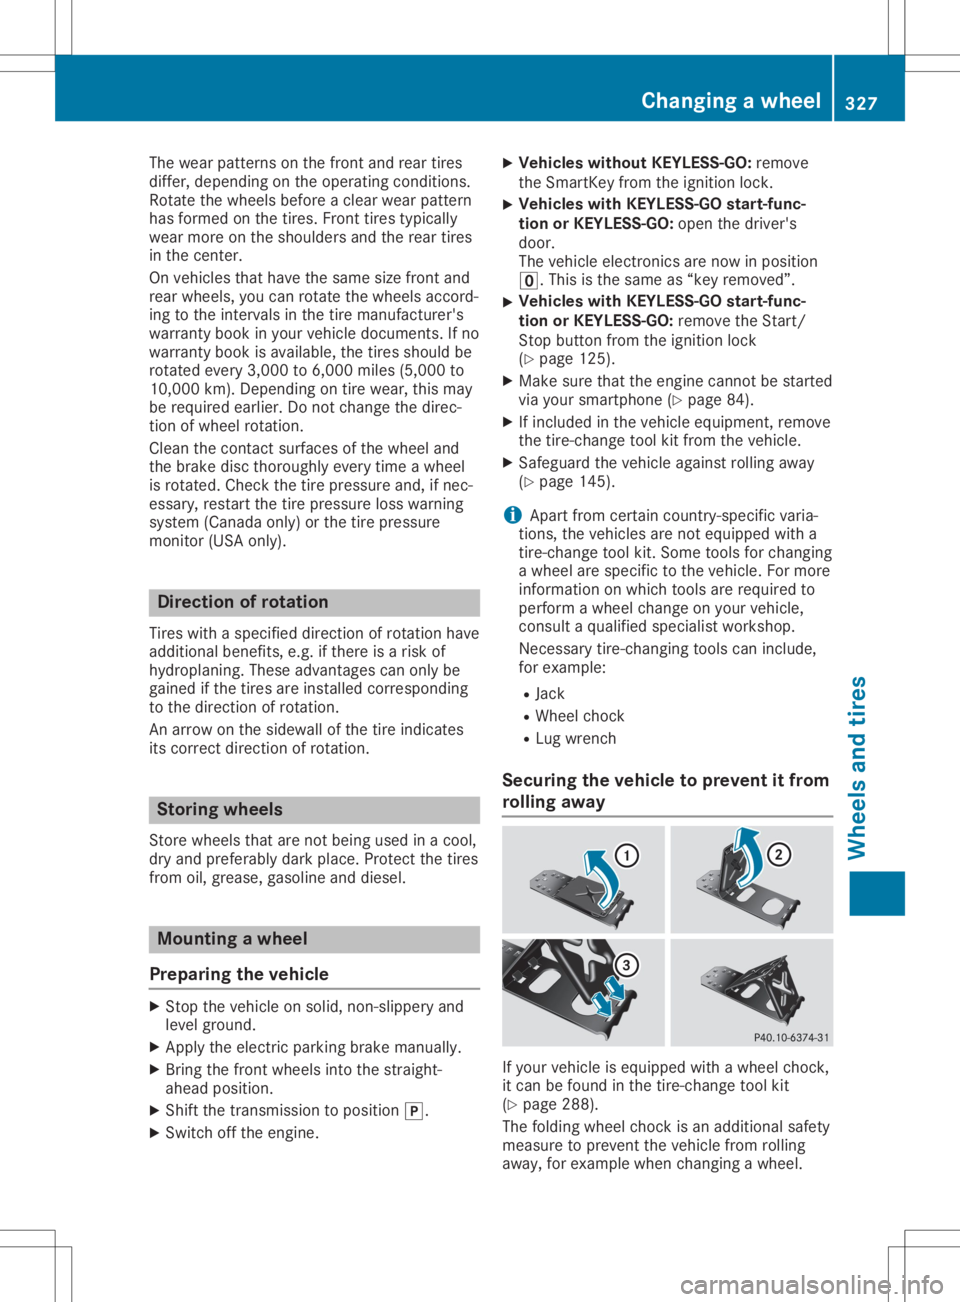
Securing thevehicle toprevent itfrom
rolling away If
your vehicle isequipped withawheel chock,
it can befound inthe tire- change toolkit
(Y page 288).
The folding wheelchock isan additional safety
measure toprevent thevehicle fromrolling
away ,for example whenchanging awheel. Changing
awheel
327Wheels andtires Z