2020 MERCEDES-BENZ E-CLASS ESTATE fuse
[x] Cancel search: fusePage 6 of 489
Climate control
......................................... 151
Overview of climate contro l systems ........... 151
Operating the climate control sy stem ......... 15 2 Driving and pa
rking ................................. 16 2
Driving ........................................................ 16 2
DY NA MIC SELECT switch ............................1 74
Au tomatic transmission .............................. 176
Fu nction of the 4MATIC .............................. 180
Re fuelling .................................................... 181
Pa rking ...................................................... .186
Driving and driving saf ety sy stems .............. 194
Tr ailer hit ch................................................. 24 8
Bicycle rack function .................................. 254
Ve hicle towing instructions ........................ .256 Instrument display and on-board
comp
uter.................................................. 257
No tes on the instrument display and on-
board computer .......................................... 257
Instrument display overview ...................... .258
Overview of the buttons on thesteering
wheel ..........................................................2 59
Operating the on-board computer .............. 259 Overview of displa
yson the multifunc‐
tion display .................................................2 61
Head-up Display .......................................... 261 MBUX multimedia sy
stem ...................... 264
Overview and operation .............................. 264
Sy stem settings .......................................... 274
Na vigation .................................................. 277
Te lephone .................................................. .284
Mercedes me and apps .............................. 287
Mercedes-Benz emer gency call sy stem ...... 296
Ra dio, media & TV...................................... 300
Sound settings ........................................... 306 Main
tenance and care ............................. 308
ASS YST PLUS service inter val display ........ 308
Engine compartment .................................. 309
Cleaning and care ...................................... .316 Breakdown assistance
............................323
Emergency .................................................. 323
Flat tyre ...................................................... 325
Battery (vehicle) .......................................... 331 To
w- starting or towing away ....................... 336
Electrical fuses ........................................... 341 Wheels and tyres
..................................... 345
No tes on noise or unusual handling char‐
acteristics .................................................. .345
No tes on regular lyinspecting wheels and
tyres .......................................................... .345
No tes on snow chains ................................ 345
Ty re pressure .............................................. 346
Wheel change ............................................ .350
Emer gency spa rewheel .............................. 360 Te
ch nical data .......................................... 361
No tes on tech nical da ta.............................. 361
On-board electronics .................................. 361
Ra dio operating permits forve hicle com‐
ponents ...................................................... 363
Ve hicle identification plate, VIN and
engine number overview ............................ 363
Operating fluids .......................................... 365
Ve hicle data ................................................ 374
Tr ailer hit ch................................................. 377 Con
tents 3
Page 156 of 489
Calling up
the air-conditioning menu using
th e but ton on the clima tecont rol panel #
Press theA button on the climate control
panel. Ac
tivating/deactivating the A/C function via
the multimedia sy stem The A/C function heats, cools and dehumidifies
th eve hicle's interior air. #
Call up the air-conditioning menu
(/ page 152). #
Select First row of seats . #
Select A/C. Setting climate control
toautomatic mode In auto
matic mode, the set temp erature is con‐
trolled and maintained at a const ant levelby the
air suppl y. #
Press the à button. #
Toswitch tomanual mode: pressthe H
or _ button. Climate
style Climate
style function
The following climate styles are available in auto‐
matic mode:
R FOCUS: high air flow , slightly cooler setting
R MEDIUM: medium air flow ,st andard setting
R DIFFUSE: low airflow , slightly warmer and
draught-f ree setting
Setting the clima testyle #
Call up the air conditioning menu
(/ page 152). #
Select First row of seats orSecond row of
seats. #
Call up theCLIMATE MODE menu. #
Select a climate style. Setting
the air distribution #
Call up the air conditioning menu
(/ page 152). #
Select a rowof seats. #
Toset the air distribution: select¯,
P orO. #
Set the air flow.
% Several air distribution options can be selec‐
te d at the same time, forex ample toset the
climate control forth e windscreen and the
fo ot we lls simultaneousl y.
The ¯ climate contro lfo rth e windscreen
can only be selected forth efirs t seat row. Ac
tivating/deactivating the climate control
syn chro nisation function via the air condi‐
tioning control panel Climate control can be set centrally using
the
synchronisation function. The temp erature and
air distribution settings forth e driver's side will
be adop ted automatically forth e front passenger
side. #
Press the0 button.
The synchronisation function will be deactivated
if th e settings for one of theot her climate con‐
trol zones are changed. Climate control
15 3
Page 344 of 489
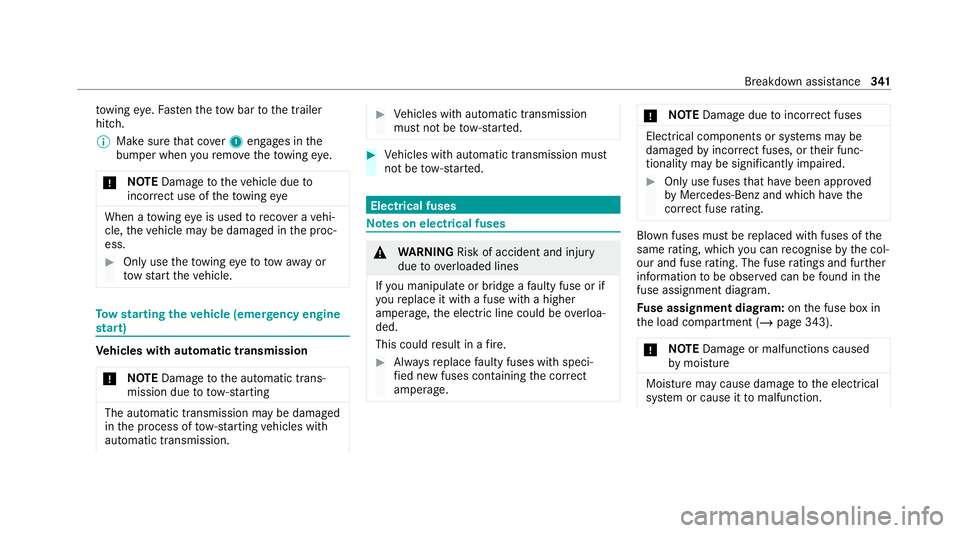
to
wing eye. Fasten theto w bar tothe trailer
hitch.
% Make sure that co ver1 engages in the
bumper when youre mo vetheto wing eye.
* NO
TEDama getotheve hicle due to
incor rect use of theto wing eye When a
towing eye is used toreco ver a vehi‐
cle, theve hicle may be damaged in the proc‐
ess. #
Only use theto wing eyeto to waw ay or
to w start theve hicle. To
w starting theve hicle (eme rgency engine
st art) Ve
hicles with automatic transmission
* NO
TEDama getothe automatic trans‐
mission due to tow-starting The automatic transmission may be damaged
in the process of tow- starting vehicles with
automatic transmission. #
Vehicles with automatic transmission
must not be tow- star ted. #
Vehicles with automatic transmission must
not be tow- star ted. Electrical fuses
Note
s on electrical fuses &
WARNING Risk of accident and inju ry
due to ov erloaded lines
If yo u manipulate or bridge a faulty fuse or if
yo ure place it with a fuse with a higher
amperage, the electric line could be overloa‐
ded.
This could result in a fire. #
Alw aysre place faulty fuses with speci‐
fi ed new fuses conta iningthe cor rect
amperage. *
NO
TEDama gedue toincor rect fuses Electrical components or sy
stems may be
damaged byincor rect fuses, or their func‐
tionality may be significant lyimpaired. #
Only use fuses that ha vebeen appr oved
by Mercedes-Benz and which ha vethe
cor rect fuse rating. Blown fuses mu
stbe replaced with fuses of the
same rating, which you can recognise bythe col‐
our and fuse rating. The fuse ratings and fu rther
information tobe obser ved can be found in the
fuse assignment diagram.
Fu se assignment diag ram: onthe fuse box in
th e load compartment (/ page 343).
* NO
TEDama geor malfunctions caused
by moisture Moisture may cause dama
getothe electrical
sy stem or cause it tomalfunction. Breakdown assi
stance 341
Page 345 of 489
#
When the fuse box is open, make sure
th at no moisture can enter the fuse
box. #
When closing the fuse box, make sure
th at the seal of the lid is positioned cor‐
re ctly on the fuse box. If
th e newly inser ted fuse also blo ws, ha vethe
cause traced and rectified at a qualified special‐
ist workshop.
Ensure thefo llowing before replacing a fuse:
R The vehicle is secured against rolling away.
R All electrical consumers are switched off.
R The ignition is switched off.
The electrical fuses are located in various fuse
bo xes:
R Fuse box in the engine compartment on the
driver's side (/ page 342)
R Fuse box on the driver's side of the cockpit
(/ page 343)
R Fuse box in the front passenger foot we ll
(/ page 343) R
Fuse box in the load compartment on the
ri ght-hand side of theve hicle, when vie wed
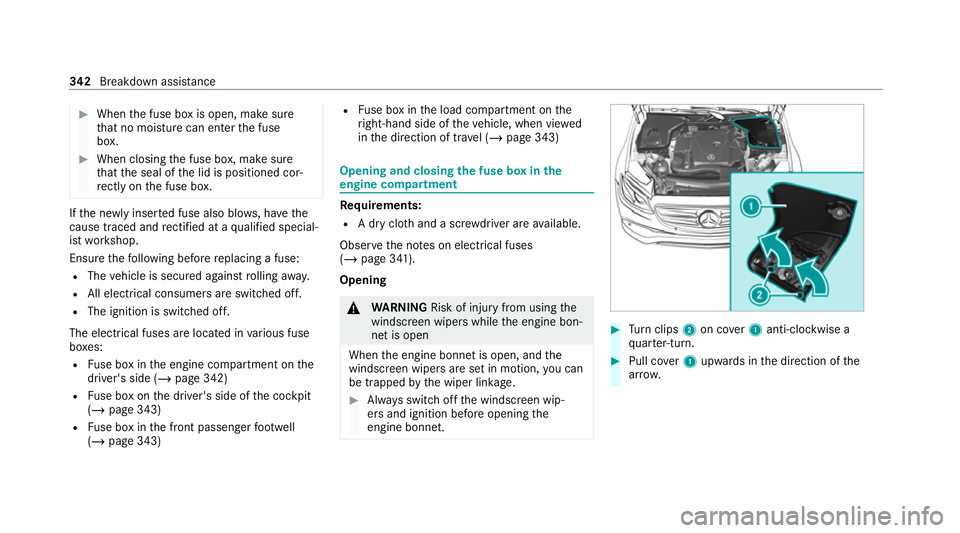
in the direction of tra vel (/ page 343) Opening and closing
the fuse box in the
engine compa rtment Re
quirements:
R A dry clo thand a sc rewdriver are available.
Obse rveth e no tes on electrical fuses
(/ page 341).
Opening &
WARNING Risk of inju ryfrom using the
windscreen wipers while the engine bon‐
net is open
When the engine bonn etis open, and the
windscreen wipers are set in motion, you can
be trapped bythe wiper linkage. #
Alw ays switch off the windscreen wip‐
ers and ignition before opening the
engine bonn et. #
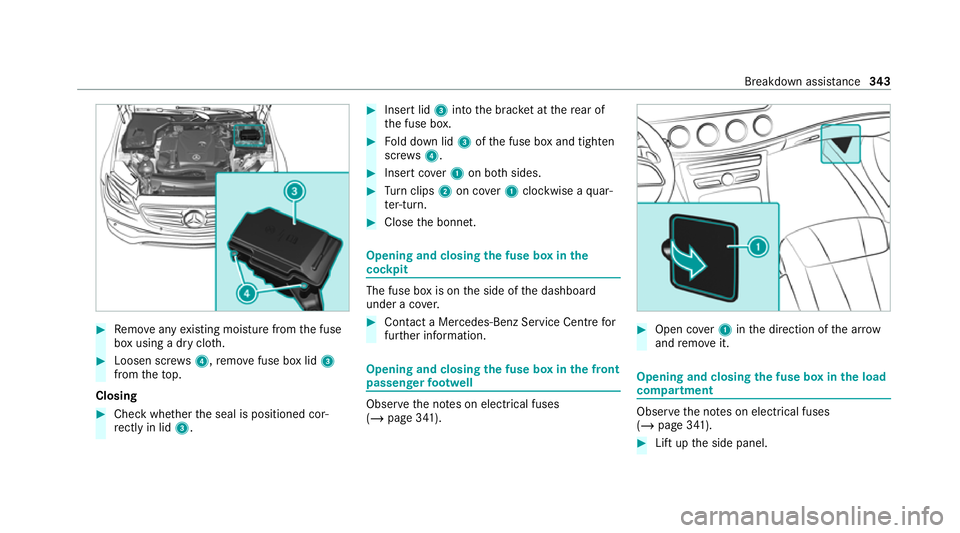
Turn clips 2on co ver1 anti-clockwise a
qu arter-turn. #
Pull co ver1 upwards in the direction of the
ar row. 342
Breakdown assis tance
Page 346 of 489
#
Remo veany existing moisture from the fuse
box using a dry clo th.#
Loosen scr ews4, remo vefuse box lid 3
from theto p.
Closing #
Check whe ther the seal is positioned cor‐
re ctly in lid 3. #
Insert lid 3into the brac ket at there ar of
th e fuse box. #
Fold down lid 3ofthe fuse box and tighten
scr ews4. #
Insert co ver1 on bo thsides. #
Turn clips 2on co ver1 clockwise a quar‐
te r-turn. #
Close the bonn et. Opening and closing
the fuse box in the
cockpit The fuse box is on
the side of the dashboard
under a co ver. #
Con tact a Mercedes-Benz Service Centre for
fur ther information. Opening and closing
the fuse box in the front
passenger foot we ll Obser
vethe no tes on electrical fuses
(/ page 341). #
Open co ver1 inthe direction of the ar row
and remo veit. Opening and closing
the fuse box in the load
compa rtment Obse
rveth e no tes on electrical fuses
(/ page 341). #
Lift up the side panel. Breakdown assis
tance 343
Page 347 of 489
#
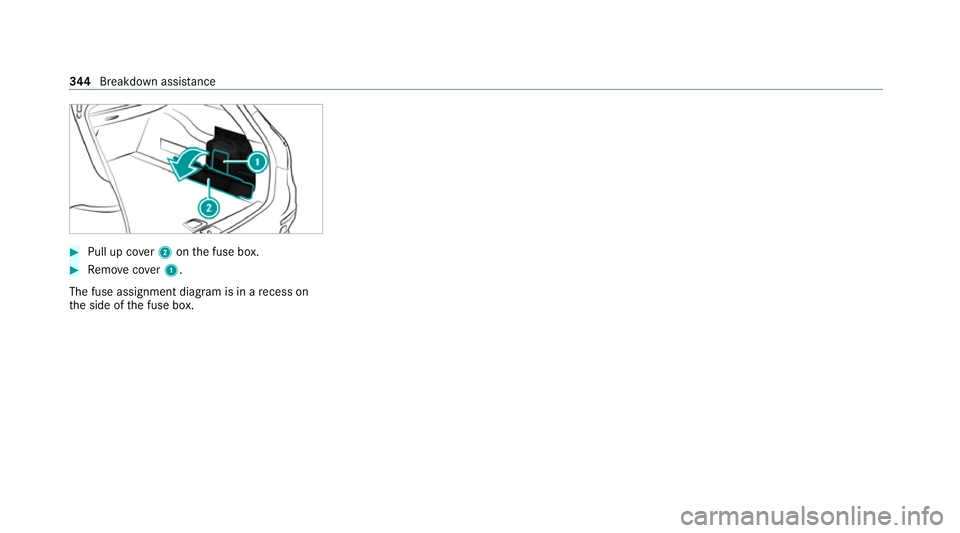
Pull up co ver2 onthe fuse box. #
Remo vecover1.
The fuse assignment diagram is in a recess on
th e side of the fuse box. 344
Breakdown assis tance
Page 388 of 489
Lights
Display messages
Possible causes/consequences and M
MSolutions
: Left dipped beam (examp le) *T
he cor responding light source is defective. #
Drive on carefully. #
Consult a qualified specialist workshop immediatel y.
% LED light sources: the display message forth e cor responding light appears only when allthe light-emitting
diodes in the light are faulty.
: Malfunction See Owner's
Manual *T
heexterior lighting is malfunctioning. #
Consult a qualified specialist workshop.
* Ve hicles with a trailer hitch: a fuse may haveblown. #
Stop theve hicle in accordance with the tra ffic conditions. #
Check the fuses and replace them if necessary (/ page 341).
: Automatic driving lights
inoperative *T
he light sensor is malfunctioning. #
Consult a qualified specialist workshop. Display messages and
warning/indicator lamps 385
Page 467 of 489
DY
NA MIC SELECT .................................... .174
Con figuring drive program I ................. 175
Displ aying engine data ........................ .176
Displ aying vehicle data ........................ 176
Drive program display .......................... 175
Drive programs .................................... 174
Fu nction ............................................... 174
Operating (DYNAMIC SELECT switch) .............................................................1 75
Selecting the drive prog ram ................. 175E
E10 ............................................................ 367
Easy entry feature
Fu nction/no tes .................................... 11 3
Setting ................................................. 11 4
Easy exitfeature
Fu nction/no tes .................................... 11 3
Setting ................................................. 11 4
EAS Y-PA CK load-securing kit ..................12 6
Inserting brac kets ................................ 12 6
Ins talling/ removing the luggage
holder .................................................. 127Ins
talling/ removing thete lescopic
ro d .......................................................1 28
No tes ................................................... 12 6
EBD (Electronic Brake forc e Distribu‐
tion)
Function/no tes ................................... 19 9
ECO Assist Displaying ............................................ 174
Fu nction/no tes .................................... 173
ECO display Function ............................................... 172
ECO start/s top function ......................... 17 0
Au tomatic engine start ........................ 17 0
Au tomatic engine stop .........................1 70
Operation ............................................ 17 0
Switching off/on ................................. 172
Electric pa rking brake ............................ .190
Applying auto matically ........................ 19 0
App lying or releasing manually ............ 19 2
Emergency braking .............................. 19 2
Re leasing automatically ...................... .191
Electrical fuses see Fuses Electromagnetic compatibility
Declaration of conformity ......................24
Electronic Stability Prog ram
see ESP ®
(Electronic Stability Prog ram)
Emer gency
Fire extinguisher ................................. .324
Fir st-aid kit (so ftsided) ....................... 324
Overview of the help functions .............. 16
Re moving thewa rning triangle ............ 323
Saf etyve st .......................................... 323
Setting up thewa rning triangle ............ 324
Emer gency braking ................................. 19 2
Emer gency braking
see BAS (Brake Assi stSystem)
Emer gency engine start .......................... 341
Emer gency key
Inserting/removing ............................... 72
Locking a door .......................................78
Un locking a door .................................. .78
Un locking theta ilgate ............................ 84
Emer gency operation mode
St arting theve hicle ............................. 16 4464
Index