2020 MERCEDES-BENZ CLS COUPE ESP
[x] Cancel search: ESPPage 47 of 469
ot
herwise be in the deployment area of the
airbags.
R The occupants must alw ayske ep their feet
on thefloor. Do not put your feet on the
cockpit, forex ample. Your feet may other‐
wise be in the deployment area of the airbag.
R Ifch ildren are tra velling in theve hicle,
obser vethe additional no tes (/ page 52).
R Alw aysstow and secure objects cor rectl y.
Objects in theve hicle interior may pr event an
airbag from functioning cor rectly. Each vehicle
occupant must alw ays make sure of thefo llow‐
ing in particular:
R There are no people, animals or objects
between theve hicle occupants and an air‐
bag.
R There are no objects between the seat, door
and door pillar (B-pillar).
R There are no hard objects, e.g. coat hangers,
hanging on the grab handles or coat hooks.
R There are no accessory parts, such as mobile
navigation devices, mobile phones or cup
holders, within the deployment area of an air‐ bag, e.g. on
the cockpit, on the door, on the
side window or on the side trim.
In addition, no connecting cables, tensioning
st ra ps or retaining stra ps must be routed or
attached totheve hicle within the deploy‐
ment area of an airbag. Alw ays comply with
th e accessory manufacturer's ins tallation
instructions and, in particular, the no tes on
suitable places for ins tallation.
R There are no heavy, sharp-edged or fragile
objects in the poc kets of your clo thing. Store
such objects in a suitable place. Limited pr
otection pr ovided byairbags &
WARNING Risk of inju rydue tomodifi‐
cations tothe co ver of an airbag
If yo u modify the co ver of an airbag or af fix
objects such as sticke rs to it,the airbag may
no longer function cor rectl y. #
Never modify the co ver of an airbag and
do not af fix objects toit. The ins
tallation location of an airbag is identified
by the AIRB AGsymbol (/ page 42). &
WARNING Risk of inju ryor death due to
th e use of unsuitable seat co vers
Due tounsuitable seat co vers,th e airbags
cann otprotect vehicle occupants as inten‐
ded.
In addition, the operation of the automatic
front passenger airbag shutoff could be
re stricted. #
You should on lyuse seat co vers that
ha ve been appr oved forth e cor respond‐
ing seats byMercedes-Benz. &
WARNING Risk of inju rydue tomalfunc‐
tioning sensors in the door
The function of the airbags can be impaired
due tomodifications or incor rect wo rkper‐
fo rm ed on the doors or door trim, or if the
doors are damaged. #
Never modify the doors or parts of the
doors. 44
Occupant saf ety
Page 49 of 469
#
The entire base of thech ild restra int
sy stem must alw aysre st on the sitting
sur face of the co-driver seat. #
The backrest of thefo rw ard-facing child
re stra int sy stem must, as far as possi‐
ble, be resting on the seat backrest of
th e co-driver seat. #
Alw ays comply with thech ild restra int
sy stem manufacturer's ins tallation
instructions. A person on
the front passenger seat must
obser vethefo llowing information:
R Fasten seat belts cor rectly (/ page 38).
R Sit in an almost upright seat position with
their back against the seat backrest.
R Sit with their feet resting on thefloor, if pos‐
sible.
The front passenger airbag may otherwise be
disabled bymis take ,fo rex ample, in thefo llow‐
ing situations:
R The front passen ger transfers their weight by
supporting themselves on a vehicle armrest. R
The front passenger sits in such a wayth at
th eir weight is raised from the sitting sur‐
fa ce. &
WARNING Risk of inju ryor death due to
a disabled front passenger airbag
The front passenger airbag is disabled when
th ePA SSENGER AIR BAG OFF indicator lamp
is lit.
A person in the front passenger seat could
th en, forex ample, come into con tact wi th
th eve hicle interior, especially if the person is
sitting too close tothe cockpit.
If th e front passenger seat is occupied,
alw ays ensure that:
R the classification of the person in the
front passenger seat is cor rect and the
front passenger airbag is enabled or disa‐
bled in accordance with the person in the
front passenger seat.
R the front passenger seat has been mo ved
as far back as possible.
R the person is seated cor rectly. #
Both before and during the journe y,
ensure that thest atus of the front
passenger airbag is cor rect. If
th e front passenger seat is occupied, the clas‐
sification of the person or child restra int sy stem
on the front passenger seat take s place af terthe
front passenger airbag shutoff self-test. The
PA SSENGER AIR BAG indicator lamps displ aythe
st atus of the front passenger airbag.
Alw ays obser vethe no tes on the function of the
PA SSENGER AIR BAG indicator lamps
(/ page 47). 46
Occupant saf ety
Page 52 of 469
A pe
rson on the front passenger seat must
alw ays obser vethefo llowing information:
R Ifth e front passenger seat is occupied byan
adult or a person with a stature cor respond‐
ing tothat of an adult, thePA SSENGER AIR
BA G OFF indicator lamp must be off. This
indicates that the front passenger airbag is
enabled.
If th ePA SSENGER AIR BAG OFF indicator
lamp is lit continuousl y,an adult or person
with a build cor responding tothat of an adult
should not use the front passenger seat.
Ins tead, they should use a rear seat.
R Ifth e front passenger seat is occupied by a
person of smaller stature (e.g. a teenager or
small adult), thePA SSENGER AIR BAG OFF
indicator lamp either lights up continuously
or remains off, depending on the classifica‐
tion.
- Ifth ePA SSENGER AIR BAG OFF indicator
lamp is off: mo vethe front passenger
seat as far back as possible, or the per‐
son of smaller stature should use a rear
seat. -
Ifth ePA SSENGER AIR BAG OFF indicator
lamp is lit continuously: the person of
smaller stature should not use the front
passenger seat. &
WARNING Risk of inju ryor death when
th ePA SSENGER AIR BAG OFF indicator
lamp is lit
If th ePA SSENGER AIR BAG OFF indicator
lamp remains lit af terth e self-test, the co-
driver airbag is disabled.
If th e co-driver seat is occupied, alw ays
ensure that:
R The classification of the person in the co-
driver seat is cor rect, and the co-driver
airbag is enabled or disabled as is appro‐
priate forth e person in the co-driver seat.
R The person is seated proper lywith a cor‐
re ctly fastened seat belt. Be sure
toalso obse rveth efo llowing fur ther
re lated subjects:
R Child restra int sy stem on the front passenger
seat (/ page 66) R
Suitable positioning of thech ild restra int sys‐
te m (/ page 55) PRE-SAFE
®
sy stem PRE-
SAFE®
(anticipa tory occupant pr otec‐
tion) PRE-
SAFE®
is able todetect cer tain critical driv‐
ing situations and implement pre-em ptive meas‐
ures toprotect theve hicle occupants.
PRE-SAFE ®
can implement thefo llowing meas‐
ures independently of each other:
R Tightening the seat belts on the driver's seat
and front passenger seat.
R Closing the side windo ws.
R Vehicles with sliding sunroof: closethe
sliding sunroof.
R Vehicles with memory function: movethe
front passenger seat toa more favo urable
seat position.
R Vehicles with multicontour seat: increase
th e air pressure in the seat side bols ters of
th e seat backrest. Occupant saf
ety49
Page 73 of 469
Ac
tivating or deactivating the child saf ety
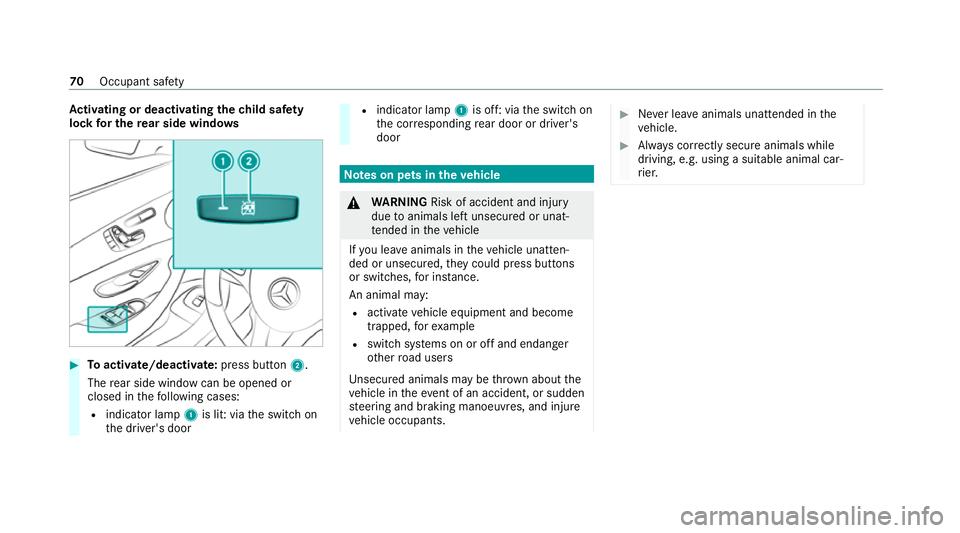
lock for the rear side windo ws#
Toactivate/deacti vate:press button 2.
The rear side wind owcan be opened or
closed in thefo llowing cases:
R indicator lamp 1is lit: via the switch on
th e driver's door R
indicator lamp 1is off: via the switch on
th e cor responding rear door or driver's
door Note
s on pets in theve hicle &
WARNING Risk of accident and inju ry
due toanimals left unsecured or unat‐
te nded in theve hicle
If yo u lea veanimals in theve hicle unatten‐
ded or unsecured, they could press buttons
or switches, for ins tance.
An animal may:
R acti vate ve hicle equipment and become
trapped, forex ample
R swit chsystems on or off and endanger
ot her road users
Un secured animals may be throw n about the
ve hicle in theev ent of an accident, or sudden
st eering and braking manoeuvres, and injure
ve hicle occupants. #
Never lea veanimals unat tended in the
ve hicle. #
Alw ays cor rectly secu reanimals while
driving, e.g. using a suitable animal car‐
ri er. 70
Occupant saf ety
Page 76 of 469
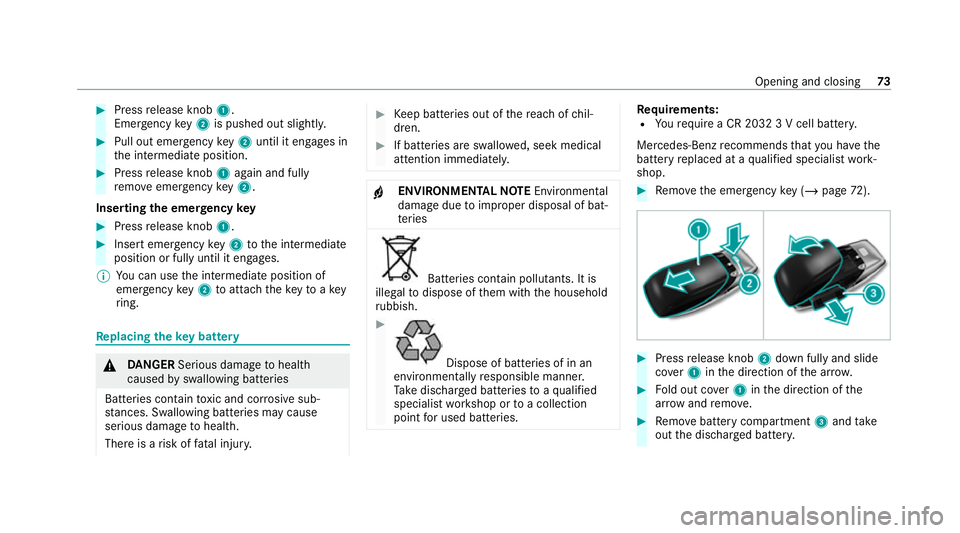
#
Press release knob 1.
Emer gency key2 is pushed out slight ly.#
Pull out emer gency key2 until it en gage s in
th e intermediate position. #
Press release knob 1again and fully
re mo veemer gency key2.
Inserting the emer gency key #
Press release knob 1. #
Insert emer gency key2 tothe intermediate
position or fully until it engages.
% You can use the intermediate position of
emer gency key2 toattach theke yto akey
ri ng. Re
placing the key battery &
DANG ER Serious damage tohealth
caused byswallowing batteries
Batteries contain toxic and cor rosive sub‐
st ances. Swallowing bat teries may cause
serious damage tohealth.
There is a risk of fata l injur y. #
Keep batteries out of there ach of chil‐
dren. #
If batteries are swallo wed, seek medical
attention immediately. +
ENVIRONMEN
TALNO TEEnvironmental
dama gedue toimproper disposal of bat‐
te ries Batteries conta
in pollutants. It is
illegal todispose of them with the household
ru bbish. #
Dispose of batteries of in an
environmen tally responsible manner.
Ta ke dischar ged batteries toaqu alified
specialist workshop or toa collection
point for used batteries. Re
quirements:
R Yourequ ire a CR 2032 3 V cell batter y.
Mercedes-Benz recommends that you ha vethe
battery replaced at a qualified specialist work‐
shop. #
Remo vethe emer gency key ( / page 72). #
Press release knob 2down fully and slide
co ver1 inthe direction of the ar row. #
Fold out co ver1 inthe direction of the
ar row and remo ve. #
Remo vebattery compartment 3and take
out the dischar ged batter y. Opening and closing
73
Page 81 of 469
Locking/unlocking
the driver's door with the
emer gency key %
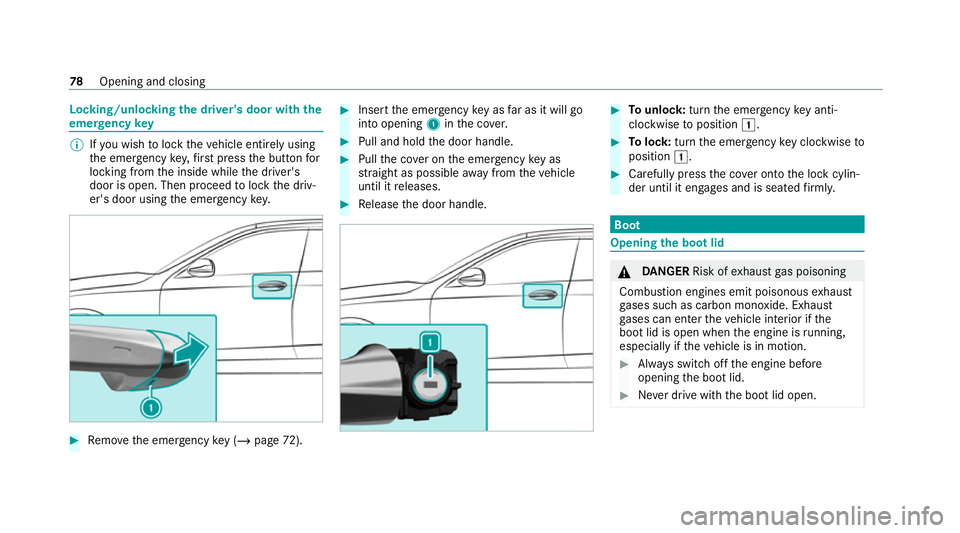
Ifyo u wish tolock theve hicle entirely using
th e emer gency key,firs t press the button for
locking from the inside while the driver's
door is open. Then proceed tolock the driv‐
er's door using the emer gency key. #
Remo vethe emer gency key ( / page 72). #
Insert the emer gency key as far as it will go
into opening 1inthe co ver. #
Pull and hold the door handle. #
Pull the co ver on the emer gency key as
st ra ight as possible away from theve hicle
until it releases. #
Release the door handle. #
Tounlo ck:turn the emer gency key anti-
clo ckwise toposition 1. #
Tolock: turnthe emer gency key clo ckwise to
position 1. #
Carefully press the co ver onto the lock cylin‐
der until it engages and is seated firm ly. Boot
Opening the bo
otlid &
DANG ER Risk of exhaust gas poisoning
Combustion engines emit poisonous exhaust
ga ses such as carbon monoxide. Exhaust
ga ses can enter theve hicle interior if the
boot lid is open when the engine is running,
especially if theve hicle is in motion. #
Alw ays switch off the engine before
opening the boot lid. #
Never drive with the boot lid open. 78
Opening and closing
Page 84 of 469
#
With th e boot lid comple tely open, press and
hold thep button on thekey. Thekey
must be in the vicinity of theve hicle.
Ve hicles with HANDS-FREE ACCESS #
With th e boot lid comple tely opened, make a
kicking mo vement with your foot below the
bumper (/ page81).
Boot lid automatic reve rsing function
The boot lid is fitted wi thautomatic bloc kage
de tection wi thare ve rsing function. If an obs ta‐
cle stops the boot lid during the automatic clos‐
ing procedure, it will automatically open again.
The automatic reve rsing function is only an aid
and is not a substitute foryo ur attentiveness. #
During the closing process, make sure that
no body parts are in the closing area. &
WARNING Risk of becoming trapped
despi tereve rsing function
The reve rsing function will not react:
R tosoft, light and thin objects, e.g. fingers
R towa rdsth e end of the closing procedure In
these situations in particular, there ve rsing
function cannot pr event someone being trap‐
ped. #
Ensu rethat no body parts are in the
closing area. #
If someone is trapped, use one of the
fo llowing options:
R Press thep button on thekey.
R Press there mo teoperating switch
on the driver's door.
R Press the closing or locking button
on the boot lid.
R Press theto p of the Mercedes star
on the boot lid. HANDS-FREE
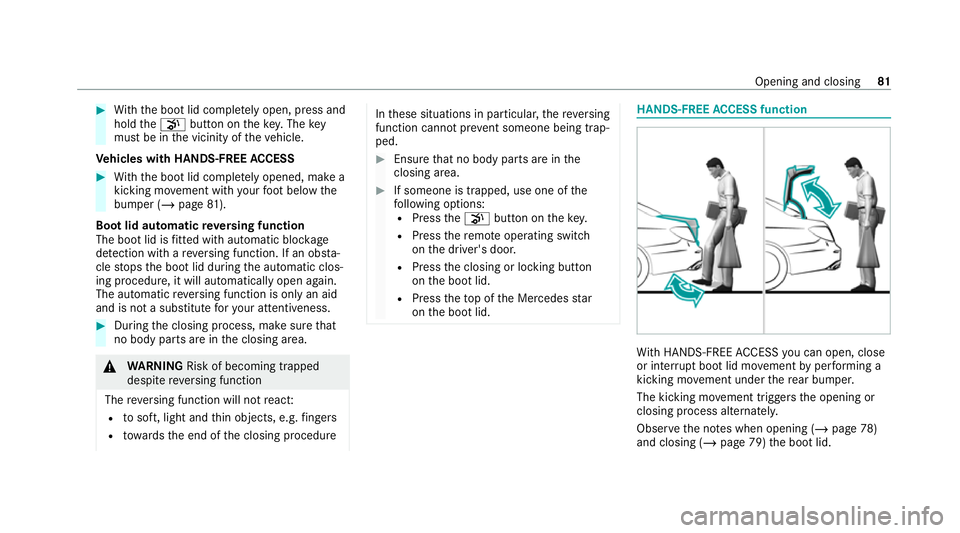
ACCESS function Wi
th HANDS-FREE ACCESS you can open, close
or inter rupt boot lid mo vement byper form ing a
kicking mo vement under there ar bumper.
The kicking mo vement triggers the opening or
closing process alternately.
Obser vethe no tes when opening (/ page78)
and closing (/ page 79)the boot lid. Opening and closing
81
Page 87 of 469
#
If someone is trapped, release the but‐
to n immedia tely or press the button in
order toreopen the side windo w. &
WARNING Risk of becoming trapped
when children opera tethe side windo ws
Children could become trapped if they oper‐
ate the side windo ws, particularly when unat‐
te nded. #
Activate thech ild saf ety lock forthe
re ar side wind ows. #
When leaving theve hicle, alw aysta ke
th eke y with you and lock theve hicle. #
Never lea vechildren unat tended in the
ve hicle. Re
quirements:
R The po wer supply or the ignition is switched
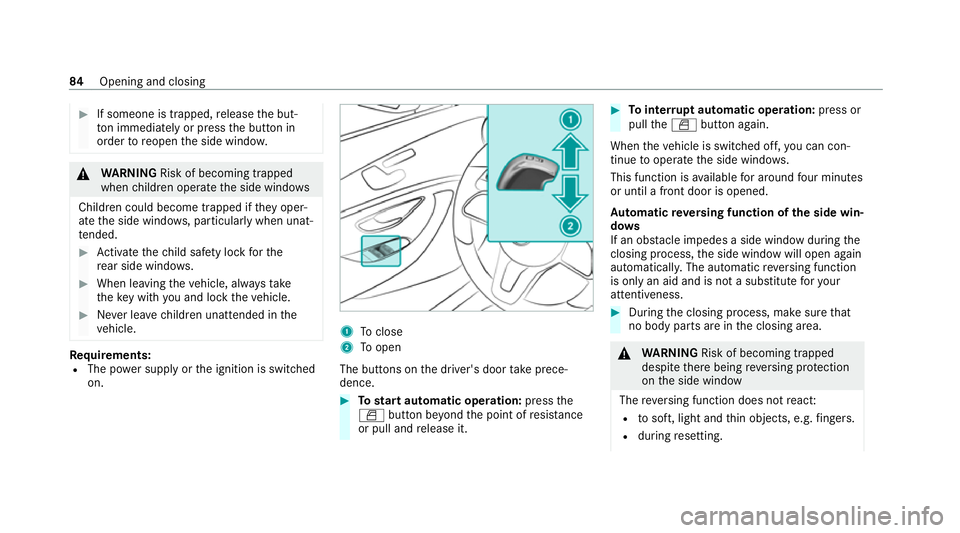
on. 1
Toclose
2 Toopen
The buttons on the driver's door take prece‐
dence. #
Tostart automatic operation: pressthe
W button be yond the point of resis tance
or pull and release it. #
Tointer rupt automatic operation: press or
pull theW button again.
When theve hicle is switched off, you can con‐
tinue tooperate the side windo ws.
This function is available for around four minutes
or until a front door is opened.
Au tomatic reve rsing function of the side win‐
do ws
If an obs tacle impedes a side window du ring the
closing process, the side window will open again
automaticall y.The automatic reve rsing function
is only an aid and is not a substitute foryo ur
attentiveness. #
During the closing process, make sure that
no body parts are in the closing area. &
WARNING Risk of becoming trapped
despi tethere being reve rsing pr otection
on the side window
The reve rsing function does not react:
R tosoft, light and thin objects, e.g. fingers.
R during resetting. 84
Opening and closing