2020 MERCEDES-BENZ C-CLASS ESTATE wipers
[x] Cancel search: wipersPage 5 of 565
Symbols
........................................................ 5At
agl ance .................................................... 6
Cockpit ........................................................... 6
Indica tor and warning lamps (s tandard) ........ 10
Indicator and warning lamps (widesc reen
cockpit) ......................................................... 12
Overhead contro l panel ................................ 14
Door control panel and seat adjustment ....... 16
Emergencies and breakdowns ...................... 18Digital Owner's Manual
.............................20
Calling up the Digital Owner's Manual ..........20 Genera
l notes............................................. 21
Pr otection of the environment ......................21
Ta ke -ba ckof end-of-life vehicles ...................21
Mercedes-Benz GenuineParts ....................... 22
Owner's Manual ...........................................23
Operating saf ety .......................................... .23
Declaration of conformity ............................. 25
Diagno stics connection ................................ 29
Qualified specialist workshop ....................... 31Ve
hicle registration ....................................... 31
Cor rect use of theve hicle ............................. 31
Information on the REA CHregulation ........... 32
No tesfo r persons with electronic medi‐
cal aids ......................................................... 32
Implied warranty .......................................... .33
QR code forre scue card ...............................33
Data storage .................................................33
Copyright ...................................................... 36 Occupant saf
ety......................................... 37
Re stra int sy stem ...........................................37
Seat belts ..................................................... 39
Airbags ......................................................... 43
PRE-SAFE ®
sy stem ........................................51
Safely transporting children in theve hi‐
cle ................................................................52
No tes on pets in theve hicle .........................72 Opening and closing
.................................. 73
Ke y .............................................................. .73
Doo rs............................................................ 76
Load compartment ....................................... 80
Side windo ws............................................... 86 Sliding sunroof ............................................. 89
Ro
ller sunblinds ............................................ 93
Anti-th eft protection .....................................93 Seats and
stowing ...................................... 97
No tes on the cor rect driver's seat posi‐
tion ............................................................... 97
Seats ............................................................ 98
St eering wheel ............................................ 105
Easy entry and exitfeature ........................ .107
Memory function ........................................1 08
St ow age areas ............................................ .110
Soc kets ....................................................... 12 3
Wi reless charging of the mobile phone
and connection with theex terior aerial .......1 24
Fitting/removing thefloor mats ................. 12 6 Light and sight
......................................... 12 8
Exterior lighting .......................................... 12 8
Interior lighting ........................................... 137
Changing bulbs (on lyforve hicles with
halogen headlamp s) .................................... 13 8
Wi ndsc reen wipers and windscreen
wa sher sy stem ............................................ 14 32
Contents
Page 146 of 565
#
If not, remo vethe missing me tal clips from
th e panel apertures in theta ilgate and inse rt
th em in the cor responding positions. #
Take trim 7and connect plug connector 6
to the sur round lighting.
The sur round lighting does not illuminate
until theta ilgate has been closed and then
opened again. #
Vehicles with EASY -PAC K tailgate: insert
th e plug connector forth e switch in thetop
ri ght of the trim. #
Vehicles with electric fold-out trailer tow
hit ch: inse rtthe plug connector forthe
switch in theto p left of the trim. #
Position trim 7and engage it in place by
ge ntly tapping it with your hand, starting
from the outside. #
Clip in the lo wer section of handle 1again. #
Insert and engage the upper section of han‐
dle 3into lo wer section 1. Wi
ndscreen wipers and windscreen washer
sy stem Switching
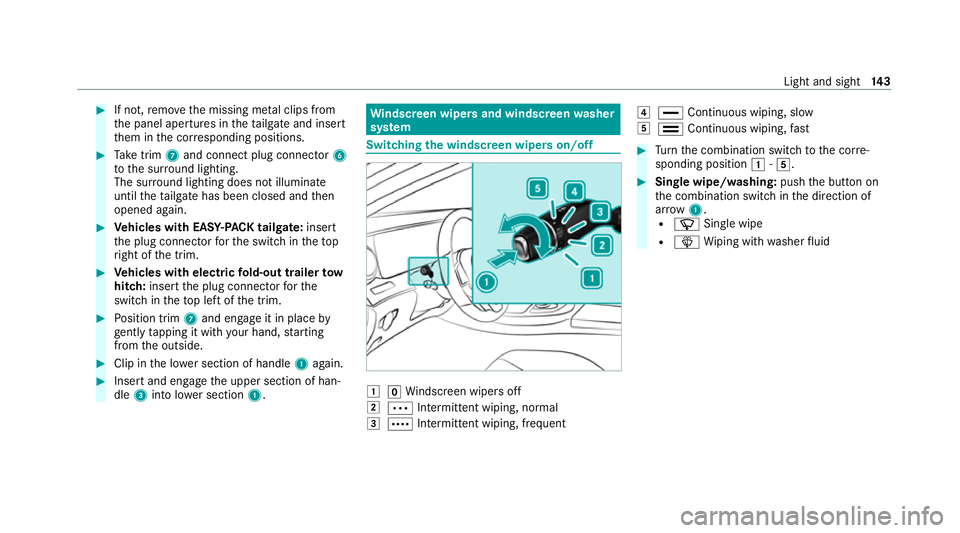
the windscreen wipers on/off 1
gWindsc reen wipers off
2 Ä Intermittent wiping, normal
3 Å Intermittent wiping, frequent 4
° Continuous wiping, slow
5 ¯ Continuous wiping, fast #
Turn the combination switch tothe cor re‐
sponding position 1-5. #
Single wipe/washing: pushthe button on
th e combination switch in the direction of
ar row 1.
R í Single wipe
R î Wiping with washer fluid Light and sight
14 3
Page 147 of 565
Switching
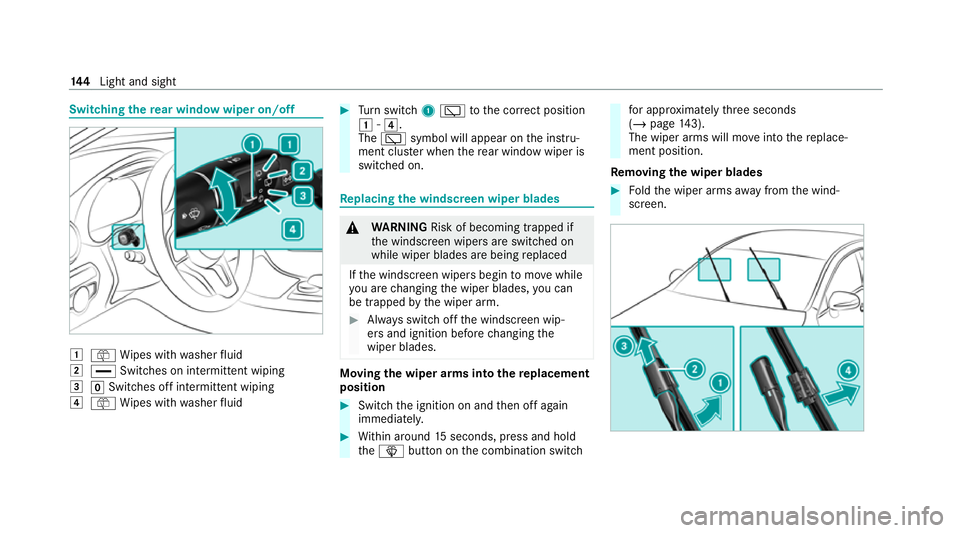
there ar window wiper on/off 1
ô Wipes with washer fluid
2 ° Switches on intermittent wiping
3 gSwitches off intermittent wiping
4 ô Wipes with washer fluid #
Turn switch 1è tothe cor rect position
1 -4.
The è symbol will appear on the instru‐
ment clus ter when there ar wind owwiper is
swit ched on. Re
placing the windsc reen wiper blades &
WARNING Risk of becoming trapped if
th e windscreen wipers are switched on
while wiper blades are being replaced
If th e windscreen wipers begin tomo vewhile
yo u are changing the wiper blades, you can
be trapped bythe wiper arm. #
Alw ays switch off the windscreen wip‐
ers and ignition before changing the
wiper blades. Moving
the wiper arms into there placement
position #
Switch the ignition on and then off again
immediatel y. #
Within around 15seconds, press and hold
th eî button on the combination switch fo
r appro ximately thre e seconds
(/ page 143).
The wiper arms will mo veinto there place‐
ment position.
Re moving the wiper blades #
Foldthe wiper arms away from the wind‐
screen. 14 4
Light and sight
Page 149 of 565
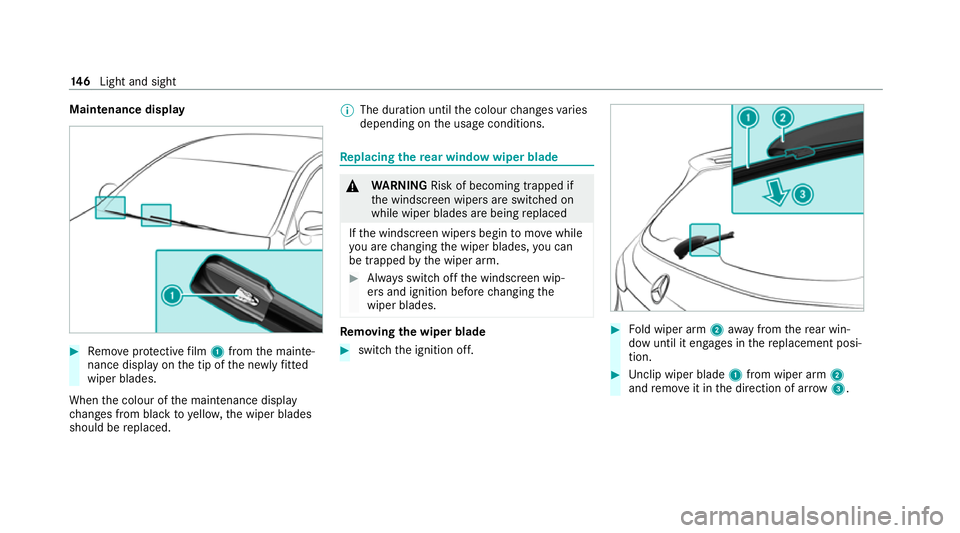
Maintenance display
#
Remo veprotective film 1 from the mainte‐
nance display on the tip of the newly fitted
wiper blades.
When the colour of the maintenance display
ch anges from black to yellow, the wiper blades
should be replaced. %
The duration until the colour changes varies
depending on the usage conditions. Re
placing the rear window wiper blade &
WARNING Risk of becoming trapped if
th e windscreen wipers are switched on
while wiper blades are being replaced
If th e windscreen wipers begin tomo vewhile
yo u are changing the wiper blades, you can
be trapped bythe wiper arm. #
Alw ays switch off the windscreen wip‐
ers and ignition before changing the
wiper blades. Re
moving the wiper blade #
switch the ignition off. #
Fold wiper arm 2away from there ar win‐
dow until it engages in there placement posi‐
tion. #
Unclip wiper blade 1from wiper arm 2
and remo veit in the direction of ar row 3. 14 6
Light and sight
Page 157 of 565
Ac
tivating/deactivating the climate control
syn chro nisation function via the multimedia
sy stem Multimedia sy
stem:
4 Vehicle 5
b Climate control
5 SYNC
Climate control can be set cent rally using the
synchronisation function. The temp erature set‐
ting will automatically be adop tedfo r all clima te
zones. #
Activate Oor deacti vate ª the function. Demisting
the windo ws Wi
ndo wsmis ted up on the inside #
Press theà button. #
Ifth e windo wscontinue tomist up: press the
¬ button.
Wi ndo wsmis ted up on the outside #
Switch on the windscreen wipers. #
Press theà button. Switching air-recirculation mode on/off
#
Press theg button.
The interior air will be recirculated.
Air-reci rculation mode automatically swit ches to
fresh air mode af ter some time.
% If air-recirculation mode is switched on, the
windo wsmay mist up more quickl y.Switch
on air- recirculation mode only brie fly. Switching
there sidual heat on/off Re
quirements:
R The vehicle is par ked.
It is possible tomake use of there sidual heat
from the engine tocontinue heating or ventilat‐
ing the front compartment of theve hicle for
appr oximately 30 minutes. #
Toswitch on: pressthe! button.
Re sidual heat is switched off automaticall y. Ac
tivating/deactivating ionisation Multimedia sy
stem:
4 Vehicle 5
b Climate control
5 Ionisation
Ionisation cleans and refreshes the interior air of
th eve hicle. Ionisation of the interior air is odour‐
less. #
Activate Oor deacti vate ª the function. Fr
ag rance sy stem Setting
the frag rance sy stem
Re quirements:
R Automatic climate control is activa ted.
R The glove box is closed.
Multimedia sy stem:
4 Vehicle 5
b Climate control
5 Air freshener
The fragrance sy stem distributes a pleasant fra‐
grance thro ughout theve hicle interior from a fla‐
con located in theglove box. 15 4
Climate cont rol
Page 384 of 565
&
WARNING Risk of injury fromtouching
co mp onents under voltage
The ignition sy stem and the fuel injection
sy stem workunder high voltage. You could
re cei vean electric shoc k. #
Neverto uch co mponents of the ignition
sy stem or the fuel injection sy stem
when the ignition is switched on. &
WARNING Risk of burn s from hot com‐
ponent parts in the engine compartment
Cer tain component parts in the engine com‐
partment can be very hot, e.g. the engine,
th e cooler and parts of theex haust sy stem. #
Allow the engine tocool down and only
to uch co mponent parts described in
th efo llowing. &
WARNING Risk of injury from usingthe
windscreen wipers while the engine bon‐
net is open
When the engine bonn etis open, and the
windscreen wipers are set in motion, you can
be trapped bythe wiper linkage. #
Alw ays switch off the windscreen wip‐
ers and ignition before opening the
engine bonn et. *
NO
TEPlug-in hybrid #
Obser vethe no tes in the Supplement.
Yo u could otherwise failto recognise
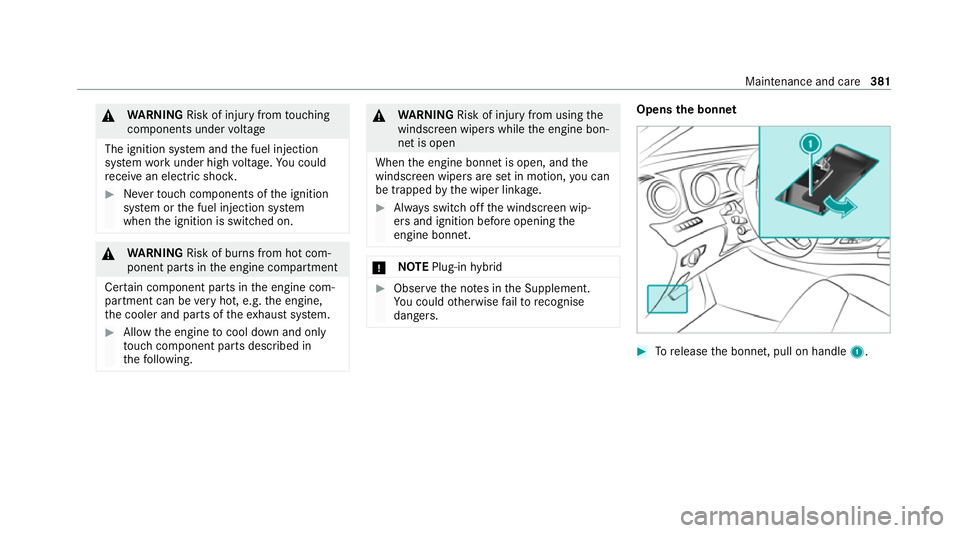
dangers. Opens the bonnet
#
Torelease the bonn et, pull on handle 1. Maintenance and care
381
Page 393 of 565
-
oily products
R Do not use polish on matt decorative foil.
Po lishing will ha vethe ef fect of shining the
fo il-wrapped sur face.
R Do not treat matt or stru ctured deco rative
fo ils with wax.Pe rm anent stains may occur.
Sc ratches, cor rosive deposits, areas af fected by
cor rosion and damage caused byincor rect care
cannot al ways be comple tely re paired. In such
cases, visit a qualified specialist workshop.
Yo u can obtain more information on care and
cleaning products from the manufacturer.
In the case of foil-wrapped sur faces, optical dif‐
fe re nces may occur between the sur faces that
we renot pr otected bya decorative foil af ter
re moving a decorative foil.
% Have wo rkor repairs todecorative foils car‐
ri ed out at a qualified specialist workshop,
e.g. in a Mercedes-Benz Service Centre. Note
s on care of car parts &
WARNING Risk of entrapment if the
windscreen wipers are swit ched on while
th e windscreen is being cleaned
If th e windscreen wipers are set in motion
while you are cleaning the windscreen or
wiper blades, you can be trapped bythe
wiper arm. #
Alw ays switch off the windscreen wip‐
ers and the ignition before cleaning the
windscreen or wiper blades. &
WARNING Risk of burn s fromtheta il‐
pipe and tailpipe trims
The exhaust tailpipe and tailpipe trims can
become very hot. If you come into contact
with these parts of theve hicle, you could
burn yourself. #
Alw ays be particular lycareful around
th eta ilpipe and theta ilpipe trims and
supervise children especially closely in
th is area. #
Allow vehicle parts tocool down before
to uching them. To
avo id damage totheve hicle, obser vethe
no tes on cleaning and care of thefo llowing vehi‐
cle parts:
Wheels and rims
R Use wate r and acid-free alloy wheel cleaners.
R Do not use acidic alloy wheel cleaners to
re mo vebrake dust. This could damage wheel
bolts and brake components.
R Toavo id cor rosion of the brake disks and
brakepads, drive theve hicle for a few
minutes af ter cleaning before parking it. The
brake disks and brakepads warm up and dry
out.
Wi ndo ws
R Clean the windo wsinside and outside with a
damp clo thand with a cleaning agent recom‐
mended for Mercedes-Benz.
R Do not use dry clo ths or abrasive or sol vent-
based cleaning agents toclean the inside of
windo ws. 390
Maintenance and care
Page 417 of 565
#
When the fuse box is open, make sure
th at no moisture can enter the fuse
box. #
When closing the fuse box, make sure
th at the seal of the lid is positioned cor‐
re ctly on the fuse box. If
th e newly inser ted fuse also blo ws, ha vethe
cause traced and rectified at a qualified special‐
ist workshop.
Ensure thefo llowing before replacing a fuse:
R The vehicle is secured against rolling away.
R All electrical consumers are switched off.
R The ignition is switched off.
The electrical fuses are located in various fuse
bo xes:
R Fuse box in the engine compartment on the
driver's side (/ page414)
R Fuse box on the driver's side of the cockpit
(/ page 415)
R Fuse box in the front passenger foot we ll
(/ page 415) R
Fuse box in the load compartment on the
ri ght-hand side of theve hicle, when vie wed
in the direction of tra vel (/ page 416) Opening and closing
the fuse box in the
engine compa rtment Re
quirements:
R A dry clo thand a sc rewdriver are available.
Obse rveth e no tes on electrical fuses
(/ page 413).
Opening &
WARNING Risk of injury from usingthe
windscreen wipers while the engine bon‐
net is open
When the engine bonn etis open, and the
windscreen wipers are set in motion, you can
be trapped bythe wiper linkage. #
Alw ays switch off the windscreen wip‐
ers and ignition before opening the
engine bonn et. #
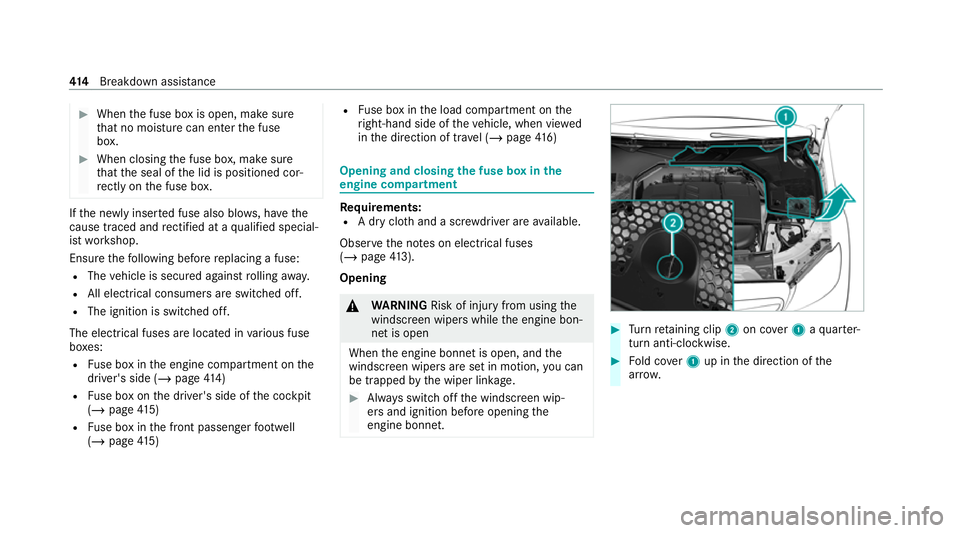
Turn retai ning clip 2on co ver1 aqu arter-
turn anti-clo ckwise. #
Fold co ver1 up in the direction of the
ar row. 414
Breakdown assis tance