2020 MERCEDES-BENZ C-CLASS ESTATE rims
[x] Cancel search: rimsPage 115 of 565
#
Alw ays make sure that the cigar ette
lighter is out of reach of children. #
Never lea vechildren unat tended in the
ve hicle. &
WARNING Risk of burn s fromtheta il‐
pipe and tailpipe trims
The exhaust tailpipe and tailpipe trims can
become very hot. If you come into contact
with these parts of theve hicle, you could
burn yourself. #
Alw ays be particular lycareful around
th eta ilpipe and theta ilpipe trims and
supervise children especially closely in
th is area. #
Allow vehicle parts tocool down before
to uching them. The driving
characteristics of your vehicle are
dependent on the distribution of the load within
th eve hicle. You should bear thefo llowing in
mind when loading theve hicle:
R neverex ceed the permissible gross mass or
th e permissible axle loads forth eve hicle
(including occupants).
Information can be found on theve hicle iden‐
tification plate (/ page 435).
R the load must not pr otru de abo vethe upper
edge of the seat backrests.
R when transporting objects in the load com‐
partment, alw ays ins tallth e combined lug‐
ga ge cover and net (load compartment co ver
and partitioning net).
R always place the load behind unoccupied
seats if possible.
R secure the load using the tie-down eyes and
distribute the load evenly. St
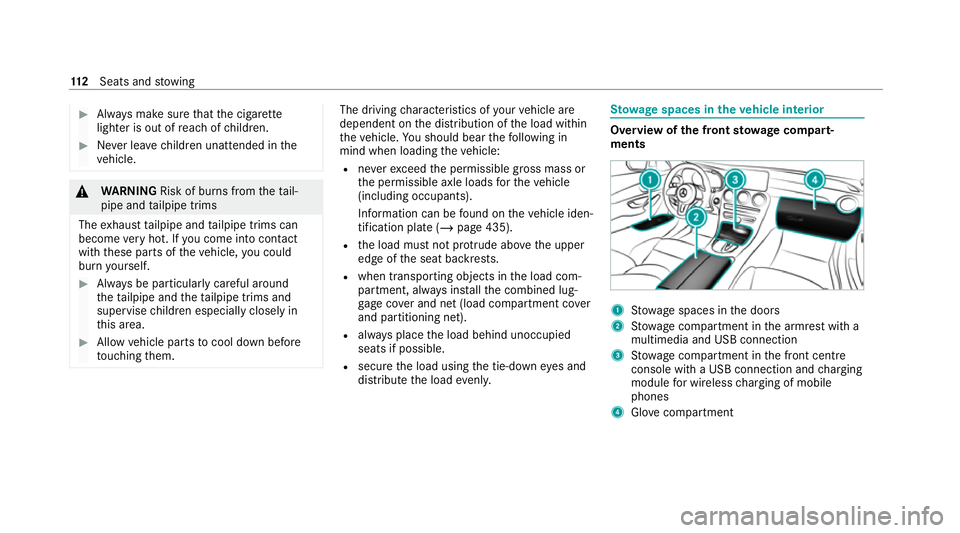
ow age spaces in theve hicle interior Overview of
the front stowage compa rt‐
ments 1
Stow age spaces in the doors
2 Stow age compartment in the armrest with a
multimedia and USB connection
3 Stow age compartment in the front cent re
console with a USB connection and charging
module for wireless charging of mobile
phones
4 Glovecompa rtment 11 2
Seats and stowing
Page 393 of 565
-
oily products
R Do not use polish on matt decorative foil.
Po lishing will ha vethe ef fect of shining the
fo il-wrapped sur face.
R Do not treat matt or stru ctured deco rative
fo ils with wax.Pe rm anent stains may occur.
Sc ratches, cor rosive deposits, areas af fected by
cor rosion and damage caused byincor rect care
cannot al ways be comple tely re paired. In such
cases, visit a qualified specialist workshop.
Yo u can obtain more information on care and
cleaning products from the manufacturer.
In the case of foil-wrapped sur faces, optical dif‐
fe re nces may occur between the sur faces that
we renot pr otected bya decorative foil af ter
re moving a decorative foil.
% Have wo rkor repairs todecorative foils car‐
ri ed out at a qualified specialist workshop,
e.g. in a Mercedes-Benz Service Centre. Note
s on care of car parts &
WARNING Risk of entrapment if the
windscreen wipers are swit ched on while
th e windscreen is being cleaned
If th e windscreen wipers are set in motion
while you are cleaning the windscreen or
wiper blades, you can be trapped bythe
wiper arm. #
Alw ays switch off the windscreen wip‐
ers and the ignition before cleaning the
windscreen or wiper blades. &
WARNING Risk of burn s fromtheta il‐
pipe and tailpipe trims
The exhaust tailpipe and tailpipe trims can
become very hot. If you come into contact
with these parts of theve hicle, you could
burn yourself. #
Alw ays be particular lycareful around
th eta ilpipe and theta ilpipe trims and
supervise children especially closely in
th is area. #
Allow vehicle parts tocool down before
to uching them. To
avo id damage totheve hicle, obser vethe
no tes on cleaning and care of thefo llowing vehi‐
cle parts:
Wheels and rims
R Use wate r and acid-free alloy wheel cleaners.
R Do not use acidic alloy wheel cleaners to
re mo vebrake dust. This could damage wheel
bolts and brake components.
R Toavo id cor rosion of the brake disks and
brakepads, drive theve hicle for a few
minutes af ter cleaning before parking it. The
brake disks and brakepads warm up and dry
out.
Wi ndo ws
R Clean the windo wsinside and outside with a
damp clo thand with a cleaning agent recom‐
mended for Mercedes-Benz.
R Do not use dry clo ths or abrasive or sol vent-
based cleaning agents toclean the inside of
windo ws. 390
Maintenance and care
Page 400 of 565
Note
s on MOExtended tyres (run-flat tyres) &
WARNING Risk of accident when driving
in limp -home mode
Driving in emergency mode impairs the han‐
dling characteristics of theve hicle. #
Do not exceed the permissible maxi‐
mum speed of the MOEx tended tyres. #
Avoid any abrupt steering and driving
manoeuvres as well as driving over
obs tacles (kerbs, pot holes, off-road).
This applies, in pa rticular, toa loaded
ve hicle. #
Stop driving in the emer gency mode if
yo u notice:
R banging noise
R vehicle vibration
R smoke which smells like rubber
R continuous ESP ®
inter vention
R crac ksinthe tyre side walls #
After driving in emergency mode, ha ve
th erims checkedby aqu alified special‐ ist
workshop with rega rd totheir fur ther
use. #
The defective tyre must be replaced in
eve rycase. Wi
th MOExtended tyres (run-flat tyres), you can
continue todrive your vehicle even if there is a
tot al loss of pressure in one or more tyres. How‐
eve r,th e tyre af fected must not show any clearly
visible damage.
Yo u can recognise MOExtended tyres bythe
MOExtended marking which appears on the side
wa ll of the tyre.
Ve hicles with tyre pressure monitoring sys‐
te m: MOExtended tyres may only be used in
conjunction wi than activated tyre pressure mon‐
itoring sy stem.
If a pressure loss warning message appears in
th e multifunction displa y,proceed as follo ws:
R Check the tyre for dama ge.
R If driving on, obser vethefo llowing no tes. Driving distance possible in emer
gency
mode af ter the pressure loss warning: Load condition Driving distance pos‐
sible in emergency
mode
Pa rtially laden 80 km
Fu lly laden 30 km The driving dis
tance possible in emergency
mode may vary depending on the driving style.
Obser vethe maximum permissible speed of
80 km/h.
If a tyre has gone flat and cannot be replaced
with an MOEx tended tyre, you can use a stand‐
ard tyre as a temp orary measure. TIREFIT kit
storage location The TIREFIT kit is located under
the load com‐
partment floor. Breakdown assis
tance 397
Page 430 of 565
Ra
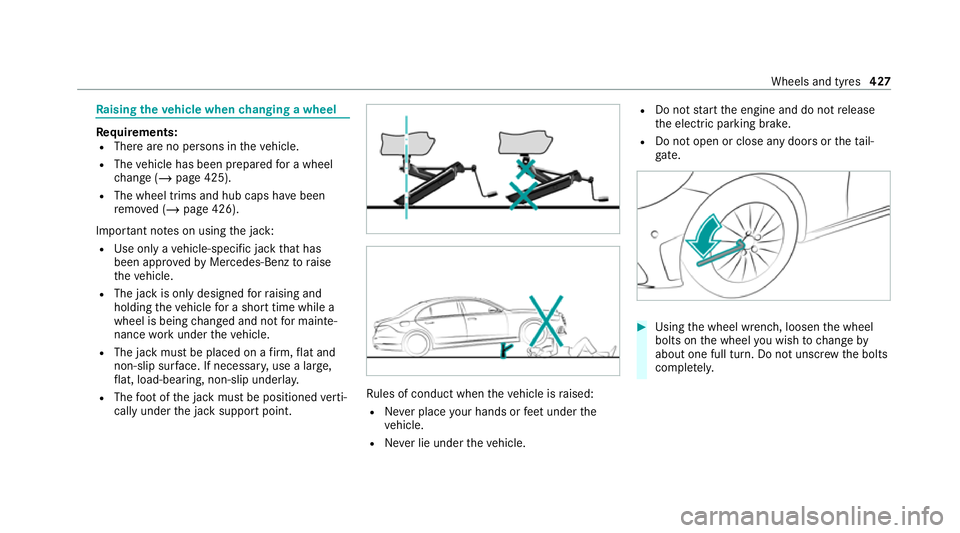
ising theve hicle when changing a wheel Re
quirements:
R There are no persons in theve hicle.
R The vehicle has been prepared for a wheel
ch ange (/ page 425).
R The wheel trims and hub caps ha vebeen
re mo ved (/ page 426).
Impor tant no tes on using the jack:
R Use only a vehicle-specific jack that has
been appr oved byMercedes-Benz toraise
th eve hicle.
R The jack is only designed forra ising and
holding theve hicle for a short time while a
wheel is being changed and not for mainte‐
nance workunder theve hicle.
R The jack must be placed on a firm ,fl at and
non-slip sur face. If necessar y,use a lar ge,
fl at, load-bearing, non-slip unde rlay.
R The foot ofthe jack must be positioned verti‐
cally under the jack support point. Ru
les of conduct when theve hicle is raised:
R Never place your hands or feet under the
ve hicle.
R Never lie under theve hicle. R
Do not start the engine and do not release
th e electric parking brake.
R Do not open or close any doors or theta il‐
gate. #
Using the wheel wrench, loosen the wheel
bolts on the wheel you wish tochange by
about one full turn. Do not unscr ewthe bolts
comple tely. Wheels and tyres
427
Page 528 of 565
Exterior lighting....................................
.390
High-p ressure cleaner........................... 388
Matt finis h............................................. 389
Pa int wo rk.............................................. 389
Plastic trim............................................ 391
Re alwo od/trim elements......................3 91
Re versing camera................................. .390
Ro of lining.............................................3 91
Seat belt................................................ 391
Seat co ver............................................. 391
Senso rs................................................. 390
St eering wheel....................................... 391
Ta ilpipes................................................ 390
Tr ailer hit ch........................................... 390
Wa shing byhand................................... 388
Wheels/rims.........................................3 90
Wi ndo ws................................................ 390
Wi per blades.........................................3 90
Carpet (Care).............................................. 391
Changing bulbs Dipped beam......................................... 14 0
Fitting/removing co ver (front wheel
ar ch )...................................................... 13 9
Main beam............................................ 14 0
No tes..................................................... 13 8Opening/closing
the side trim panels.. .140
Overview.............................................. .138
Re versing lights...................................... 141
Tu rn signal light (front).......................... 14 0
Tu rn signal lights (rear).......................... 141
Changing gears
Manually. ............................................... 17 7
Changing hub caps .................................. .426
Changing the lights
Driving abroad (symm etrical low
beam)................................................... .128
Charging Battery (vehicle).................................... 406
USB port................................................ 124
Chassis Damping characteristics....................... .225
DY NA MIC BODY CONTROL.................... 225
Child saf ety lock
Re ar door................................................ 70
Re ar side wind ows................................... 71
Child seat App rova l categories................................ .57
At tach ing (no tes).....................................57 Basic instructions.................................... 52
Fr
ont passenger seat (no tes)...................68
Fr ont passenger seat (without auto‐
matic airbag shutoff)...............................67
ISOFIX/i-Size (fitting)............................... 61
No tes on risks and dangers..................... 53
Re commended child restra int sy stems.... 56
Seats suitable for belt-secu redch ild
re stra int sy stems..................................... 64
Seats suitable for i‑Size child
re stra int sy stems..................................... 60
Seats suitable for ISOFIX child
re stra int sy stems..................................... 59
Securing on the co-driver seat................69
Secu ring on there ar seat........................ 66
To pTe ther............................................... 63
Children Avoiding dangers in theve hicle............... 53
Basic instructions.................................... 52
Chock Storage location.................................... 425
Chock see Chock Index
525
Page 550 of 565
Re
ducing agent
see AdBlue ®
Re fuelling
Re fuelling theve hicle............................1 79
To pping up AdBlue ®
............................... 183
Re gistration
Ve hicle.....................................................31
Re mo tecont rol (stationa ryheater/
ve ntilation)
Displa ys................................................. 15 8
Problems............................................... 15 9
Re placing the battery............................ 15 8
Setting................................................... 157
Re mo teOnline
Charging thest ar ter battery.................. 16 3
Cooling or heating theve hicle interior... 16 3
St arting theve hicle...............................1 64
Re placing a bulb
see Changing bulbs
Re scue card................................................. 33
Re ser ve
Fu el....................................................... 441
Re set function (multimedia sy stem)....... 291 Re
sidual heat............................................. 154
Re storing (factory settings)
see Reset function (multimedia sy stem)
Re stra int sy stem
Basic instructions forch ildren................ .52
Fu nction in an accident.......................... .38
Fu nctionality............................................ 37
Malfunction............................................. 38
Pr otection................................................ 37
Re duced pr otection.................................37
Self-test................................................... 37
Wa rning lamp......................................... .37
Re versege ar
Inserting................................................ 175
Re versing camera
Care..................................................... .390
Fu nction................................................ 227
Opening the camera co ver (360°
Camera)................................................ 234
Setting favo urites (360° Camera)........ .234
Switching auto matic operation
on/off (360° Camera)........................... 233
Re versing lights (changing bulbs) ............141
Rims (care)................................................. 390 Ro
llaw ay protection
see HOLD function
Ro ller sunblind
Pa norama sliding sunroof........................ 89
Side windo ws.......................................... 93
Ro of lining (care) ...................................... .391
Ro of load .................................................... 448
Ro of luggage rack
Loading.................................................. 12 2
Secu ring................................................ 12 2
Ro ute
Calculating............................................ 301
Displ aying destination informatio n........303
Planning................................................ 298
Selecting a type..................................... 301
Selecting an alte rnative route............... 303
Selecting notification s........................... 303
Selecting options.................................. 302
St arting the automatic service sta‐
tion sear ch............................................ 304
Switching the automatic filling sta‐
tion sear chon/off................................. 303
Using automatic filling station sear ch... 303
Wi th intermediate destinations............ .299 Index
547