Page 429 of 565

#
App lythe electric parking brake manually. #
Movethe front wheels tothest ra ight-ahead
position. #
Vehicles with automatic transmission:
shift into position j.#
Vehicles with le vel control sy stem: setthe
normal vehicle le vel (/ page 226). #
Swit choff the engine. #
Make sure that the engine cann otbe star ted. #
Place choc ks orother suitable items under
th e front and rear of the wheel that is diago‐
nally opposite the wheel you wish tochange. #
If necessar y,remo vethe wheel trim/hub
caps (/ page 426). #
Raise theve hicle (/ page 427). Re
moving and fitting the wheel trim/hub
caps Re
quirements:
R The vehicle is prepared for a wheel change
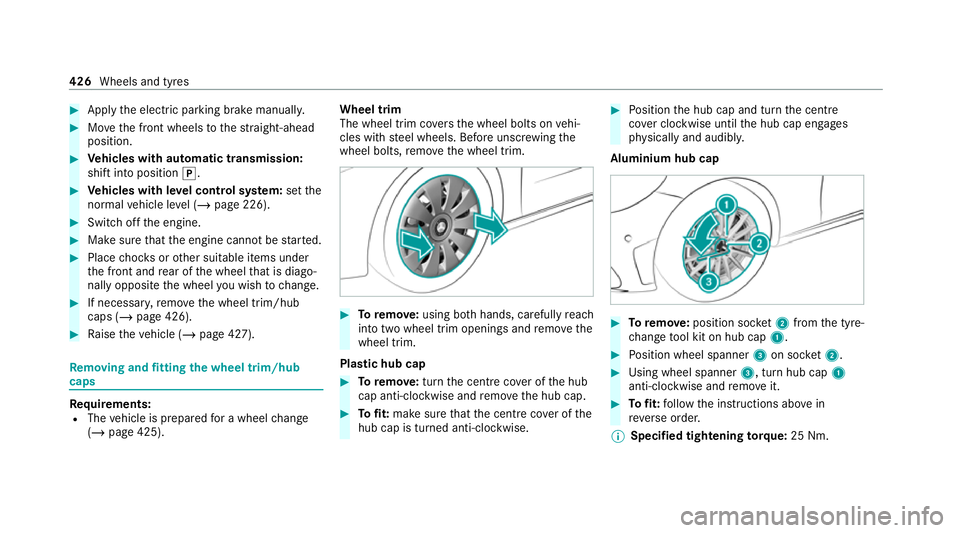
(/ page 425). Wheel trim
The wheel trim co
vers the wheel bolts on vehi‐
cles with steel wheels. Before unscr ewing the
wheel bolts, remo vethe wheel trim. #
Toremo ve:using bo thhands, carefully reach
into two wheel trim openings and remo vethe
wheel trim.
Plastic hub cap #
Toremo ve:turn the cent recover of the hub
cap anti-clockwise and remo vethe hub cap. #
Tofit: make sure that the cent recover of the
hub cap is turned anti-clockwise. #
Position the hub cap and turn the cent re
co ver clockwise until the hub cap engages
ph ysically and audibly.
Aluminium hub cap #
Toremo ve:position soc ket2 from the tyre-
ch ange tool kit on hub cap 1. #
Position wheel spanner 3on soc ket2. #
Using wheel spanner 3, turn hub cap1
anti-clo ckwise and remo veit. #
Tofit: follow the instructions abo vein
re ve rse order.
% Specified tightening torq ue: 25 Nm. 426
Wheels and tyres
Page 430 of 565

Ra
ising theve hicle when changing a wheel Re
quirements:
R There are no persons in theve hicle.
R The vehicle has been prepared for a wheel
ch ange (/ page 425).
R The wheel trims and hub caps ha vebeen
re mo ved (/ page 426).
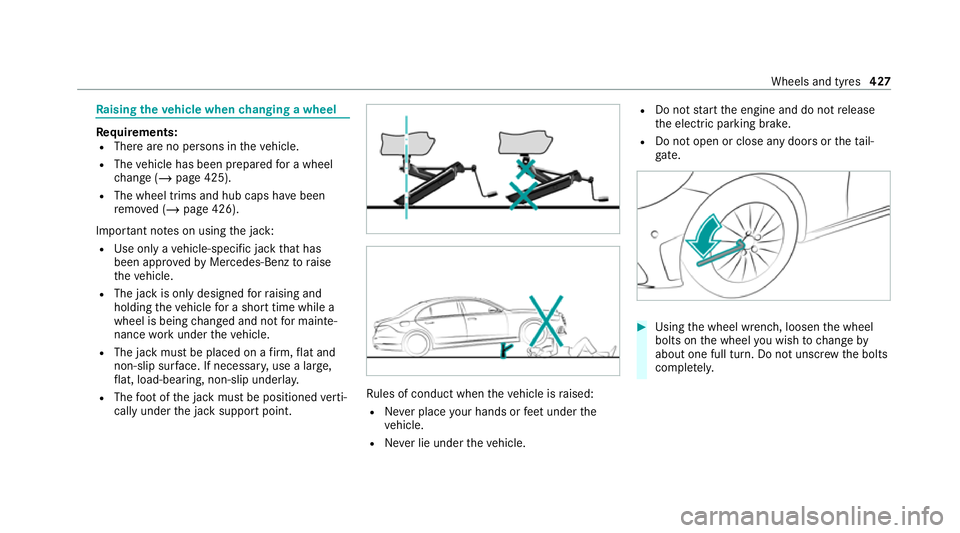
Impor tant no tes on using the jack:
R Use only a vehicle-specific jack that has
been appr oved byMercedes-Benz toraise
th eve hicle.
R The jack is only designed forra ising and
holding theve hicle for a short time while a
wheel is being changed and not for mainte‐
nance workunder theve hicle.
R The jack must be placed on a firm ,fl at and
non-slip sur face. If necessar y,use a lar ge,
fl at, load-bearing, non-slip unde rlay.
R The foot ofthe jack must be positioned verti‐
cally under the jack support point. Ru
les of conduct when theve hicle is raised:
R Never place your hands or feet under the
ve hicle.
R Never lie under theve hicle. R
Do not start the engine and do not release
th e electric parking brake.
R Do not open or close any doors or theta il‐
gate. #
Using the wheel wrench, loosen the wheel
bolts on the wheel you wish tochange by
about one full turn. Do not unscr ewthe bolts
comple tely. Wheels and tyres
427
Page 433 of 565

#
Obser vethe information on thech oice of
tyres (/ page 421).
Fo r tyres with a specified direction of rotation,
an ar row on the side wall of the tyre indicates
th e cor rect dire ction of rotation. Obse rvethe
direction of rotation when fitting. #
Slide the wheel tobe mounted onto the cen‐
tring pin and push it on. &
WARNING Risk of injury from tightening
wheel bolts and nuts
If yo u tighten the wheel bolts or wheel nuts
when theve hicle is raised, the jack could tip. #
Only tighten wheel bolts or wheel nuts
when theve hicle is on the ground. #
Be sure toobser vethe instructions and
saf ety no tes on "Changing a wheel"
(/ page 421). #
For saf etyre asons, only use wheel bolts
which ha vebeen appr ovedby Mercedes-
Benz and forth e wheel in question. #
Tighten the wheel bolts evenly in a diagonal
pattern in the order indicated until they are
fi nger-tight. #
Unscr ew and remo vethe cent ring pin. #
Tighten the last wheel bolt until it is finger-
tight. #
Lowe rth eve hicle (/ page 430). Lo
weri ngtheve hicle af ter a wheel change Re
quirements:
R The new wheel has been fitted
(/ page 429). #
Tolowe r the vehicle: turnthe crank of the
jack anti-clo ckwise until theve hicle is once
again standing firm lyon the ground. #
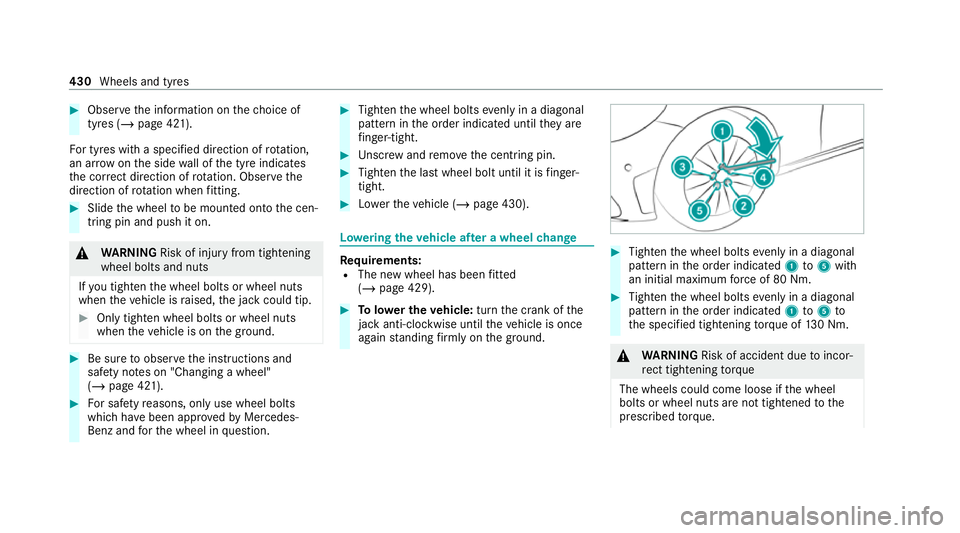
Tighten the wheel bolts evenly in a diagonal
pattern in the order indicated 1to5 with
an initial maximum forc e of 80 Nm. #
Tighten the wheel bolts evenly in a diagonal
pattern in the order indicated 1to5 to
th e specified tightening torque of 130 Nm. &
WARNING Risk of accident due toincor‐
re ct tigh tening torque
The wheels could come loose if the wheel
bolts or wheel nuts are not tightened tothe
prescribed torque. 430
Wheels and tyres
Page 561 of 565

What3words
Destination entry with a 3 word
address................................................ .299
Wheel change
Fitting a new wheel............................... 429
Lo we ring theve hicle.............................4 30
Prepa ration........................................... 425
Ra ising theve hicle................................4 27
Re moving a wheel. ................................ 429
Re moving/fitting hub caps.................... 426
Wheel change
see Emer gency spa rewheel
Wheel rotation........................................... 424
Wheels Care...................................................... 390
Changing hub caps................................ 426
Checking............................................... .417
Checking the tyre pressure (tyre
pressure monitoring sy stem)................. 420
Fitting.................................................... 429
Flat tyre.................................................3 96
Inter changing........................................ 424
MOExtended tyres................................ .397
No ise.................................................... .417 No
tes on fitting...................................... 421
Re moving.............................................. 429
Re placing.......................................4 21, 425
Re starting the tyre pressure monitor‐
ing sy stem.............................................4 20
Selection............................................... 421
Snow chains.......................................... .417
St oring................................................... 424
TIREFIT kit............................................. 398
Ty re pressure (N otes)............................. 41 8
Ty re pressure monitoring sy stem
(function)............................................... 419
Ty re pressure table................................ 419
Un usual handling characteristic s...........417
Wi -Fi
Overview............................................... 283
Setting................................................... 283
Setting up a hotspot.............................. 284
Setting up an Internet connection........ .347
Wi descreen cock pit instrument dis‐
play
Instrument clust er................................... 12
Wi ndow airbag............................................. 43 Wi
ndo ws
see Side windo ws
Wi ndo ws(care)......................................... .390
Wi ndscreen
Demisting.............................................. 151
Re placing the wiper blades.................... 14 4
Wi ndscreen
see Windsc reen
Wi ndscreen washer fluid
No tes....................................................4 46
Wi ndscreen washer sy stem
To pping up............................................. 386
Wi ndscreen wipers
Re placing the wiper blades.................... 14 4
Switching on/of f................................... 14 3
Wi ng
see Front wheel ar ch
Wi nter operation
Snow chains.......................................... .417
Wi nter tyres
Setting the permanent speed limit........ 203
Wi per blades
Ca re...................................................... 390 558
Index