2020 MERCEDES-BENZ C-CLASS ESTATE buttons
[x] Cancel search: buttonsPage 161 of 565
#
Press theu and^ buttons simultane‐
ousl y.
The Îsymbol on there mo tecontrol display
will flash. #
Use the, and. buttons toset the
desired departure time. #
Press theu and^ buttons simultane‐
ousl y.
The new departure time will be stored.
Up tothre e departure times can be stored. #
Toactivate the departu retime: select the
desired departure time and press and hold
th eu button.
The Ísymbol, the departure time and,
depending on the selected departure time,
th e letter A, BorCwill appear on the displa y. #
Todeactivate the departure time: select
th e desired departure time and press and
hold the^ button.
OFF will appear on the displa y. #
Tocheck thest atus of the active station‐
ary heater: briefly press theu button. Switching off immediately #
Press and hold the^ button.
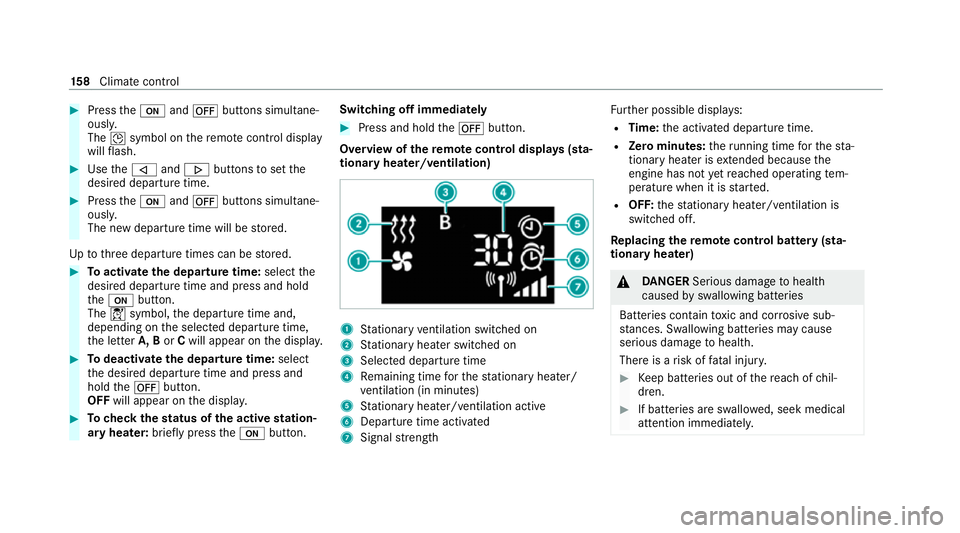
Overview of there mo tecont rol displa ys(sta‐
tiona ryheater/ventilation) 1
Stationary ventilation switched on
2 Stationary heater swit ched on
3 Selected departure time
4 Remaining time forth est ationary heater/
ve ntilation (in minu tes)
5 Stationary heater/ ventilation acti ve
6 Departure time acti vated
7 Signal stre ngth Fu
rther possible displa ys:
R Time: the activated departure time.
R Zero minutes: theru nning time forth est a‐
tionary heater is extended because the
engine has not yetre ached operating tem‐
perature when it is star ted.
R OFF: thest ationary heater/ ventilation is
switched off.
Re placing the remo tecont rol bat tery (sta‐
tiona ryheater) &
DANG ER Serious damage tohealth
caused byswallowing batteries
Batteries contain toxic and cor rosive sub‐
st ances. Swallowing bat teries may cause
serious damage tohealth.
There is a risk of fatal injur y. #
Keep batteries out of there ach of chil‐
dren. #
If batteries are swallo wed, seek medical
attention immediately. 15 8
Climate cont rol
Page 164 of 565
Driving
Note
s on Mercedes-AMG vehicles Obser
vethe no tes on thefo llowing topics in the
Supplement, otherwise you may failto recognise
dangers.
% The availability of cer tain functions depends
on the equipment and model of theve hicle.
R Emotion Start
R Rear axle locking dif fere ntial
R AMG Performance exhaust sy stem
R AMG ceramic high-per form ance composite
brake sy stem
R Traction control
R RACE START
R AMG RIDE CONTROL
R AMG steering-wheel buttons Switching on
the po wer supp lyor ignition &
WARNING Risk of accident and inju ry
due toleaving children unat tended in the
ve hicle
If ch ildren are left unat tended in theve hicle,
th ey could, in part icular:
R open doors, thereby endangering other
persons or road users.
R get out and be stru ck byoncoming traf‐
fi c.
R ope rate ve hicle equipment and become
trapped, forex ample.
In addition, thech ildren could also set the
ve hicle in motion by,fo rex ample:
R releasing the parking brake.
R changing the transmission position.
R starting theve hicle. #
Never lea vechildren unat tended in the
ve hicle. #
When leaving theve hicle, alw aysta ke
th eke y with you and lock theve hicle. #
Keep theve hicle key out of there ach of
ch ildren. Re
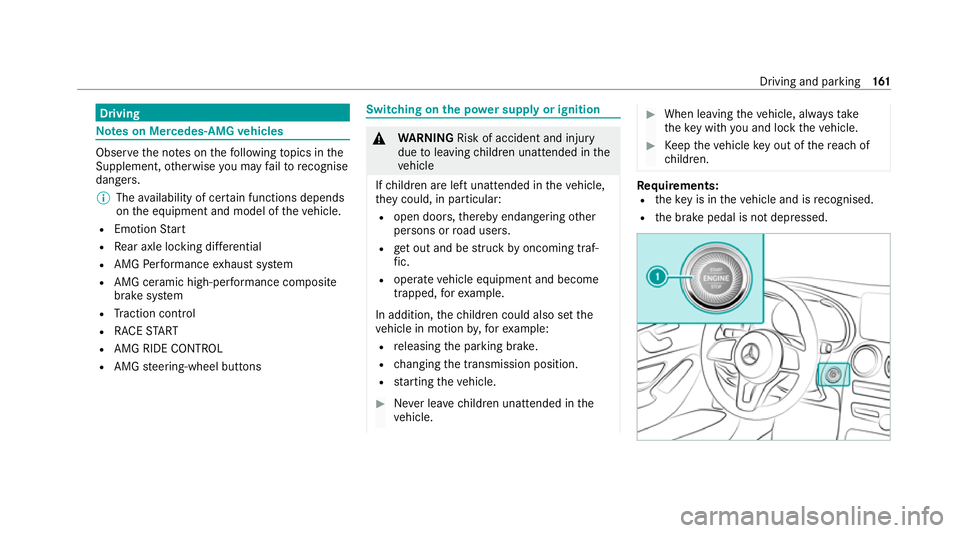
quirements:
R theke y is in theve hicle and is recognised.
R the brake pedal is not depressed. Driving and parking
161
Page 189 of 565
#
When leaving theve hicle, alw aysta ke
th eke y with you and lock theve hicle. #
Keep theve hicle key out of there ach of
ch ildren. *
NO
TEDama getotheve hicle due toit
ro lling away #
Alw ays secure theve hicle against roll‐
ing away. *
NO
TEDama gedue totheve hicle lo wer‐
ing Ve
hicles with AIRMATIC or le vel control:
The vehicle can lo wer because of temp era‐
ture dif fere nces or longer non-operational
times. This can cause dama getoparts of the
body. #
When stopping theve hicle and when
driving off, make sure that there are no
obs tacles su chas curbs under or in the
immediate vicinity of the body. #
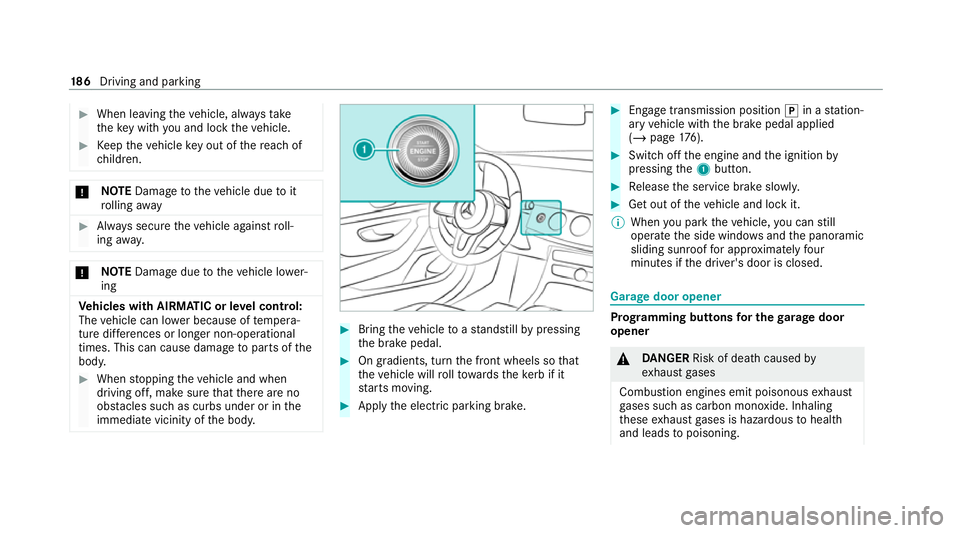
Bring theve hicle toast andstill bypressing
th e brake pedal. #
On gradients, turn the front wheels so that
th eve hicle will rollto wa rdsth eke rb if it
st arts moving. #
App lythe electric parking brake. #
Enga getransmission position jin a station‐
ary vehicle with the brake pedal applied
(/ page 176). #
Switch off the engine and the ignition by
pressing the1 button. #
Release the service brake slowl y. #
Get out of theve hicle and lock it.
% When you park theve hicle, you can still
operate the side windo wsand the panoramic
sliding sunroof for appro ximately four
minutes if the driver's door is closed. Garage door opener
Prog
ramming buttons for the garage door
opener &
DANG ER Risk of death caused by
ex haust gases
Combustion engines emit poisonous exhaust
ga ses such as carbon monoxide. Inhaling
th ese exhaust gases is hazardous tohealth
and leads topoisoning. 18 6
Driving and pa rking
Page 190 of 565
#
Never lea vethe engine or, if present,
th e auxiliary heating running in an
enclosed space wi thout suf ficient venti‐
lation. &
WARNING Risk of injury when opening
or closing a door with thega rage door
opener
When you operate or program the door with
th e integrated garage door opener, persons
in thera nge of mo vement of the door may
become trapped or be stru ck bythe door. #
Alw ays make sure that nobody is within
th era nge of mo vement of the door. Re
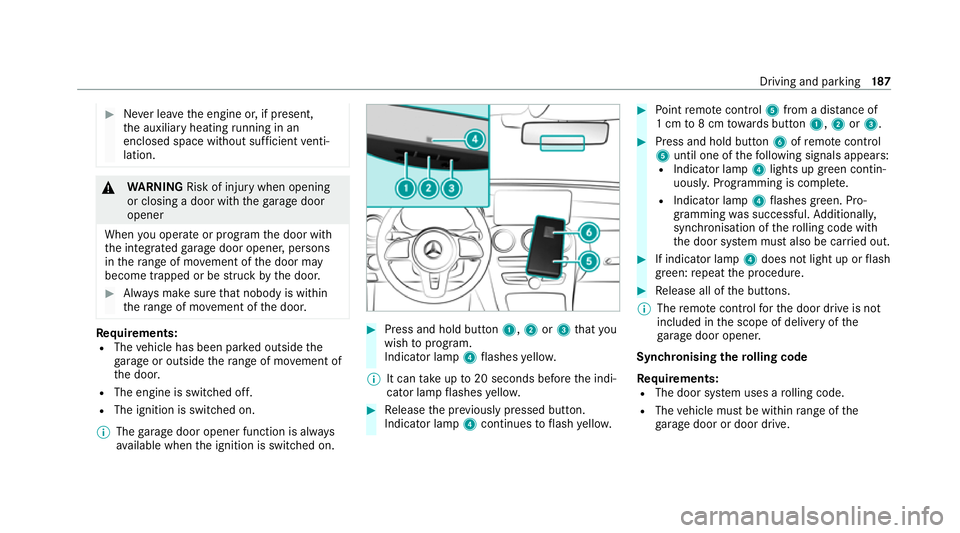
quirements:
R The vehicle has been par ked outside the
ga rage or outside thera nge of mo vement of
th e door.
R The engine is switched off.
R The ignition is switched on.
% The garage door opener function is alw ays
av ailable when the ignition is switched on. #
Press and hold button 1,2or3 that you
wish toprog ram.
Indicator lamp 4flashes yello w.
% It can take up to20 seconds before the indi‐
cator lamp flashes yello w. #
Release the pr eviously pressed button.
Indicator lamp 4continues toflash yello w. #
Point remo tecontrol 5from a dist ance of
1 cm to8 cm towa rds button 1,2or3. #
Press and hold button 6ofremo tecontrol
5 until one of thefo llowing signals appears:
R Indicator lamp 4lights up green contin‐
uousl y.Programming is comple te.
R Indicator lamp 4flashes green. Pro‐
gramming was successful. Additionall y,
synchronisation of thero lling code with
th e door sy stem must also be car ried out. #
If indicator lamp 4does not light up or flash
green: repeat the procedure. #
Release all of the buttons.
% The remo tecontrol forth e door drive is not
included in the scope of delivery of the
ga rage door opener.
Synchronising thero lling code
Re quirements:
R The door sy stem uses a rolling code.
R The vehicle must be within range of the
ga rage door or door drive. Driving and parking
187
Page 191 of 565
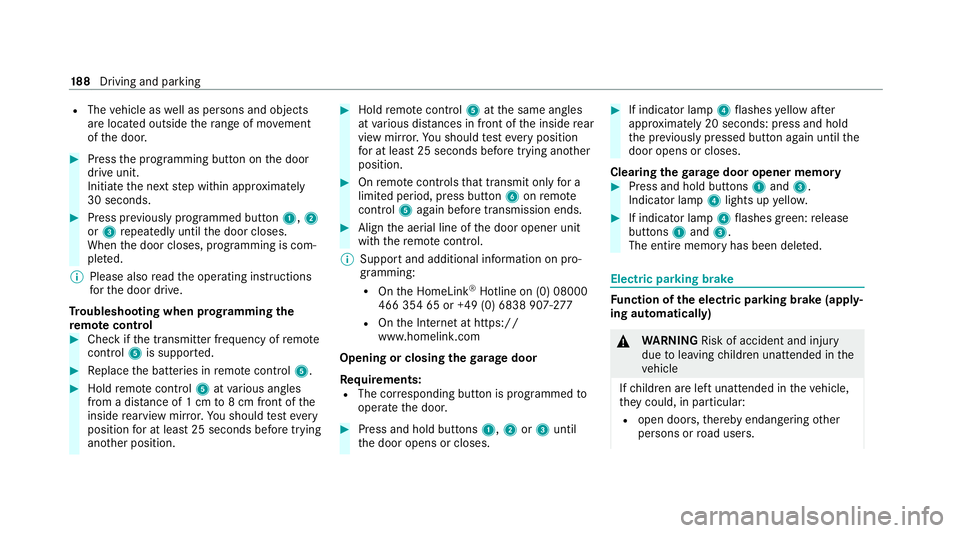
R
The vehicle as well as persons and objects
are located outside thera nge of mo vement
of the door. #
Press the programming button on the door
drive unit.
Initiate the next step within appr oximately
30 seconds. #
Press pr eviously prog rammed button 1,2
or 3 repeatedly until the door closes.
When the door closes, programming is com‐
ple ted.
% Please also read the operating instructions
fo rth e door drive.
Tr oubleshooting when prog ramming the
re mo tecont rol #
Check if the transmit ter frequency of remo te
control 5is support ed. #
Replace the batteries in remo tecontrol 5. #
Hold remo tecontrol 5atvarious angles
from a dis tance of 1 cm to8 cm front of the
inside rearview mir ror.Yo u should test eve ry
position for at least 25 seconds before trying
ano ther position. #
Hold remo tecontrol 5atthe same angles
at various dis tances in front of the inside rear
view mir ror.Yo u should test eve ryposition
fo r at least 25 seconds before trying ano ther
position. #
Onremo tecontrols that transmit on lyfor a
limi ted period, press button 6onremo te
control 5again before transmission ends. #
Align the aerial line of the door opener unit
with there mo tecontrol.
% Support and additional information on pro‐
gramming:
R Onthe HomeLink ®
Hotline on (0) 08000
466 354 65 or +49 (0) 6838 907-2 77
R Onthe Internet at https://
www.homelin k.com
Opening or closing the garage door
Requ irements:
R The cor responding button is programmed to
operate the door. #
Press and hold buttons 1,2or3 until
th e door opens or closes. #
If indicator lamp 4flashes yellow af ter
appr oximately 20 seconds: press and hold
th e pr eviously pressed button again until the
door opens or closes.
Clearing thega rage door opener memo ry #
Press and hold buttons 1and 3.
Indicator lamp 4lights up yello w. #
If indicator lamp 4flashes green: release
buttons 1and 3.
The entire memo ryhas been dele ted. Electric parking brake
Fu
nction of the electric pa rking brake (apply‐
ing automatically) &
WARNING Risk of accident and inju ry
due toleaving children unat tended in the
ve hicle
If ch ildren are left unat tended in theve hicle,
th ey could, in part icular:
R open doors, thereby endangering other
persons or road users. 18 8
Driving and pa rking
Page 255 of 565
7
Selected transmission position
8 Multifunction displ ay(exa mp le:standard dis‐
play for a trip): assi stance / telephone /
navigation / trip / media / radio / styles
and displa ys/ service / possible settings
fo r head-up display
9 Fuel le vel and fuel filler flap location indica‐
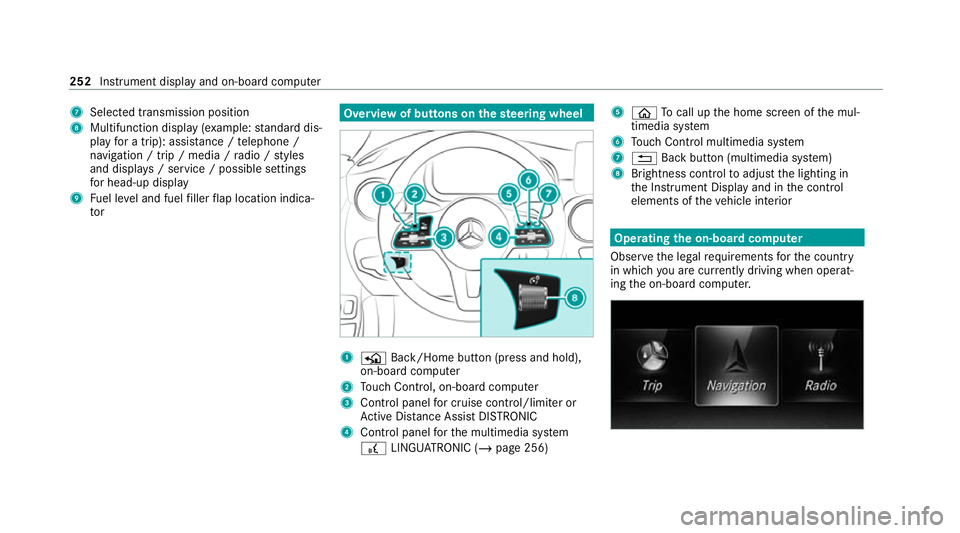
tor Overview of buttons on
thest eering wheel 1
P Back/Home button (press and hold),
on-board computer
2 Touch Control, on-board co mputer
3 Control panel for cruise control/limiter or
Ac tive Dis tance Assi stDISTRONIC
4 Control panel forth e multimedia sy stem
£ LINGU ATRO NIC (/ page 256) 5
ò Tocall up the home screen of the mul‐
timedia sy stem
6 Touch Control multimedia sy stem
7 % Back button (multimedia sy stem)
8 Brightness control toadjust the lighting in
th e Instrument Display and in the control
elements of theve hicle interior Operating
the on-boa rdcompu ter
Obser vethe legal requ irements forth e count ry
in which you are cur rently driving when operat‐
ing the on-board computer. 252
Instrument display and on-board computer
Page 522 of 565
1,
2, 3 ...
4MATIC Function................................................ 17 9
12 V battery
see Battery (vehicle)
12 V so cket
see Soc ket (12 V)
48 V on-board electrical sy stem
Operating saf ety...................................... 23
230 V soc ket
see Soc ket (230 V)
360° Camera Button................................................... 233
Care...................................................... 390
Fu nction................................................ 230
Opening the camera co ver (r eve rsing
camera)................................................. 234
Selecting a view................................... .233
Setting favo urites.................................. 234
Swit ching automatic operation
on/off (r eversing camera).................... .233 A
A/C function Activating/deactivating (MBUX mul‐
timedia sy stem).....................................1 53
Switching on/off (control panel)........... 15 2
ABS (Anti-lock Braking Sy stem) .............. .194
Ac celeration
see Kickdown
Ac cess data
Editing (Blue tooth®
)...............................3 49
Setting (Blu etoo th®
).............................. 348
Ac cident and Breakdown Manage‐
ment
Mercedes me connect...........................3 42
Ac oustic locking verification signal
Ac tivating/deactivating........................... 74
Ac tivating/deactivating automatic
vo lume adjustment
Burmes ter®
sur round sound sy stem...... 376
Ac tive Blind Spot Assi st
Brake application................................... 221
Fu nction................................................. 219
Sy stem limitations................................. 219Tr
ailer operatio n.................................... 221
Ac tive bonn et(pedestrian pr otection)
Operation.............................................. 379
Re setting...............................................3 79
Ac tive Brake Assi st
Fu nction/no tes...................................... 213
Setting................................................... 217
Ac tive Di stance Assist DISTRO NIC
Ac tive Emergency Stop Assis t................ 212
Calling up a spee d................................. 206
Fu nction................................................ 203
Increasing/decreasing speed................ 206
Re quirements:...................................... .206
Ro ute-based speed adap tatio n.............. 208
Selecting............................................... 206
St eering wheel buttons......................... 206
St oring a speed.....................................2 06
Switching off/deactivating.................... 206
Switching on/activating........................ 206
Sy stem limitations.................................2 03
Ac tive Eme rgency Stop Assist .................. 212
Ac tive headlamps...................................... 13 2
Ac tive Lane Keeping Assist
Ac tivating/deactivating......................... 224 Index
519
Page 527 of 565
Brake
fluid
No tes....................................................4 45
Brake forc e distribution
EBD (Elect ronic Brake forc e Distribu‐
tion).......................................................1 96
Brakes ABS (Anti-lock Braking Sy stem).............1 94
Ac tive Brake Assi st................................ 213
Ad aptive brake lights............................. 19 8
BA S (Brake Assi stSystem).................... 194
Driving tips........................................... .166
EBD (Electronic Brake forc e Distribu‐
tion).......................................................1 96
HOLD function....................................... 197
Limited braking ef fect (salt-treated
ro ads).................................................... 16 6
New/replaced brakepads/brake
discs...................................................... 16 4
Ru nning-in no tes.................................... 16 4
Braking assistance see BAS (Brake Assi stSystem)
Breakdown Overview of the help functions................ 18
To w- starting........................................... 413To
wing away.......................................... 409
Tr ansporting theve hicle......................... 411
Wheel chang e....................................... .425
Breakdown see Flat tyre
Burmes ter®
sur round sound sy stem
Ad justing the balance/fader.................. 376
Ad justing the sound focus..................... 376
Ad justing treble, mid-range and bass
setting s.................................................. 376
Au tomatic volume adjustment............... 376
Calling up the sound menu.................... 376
Information............................................ 375
Switching the sur round sound on/off.... 376
Buttons Steering wheel...................................... 252 C
Call list Making a call.........................................3 30
Overview.............................................. .329
Calling up the sound menu
Adva nced sound sy stem........................3 77
Burmes ter®
sur round sound sy stem...... 376Calls
Accepting.............................................. 326
Ac tivating functions du ring a call......... .326
Calls with se veral participant s............... 326
Declining............................................... 326
Ending a call.......................................... 326
Incoming call du ring an existing call...... 327
Making.................................................. 326
Mercedes me....................................... .337
Camera see 360° Camera
see Reversing camera
Car key
see Key
Car wash
see Care
Car wash (care).........................................3 87
Care 360° camera........................................ .390
Air-water duct........................................ 387
Au tomatic car wash...............................3 87
Carpe t.................................................. .391
Deco rative foil...................................... .389
Displ ay................................................... 391 524
Index