2020 MERCEDES-BENZ C-CLASS ESTATE USB port
[x] Cancel search: USB portPage 339 of 565
using
the cent ral control element or voice con‐
trol sy stem. You can activate thevo ice control
sy stem bypressing and holding theó button
on the multifunction steering wheel.
When using Android Autowith voice control, the
multimedia sy stem can still be operated using
LINGU ATRO NIC (/ page 256).
Only one mobile phone at a time can be connec‐
te d via Android Autowith the multimedia sys‐
te m.
The availability of Android Autoand Android Auto
apps may vary according tothe count ry.
The service pr ovider is responsible forth is appli‐
cation and the services and conte nt connected
to it.
Information on Android Auto
While using Android Auto,va rious functions of
th e multimedia sy stem, forex ample the media
source Blue tooth ®
audio, are not available.
On lyone route guidance can be active at a time.
If ro ute guidance is active on the multimedia sys‐
te m, it is closed when route guidance is star ted
on the mobile phone. Connecting a mobile phone via Android
Auto
Requ irements:
R The firs t acti vation of Android Autoon the
multimedia sy stem must be car ried out when
th eve hicle is stationary for saf etyre asons.
R The mobile phone suppo rts Android Auto
from Android 5.0.
R The Android Autoapp is ins talled on the
mobile phone.
R In order touse thete lephone functions, the
mobile phone must be connected tothe mul‐
timedia sy stem via Blue tooth®
( / page 322).
If th ere was no prior Internet connection, this
is es tablished with the use of the mobile
phone with Android Auto.
R The mobile phone is connected tothe multi‐
media sy stem via the USB port çusing a
suitable cable (/ page 355).
R An Internet connection is requiredforth e full
ra nge of functions for Android Auto. Multimedia sy
stem:
4 Connect 5
Android Auto #
Select the mobile phone from the device list.
Ac cepting/rejecting the data pr otection reg‐
ulations
A message with the data pr otection regulations
appears. #
Select Accept & Start .
or #
Select Decline & End.
Ac tivating automatic start #
Select Start automatically O.
St arting manually #
Select the mobile phone from the device list.
Exiting Android Auto #
Press theò button on the multifunction
st eering wheel, forex ample. 336
Multimedia sy stem
Page 355 of 565
Setting
theTu neIn Radio options
Multimedia sy stem:
4 Radio 5
Þ Radio source
5 TuneIn Radio 5
Z Options
The following options are available:
R Select stream: select thest re am quality
R Login to TuneIn account: log in to your
Tu neIn user account
R Log out of account: log out of your TuneIn
user account #
Select an option. Media
Au
dio mode In
fo rm ation on the audio mode &
WARNING Risk of dist raction when han‐
dling data storage media
If yo u handle a data storage medium while
driving, your attention is diver ted from the traf
fic conditions. This could also cause you
to lose control of theve hicle. #
Only handle a data storage medium
when theve hicle is stationar y. Pe
rm issible file sy stems:
R FAT32
R exFAT
R NTFS
Pe rm issible data storage medium:
R SD card
R USB storage device
R iPod ®
/iPhone ®
R MTP devices
R Blue tooth ®
audio equipment
% Obse rveth efo llowing no tes:
R The multimedia sy stem supports a total
of up to50,000 files.
R Data storage media up to2 TB are sup‐
por ted (32‑bit address space). Suppor
tedfo rm ats:
R MP3
R WMA
R AAC
R WAV
R FLAC
R ALAC
% Obser vethefo llowing no tes:
R Due tothe lar gevariet y of available
music files rega rding encoders, sampling
ra tes and data rates, playback cannot
alw ays be guaranteed.
R Due tothe wide range of USB devices
av ailable on the mar ket, pl ayback cann ot
be guaranteed for all USB devices.
R Cop y-pr otected music files or DRM
enc rypte dfiles cannot be pla yed bac k.
R MP3 pla yers must support Media Trans‐
fe r Pr otocol (MTP). 352
Multimedia sy stem
Page 359 of 565
The multimedia connection unit is
found in the
stow age compartment under the armrest and
has two USB ports.
Depending on theve hicle's equipment, addi‐
tional USB ports can be found in thestow age
compartment of the cent reconsole and in the
re ar passenger compartment. #
Connect the USB device tothe USB port.
Pla yable music files are pla yed back only if
th e cor responding media display is activated.
% Use the USB port identified byç touse
Apple CarPlay ®
and Android Auto.
% Depending on theve hicle equipment there is
an additional USB port in there ar passenger
compartment. Ports th at are labelled with a
bat tery symbol can only be used tocharge
USB devices.
Selecting a track in the media playba ck
Multimedia sy stem:
4 Media
Selecting a track byskipping toa track #
Toskip backwards or forw ards toa
track: navigate up or down. Selecting a track using
the cur rent track list #
Select è. #
Select Current track list. #
Select a tra ck.
Selecting playback options
Multimedia sy stem:
4 Media 5
Z Options
Playing back similar trac ks #
Select Play similar tracks.
A track li stwith similar trac ksis created and
pla yed bac k.
Playback mode #
Select Random playback of the current track
list.
The cur rent track li stis pla yed in random
orde r. #
Select Random playback of the current
medium.
All trac kson the active data storage medium
are pla yed in random orde r. #
Select Normal track sequence .
The cur rent track li stis pla yed in the order it
appears on the data storage medium.
Controlling media playback
Multimedia sy stem:
4 Media 5
Y Playback control
A bar with playback controls is shown. #
Topause playback: select and confirm
Y with th e cent ral control element.
The Ë symbol is displa yed. #
Toresume playback: select and confirm
Y again with the cent ral control element.
The Ì symbol is displa yed.
To fast forw ard/r ewind #
MoveË onthe timeline.
To hide the playback controls #
Press the% button. 356
Multimedia sy stem
Page 362 of 565
#
Todeactivate full-sc reen mode: pressthe
to uchpad.
Changing video settings
Multimedia sy stem:
4 Media 5
Z Options
5 Picture format
The following picture form ats are available:
R Automatic
R 16:9
R 4:3
R Zoom #
Select a picture form at.
Ad justing the brightness manually
If th eAutomatic pictureform at is swit ched off,
yo u can adjust the brightness yourself. #
Select Brightness. #
Adjust the brightness. Media sear
ch St
arting the media sear ch
Multimedia sy stem:
4 Media 5
ª Search
Depending on the connected media sources and
fi les, thefo llowing categories are lis ted:
R Current track list
R Keyword search
R Playlists
R Artists
R Albums
R Tracks
R Folders
R Music genres
R Year
R Composers
R Videos
R Podcasts (Apple®
devices)
R Audiobooks (Apple®
devices) #
Select a categor y. %
The categories are available as soon as the
entire media conte nt has beenread in and
anal ysed. Media Inter
face Information about
the Media Inter face
Media In terface is a universal inter face forthe
connection of mobile audio equipment. The mul‐
timedia sy stem has two USB ports. The USB
ports are located in thestow age compartment
under the armrest.
Suppor ted devices
The Media Inter face allo wsyouto connect the
fo llowing data storage media:
R iPod ®
R iPhone ®
R MP3 pla yer
R USB devices
Fo r de tails and a list of suppor ted devices, visit
our website at https://www.mercedes-
benz.com/connect. Follow the instructions in
th e "Media Inter face" section. Multimedia sy
stem 359
Page 363 of 565
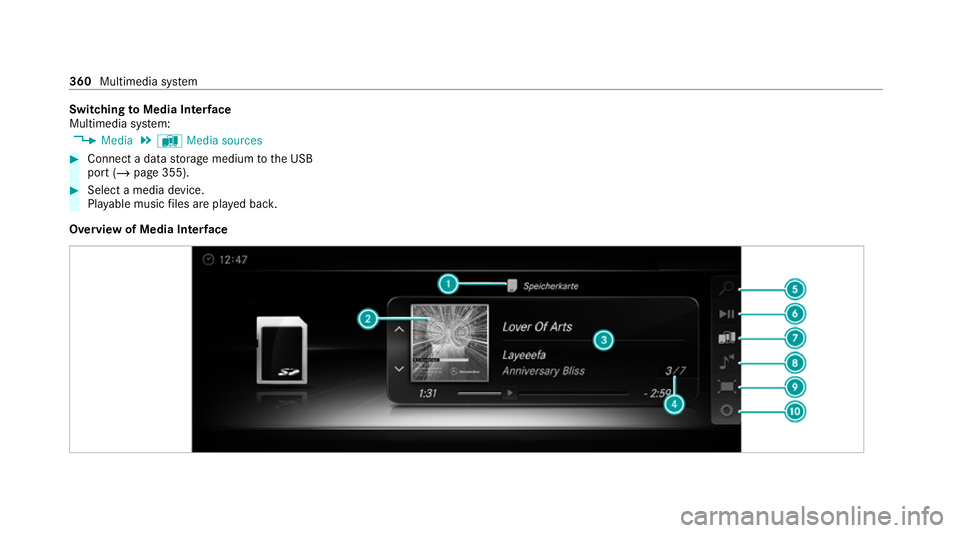
Switching
toMedia Inter face
Multimedia sy stem:
4 Media 5
à Media sources #
Connect a data storage medium tothe USB
port (/ page 355). #
Select a media device.
Playable music files are pla yed bac k.
Overview of Media Inter face 360
Multimedia sy stem
Page 528 of 565
Exterior lighting....................................
.390
High-p ressure cleaner........................... 388
Matt finis h............................................. 389
Pa int wo rk.............................................. 389
Plastic trim............................................ 391
Re alwo od/trim elements......................3 91
Re versing camera................................. .390
Ro of lining.............................................3 91
Seat belt................................................ 391
Seat co ver............................................. 391
Senso rs................................................. 390
St eering wheel....................................... 391
Ta ilpipes................................................ 390
Tr ailer hit ch........................................... 390
Wa shing byhand................................... 388
Wheels/rims.........................................3 90
Wi ndo ws................................................ 390
Wi per blades.........................................3 90
Carpet (Care).............................................. 391
Changing bulbs Dipped beam......................................... 14 0
Fitting/removing co ver (front wheel
ar ch )...................................................... 13 9
Main beam............................................ 14 0
No tes..................................................... 13 8Opening/closing
the side trim panels.. .140
Overview.............................................. .138
Re versing lights...................................... 141
Tu rn signal light (front).......................... 14 0
Tu rn signal lights (rear).......................... 141
Changing gears
Manually. ............................................... 17 7
Changing hub caps .................................. .426
Changing the lights
Driving abroad (symm etrical low
beam)................................................... .128
Charging Battery (vehicle).................................... 406
USB port................................................ 124
Chassis Damping characteristics....................... .225
DY NA MIC BODY CONTROL.................... 225
Child saf ety lock
Re ar door................................................ 70
Re ar side wind ows................................... 71
Child seat App rova l categories................................ .57
At tach ing (no tes).....................................57 Basic instructions.................................... 52
Fr
ont passenger seat (no tes)...................68
Fr ont passenger seat (without auto‐
matic airbag shutoff)...............................67
ISOFIX/i-Size (fitting)............................... 61
No tes on risks and dangers..................... 53
Re commended child restra int sy stems.... 56
Seats suitable for belt-secu redch ild
re stra int sy stems..................................... 64
Seats suitable for i‑Size child
re stra int sy stems..................................... 60
Seats suitable for ISOFIX child
re stra int sy stems..................................... 59
Securing on the co-driver seat................69
Secu ring on there ar seat........................ 66
To pTe ther............................................... 63
Children Avoiding dangers in theve hicle............... 53
Basic instructions.................................... 52
Chock Storage location.................................... 425
Chock see Chock Index
525
Page 554 of 565
St
ow age areas
see Loading
see Stow age space
St ow age comp artments
see Loading
see Stow age space
St ow age space
Armrest.................................................. 11 2
Centre console....................................... 11 2
Door....................................................... 11 2
Glo vecompa rtment............................... 11 2
USB ports.............................................. 11 2
Sulphur content........................................4 39
Sur round lighting
Setting................................................... 137
Sur round View
see 360° Camera
Suspension Setting the suspension le vel (AIR‐
MATIC)................................................. .226
Suspension see AIRMATIC Suspension le
vel (AIRMATIC)
Setting................................................... 226
SV HC (substances of very high con‐
cern) ............................................................. 32
Switch-off del aytime
Exterio r.................................................. 13 6
Interior.................................................. 13 8
Switching the sur round sound on/off
Burmes ter®
sur round sound sy stem......3 76
Switching volume adjustment on/off
Adva nced sound sy stem........................3 77
Synchronisation function Activating/deactivating (multimedia
sy stem).................................................. 154
Switching on/off (control panel )........... 15 3
Sy stem settings
Ac tivating/deactivating PIN pr otec‐
tion........................................................ 287
Re set function (multimedia sy stem)...... 291
Setting the dis tance uni t....................... 286
Setting the time and date automati‐
cally.......................................................2 81
Setting the time zone. ........................... 281
Setting the time/date form at................ 282 Swit
ching transmission of theve hicle
position on/off...................................... 282
Sy stem settings
see Blue tooth®
see Data import/export
see Language
see Wi-Fi T
Ta ilgate
Closing.................................................... 81
HANDS-FREE ACCES S............................. 83
Limiting the opening angle......................85
Opening................................................... 80
Opening dimensions.............................. 447
Unlocking (emergency key)..................... 85
Ta ilpipes (care)......................................... .390
Ta ke -back of end-of-life vehicles
Pr otection of the environmen t................. 21
Ta nk content
Ad Blue ®
................................................ 443
Fu el....................................................... 441
Re ser ve(fuel)........................................ 441 Index
551
Page 558 of 565
Tw
o-w ayradios
Fr equencies........................................... 434
No tes on ins tallation............................ .433
Tr ansmission output (maximum )........... 434
Ty re inflation compressor
see TIREFIT kit
Ty re pressure
Checking (ty repressure monitoring
sy stem)................................................. 420
No tes..................................................... 41 8
Re starting the tyre pressure monitor‐
ing sy stem.............................................4 20
TIREFIT kit............................................. 398
Ty re pressure monitoring sy stem
(function)............................................... 419
Ty re pressure table................................ 419
Ty re pressure moni tor
Fu nction................................................. 419
Ty re pressure moni toring sy stem
Checking the tyre pressure...................4 20
Che cking the tyre temp erature............. 420
Re starting.............................................. 420
Ty re pressure table ................................... .419 Ty
re temp erature
Checking (tyre pressure monitoring
sy stem)................................................. 420
Ty re pressure monitoring sy stem
(function)............................................... 419
Ty re tread ................................................... 417
Ty re-change tool kit
Overview............................................... 425
Ty res
Changing hub caps................................ 426
Checking............................................... .417
Checking the tyre pressure (tyre
pressure monitoring sy stem)................. 420
Fitting.................................................... 429
Flat tyre.................................................3 96
Inter changing........................................ 424
MOExtended tyres................................ .397
No ise.................................................... .417
No tes on fitting...................................... 421
Re moving.............................................. 429
Re placing.......................................4 21, 425
Re starting the tyre pressure monitor‐
ing sy stem.............................................4 20
Selection............................................... 421
Snow chains.......................................... .417 St
oring................................................... 424
TIREFIT kit............................................. 398
Ty re pressure (N otes).............................4 18
Ty re pressure monitoring sy stem
(function)............................................... 419
Ty re pressure table................................ 419
Un usual handling characteristic s...........417 U
Un its of measurement
Setting................................................... 286
Un locking setting ........................................ 74
Up dates
Impor tant sy stem updates....................2 90
Information............................................ 289
Pe rforming............................................2 90
Software updates................................. .290
USB devices Connecting............................................ 355
USB port Rear...................................................... .124
User profile Creating................................................ 288
Importing/exporting.............................2 89 Index
555