2020 MERCEDES-BENZ AMG GT ROADSTER check engine
[x] Cancel search: check enginePage 109 of 381
#
Toswitch on the ignition: press button 1
twice.
The indicator lamps in the instrument clus ter
light up.
The ignition is switched off again if one of the
fo llowing conditions is me t:
R you do not start theve hicle within
15 minutes and the transmission is in posi‐
tion jorthe electric parking brake is
applied.
R you press but ton1 once.
% You can also swit chon the po wer supp lyor
th e ignition with theke y in the ignition lock
(/ page 107). St
arting theve hicle St
arting theve hicle with thest art/s top but‐
ton &
DANG ER Risk of death caused by
ex haust gases
Combustion engines emit poisonous exhaust
ga ses such as carbon monoxide. Inhaling
th ese exhaust gases is hazardous tohealth
and leads topoisoning. #
Never lea vethe engine or, if present,
th e auxiliary heating running in an
enclosed space wi thout suf ficient venti‐
lation. &
WARNING Risk offire due toflammable
material in the engine compartment or
th eex haust sy stem
Flammable materials may ignite. #
Therefore, check regularly that there
are no flammable materials in the
engine compartment or on theex haust
sy stem. Re
quirements:
R theke y is located in theve hicle and thekey
battery is not dischar ged. #
Shift the transmission toposition jori. #
Depress the brake pedal and press button
1 once. #
Ifth eve hicle does not star t:switch off non-
essential consumers and press button 1
once. #
Ifth eve hicle still does not start and theKey
not detected display message also appears
in the multifunction display: start theve hicle
with theke y (/ page107).
% You can swit choff the engine while driving
by pressing button 1for about thre e sec‐
onds or bypressing button 1thre e times
within thre e seconds. Be sure toobser vethe
saf ety no tes under "Driving tips"
(/ page 108). 106
Driving and pa rking
Page 115 of 381
Information on
the AMG ceramic high-per‐
fo rm ance comp osite brake sy stem The brake sy
stem is designed for heavy loads.
This may lead tonoise when braking. This ef fect
can also occur af terwa shing theve hicle.
The noise depends on thefo llowing factors:
R speed
R brake force
R environmen tal conditions, e.g. temp erature
and air humidity
% Have the brake sy stem checked at a quali‐
fi ed specialist workshop af ter it has been
subjected toextreme loads. ECO
start/s top function Ope
ration of the ECO start/s top function
The engine is switched off auto matically inthe
fo llowing situations if all vehicle conditions for
an automatic engine stop are me t:
R you brake theve hicle toast andstill in trans‐
mission position hori. If
yo u swit chon the HOLD function in transmis‐
sion position hori, the engine will automati‐
cally stop in thefo llowing situations:
R youstop behind a vehicle that is pulling
aw ay.
R youstop at a stop sign when there is no vehi‐
cle in front of you.
R you turn thesteering wheel hard at a low
speed.
% In transmission position k,the engine is
not switched off automatically even when
th e HOLD function is switched on.
The engine is restar ted automatically if:
R youre lease the brake pedal in transmission
position hwhen the HOLD function is not
active and theve hicle does not start to
mo ve.
R you shift from transmission position j.
R youre lease the brake pedal and theve hicle
st arts tomo veon a gentle downhill gradient
at a speed below 5 km/h.
R you depress the accelera tor pedal. R
you permanently activate manual gearshift‐
ing.
R you pull the left-hand steering wheel gear‐
shift paddle.
R an automatic engine start is requ ired bythe
ve hicle.
If th e engine was switched off bythe ECO start/
st op function and you lea vetheve hicle, a warn‐
ing tone sounds. In addition, the message Vehi-
cle is operational Switch off ignition before exit-
ing appears in the multifunction displa y.Ifyou
do not switch off the ignition, the ignition is
automatically switched off af ter one minute. 11 2
Driving and pa rking
Page 117 of 381
Ra
cetrack operation Information on
racetrack operation %
Racetrack opera tion is understood as the
operation of theve hicle in extreme situa‐
tions when it is used on race trac ksor
closed-off trac ks.
Yo ur vehicle may be used on bo thpublic roads
and race trac ks. The vehicle operating loads dif‐
fe r depending on use, which require dif fering
maintenance inter vals.
When theve hicle is operated on a racetrac k,the
component pa rts are subject tohigher loads
th an on thero ad.
To account forth ese loads, thefo llowing meas‐
ures in particular are take n as pa rtof the main‐
te nance inter vals:
R Checking and replacing individual compo‐
nents
R Overhauling comple teassemblies af ter spe‐
cific periods of use Ad
ditional checks must alw ays be car ried out on
th eve hicle before and af ter each use on a race‐
trac k.
* NO
TEDama getocomponent pa rts
th ro ugh a rise in temp erature af ter oper‐
ation on a racetrack Switching
theve hicle off directly af ter opera‐
tion on a racetrack can lead toa continued
te mp erature increase of the component
parts as a result of heating while theve hicle
is stationar y.
The component parts may thereby be perma‐
nently damaged in exceptional cases. #
Do not switch off theve hicle immedi‐
atel y.Car ryout cool down laps at low
speed with minimal brake application.
Assemblies under stra in, such as the
engine and the braking sy stem, cool
down fasterthis wa y. #
Alw ays allow a Trac k-Check tobe car‐
ri ed out at a Mercedes-Benz Service
Centre before and af ter use on the
ra cetrac k. Mo
torsport equipment, e.g. six-point seat belts,
are only intended for use where road traf fic re g‐
ulations do not appl y.This also applies tomodifi‐
cations toboth th e suspension and aerodynamic
component parts.
Yo u can obtain fur ther information on servicing
yo ur vehicle from a Mercedes-Benz Service
Centre. Note
s onthech aracteristics of individual
ve hicle assemblies Due
tospecific vehicle operating loads in race‐
track ope ration, additional requirements must
be obser ved.
The following vehicle assemblies are af fected in
pa rticular:
R brake sy stem
R wheels and tyres
R suspension
R aerodynamic components 11 4
Driving and pa rking
Page 120 of 381
Check
the tyres for dama geand the cor rect tyre
tread dep thboth before and af ter use on a race‐
trac k.Only then is it safe todrive on a racetrack
and on public roads.
As a result of the driving style and at high ambi‐
ent temp eratures, when driving on a racetrack it
may be necessary tocompensate forthe
inc rease in pressure in warm tyres byreleasing
air. Even forwa rm tyres, the specified tyre pres‐
sure may only be exceeded bymax. 0.5 bar.
Af terth e tyres ha vecooled down again, you
must readjust the tyre pressure in accordance
with the specifications in order todrive on public
ro ads. Suspension
Suspension settings
The
factory setting pr ovides a good compromise
fo r driving on public roads and on a racetrac k.
Ve hicle measurements
Even small changes tothe suspension settings
alter the driving characteristics of theve hicle. To
ensure optimal driving characteristics, the speci‐ fi
ed values and tolerances of the individual sus‐
pension settings must be complied with. The
driving characteristics of theve hicle may other‐
wise be undesirable.
Ve hicle measurements are requ ired in thefo llow‐
ing situations:
R theve hicle height has changed in relation to
th e optimised setting.
R theve hicle is frequently subjected tovery
high loads, e.g. when driving over kerbs.
Therefore, check theve hicle height at regular
inter vals and, if necessar y,per form vehicle
measurements.
Note s on suspension components
Despite regular checks, and rega rdless of
whe ther there leva nt suspension components
are in good condition, thefo llowing components
must be replaced af ter a cer tain amount of use
on thera cetrack:
R Wheel bolts (/ page 116)
R Wheel hubs including the wheel bearings Note
s on engine oil Check
the engine oil le vel before operating in
ra cetrack mode. DY
NA MIC SELECT switch Fu
nction of theDY NA MIC SELECT switch Use
theDY NA MIC SELECT switch tochange
between thefo llowing drive programs:
R o (Slippery): optimised pulling away and
driving characteristics in wint ryand slippe ry
ro ad conditions
R = (Individual): individual settings
R A (Comfort): comfortable and economi‐
cal driving style
R C (Sport): sporty driving style
R B (Sport Plus): particularly sporty driving
st yle
R I (RACE): driving like on a race track
The I (RACE) drive program may not be
used on normal roads. I (RACE) must on ly Driving
and parking 117
Page 185 of 381
R
Date
R Weather #
Select a desired lap.
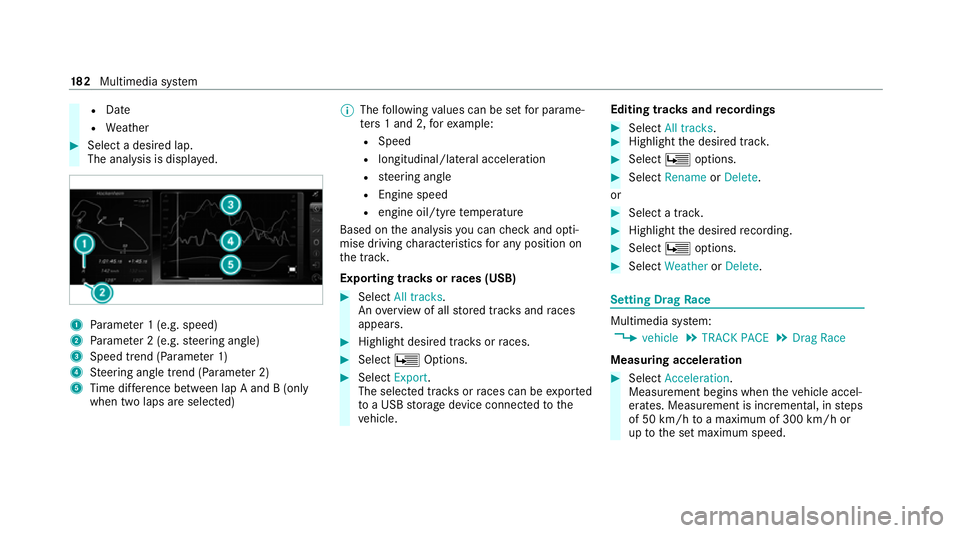
The anal ysis is displa yed. 1
Parame ter 1 (e.g. speed)
2 Parame ter 2 (e.g. steering angle)
3 Speed trend (Parame ter 1)
4 Steering angle trend (Parame ter 2)
5 Time dif fere nce between lap A and B (only
when two laps are selected) %
The following values can be set for parame‐
te rs 1 and 2, forex ample:
R Speed
R longitudinal/lateral acceleration
R steering angle
R Engine speed
R engine oil/tyre temp erature
Based on the anal ysis yo u can check and opti‐
mise driving characteristics for any position on
th e tra ck.
Exporting trac ksorraces (USB) #
Select All tracks.
An ove rview of all stored trac ksand races
appea rs. #
Highlight desired trac ksorraces. #
Select ÜOptions. #
Select Export.
The selected trac ksorraces can be expor ted
to a USB storage device connected tothe
ve hicle. Editing trac
ksand recordings #
Select All tracks. #
Highlight the desired trac k. #
Select Üoptions. #
Select Rename orDelete.
or #
Select a trac k. #
Highlight the desired recording. #
Select Üoptions. #
Select Weather orDelete. Setting Drag
Race Multimedia sy
stem:
4 vehicle 5
TRACK PACE 5
Drag Race
Measuring acceleration #
Select Acceleration.
Measurement begins when theve hicle accel‐
erates. Measurement is incremental, in steps
of 50 km/h toa maximum of 300 km/h or
up tothe set maximum speed. 18 2
Multimedia sy stem
Page 234 of 381
R
frequent operation in mountainous terrain or
on poor road sur faces
R when the engine is of ten le ftidling for long
periods
R operation in particula rly dusty conditions
and/or if air-recirculation mode is frequently
used
In these or similar operating conditions, ha vethe
interior air filter, engine air cleaner, engine oil
and oil filter etc. changed more frequent ly. The
tyres must be checked more frequently if the
ve hicle is operated under increased loads. Fur‐
th er information can be obtained at a qualified
specialist workshop. Battery disconnection periods
The ASS
YST PLUS se rvice inter val display
can only calculate the service due da tewhen
th e bat tery is connected. #
Notedown the service due date displa yed on
th e instrument display before disconnecting
th e battery (/ page 230). Engine compartment
Opening/closing
the bonnet &
WARNING Risk of accident due todriv‐
ing with the bonn etunlo cked
The bonn etmay open and block your vie w. #
Neverre lease the bonn etwhen driving. #
Before every trip, ensure that the
engine bonn etis loc ked. &
WARNING Risk of accident and inju ry
when opening and closing the bonn et
The bonnet may suddenly drop into the end
position.
There is a risk of injury for an yone in the bon‐
net's range of mo vement. #
Open or close the bonn etonly when
th ere is nobody in the bonn et's range of
mo vement. &
WARNING Danger of burn s when open‐
ing the bonn et
If yo u open the engine bonn etwhen the
engine has overheated or during a fire inthe
engine compartment, you could come into
contact with hot gases or other escaping
operating fluids. #
Before opening the bonn et, allow the
engine tocool down. #
Intheeve nt of a fire inthe engine com‐
partment, keep the engine bonn et
closed and call thefire service. &
WARNING Risk of injury duetomoving
parts
Components in the engine compartment may
continue running or start up sudden ly,even if
th e ignition is switched off.
Make sure of thefo llowing before per form ing
ta sks in the engine compartmen t: #
Switch the ignition off. Maintenance and care
231
Page 236 of 381
#
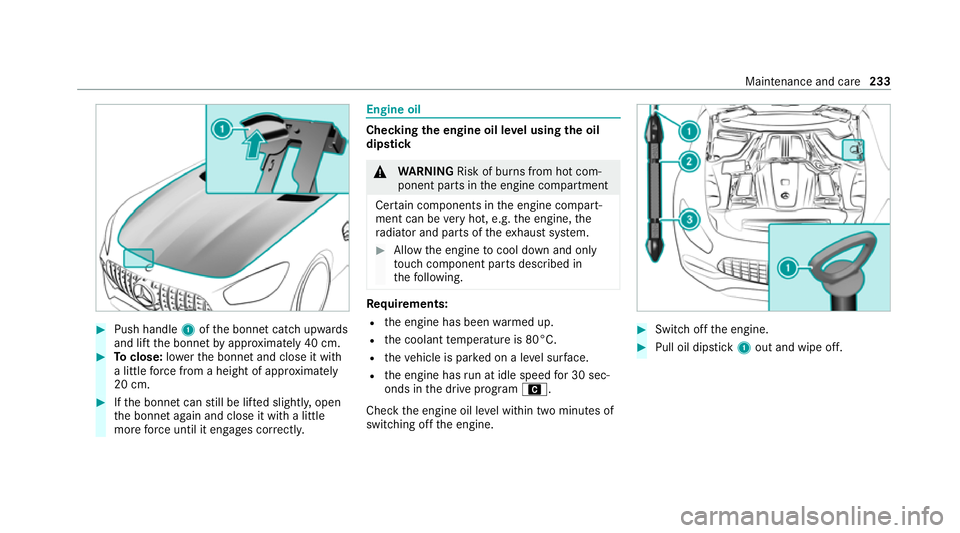
Push handle 1ofthe bonn etcatch up wards
and lift the bonn etby appr oximately 40 cm. #
Toclose: lowe rth e bonn etand close it with
a little forc e from a height of appr oximately
20 cm. #
Ifth e bonn etcan still be lif ted slightl y,open
th e bonn etagain and close it with a little
more forc e until it engages cor rectly. Engine oil
Che
cking the engine oil le vel using the oil
dip stick &
WARNING Risk of burn s from hot com‐
ponent parts in the engine compartment
Cer tain components in the engine compart‐
ment can be very hot, e.g. the engine, the
ra diator and parts of theex haust sy stem. #
Allow the engine tocool down and only
to uch co mponent parts described in
th efo llowing. Re
quirements:
R the engine has been warmed up.
R the coolant temp erature is 80°C.
R theve hicle is par ked on a le vel sur face.
R the engine has run at idle speed for 30 sec‐
onds in the drive program A.
Check the engine oil le vel within two minutes of
switching off the engine. #
Switch off the engine. #
Pull oil dipstick 1out and wipe off. Maintenance and care
233
Page 238 of 381
#
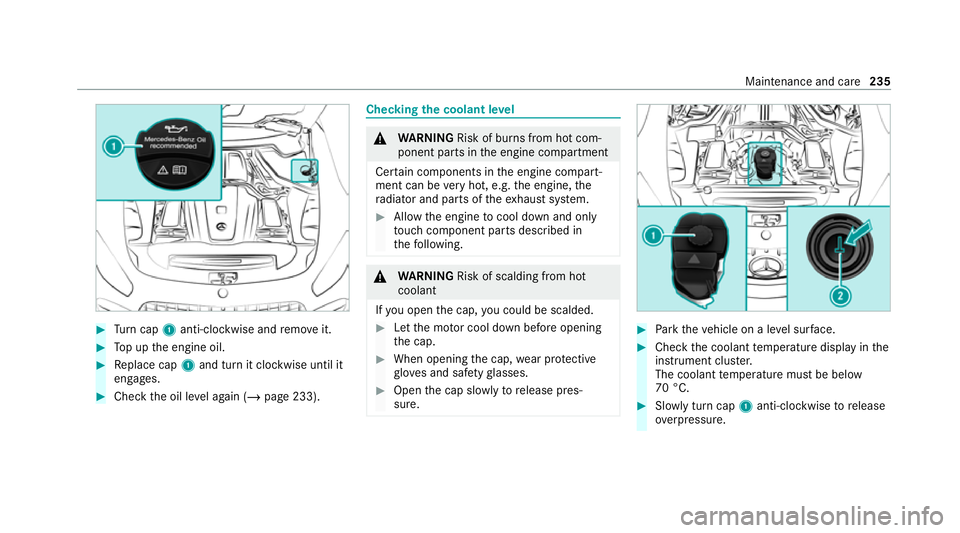
Turn cap 1anti-clockwise and remo veit. #
Top up the engine oil. #
Replace cap 1and turn it clockwise until it
engages. #
Check the oil le vel again (/ page 233). Checking
the coolant le vel &
WARNING Risk of burn s from hot com‐
ponent parts in the engine compartment
Cer tain components in the engine compart‐
ment can be very hot, e.g. the engine, the
ra diator and parts of theex haust sy stem. #
Allow the engine tocool down and only
to uch co mponent parts described in
th efo llowing. &
WARNING Risk of scalding from hot
coolant
If yo u open the cap, you could be scalded. #
Let the mo tor cool down before opening
th e cap. #
When opening the cap, wear pr otective
gl ove s and saf etygl asses. #
Open the cap slowly torelease pres‐
sure. #
Park theve hicle on a le vel sur face. #
Check the coolant temp erature display in the
instrument clus ter.
The coolant temp erature must be below
70 °C. #
Slowly turn cap 1anti-clockwise torelease
ove rpressure. Maintenance and care
235